2007 MERCEDES-BENZ C-CLASS ESTATE window
[x] Cancel search: windowPage 55 of 377
Occupant safet
y521
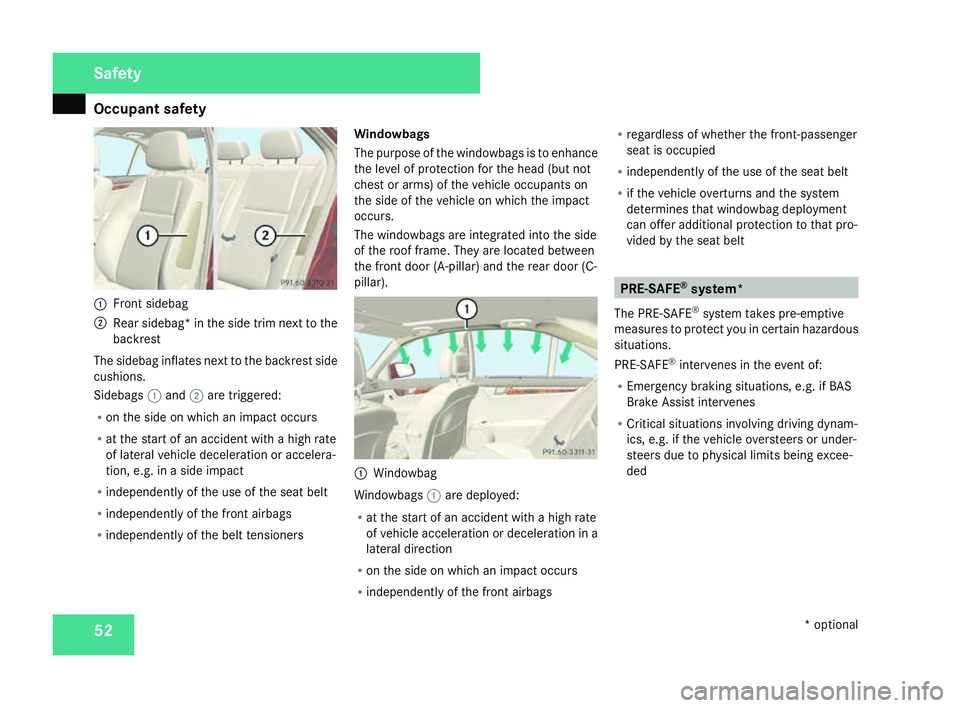
Front sideba g
2 Rear sidebag* in the side trim next to th e
backrest
The sidebag inflates next to the backrest side
cushions.
Sidebags 1and 2are triggered:
R on the side on which an impact occurs
R at the start of an accident with a high rat e
of lateral vehicle deceleration or accelera-
tion, e.g. in a side impact
R independently of the use of the seat belt
R independently of the front airbags
R independently of the belt tensioners Windowbags
The purpose of the windowbags is to enhanc
e
the level of protection for the head (but not
chest or arms) of the vehicle occupants on
the side of the vehicle on which the impact
occurs.
The windowbags are integrated into the side
of the roof frame. They are located between
the front door (A-pillar) and the rear door (C -
pillar). 1
Windowbag
Windowbags 1are deployed:
R at the start of an accident with a high rat e
of vehicle acceleration or deceleration in a
lateral direction
R on the side on which an impact occurs
R independently of the front airbags R
regardless of whether the front-passenge r
seat is occupied
R independently of the use of the seat belt
R if the vehicle overturns and the system
determines that windowbag deploymen t
can offer additional protection to that pro -
vided by the seat belt PRE-SAFE
®
system *
The PRE-SAFE ®
system takes pre-emptive
measures to protect you in certain hazardous
situations.
PRE-SAFE ®
intervenes in the event of:
R Emergency braking situations, e.g. if BAS
Brake Assist intervenes
R Critical situations involving driving dynam-
ics, e.g. if the vehicle oversteers or under-
steers due to physical limits being excee -
ded Safet
y
* optional
204_AKB; 2; 3, en-GB
mkalafa,
2007-06-26T23:11:51+02:00 - Seite 52
Page 56 of 377
Occupant safet
y 53
If you are driving faster than approximately
35 km/h, PRE-SAFE ®
takes the following
measures in the aforementioned situations:
R It tensions the front seat belts.
R On vehicles with the memory package*: it
adjusts the front-passenger seat to a more
favourable position.
R If the vehicle skids, it closes the sliding/
tilting sunroof* or panorama sliding/tilting
sunroof* and the side windows, leaving a
small gap.
If the hazardous situation passes without
resulting in an accident, PRE-SAFE ®
releases
the belt pretensioning. You can then readjust
the front-passenger seat and, on vehicles
with the memory package*, the sides win-
dows and the sliding/tilting sunroof* or pan-
orama sliding/tilting sunroof* .
If the seat belts are not released:
X Move the backrest or the seat back slightly
until the belt tension is reduced.
The locking mechanism releases. G
Risk of injury
Make sure that nobody can become trap -
ped as you adjust the seat. !
Make sure that there are no objects in the
footwell or behind the seats when adjustin g
the seats. You could otherwise damage the
seats and the objects . NECK-PRO head restrain
t
NECK-PRO head restraints are designed to
increase protection to the driver's and front-
passenger's head and neck. To this end, the
head restraints on the driver's and front-
passenger seats are moved forwards and
upwards in the event of a rear-end collision in
the direction of travel. This provides better
head support. G
Risk of injury
Head restraint covers prevent the NECK -
PRO head restraints from triggering cor-
rectly. Consequently, the NECK-PRO head
restraints cannot provide the intended level
of protection. Do not use head restraint
covers .
If the NECK-PRO head restraints are triggered
in an accident, you must reset the head
restraints on the driver's and front-passenger
seats (Y page 303). Head restraints that have
been triggered are tilted forwards. Children in the vehicle
If a child is travelling in your vehicle, secure
the child, preferably on a suitable seat in the
rear, using a child restraint system appropri-
ate to the size and age of the child and rec-
ommended for Mercedes-Benz vehicles. If
possible you should do this on a suitable rear
seat.
You can obtain information about the correct
child restraint system from any Mercedes-
Benz Service Centre.
i It is advisable to use Mercedes-Benz care
products to clean child restraint systems.
You can obtain information about this from
any Mercedes-Benz Service Centre. G
Risk of injury
Do not leave children unsupervised in the
vehicle, even if they are secured in a chil d
restraint system. They could be injured on
parts of the vehicle. They could be seriously
or even fatally injured by prolonged expo-
sure to extreme heat or cold.
Do not expose the child restraint system to
direct sunlight. The metallic parts of the
child restraint system could heat up and the
child could be burned by them. Safety
* optional
204_AKB; 2; 3, en-GB
mkalafa,
2007-06-26T23:11:51+02:00 - Seite 53 Z
Page 59 of 377
Occupant safet
y561
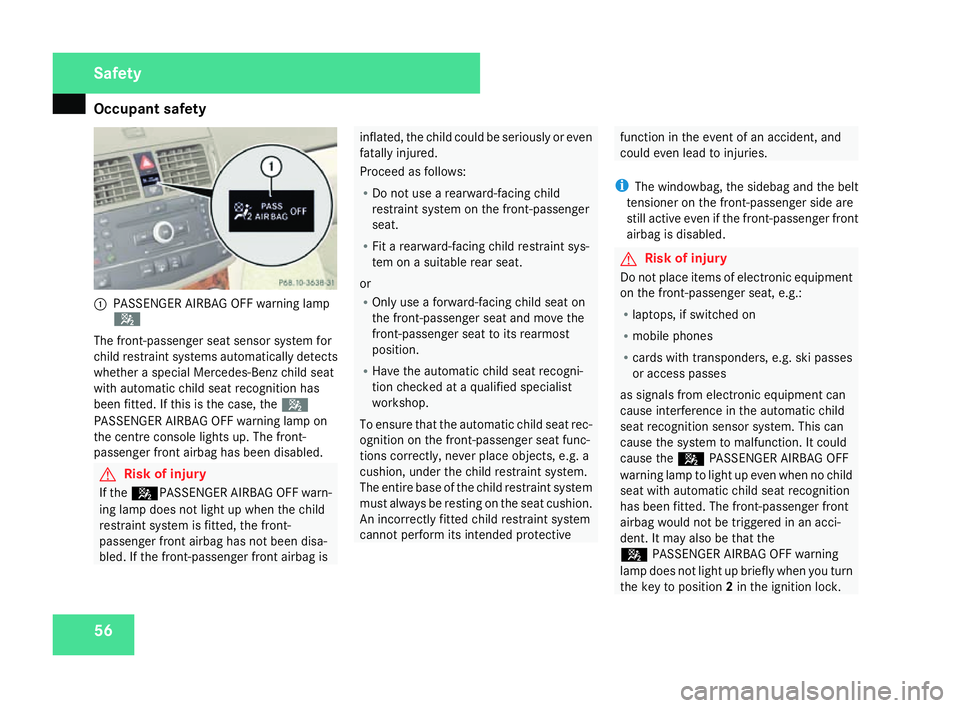
PASSENGER AIRBAG OFF warning lamp
5
The front-passenger seat sensor system for
child restraint systems automatically detect s
whether a special Mercedes-Benz child seat
with automatic child seat recognition has
been fitted. If this is the case, the 5
PASSENGER AIRBAG OFF warning lamp on
the centre console lights up. The front-
passenger front airbag has been disabled. G
Risk of injury
If the 5PASSENGER AIRBAG OFF warn-
ing lamp does not light up when the child
restraint system is fitted, the front-
passenger front airbag has not been disa-
bled. If the front-passenger front airbag is inflated, the child could be seriously or even
fatally injured.
Proceed as follows:
R
Do not use a rearward-facing child
restraint system on the front-passenge r
seat.
R Fit a rearward-facing child restraint sys-
tem on a suitable rear seat.
or
R Only use a forward-facing child seat on
the front-passenger seat and move the
front-passenger seat to its rearmost
position.
R Have the automatic child seat recogni-
tion checked at a qualified specialist
workshop .
To ensure that the automatic child seat rec-
ognition on the front-passenger seat func-
tions correctly, never place objects, e.g. a
cushion, under the child restraint system.
The entire base of the child restraint system
must always be resting on the seat cushion.
An incorrectly fitted child restraint system
cannot perform its intended protective function in the event of an accident, and
could even lead to injuries.
i The windowbag, the sidebag and the belt
tensioner on the front-passenger side are
still active even if the front-passenger front
airbag is disabled. G
Risk of injury
Do not place items of electronic equipment
on the front-passenger seat, e.g.:
R laptops, if switched on
R mobile phones
R cards with transponders, e.g. ski passe s
or access passes
as signals from electronic equipment can
cause interference in the automatic child
seat recognition sensor system. This can
cause the system to malfunction. It could
cause the 5PASSENGER AIRBAG OFF
warning lamp to light up even when no child
seat with automatic child seat recognition
has been fitted. The front-passenger front
airbag would not be triggered in an acci-
dent. It may also be that th e
5 PASSENGER AIRBAG OFF warning
lamp does not light up briefly when you turn
the key to position 2in the ignition lock .Safety
204_AKB; 2; 3, en-GB
mkalafa,
2007-06-26T23:11:51+02:00 - Seite 56
Page 69 of 377
Occupant safet
y66
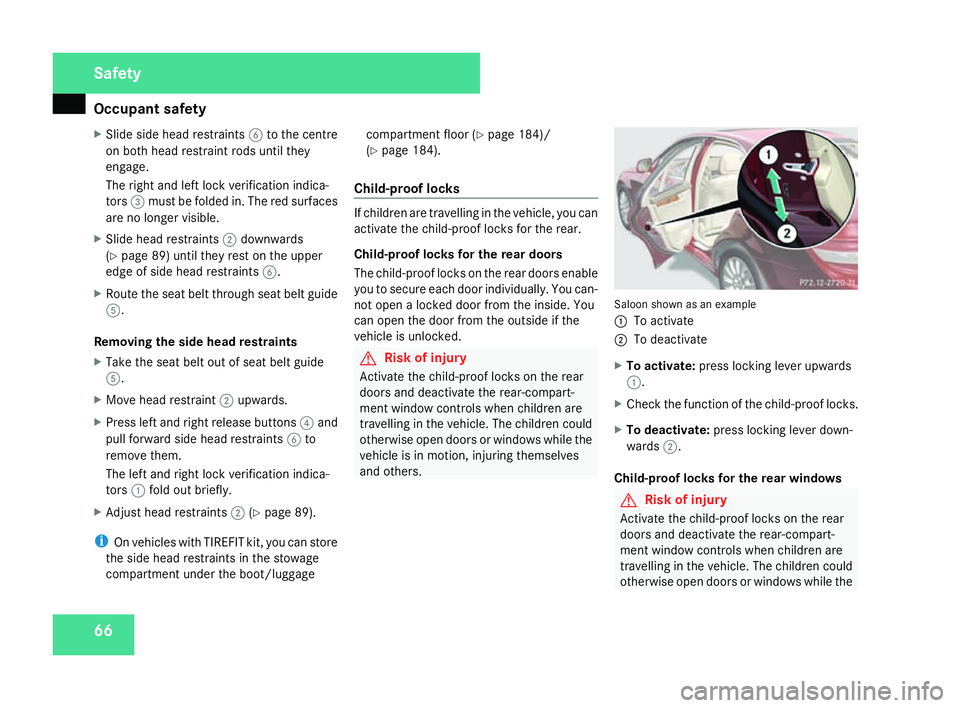
X
Slide side head restraints 6to the centr e
on both head restraint rods until they
engage.
The right and left lock verification indica-
tors 3must be folded in. The red surfaces
are no longer visible.
X Slide head restraints 2downwards
( Y page 89) until they rest on the upper
edge of side head restraints 6.
X Route the seat belt through seat belt guide
5 .
Removing the side head restraints
X Take the seat belt out of seat belt guide
5 .
X Move head restraint 2upwards.
X Press left and right release buttons 4and
pull forward side head restraints 6to
remove them.
The left and right lock verification indica -
tors 1fold out briefly .
X Adjust head restraints 2(Y page 89).
i On vehicles with TIREFIT kit, you can store
the side head restraints in the stowage
compartment under the boot/luggage compartment floor
(Y page 184)/
( Y page 184).
Child-proof locks If children are travelling in the vehicle, you can
activate the child-proof locks for the rear.
Child-proof locks for the rear doors
The child-proof locks on the rear doors enable
you to secure each door individually. You can-
not open a locked door from the inside. You
can open the door from the outside if the
vehicle is unlocked. G
Risk of injury
Activate the child-proof locks on the rea r
doors and deactivate the rear-compart -
ment window controls when children are
travelling in the vehicle. The children could
otherwise open doors or windows while the
vehicle is in motion, injuring themselve s
and others. Saloon shown as an example
1
To activat e
2 To deactivate
X To activate :press locking lever upwards
1 .
X Check the function of the child-proof locks .
X To deactivate :press locking lever down-
wards 2.
Child-proof locks for the rear windows G
Risk of injury
Activate the child-proof locks on the rea r
doors and deactivate the rear-compart -
ment window controls when children are
travelling in the vehicle. The children could
otherwise open doors or windows while the Safety
204_AKB; 2; 3, en-GB
mkalafa,
2007-06-26T23:11:51+02:00 - Seite 66
Page 70 of 377
Driving safety sys
tems 67vehicle is in motion, injuring themselves
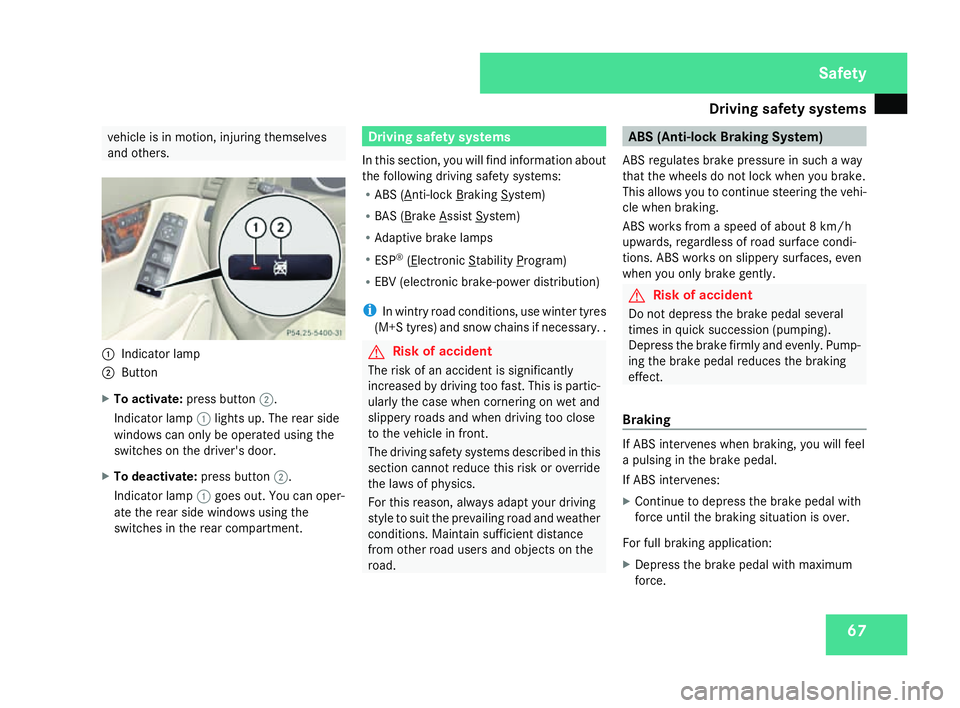
and others . 1
Indicator lamp
2 Button
X To activate :press button 2.
Indicator lamp 1lights up. The rear side
windows can only be operated using the
switches on the driver's door.
X To deactivate :press button 2.
Indicator lamp 1goes out. You can oper-
ate the rear side windows using the
switches in the rear compartment. Driving safety systems
In this section, you will find information about
the following driving safety systems:
R ABS ( Anti-lock Braking System)
R BAS ( Brake Assist System)
R Adaptive brake lamps
R ESP ®
( Electronic Stability Program)
R EBV (electronic brake-power distribution)
i In wintry road conditions, use winter tyres
(M+S tyres) and snow chains if necessary. . G
Risk of accident
The risk of an accident is significantl y
increased by driving too fast. This is partic-
ularly the case when cornering on wet and
slippery roads and when driving too clos e
to the vehicle in front.
The driving safety systems described in thi s
section cannot reduce this risk or override
the laws of physics.
For this reason, always adapt your driving
style to suit the prevailing road and weather
conditions. Maintain sufficient distance
from other road users and objects on the
road. ABS (Anti-lock Braking System)
ABS regulates brake pressure in such a way
that the wheels do not lock when you brake.
This allows you to continue steering the vehi-
cle when braking.
ABS works from a speed of about 8 km/h
upwards, regardless of road surface condi-
tions. ABS works on slippery surfaces, even
when you only brake gently. G
Risk of accident
Do not depress the brake pedal severa l
times in quick succession (pumping) .
Depress the brake firmly and evenly. Pump-
ing the brake pedal reduces the braking
effect.
Braking If ABS intervenes when braking, you will fee
l
a pulsing in the brake pedal.
If ABS intervenes:
X Continue to depress the brake pedal wit h
force until the braking situation is over.
For full braking application:
X Depress the brake pedal with maximum
force. Safety
204_AKB; 2; 3, en-G
B
mkalafa , 2007-06-26T23:11:51+02:00 - Seite 67
Page 75 of 377
Anti-theft syste
ms72
Deactivate tow-away protection manually if
your vehicle:
R is being transported
R is being loaded, e.g. onto a ferry or car
transporter
R is being parked on a movable surface, e.g.
split-level garages
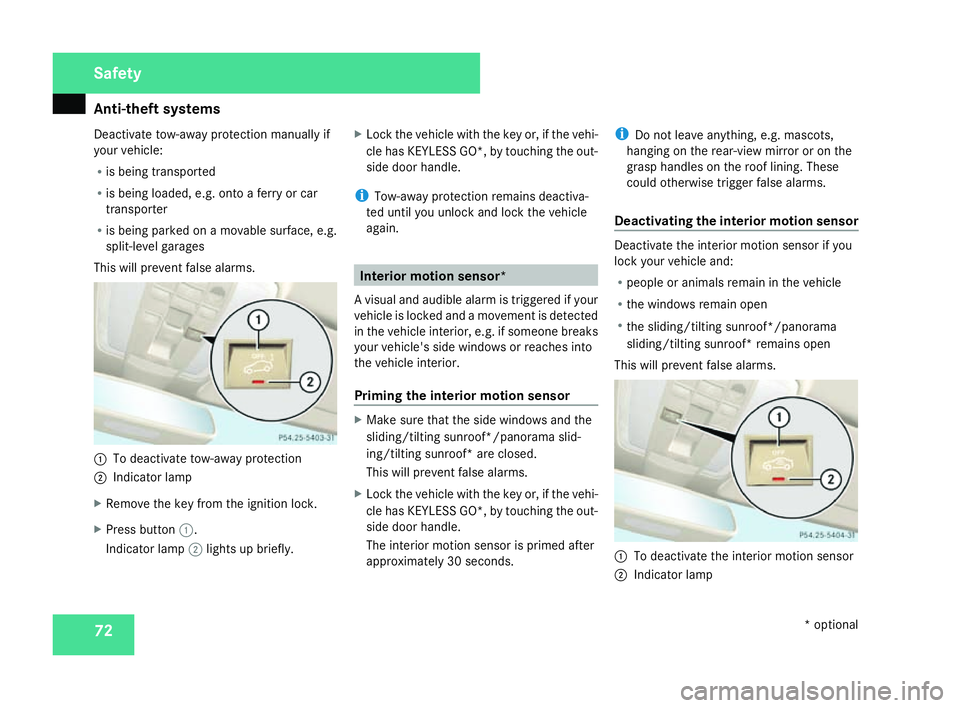
This will prevent false alarms. 1
To deactivate tow-away protection
2 Indicator lamp
X Remove the key from the ignition lock.
X Press button 1.
Indicator lamp 2lights up briefly. X
Lock the vehicle with the key or, if the vehi-
cle has KEYLESS GO*, by touching the out-
side door handle .
i Tow-away protection remains deactiva-
ted until you unlock and lock the vehicle
again. Interior motion sensor*
A visual and audible alarm is triggered if your
vehicle is locked and a movement is detected
in the vehicle interior, e.g. if someone breaks
your vehicle's side windows or reaches into
the vehicle interior.
Priming the interior motion sensor X
Make sure that the side windows and the
sliding/tilting sunroof*/panorama slid-
ing/tilting sunroof* are closed.
This will prevent false alarms.
X Lock the vehicle with the key or, if the vehi-
cle has KEYLESS GO*, by touching the out-
side door handle .
The interior motion sensor is primed after
approximately 30 seconds. i
Do not leave anything, e.g. mascots,
hanging on the rear-view mirror or on the
grasp handles on the roof lining. Thes e
could otherwise trigger false alarms.
Deactivating the interior motion senso r Deactivate the interior motion sensor if yo
u
lock your vehicle and:
R people or animals remain in the vehicle
R the windows remain open
R the sliding/tilting sunroof*/panorama
sliding/tilting sunroof* remains open
This will prevent false alarms. 1
To deactivate the interior motion sensor
2 Indicator lamp Safety
* optional
204_AKB; 2; 3, en-GB
mkalafa
, 2007-06-26T23:11:51+02:00 - Seite 72
Page 78 of 377
75
Opening and closing
...........................76
Key positions ...................................... .85
Seats .................................................... 86
Steering wheel .................................... 92
Mirrors ................................................. 93
Memory functions* .............................96
Seat belts ............................................ .98
Lights ................................................. 102
Windscreen wipers ...........................108
Side windows .................................... 110
Driving and parking ..........................113
Transmission ..................................... 117Instrument cluster
............................123
On-board computer (vehicles with
multi-function steering wheel, 4
buttons) ............................................. 125
On-board computer (vehicles with
the luxury multi-function steering
wheel*, 12 buttons) ..........................129
Driving systems ................................ 145
Air vents ............................................ 156
Thermatic .......................................... 158
Thermotronic* ................................... 165
Rear window heating ........................173
Sliding sunroof .................................. 173
Loading and stowing ........................179
Features ............................................. 195 Controls
204_AKB; 2; 3, en-GB
mkalafa,
2007-06-26T23:11:51+02:00 - Seite 75
Page 80 of 377
Opening and closing
77
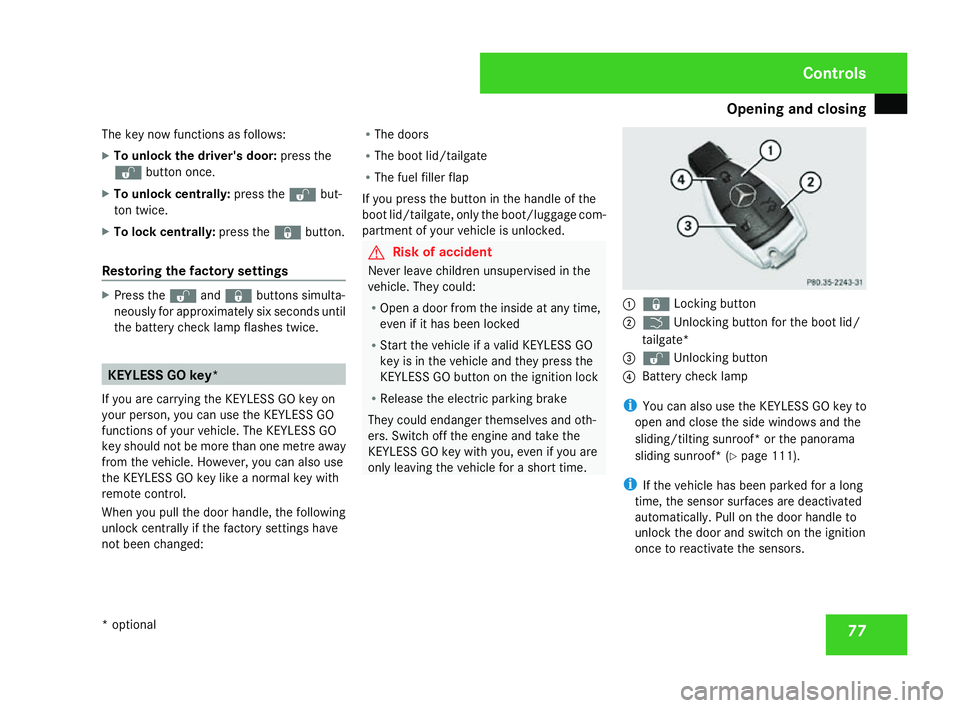
The key now functions as follows:
X
To unlock the driver's door: press the
k button once.
X To unlock centrally :press the kbut-
ton twice.
X To lock centrally :press the jbutton.
Restoring the factory settings X
Press the kandj buttons simulta-
neously for approximately six seconds until
the battery check lamp flashes twice. KEYLESS GO key*
If you are carrying the KEYLESS GO key on
your person, you can use the KEYLESS GO
functions of your vehicle. The KEYLESS GO
key should not be more than one metre away
from the vehicle. However, you can also use
the KEYLESS GO key like a normal key with
remote control.
When you pull the door handle, the following
unlock centrally if the factory settings have
not been changed: R
The doors
R The boot lid/tailgate
R The fuel filler flap
If you press the button in the handle of the
boot lid/tailgate, only the boot/luggage com-
partment of your vehicle is unlocked. G
Risk of accident
Never leave children unsupervised in the
vehicle. They could :
R Open a door from the inside at any time,
even if it has been locked
R Start the vehicle if a valid KEYLESS GO
key is in the vehicle and they press the
KEYLESS GO button on the ignition lock
R Release the electric parking brak e
They could endanger themselves and oth-
ers. Switch off the engine and take the
KEYLESS GO key with you, even if you are
only leaving the vehicle for a short time. 1
j Locking button
2 i Unlocking button for the boot lid/
tailgate*
3 k Unlocking button
4 Battery check lamp
i You can also use the KEYLESS GO key to
open and close the side windows and the
sliding/tilting sunroof* or the panorama
sliding sunroof* (Y page 111).
i If the vehicle has been parked for a long
time, the sensor surfaces are deactivated
automatically. Pull on the door handle to
unlock the door and switch on the ignition
once to reactivate the sensors. Controls
* optional
204_AKB; 2; 3, en-GB
mkalafa
, 2007-06-26T23:11:51+02:00 - Seite 77