2007 MERCEDES-BENZ C-CLASS ESTATE window
[x] Cancel search: windowPage 172 of 377
Thermotronic*
16
9 Setting the airflow manually
You can also set the airflow manually for the
entire vehicle.
X To increase/reduce: press theQor
the Ï button.
The indicator lamp in the Ubutton goes
out. Automatic air distribution remains acti-
vated. Mono function
You can use the mono function to adopt the
settings configured for temperature, air dis-
tribution and airflow on the driver's side for
the front-passenger side and the rear com-
partment .
X To activate :press the zbutton.
The indicator lamp in the zbutton lights
up.
X To deactivate: press thezbutton.
The indicator lamp in the zbutton goes
out. Demisting
i You should only select the demisting
function until the windscreen is clear again.
You can use the following settings to demist
the windscreen, e.g. when it is covered with
frost:
X To switch on :press the ybutton.
The indicator lamp in the ybutton
comes on.
Thermotronic automatically switches to
the following functions:
R Cooling with dehumidification on
R High airflo w
R High temperature
R Air distribution to the windscreen and
front side windows
R Air-recirculation mode off
i You can modify the settings for tempera-
ture, airflow and air distribution. The other
settings of the demisting function are
retained.
X To deactivate: press theybutton.
The indicator lamp in the ybutton goes
off. The previously selected settings come into effect again. Cooling with dehumidifi-
cation remains active.
or
X Press the Ubutton.
The indicator lamp in the ybutton goes
off. The indicator lamp in the Ubutton
is lit. Airflow and air distribution are set to
automatic mode. Windows misted up
Windows misted up on the inside You can use the following settings to demist
the windscreen, e.g. when it is covered with
frost
:
X Activate automatic mode (Y page 168).
If the windows are still misted up:
X Activate the demisting functio n
( Y page 169).
Windscreen misted up on the outsid e X
Switch on the windscreen wipers.
X Close the centre air vents . Cont
rols
* optional
204_AKB; 2; 3, en-GB
mkalafa,
2007-06-26T23:11:51+02:00 - Seite 169 Z
Page 173 of 377
Thermotronic*
17
0
X
Press the Zbutton repeatedly until the
Y ora setting appears in display
d .
i You should only select this setting until
the windscreen is clear again. Air-recirculation mod
e
You can deactivate the flow of fresh air if
unpleasant odours are entering the vehicle
from outside. No more fresh air will be taken
in and the air inside the vehicle will be recir-
culated. G
Risk of accident
Only switch over to air-recirculation mod e
briefly at low outside temperatures. Other -
wise, the windows could mist up, thus
impairing visibility and endangering your-
self and others. This may obstruct your view
of the traffic situation, thereby causing an
accident.
X To activate :briefly press the ,button.
The indicator lamp in the ,button is lit.
i Air-recirculation mode is activated auto-
matically at high outside temperatures.
When air-recirculation mode is activated automatically, the indicator lamp in
the
, button goes off.
Outside air is added after about 30
minutes.
X To deactivate: press the,button.
The indicator lamp in the ,button is off.
i Air-recirculation mode switches off auto-
matically:
R after approximately five minutes at out -
side temperatures below approximately
7 °C
R after approximately five minutes if th e
cooling with dehumidification function is
deactivated
R after approximately 30 minutes at out -
side temperatures above approximately
5 °C
Air-recirculation mode with conveni-
ence opening/closing feature G
Risk of injury
Make sure that nobody can become trap -
ped between the side window and the door
frame as the side windows are opened and closed. Do not place objects or lean against
the side window when it is being opened or
closed. You or the objects could be drawn
in or become trapped between the side
window and the door frame as the window
moves. If there is a risk of entrapment,
release the ,button. If necessary, press
the switch that stops, opens or closes the
side window in the opposite direction.
Make sure that nobody can become trap-
ped when you open or close the sliding/
tilting sunroof*/panorama sliding sun-
roof*. If there is a risk of entrapment,
release the ,button. If necessary, press
the switch that stops, opens or closes the
sliding/tilting sunroof* or panorama sliding
sunroof* in the opposite direction.
X Convenience closing: press and hold
the , button until the side windows and
the sliding /tilting sunroof*/panorama
sliding sunroof* close.
The indicator lamp in the ,button is lit.
Air-recirculation mode is activated.
X Convenience opening: press and hold
the , button until the side windows and
the sliding /tilting sunroof*/panorama Controls
* optional
204_AKB; 2; 3, en-GB
mkalafa,
2007-06-26T23:11:51+02:00 - Seite 170
Page 174 of 377
Thermotronic*
17
1
sliding sunroof* move back into their pre-
vious position.
The indicator lamp in the ,button is off.
Air-recirculation mode is deactivated.
i If you open a side window or the sliding/
tilting sunroof* or panorama sliding sun-
roof* manually after closing using the con-
venience closing feature, it will remain in
this position when opened using the con-
venience opening feature. Residual heat/auxiliary ventilation
It is possible to make use of the residual heat
of the engine to continue heating the station-
ary vehicle for up to 30 minutes after the
engine has been switched off. The heating
time depends on the coolant temperature and
on the interior temperature that has been set.
i If you activate residual heat at high tem-
peratures, only the ventilation is activated.
i The blower will run at a low speed regard-
less of the airflow setting.
X Make sure the key is in position 0in the
ignition lock or that it has been removed. X
To activate :press the Tbutton.
The indicator lamp in the Tbutton is lit.
The REST display message in the display is
lit.
X To deactivate: press theTbutton.
The indicator lamp in the Tbutton is off.
The REST display message in the display is
not lit.
i The residual heat/auxiliary ventilation is
automatically deactivated after about 30
minutes, or when:
R the ignition is switched on
R the battery voltage drops
R the coolant temperature is too lo w Cooling with air-dehumidification
G
Risk of accident
If you deactivate the cooling function with
air dehumidification, the vehicle will not be
cooled in warm weather and the air will not
be dehumidified. The windows could mis t
up more quickly. This may prevent you from
observing the traffic conditions, thereby
causing an accident. H
Environmental not
e
The cooling system uses the refrigerant
R134A. This refrigerant does not damage
the earth's ozone layer.
i Condensation may drip from the under-
side of the vehicle when Thermatic is in
cooling mode.
Cooling with dehumidification is operational
when the engine is running, and cools accord -
ing to the interior temperature selected. The
air inside the vehicle is also dried, thereby
preventing the windows from misting up.
X To activate :press the œbutton.
The indicator lamp in the œbutton is lit.
The cooling with dehumidification function
is activated. Controls
* optional
204_AKB; 2; 3, en-GB
mkalafa,
2007-06-26T23:11:51+02:00 - Seite 171 Z
Page 176 of 377
Sliding sunroof
173Rear window heating
G
Risk of accident
Clear all windows of ice or snow before set-
ting off. Impaired visibility could otherwise
endanger yourself and others.
i The rear window heating has a high cur-
rent draw. Therefore, switch it off as soon
as the rear window is free of snow and ice,
as it only switches itself off automatically
after between fifteen and thirty minutes.
i If the battery voltage is too low, the rear
window heating may switch off.
X Make sure that the key is in position 2in
the ignition lock .
X To switch on/off :press the ¯button.
The indicator lamp in the ¯switch is lit
or off. Sliding sunroof
Sliding/tilting sunroof*
G
Risk of injury
Never leave children unsupervised in the
vehicle. They could operate the sliding/tilt-
ing sunroof and injure themselves. Alway s
take the key with you when leaving the
vehicle, even if you only leave it for a short
time. G
Risk of injury
Make sure that nobody can become trap -
ped when you are opening and closing the
sliding/tilting sunroof. If danger threatens,
release the switch and push it briefly in any
direction to stop the sliding/tilting sunroof . G
Risk of injury
The glass in the sliding/tilting sunroof
could break in an accident. If you are not
wearing a seat belt, there is a risk that yo u
could be thrown through the opening in the
event of the vehicle overturning. Therefore,
always wear a seat belt to reduce the ris k
of injuries. !
Only open the sliding/tilting sunroof if it
is free of snow and ice. Otherwise, mal-
functions may occur.
Do not allow anything to protrude from the
sliding/tilting sunroof. The seals could oth-
erwise be damaged.
i Resonance noises can occur in addition
to the usual airflow noises when the slid -
ing/tilting sunroof is open. They are caused
by minor pressure fluctuations in the vehi-
cle interior .
Change the position of the sliding/tilting
sunroof or open a side window slightly to
reduce or eliminate these noises .
i It is also possible to open and close the
sliding/tilting sunroof from the outsid e
using the "Summer opening" (Y page 111 )
and "Convenience closing" (Y page 112 )
features respectively .
i If PRE-SAFE ®
has been activated, the slid-
ing/tilting sunroof closes automatically ,
leaving a small gap open . Cont
rols
* optional
204_AKB; 2; 3, en-GB
mkalafa,
2007-06-26T23:11:51+02:00 - Seite 173
Page 179 of 377
Sliding sunroof
176 Panorama sliding sunroof*
Panorama sliding sunroof G
Risk of injury
Make sure that nobody can become trap -
ped when closing the panorama sliding sun-
roof. If danger threatens, release the switc h
and push it briefly in any direction to stop
the panorama sliding sunroof. G
Risk of injury
The glass in the panorama sliding sunroof
could break in an accident. If you are not
wearing a seat belt, there is a risk that yo u
could be thrown through the opening in the
event of the vehicle overturning. Therefore,
always wear a seat belt to reduce the ris k
of injuries.
! Only open the panorama sliding sunroof
if it is free of snow and ice. Otherwise, mal-
functions may occur.
Do not allow anything to protrude from the
panorama sliding sunroof. The seals could
otherwise be damaged.
i When the panorama sliding sunroof is
open, resonance noises may occur as well as the usual airflow noises. They are caused
by minor pressure fluctuations in the vehi-
cle interior. Change the position of the pan-
orama sliding sunroof or open a side
window slightly to reduce or eliminate
these noises.
i It is also possible to open and close the
panorama sliding sunroof from the outsid e
using the "Summer opening" (Y page 111 )
and the "Convenience clos-
ing" (Y page 112) features respectively.
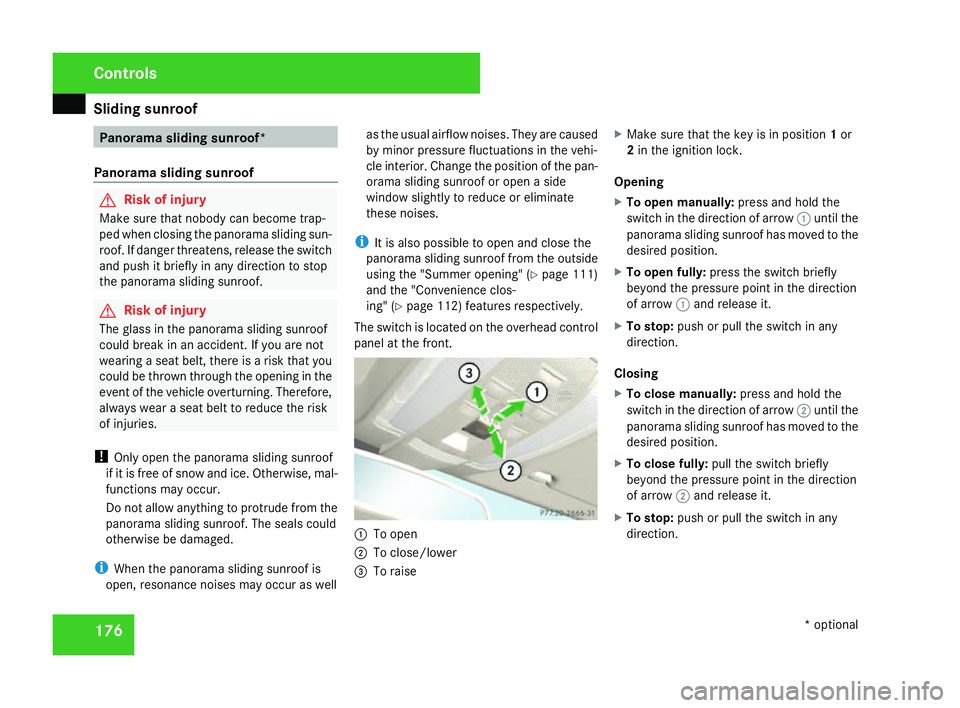
The switch is located on the overhead contro l
panel at the front. 1
To open
2 To close/lower
3 To raise X
Make sure that the key is in position 1or
2 in the ignition lock .
Opening
X To open manually: press and hold the
switch in the direction of arrow 1until th e
panorama sliding sunroof has moved to the
desired position .
X To open fully: press the switch briefl y
beyond the pressure point in the direction
of arrow 1and release it.
X To stop: push or pull the switch in any
direction.
Closin g
X To close manually: press and hold the
switch in the direction of arrow 2until th e
panorama sliding sunroof has moved to the
desired position .
X To close fully: pull the switch briefl y
beyond the pressure point in the direction
of arrow 2and release it.
X To stop: push or pull the switch in any
direction. Controls
* optional
204_AKB; 2; 3, en-G
B
mkalafa , 2007-06-26T23:11:51+02:00 - Seite 176
Page 199 of 377
Features
196
Mirror in the sun viso
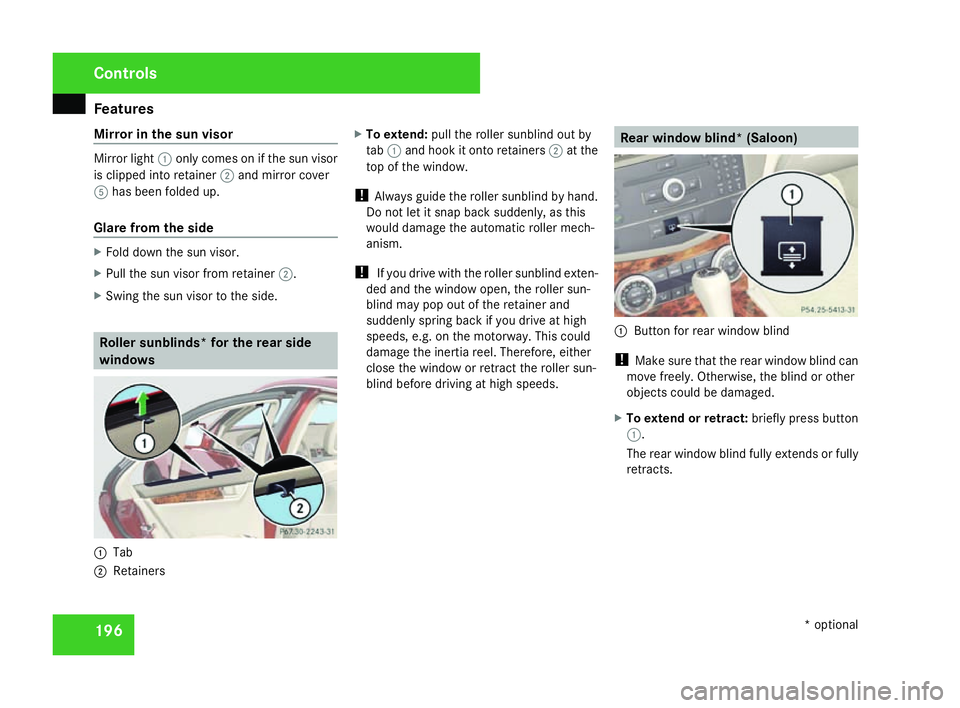
rMirror light
1only comes on if the sun visor
is clipped into retainer 2and mirror cover
5 has been folded up.
Glare from the side X
Fold down the sun visor.
X Pull the sun visor from retainer 2.
X Swing the sun visor to the side. Roller sunblinds* for the rear side
windows 1
Tab
2 Retainers X
To extend: pull the roller sunblind out by
tab 1and hook it onto retainers 2at th e
top of the window.
! Always guide the roller sunblind by hand.
Do not let it snap back suddenly, as thi s
would damage the automatic roller mech-
anism.
! If you drive with the roller sunblind exten-
ded and the window open, the roller sun-
blind may pop out of the retainer and
suddenly spring back if you drive at high
speeds, e.g. on the motorway. This could
damage the inertia reel. Therefore, either
close the window or retract the roller sun-
blind before driving at high speeds. Rear window blind* (Saloon
) 1
Button for rear window blind
! Make sure that the rear window blind can
move freely. Otherwise, the blind or othe r
objects could be damaged.
X To extend or retract: briefly press button
1 .
The rear window blind fully extends or fully
retracts. Controls
* optional
204_AKB; 2; 3, en-GB
mkalafa,
2007-06-26T23:11:51+02:00 - Seite 196
Page 230 of 377
Car
e 227Care
Notes on care
Regular and proper care maintains the value
of your vehicle.
i It is advisable to use Mercedes-Benz care
products.
Scratches, corrosive deposits, areas affected
by corrosion and damage caused by inade-
quate care cannot always be completely
repaired. In such cases, visit a qualified spe-
cialist workshop immediately, e.g. a
Mercedes-Benz Service Centre.
Repair damage caused by loose chippings
and remove the following substances imme-
diately, whilst avoiding rubbing too hard:
R Soak insect remains with insect remover
and rinse off afterwards .
R Soak bird droppings with water and rins e
off afterwards.
R Remove tree resin, oils, fuels and grease by
rubbing gently with a cloth soaked in clean-
ing or lighter fluid .
R Use silicone remover to remove wax.
R Use tar remover to remove tar stains. H
Environmental not
e
Dispose of empty packaging, cleaning
cloths and polishing wads in an environ-
mentally-responsible manner.
! Do not affix :
R stickers
R films
R magnetic plates or similar
to painted surfaces, otherwise you could
damage the paintwork. Vehicle care
! Do not park the vehicle for a long perio d
of time directly after cleaning, especially if
the wheels have just been cleaned with a
wheel cleaner. Wheel cleaners could cause
rapid corrosion of the brake discs and
brake pads/linings. After cleaning, park
the vehicle when it is at normal operatin g
temperature.
Automatic car wash You can wash the vehicle in an automatic car
wash from the very start,!
Do not use high pressure car wash sys-
tems. The strong water jet could damage
painted parts or attachments.
! Do not use a brush-free automatic car
wash that uses chemical agents to wash
the vehicle.
but preferably one without brushes.
If the vehicle is very dirty, prewash it befor e
cleaning it in an automatic car wash.
! Make sure that the automatic car wash is
suitable for the size of the vehicle. Fold in
the exterior mirrors before the vehicle is
washed. There is otherwise a risk of dam-
age to the exterior mirrors.
! Make sure the side windows are com-
pletely closed, the ventilation/heater
blower is fully turned off and the wind-
screen wiper switch is set to 0. The rai n
sensor may otherwise be activated, for
instance, leading to inadvertent wiper
sweeps being triggered. This could cause
damage to the vehicle.
After using an automatic car wash, wipe off
wax from the windscreen and the wiper
blades. This will prevent smears and reduce
wiping noises caused by residue on the wind-
screen. Operation
204_AKB; 2; 3, en-GB
mkalafa,
2007-06-26T23:11:51+02:00 - Seite 227
Page 231 of 377
Car
e 228
High-pressure cleaners G
Risk of accident
Do not use high-pressure cleaners with cir-
cular-jet nozzles (dirt grinders) to clean
your vehicle or - especially - the tyres. Yo u
could otherwise damage the tyres and
cause an accident.
! Observe the instructions issued by the
equipment manufacturer concerning the
distance to be maintained between the
nozzle of the high-pressure cleaner and the
vehicle (at least 30 cm).
Move the high-pressure cleaner nozzle
around when cleaning your vehicle .
Do not aim directly at any of the following:
R Tyres
R Door joint
R Electrical components
R Batter y
R Connectors
R Bulbs
R Seals
Damaged seals or electrical components
can lead to failures or leaks .Cleaning the wiper blades and the out
-
side of the windscreen G
Risk of injury
Turn the key to position 0in the ignition
lock before cleaning the windscreen or the
wiper blades. There is otherwise a risk of
the windscreen wipers being set in motion
and causing injury.
! Only fold the windscreen wipers away
from the windscreen when vertical, other-
wise you will damage the bonnet.
X Fold the wiper arms away from the wind-
screen until you feel them engage.
X Clean the windscreen and the wiper blades .
X Fold the windscreen wipers back agai n
before the ignition is switched on.
! Do not clean the wiper blades too often,
as otherwise the coating may come off.
This could cause wiper noise.
Cleaning the windows !
Do not use dry cloths, abrasive products,
solvents or cleaning agents containing sol-
vents to clean the inside of the windows. Clean the insides of the windows with
a
damp cloth or commercially-available glass
cleaner. Avoid touching the inside of the
rear windscreen and the side windows with
hard objects, e.g. ice scrapers or rings. You
could otherwise cause damage to the win-
dows, rear window heating or aerial on the
rear window.
i Anti-glare film retrofitted to the insides of
the windows could interfere with radio or
mobile phone reception, especially if it is
conductive or metal-coated film. Informa -
tion about anti-glare film can be obtained
from any Mercedes-Benz Service Centre.
Cleaning the headlamps X
Clean the headlamp lenses with a wet
sponge.
! Only use washer fluid which is suitable
for plastic lenses. Unsuitable washer fluid
could damage the plastic lenses of th e
headlamps.
Therefore, do not use the following:
R Dry cloths
R Abrasive cleaning agents Operatio
n
204_AKB; 2; 3, en-GB
mkalafa,
2007-06-26T23:11:51+02:00 - Seite 228