2007 MERCEDES-BENZ C-CLASS ESTATE spare tire
[x] Cancel search: spare tirePage 215 of 377
Tyres and wheels
21
2
cate that the wheels or tyres are damaged.
If you suspect that a tyre is defective,
reduce your speed and stop the vehicle as
soon as possible to check the wheels and
tyres for damage. Hidden tyre damag
e
could also be causing the unusual handling
characteristics. If you find no signs of dam-
age, have the wheels and tyres inspected
at a specialist workshop, for example at a
Mercedes-Benz Service Centre.
R When parking your vehicle, make sure that
the tyres do not get deformed by the kerb
or other obstacles. If it is necessary to drive
over kerbs, speed humps or similar, try to
do so slowly and at an obtuse angle. Oth-
erwise, the tyres, particularly the sidewalls,
could get damaged. Direction of rotation
Direction of rotation Tyres with a specified direction of rotation
have additional benefits, e.g. if there is a risk
of aquaplaning. You will only gain these ben-
efits if the correct direction of rotation is
observed.
An arrow on the sidewall of the tyre indicates
its correct direction of rotation.
i You may fit a spare tyre *against th e
direction of rotation. MOExtended run-flat system
*
The MOExtended run-flat system* allows you
to continue driving the vehicle even when one
or more tyres lose all air pressure.
The MOExtended run-flat system* may only
be used in combination with the tyre pressure
loss warning system and only on wheels spe-
cifically tested and approved by Mercedes-
Benz.
i Vehicles with MOExtended run-flat sys-
tem* are not equipped with the TIREFIT
kit*. 14 It is therefore recommended to additionally
equip your vehicle with the TIREFIT kit*
when fitting tyres that do not feature run-
flat properties, e.g. winter tyres.
i A TIREFIT kit* is available from any quali-
fied specialist workshop, e.g. a Mercedes-
Benz Service Centre.
You will find notes on driving with a flat tyr e
in the "Practical advice" section
( Y page 323). Tyre tread
G
Risk of accident
Bear in mind that:
R tyre grip decreases rapidly on wet roads
when the tread depth is less than 3 mm.
You should thus replace tyres that have
insufficient tread.
R winter tyres should be replaced when th e
tread depth is 4 mm or less because oth -
erwise they no longer provide adequate
grip.
R the tread on a tyre may not wear evenly .
You should thus regularly check the tread
14 Only for certain countries. Operation
* optional
204_AKB; 2; 3, en-GB
mkalafa,
2007-06-26T23:11:51+02:00 - Seite 212
Page 216 of 377
Tyres and wheels
21
3 depth and the condition of the tread
across the entire width of all tyres. If nec
-
essary, turn the steering wheel so that
you can see the tyre tread more easily.
You could otherwise lose control of the
vehicle and cause an accident due to the
reduced grip of the tyres on the road. Tyre pressures
G
Risk of accident
Tyre pressure that is either too high or too
low has a negative effect on the vehicle’ s
active safety, which could lead you to caus e
an accident. You should therefore regularly
check the pressure of all your tyres (includ -
ing the spare tyre*), particularly prior to
long trips, and correct the pressure as nec -
essary.
To test tyre pressure, use a suitable pressure
gauge. The outer appearance of a tyre does
not permit any reliable conclusion about the
tyre pressure.
If the vehicle is to be heavily laden or driven
at high speeds, the tyre pressure must be
adapted according to the specifications given
in the fuel filler flap (Y page 204). Use the highest specified tyre pressure for
the spare wheel*
. G
Risk of accident
Should the tyre pressure drop repeatedly:
R Check the tyre for foreign bodies.
R Check whether the wheel is losing air or
the valve is leaking .
Tyre pressure that is too low has a negative
effect on the vehicle’s active safety, which
could lead to your causing an accident .
Tyre pressure changes by approximately
0.1 bar for every 10 °C change in ambient
temperature.
If you measure the tyre pressure in enclosed
spaces where the temperature differs from
the outside temperature, you will have to cor-
rect the measured value accordingly.
When the vehicle is driven, the tyre tempera-
ture, and with it the tyre pressure, will
increase depending on the road speed and
the load on the tyres.
Therefore, you should only correct tyre pres-
sures when the tyres are cold.
The pressure of warm tyres should only be
corrected if it is too low for the current oper-
ating conditions. You will find a table of tyre pressures for var-
ious operating conditions on the inside of
your vehicle's fuel filler flap.
Driving with tyre pressure that is too high or
too low can:
R
shorten the service life of the tyres
R cause increased tyre damag e
R have a negative effect on handling charac-
teristics (e.g. by causing aquaplaning)
i The tyre pressure values given for low
loads are minimum values which offer you
good ride comfort characteristics .
You can, however, also use the values given
for higher loads. These are permissible and
will not adversely affect the running of the
vehicle.
Also check the tyre pressure of the spare
wheel* . H
Environmental not
e
Check the tyre pressure regularly, and at
least every 14 days. Operation
* optional
204_AKB; 2; 3, en-GB
mkalafa,
2007-06-26T23:11:51+02:00 - Seite 21
3
Page 237 of 377
Where will I find...?
234
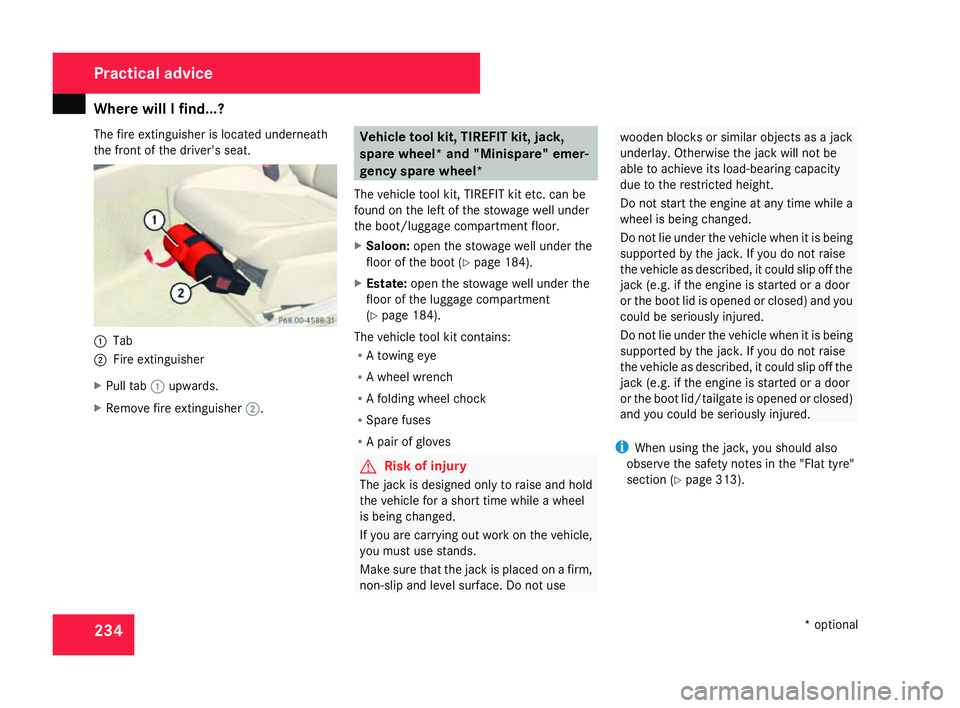
The fire extinguisher is located underneath
the front of the driver's seat.
1
Tab
2 Fire extinguishe r
X Pull tab 1upwards.
X Remove fire extinguisher 2. Vehicle tool kit, TIREFIT kit, jack
,
spare wheel* and "Minispare" emer-
gency spare wheel*
The vehicle tool kit, TIREFIT kit etc. can be
found on the left of the stowage well under
the boot/luggage compartment floor.
X Saloon: open the stowage well under the
floor of the boot (Y page 184).
X Estate: open the stowage well under th e
floor of the luggage compartment
( Y page 184).
The vehicle tool kit contains :
R A towing ey e
R A wheel wrench
R A folding wheel chock
R Spare fuses
R A pair of glove s G
Risk of injury
The jack is designed only to raise and hol d
the vehicle for a short time while a whee l
is being changed.
If you are carrying out work on the vehicle,
you must use stands.
Make sure that the jack is placed on a firm ,
non-slip and level surface. Do not us e wooden blocks or similar objects as a jac
k
underlay. Otherwise the jack will not be
able to achieve its load-bearing capacit y
due to the restricted height.
Do not start the engine at any time while a
wheel is being changed.
Do not lie under the vehicle when it is bein g
supported by the jack. If you do not raise
the vehicle as described, it could slip off the
jack (e.g. if the engine is started or a door
or the boot lid is opened or closed) and you
could be seriously injured.
Do not lie under the vehicle when it is being
supported by the jack. If you do not raise
the vehicle as described, it could slip off the
jack (e.g. if the engine is started or a door
or the boot lid/tailgate is opened or closed)
and you could be seriously injured.
i When using the jack, you should also
observe the safety notes in the "Flat tyre"
section (Y page 313). Practical advice
* optional
204_AKB; 2; 3, en-GB
mkalafa,
2007-06-26T23:11:51+02:00 - Seite 234
Page 238 of 377
Where will I find...?
235
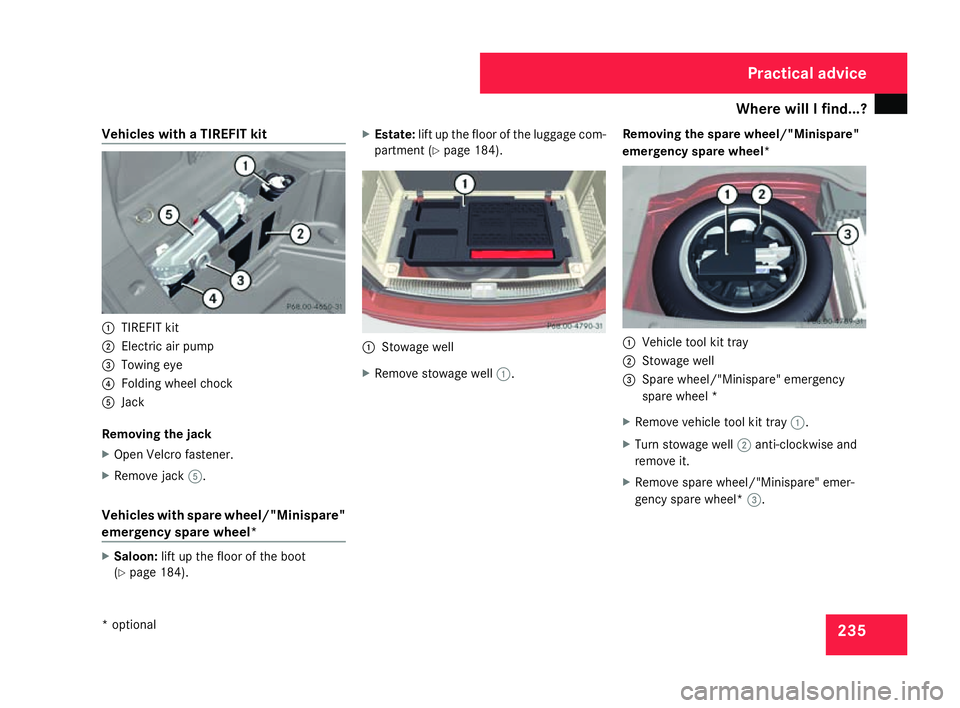
Vehicles with a TIREFIT kit
1
TIREFIT kit
2 Electric air pump
3 Towing eye
4 Folding wheel chock
5 Jack
Removing the jack
X Open Velcro fastener.
X Remove jack 5.
Vehicles with spare wheel/"Minispare "
emergency spare wheel* X
Saloon: lift up the floor of the boot
( Y page 184). X
Estate: lift up the floor of the luggage com -
partment (Y page 184). 1
Stowage well
X Remove stowage well 1. Removing the spare wheel/"Minispare"
emergency spare wheel
* 1
Vehicle tool kit tray
2 Stowage well
3 Spare wheel/"Minispare" emergency
spare wheel *
X Remove vehicle tool kit tray 1.
X Turn stowage well 2anti-clockwise and
remove it.
X Remove spare wheel/"Minispare" emer-
gency spare wheel* 3. Practical advice
* optional
204_AKB; 2; 3, en-GB
mkalafa,
2007-06-26T23:11:51+02:00 - Seite 235
Page 316 of 377
Flat tyre
313Rear window wiper blade (Estate)
Removin g G
Risk of injury
The wiper arm could be set in motion and
injure you if the windscreen wipers are
switched on.
Remove the key from the ignition lock
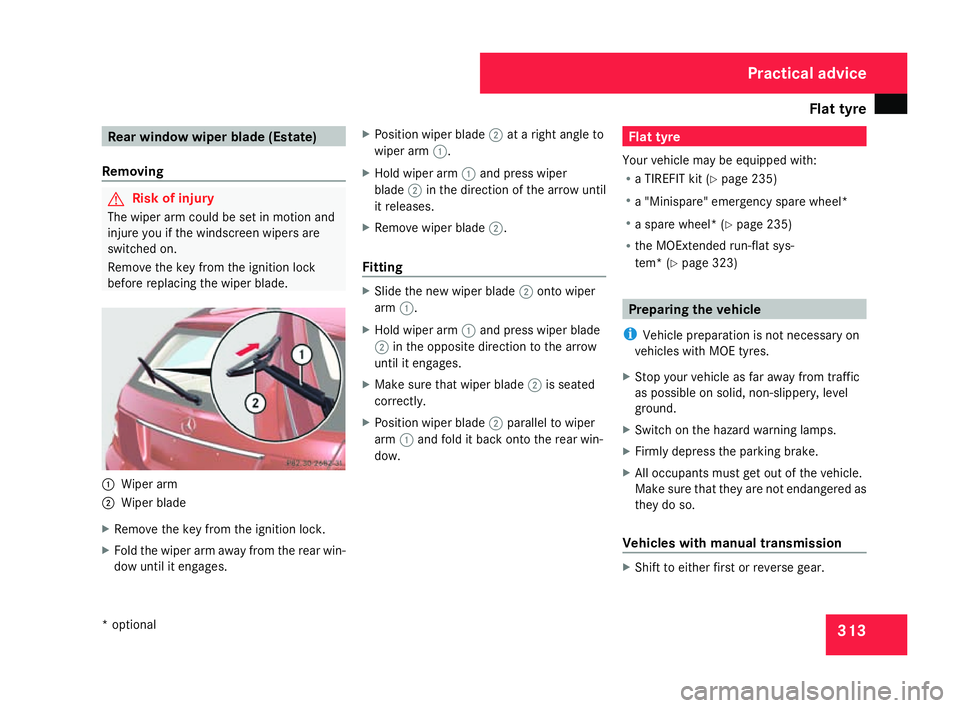
before replacing the wiper blade. 1
Wiper arm
2 Wiper blade
X Remove the key from the ignition lock.
X Fold the wiper arm away from the rear win-
dow until it engages . X
Position wiper blade 2at a right angle to
wiper arm 1.
X Hold wiper arm 1and press wiper
blade 2in the direction of the arrow until
it releases .
X Remove wiper blade 2.
Fitting X
Slide the new wiper blade 2onto wiper
arm 1.
X Hold wiper arm 1and press wiper blade
2 in the opposite direction to the arrow
until it engages.
X Make sure that wiper blade 2is seated
correctly.
X Position wiper blade 2parallel to wiper
arm 1and fold it back onto the rear win-
dow. Flat tyre
Your vehicle may be equipped with:
R a TIREFIT kit (Y page 235 )
R a "Minispare" emergency spare wheel*
R a spare wheel* (Y page 235 )
R the MOExtended run-flat sys-
tem* (Y page 323 ) Preparing the vehicle
i Vehicle preparation is not necessary on
vehicles with MOE tyres.
X Stop your vehicle as far away from traffic
as possible on solid, non-slippery, level
ground .
X Switch on the hazard warning lamps .
X Firmly depress the parking brake.
X All occupants must get out of the vehicle.
Make sure that they are not endangered as
they do so.
Vehicles with manual transmission X
Shift to either first or reverse gear. Practical advice
* optiona l
204_AKB; 2; 3, en-GB
mkalafa,
2007-06-26T23:11:51+02:00 - Seite 313
Page 322 of 377
Flat tyre
319specialist workshop which has the neces-
sary specialist knowledge and tools to carry
out the work required. Mercedes-Benz rec -
ommends that you use a Mercedes-Benz
Service Centre for this purpose. In particu-
lar, work relevant to safety or on safety-
related systems must be carried out at a
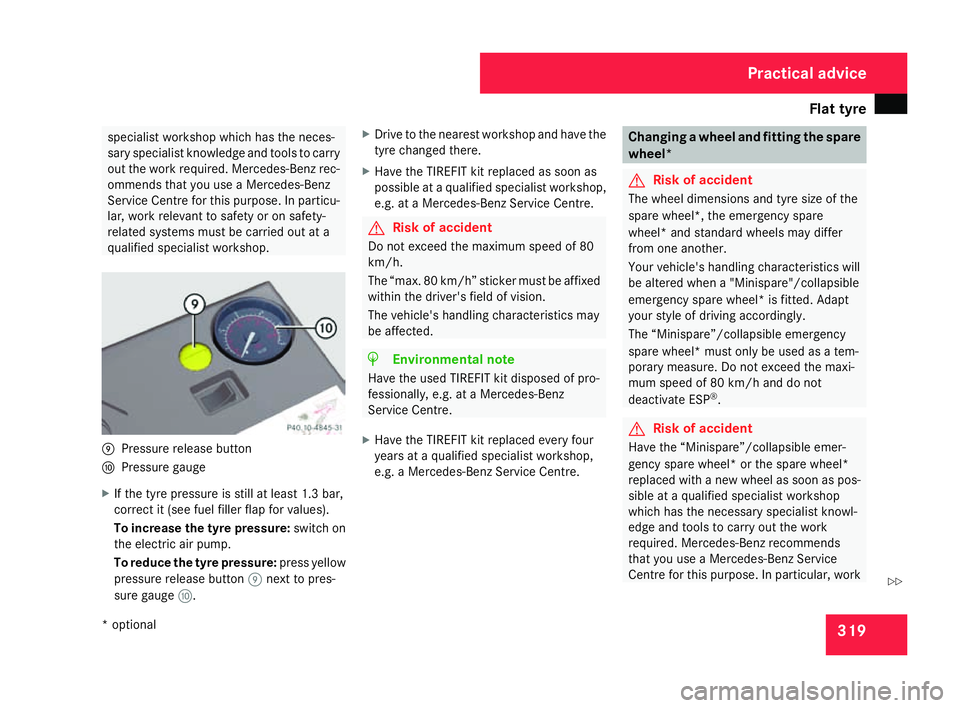
qualified specialist workshop. 9
Pressure release button
a Pressure gauge
X If the tyre pressure is still at least 1.3 bar,
correct it (see fuel filler flap for values).
To increase the tyre pressure: switch on
the electric air pump.
To reduce the tyre pressure :press yellow
pressure release button 9next to pres-
sure gauge a. X
Drive to the nearest workshop and have the
tyre changed there.
X Have the TIREFIT kit replaced as soon as
possible at a qualified specialist workshop ,
e.g. at a Mercedes-Benz Service Centre. G
Risk of accident
Do not exceed the maximum speed of 80
km/h.
The “max. 80 km/h” sticker must be affixe d
within the driver's field of vision.
The vehicle's handling characteristics may
be affected. H
Environmental not
e
Have the used TIREFIT kit disposed of pro-
fessionally, e.g. at a Mercedes-Benz
Service Centre.
X Have the TIREFIT kit replaced every fou r
years at a qualified specialist workshop ,
e.g. a Mercedes-Benz Service Centre. Changing a wheel and fitting the spar
e
wheel * G
Risk of accident
The wheel dimensions and tyre size of the
spare wheel*, the emergency spare
wheel* and standard wheels may differ
from one another.
Your vehicle's handling characteristics will
be altered when a "Minispare"/collapsibl e
emergency spare wheel* is fitted. Adapt
your style of driving accordingly.
The “Minispare”/collapsible emergency
spare wheel* must only be used as a tem-
porary measure. Do not exceed the maxi-
mum speed of 80 km/h and do not
deactivate ESP ®
. G
Risk of accident
Have the “Minispare”/collapsible emer-
gency spare wheel* or the spare wheel *
replaced with a new wheel as soon as pos-
sible at a qualified specialist workshop
which has the necessary specialist knowl-
edge and tools to carry out the work
required. Mercedes-Benz recommends
that you use a Mercedes-Benz Service
Centre for this purpose. In particular, work Practical advice
* optiona l
204_AKB; 2; 3, en-GB
mkalafa,
2007-06-26T23:11:51+02:00 - Seite 319 Z
Page 326 of 377
Flat tyre
323
X
Turn the jack back to its initial position and
store it and the rest of the vehicle tool kit
in the boot/luggage compartment.
Vehicles with the "Minispare" emergency
spare wheel*:
X Transport the faulty wheel in the boot/lug-
gage compartment.
or
X Depending on the size of the wheel, yo u
may also be able to secure the faulty whee l
in the spare wheel well. In this case, you
will have to remove the stowage well casin g
from the spare wheel well and stow it
securely in the boot/luggage compart-
ment. MOExtended run-flat system*
The MOExtended run-flat system* must only
be used in conjunction with the tyre pressure
loss warning system*.
! The maximum permissible distance which
can be driven in run-flat mode depends on
the load in the vehicle. It is 50 km if the
vehicle is partially laden and 30 km if fully
laden. The maximum permissible distance which
can be driven in run-flat mode is counted
from the moment the tyre pressure loss
warning appears in the multi-function dis-
play.
You must not exceed a maximum speed of
80 km/h.
i Vehicles featuring the MOExtended run-
flat system* are not equipped with the
TIREFIT kit*.
It is therefore recommended to additionally
equip your vehicle with the TIREFIT kit*
when fitting tyres that do not feature run-
flat properties, e.g. winter tyres.
i A TIREFIT kit* is available from any quali-
fied specialist workshop, e.g. a Mercedes-
Benz Service Centre. G
Risk of accident
The handling characteristics of your vehicl e
deteriorate in run-flat mode, for example:
R when cornering
R when braking
R when accelerating rapidly
Adapt your driving style accordingly and
avoid sudden changes in direction and sud- den acceleration, as well as driving over
obstacles (i.e. kerbs, potholes), and driving
off-road. This is particularly the case when
the vehicle is heavily laden .
The maximum permissible distance that
can be driven in run-flat mode depends to
a large extent on the loads placed on the
vehicle. It can be shorter due to high
speeds, a heavy load, sudden acceleration
and/or manoeuvring, the road surface con-
dition, outside temperature, etc., or further
if you drive carefully and conservatively.
Do not continue to drive in run-flat mode if:
R you hear banging noises
R the vehicle starts to shake
R you see smoke and smell rubber
R ESP ®
is intervening constantly
R there are tears in the sidewalls of the tyr e
After driving in run-flat mode, you must
have the rims checked for damage at a
qualified specialist workshop which has the
necessary specialist knowledge and tools
to carry out the work required. The faulty
tyre must be replaced in every case.
Mercedes-Benz recommends that you use
a Mercedes-Benz Service Centre for this Practical advice
* optional
204_AKB; 2; 3, en-GB
mkalafa,
2007-06-26T23:11:51+02:00 - Seite 323 Z
Page 357 of 377
Tyres and wheels
35
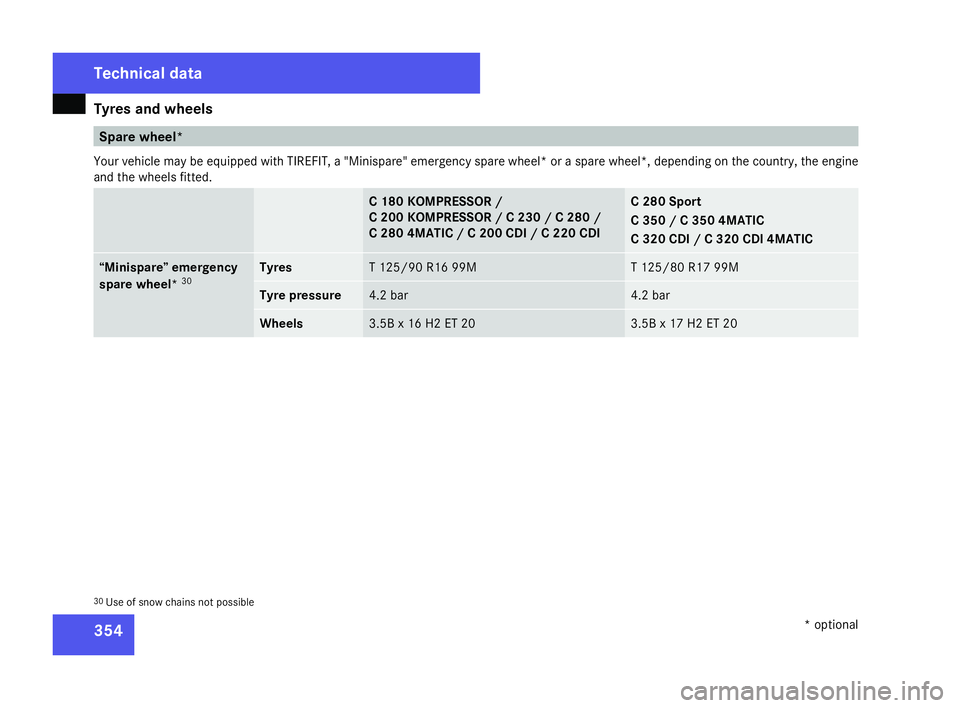
4 Spare wheel*
Your vehicle may be equipped with TIREFIT, a "Minispare" emergency spare wheel* or a spare wheel*, depending on the country, the engine
and the wheels fitted. C 180 KOMPRESSOR
/
C 200 KOMPRESSOR / C 230 / C 280 /
C 280 4MATIC / C 200 CDI / C 220 CDI C 280 Sport
C 350 / C 350 4MATIC
C 320 CDI / C 320 CDI 4MATIC
“Minispare” emergency
spare wheel*
30 Tyres T 125/90 R16 99
M T 125/80 R17 99M
Tyre pressur
e 4.2 bar 4.2 bar
Wheels 3.5B x 16 H2 ET 20 3.5B x 17 H2 ET 20
30
Use of snow chains not possibl eTechni
cal data
* optional
204_AKB; 2; 3, en-GB
mkalafa,
2007-06-26T23:11:51+02:00 - Seite 354