Page 1 of 72
SECTION VI
159
ES350_Navi_U (L/O 0603)
AUDIO/VIDEO SYSTEM
AUDIO/VIDEO SYSTEM
Audio/video system
�Quick reference 160
�Using your audio/video system 162
Some basics162 . . . . . . . . . . . . . . . . . . . . . . . . . . . . . . . . . . . . . . . .
Radio operation169 . . . . . . . . . . . . . . . . . . . . . . . . . . . . . . . . . . . . .
Cassette taple player operation181 . . . . . . . . . . . . . . . . . . . . . . .
CD changer operation184 . . . . . . . . . . . . . . . . . . . . . . . . . . . . . . .
DVD changer operation198 . . . . . . . . . . . . . . . . . . . . . . . . . . . . . .
�Audio/video remote controls 219
�Audio/video system operating hints 221
Page 2 of 72

160AUDIO/VIDEO SYSTEM
ES350_Navi_U (L/O 0603)
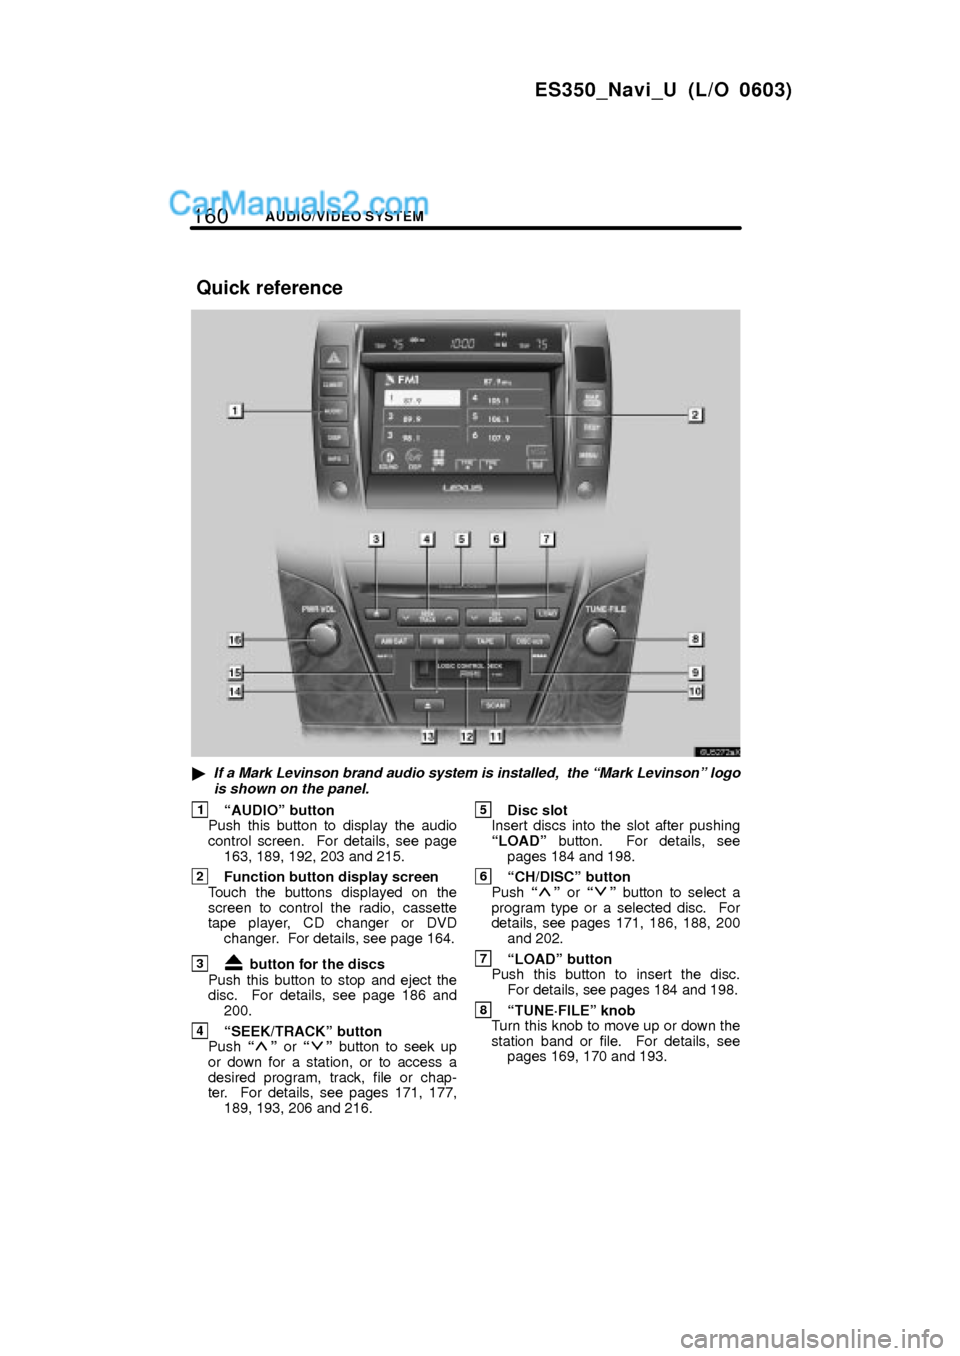
�If a Mark Levinson brand audio system is installed, the Mark Levinsonº logo
is shown on the panel.
1AUDIOº button
Push this button to display the audio
control screen. For details, see page
163, 189, 192, 203 and 215.
2Function button display screen
Touch the buttons displayed on the
screen to control the radio, cassette
tape player, CD changer or DVD
changer. For details, see page 164.
3 button for the discs
Push this button to stop and eject the
disc. For details, see page 186 and
200.
4SEEK/TRACKº button
Push º or º button to seek up
or down for a station, or to access a
desired program, track, file or chap-
ter. For details, see pages 171, 177,
189, 193, 206 and 216.
5Disc slot
Insert discs into the slot after pushing
LOADº button. For details, see
pages 184 and 198.
6CH/DISCº button
Push º or º button to select a
program type or a selected disc. For
details, see pages 171, 186, 188, 200
and 202.
7LOADº button
Push this button to insert the disc.
For details, see pages 184 and 198.
8TUNE´FILEº knob
Turn this knob to move up or down the
station band or file. For details, see
pages 169, 170 and 193.
Quick reference
Page 3 of 72
161
ES350_Navi_U (L/O 0603)
AUDIO/VIDEO SYSTEM
9DISC´AUXº button
Push this button to turn the CD
changer, DVD changer or AUX on.
For details, see pages 163, 188, 189
and 201.
10TAPEº button
Push this button to turn the cassette
tape player on. For details, see
pages 163 and 181.
11SCANº button
Push this button to scan radio sta-
tions or scan the tracks,discs, files or
folders. For details, see page 171.
12Cassette tape slot
Insert a cassette tape into the slot.
For details, see page 181.
13 button for the cassette tape
Push this button to stop and eject the
cassette tape. For details, see page
181.
14FMº button
Push this button to choose an FM sta-
tion. For details, see pages 163 and
169.
15AM´SATº button
Push this button to choose either an
AM or SAT station. For details, see
pages 163, 169 and 175.
16PWR´VOLº knob
Push this knob to turn the audio sys-
tem on and off, and turn it to adjust the
volume. For details, see page 163.
Page 6 of 72
164AUDIO/VIDEO SYSTEM
ES350_Navi_U (L/O 0603)
The buttons for radio, cassette tape player,
CD changer and DVD changer operation
are displayed on the function button dis-
play screen when the audio control mode
is selected.
Touch them lightly and directly on the
screen.
The selected button is highlighted.
Page 11 of 72
169
ES350_Navi_U (L/O 0603)
AUDIO/VIDEO SYSTEM
�AUX adapter
The sound of portable audio players con-
nected to the AUX adapter can be enjoyed.
Push the DISC´AUXº button to switch to
AUX mode. For details, refer to the
Own-
er's Manualº.
�Listening to the radio
Push AM´SATº or FMº to choose ei-
ther an AM or FM station.
AMº, FM1º or FM2º appears on the
screen.
If your vehicle is equipped with a satellite
radio broadcast system, when you push
the AM´SATº button, AMº, SAT1º,
SAT2º, SAT3º station appears on the dis-
play. For details about satellite radio
broadcast, see Ð Radio operation (XM�
Satellite Radio broadcast)º on page 174.
Ð Radio operation
Page 12 of 72

170AUDIO/VIDEO SYSTEM
ES350_Navi_U (L/O 0603)
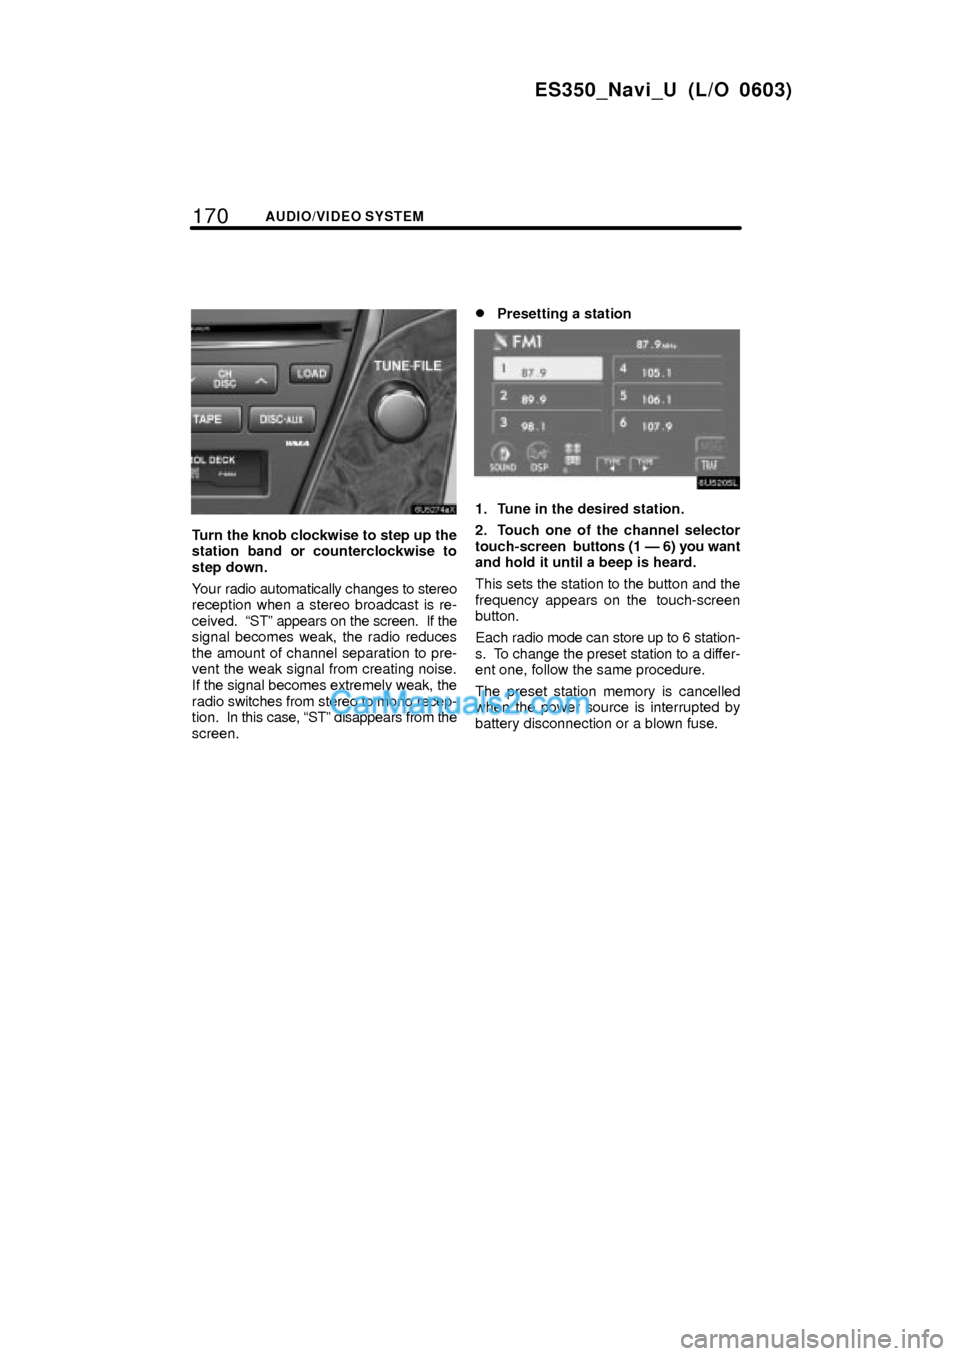
Turn the knob clockwise to step up the
station band or counterclockwise to
step down.
Your radio automatically changes to stereo
reception when a stereo broadcast is re-
ceived. STº appears on the screen. If the
signal becomes weak, the radio reduces
the amount of channel separation to pre-
vent the weak signal from creating noise.
If the signal becomes extremely weak, the
radio switches from stereo to mono recep-
tion. In this case, STº disappears from the
screen.
�Presetting a station
1. Tune in the desired station.
2. Touch one of the channel selector
touch-screen buttons (1 Ð 6) you want
and hold it until a beep is heard.
This sets the station to the button and the
frequency appears on the touch-screen
button.
Each radio mode can store up to 6 station-
s. To change the preset station to a differ-
ent one, follow the same procedure.
The preset station memory is cancelled
when the power source is interrupted by
battery disconnection or a blown fuse.
Page 13 of 72

171
ES350_Navi_U (L/O 0603)
AUDIO/VIDEO SYSTEM
�Selecting a station
Tune in the desired station using one of the
following methods.
Preset tuning: Touch the channel selec-
tor touch-screen button (1 Ð 6) or push
the
º or º button of CH/DISCº for
the station you want. The touch-screen
button is highlighted and the station fre-
quency appears on the screen.
Seek tuning: Push the
º or º but-
ton of SEEK/TRACKº. The radio will be-
gin seeking up or down for a station of the
nearest frequency and will stop on recep-
tion. Each time you push the button, the
stations will be searched automatically
one after another.
To scan all the frequencies: Touch
SCANº on the screen or push the
SCANº button briefly. SCANº appears
on the screen. The radio will find the next
station and stay there for a few seconds,
and then scan again. To select a station,
touch SCANº or push the SCANº but-
ton again.
To scan the preset stations: Touch
SCANº on the screen or push the
SCANº button for longer than approxi-
mately a second. P´SCANº appears on
the screen. The radio will tune in the next
preset station, stay there for a few se-
conds, and then move to the next preset
station. To select a station, touch SCANº
or push the SCANº button again.
�RDS (Radio Data System)
Your audio system is equipped with Radio
Data Systems (RDS). RDS mode allows
you to receive text messages from radio
stations that utilize RDS transmitters.
When RDS is on, the radio can
Ð select only stations of a particular pro-
gram type,
Ð display messages from radio stations,
Ð search for a stronger signal station.
RDS features are available for use only on
FM stations which broadcast RDS infor-
mation.
If the system receives no RDS stations,
NO PTYº appears on the display.
Page 15 of 72

173
ES350_Navi_U (L/O 0603)
AUDIO/VIDEO SYSTEM
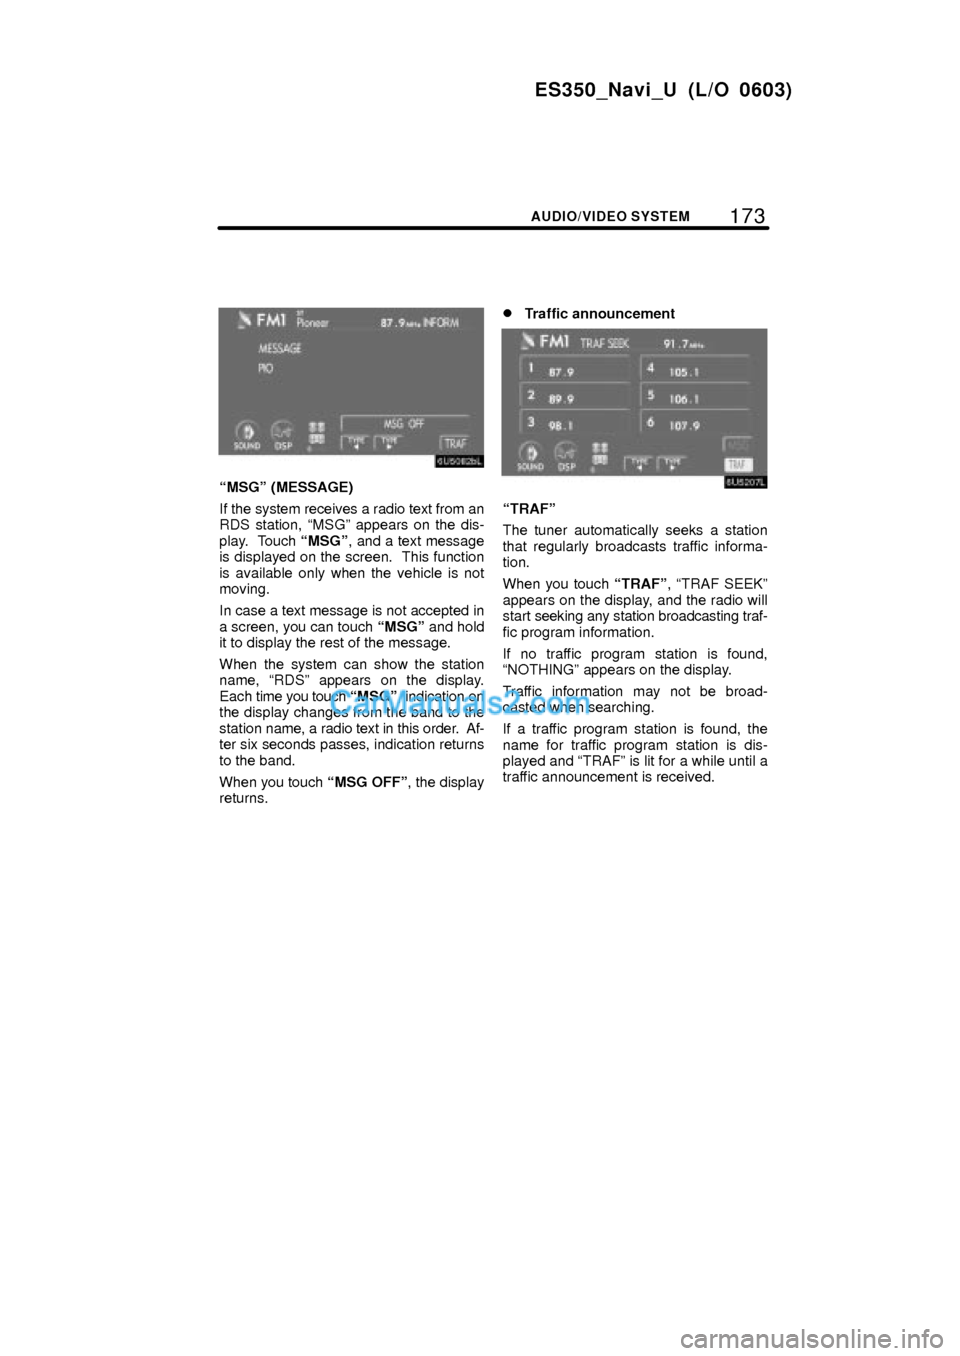
MSGº (MESSAGE)
If the system receives a radio text from an
RDS station, MSGº appears on the dis-
play. Touch MSGº, and a text message
is displayed on the screen. This function
is available only when the vehicle is not
moving.
In case a text message is not accepted in
a screen, you can touch MSGº and hold
it to display the rest of the message.
When the system can show the station
name, RDSº appears on the display.
Each time you touch MSGº, indication on
the display changes from the band to the
station name, a radio text in this order. Af-
ter six seconds passes, indication returns
to the band.
When you touch MSG OFFº, the display
returns.
�Traffic announcement
TRAFº
The tuner automatically seeks a station
that regularly broadcasts traffic informa-
tion.
When you touch TRAFº, TRAF SEEKº
appears on the display, and the radio will
start seeking any station broadcasting traf-
fic program information.
If no traffic program station is found,
NOTHINGº appears on the display.
Traffic information may not be broad-
casted when searching.
If a traffic program station is found, the
name for traffic program station is dis-
played and TRAFº is lit for a while until a
traffic announcement is received.