2007 KIA Sedona light
[x] Cancel search: lightPage 270 of 344

433
Driving your vehicle
Maintenance when trailer towing Your vehicle will need service more often
when you regularly pull a trailer.
Important items to pay particular atten-
tion to include engine oil, automatic
transaxle fluid, axle lubricant and cooling
system fluid. Brake condition is another
important item to frequently check. Each
item is covered in this manual, and the
Index will help you find them quickly. If
you’re trailering, it’s a good idea to review
these sections before you start your trip.
Don’t forget to also maintain your trailer
and hitch. Follow the maintenance
schedule that accompanied your trailer
and check it periodically. Preferably, con-
duct the check at the start of each day’s
driving. Most importantly, all hitch nuts
and bolts should be tight.
If you do decide to pull a trailerHere are some important points if you
decide to pull a trailer:
government have varying trailering
laws. Make sure your hitch, mirrors,
lights and wiring arrangements are
legal, not only where you live, but also
where you’ll be driving. A good source
for this information is provincial or local
law enforcement agencies.
Consider using a sway control. You can ask a hitch dealer about sway control.
After your odometer indicates 800 km (500 miles) or more, you can tow a
trailer. For the first 800 km (500 miles)
that you tow a trailer, don’t drive over
80 km/h (50 mph) and don’t make
starts at full throttle. This helps your
engine and other parts of your vehicle
“wear” in at the heavier loads.
Always drive your vehicle at a moder- ate speed (less than 100 km/h (60
mph)).
On a long uphill grade, do not exceed 70 km/h (45 mph) or the posted towing
speed limit, whichever is lower.
The important considerations have to do with weight:
CAUTION
Due to higher load during trailer usage, overheating might occurin hot days or during uphill driv-ing. If the coolant gauge indicates over-heating, switch off the A/Cand stop the vehicle in a safe areato cool down the engine.
When towing check transaxle fluid more frequently.
If your vehicle is not equipped with the air conditioner, youshould install a condenser fan to improve engine performancewhen towing a trailer.
Page 274 of 344

What to do in an emergency25ROAD WARNING Hazard warning flasher The hazard warning flasher serves as a
warning to other drivers to exercise
extreme caution when approaching,
overtaking, or passing your vehicle.It should be used whenever emergency
repairs are being made or when the vehi-
cle is stopped near the edge of a road-
way.
Depress the flasher switch with the igni-
tion switch in any position. The flasher
switch is located in the center console
switch panel. All turn signal lights will
flash simultaneously.
• The hazard warning flasher operates
whether your vehicle is running or not.
The turn signals do not work when the hazard flasher is on.
Care must be taken when using the hazard warning flasher while the vehi-
cle is being towed.
Jump starting Jump starting can be dangerous if done
incorrectly. Therefore, to avoid harm to
yourself or damage to your vehicle or
battery, follow the jump starting proce-
dures. If in doubt, we strongly recom-
mend that you have a competent techni-
cian or towing service jump start your
vehicle.EMERGENCY STARTING
CAUTION
Use only a 12-volt jumper system.You can damage a 12-volt starting motor, ignition system, and otherelectrical parts beyond repair by use of a 24-volt power supply (eithertwo 12-volt batteries in series or a 24-volt motor generator set).
OVQ036059NOVQ036060N
Type AType B
Page 297 of 344

67
Maintenance
OWNER MAINTENANCE Owner maintenance schedule The following lists are vehicle checks and
inspections that should be performed by
the owner or an Authorized Kia Dealer at
the frequencies indicated to help ensure
safe, dependable operation of your vehi-
cle.
Any adverse conditions should be
brought to the attention of your dealer as
soon as possible.
These Owner Maintenance Checks are
generally not covered by warranties and
you may be charged for labor, parts and
lubricants used.When you stop for fuel: Check the engine oil level.
Check coolant level in coolant reser-voir.
Check the windshield washer fluid level.
Look for low or under-inflated tires.
While operating your vehicle: Note any changes in the sound of the exhaust or any smell of exhaust fumes
in the vehicle.
Check for vibrations in the steering wheel. Notice any increased steering
effort or looseness in the steering
wheel, or change in its straight-ahead
position.
Notice if your vehicle constantly turns slightly or “pulls” to one side when trav-
eling on smooth, level road.
When stopping, listen and check for unusual sounds, pulling to one side,
increased brake pedal travel or “hard-
to-push” brake pedal.
If any slipping or changes in the oper- ation of your transaxle occurs, check
the transaxle fluid level.
Check automatic transaxle P (Park) function.
Check parking brake.
Check for fluid leaks under your vehicle (water dripping from the air condition-
ing system during or after use is nor-
mal).
At least monthly: Check coolant level in the coolantrecovery reservoir.
Check the operation of all exterior lights, including the stoplights, turn sig-
nals and hazard warning flashers.
Check the inflation pressures of all tires including the spare.At least twice a year (i.e., every Spring and Fall): Check radiator, heater and air condi- tioning hoses for leaks or damage.
Check windshield washer spray and wiper operation. Clean wiper blades
with clean cloth dampened with wash-
er fluid.
Check headlight alignment.
Check muffler, exhaust pipes, shields and clamps.
Check the lap/shoulder belts for wear and function.
Check for worn tires and loose wheel lug nuts.
WARNING
Be careful when checking your
engine coolant level when the
engine is hot. Scalding hot coolant
and steam may blow out under
pressure. This could cause burns or
other serious injury.
Page 304 of 344

Maintenance14
6
“COLD” scale is for reference only
and should NOT be used to determine
transaxle fluid level.
New automatic transaxle fluid should
be red. The red dye is added so the
assembly plant can identify it as auto-
matic transaxle fluid and distinguish it
from engine oil or antifreeze. The red
dye, which is not an indicator of fluid
quality, is not permanent. As the vehi-
cle is driven, the automatic transaxle
fluid will begin to look darker. The
color may eventually appear light
brown.
✽ ✽
NOTICEHave an Authorized Kia dealer change
the automatic transaxle fluid according
to the Scheduled Maintenance at the
beginning of this section.Use only the specified automatic
transaxle fluid. (Refer to "Recommended
Lubricants" later in this section.)
WARNING
- Parking brake
To avoid sudden movement of the
vehicle, apply parking brake and
depress the brake pedal before
moving the shift lever.
CAUTION
Low fluid level causes transaxle
slippage. Overfilling can causefoaming, loss of fluid andtransaxle malfunction.
The use of a non-specified fluid could result in transaxle malfunc-tion and failure.
WARNING -
Transaxle fluid
The transaxle fluid level should be
checked when the engine is at nor-
mal operating temperature. This
means that the engine, radiator,
radiator hose and exhaust system
etc., are very hot. Exercise great
care not to burn yourself during this
procedure.
Page 306 of 344

Maintenance16
6LUBRICANTS AND FLUIDS Checking the washer fluid level The reservoir is translucent so that you
can check the level with a quick visual
inspection.
Check the fluid level in the washer fluid
reservoir and add fluid if necessary. Plain
water may be used if washer fluid is not
available. However, use washer solvent
with antifreeze characteristics in cold cli-
mates to prevent freezing.
This warning light indicatesthe washer fluid reservoir is
near empty. Refill the washer
fluid as soon as possible.
Body lubrication All moving points of the body, such as
door hinges, hood hinges, and locks,
should be lubricated each time the
engine oil is changed. Use a non-freez-
ing lubricant on locks during cold weath-
er.
Make sure the engine hood secondary
latch keeps the hood from opening when
the primary latch is released.
WARNING -
Coolant
Do not use radiator coolant or antifreeze in the washer fluid
reservoir.
Radiator coolant can severely obscure visibility when sprayed
on the windshield and may cause
loss of vehicle control or damage
to paint and body trim.
Windshield washer fluid agents contain some amounts of alcohol
and can be flammable under cer-
tain circumstances. Do not allow
sparks or flame to contact the
washer fluid or the washer fluid
reservoir. Damage to the vehicle
or it's occupants could occur.
Windshield washer fluid is poi- sonous to humans and animals.
Do not drink and avoid contacting
windshield washer fluid. Serious
injury or death could occur.
OVQ066013N
Page 310 of 344

Maintenance20
6FUSESA vehicle’s electrical system is protected
from electrical overload damage by
fuses. This vehicle has three fuse panels, one
located in the driver’s side panel bolster,
another in the cargo area, the other in
the engine compartment near the bat-
tery.
If any of your vehicle’s lights, acces-
sories, or controls do not work, check the
appropriate circuit fuse. If a fuse has
blown, the element inside the fuse will be
melted.
If the electrical system does not work,
first check the driver’s side fuse panel.
Always replace a blown fuse with one of
the same rating.
If the replacement fuse blows, this indi-
cates an electrical problem. Avoid using
the system involved and immediately
consult an Authorized Kia Dealer.
Three kinds of fuses are used: blade type
for lower amperage rating and cartridge type, fusible link for higher amperage rat-ings.
Fuse replacement
1VQA4037
Normal
Normal
Blade type
Cartridge type
Fusible link Blown
Blown
Normal Blown
WARNING
- Fuse replace-
ment
Never replace a fuse with any-
thing but another fuse of the
same rating.
A higher capacity fuse could cause damage possibly a fire.
Never install a wire instead of the proper fuse - even as a temporary
repair. It may cause extensive
wiring damage and possibly a fire.
CAUTION
Do not use a screwdriver or anyother metal object to remove fusesbecause it may cause a short circuitand damage the system.
Page 312 of 344

Maintenance22
63. Pull the suspected fuse straight out.
Use the removal tool provided on the
main fuse box in the engine compart-
ment.
4. Check the removed fuse; replace it if it is blown.Spare fuses are provided in the mainfuse box in the engine compartment.5. Push in a new fuse of the same rating, and make sure it fits tightly in the clips.
If it fits loosely, consult an Authorized Kia
Dealer.If you do not have a spare, use a fuse of the same rating from a circuit you maynot need for operating the vehicle, suchas the cigar lighter fuse.
If the headlights or other electrical com-
ponents do not work and the fuses are
OK, check the fuse block in the engine
compartment. If a fuse is blown, it must
be replaced.
Main fuseIf the main fuse is blown, it must be
removed as follows:
1. Disconnect the negative battery cable.
2. Remove the nuts shown in the picture above.
3. Replace the fuse with a new one of the same rating.
4. Reinstall in the reverse order of removal.✽ ✽NOTICEIf the main fuse is blown, consult an
Authorized Kia Dealer.
1VQA4008
1VQA4004
Page 314 of 344

Maintenance24
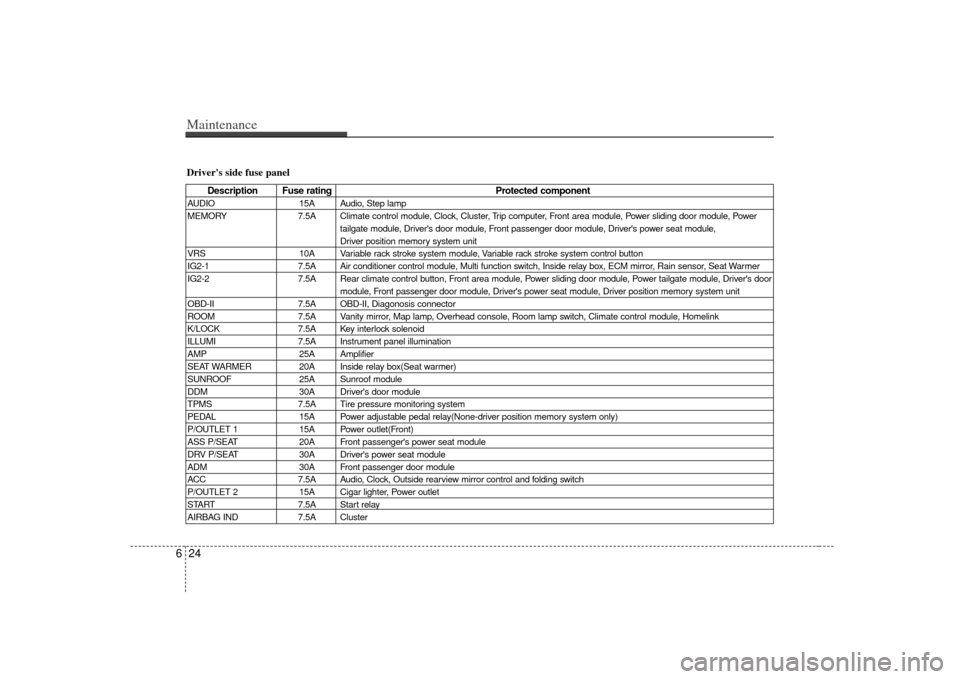
6Driver's side fuse panel
Description Fuse rating Protected component
AUDIO15A Audio, Step lamp
MEMORY 7.5A Climate control module, Clock, Cluster, Trip computer, Front area module, Power sliding door module, Power
tailgate module, Driver's door module, Front passenger door module, Driver's power seat module,
Driver position memory system unit
VRS 10A Variable rack stroke system module, Variable rack stroke system control button
IG2-1 7.5A Air conditioner control module, Multi function switch, Inside relay box, ECM mirror, Rain sensor, Seat Warmer
IG2-2 7.5A Rear climate control button, Front area module, Power sliding door module, Power tailgate module, Driver's door
module, Front passenger door module, Driver's power seat module, Driver position memory system unit
OBD-II 7.5A OBD-II, Diagonosis connector
ROOM 7.5A Vanity mirror, Map lamp, Overhead console, Room lamp switch, Climate control module, Homelink
K/LOCK 7.5A Key interlock solenoid
ILLUMI 7.5A Instrument panel illumination
AMP 25A Amplifier
SEAT WARMER 20A Inside relay box(Seat warmer)
SUNROOF 25A Sunroof module
DDM 30A Driver's door module
TPMS 7.5A Tire pressure monitoring system
PEDAL 15A Power adjustable pedal relay(None-driver position memory system only)
P/OUTLET 1 15A Power outlet(Front)
ASS P/SEAT 20A Front passenger's power seat module
DRV P/SEAT 30A Driver's power seat module
ADM 30A Front passenger door module
ACC 7.5A Audio, Clock, Outside rearview mirror control and folding switch
P/OUTLET 2 15A Cigar lighter, Power outlet
START 7.5A Start relay
AIRBAG IND 7.5A Cluster