2007 JEEP PATRIOT tow
[x] Cancel search: towPage 265 of 440
²Before You Cross Any Type Of Water± As you
approach any type of water you need to determine if
you can cross it safely and responsibly. If necessary, get
out and walk through the water or probe it with a
stick. You need to be sure of its depth, approach angle,
current and bottom condition. Be careful of murky or
muddy waters, check for hidden obstacles. Make sure
you will not be intruding on any wildlife and you can
recover the vehicle if necessary. The key to a safe
crossing is the water depth, current and bottom con-
ditions. On soft bottoms the vehicle will sink in,
effectively increasing the water level on the vehicle. Be
sure to consider this when determining the depth and
the ability to safely cross
²Crossing Puddles, Pools, Flooded Areas Or Other
Standing Water± Puddles, pools, flooded or other
standing water areas normally contain murky or
muddy waters. These water types normally contain
hidden obstacles and make it difficult to determine anaccurate water depth, approach angle, and bottom
condition. Murky or muddy water holes are where
you want to hook up tow straps prior to entering. This
makes for a faster, cleaner and easier vehicle recovery.
If you are able to determine you can safely cross, than
proceed using the low and slow method.
CAUTION!
Muddy waters can reduce the cooling system effec-
tiveness by depositing debris onto the radiator.
²Crossing Ditches, Streams, Shallow Rivers Or Other
Flowing Water± Flowing water can be extremely
dangerous. Never attempt to cross a fast running
stream or river even in shallow water. Fast moving
water can easily push your vehicle downstream
sweeping it out of control. Even in very shallow water,
a high current can still wash the dirt out from around
264 STARTING AND OPERATING
Page 268 of 440
surroundings, then using a tow strap to the vehicle tow
hooks would be fast and easy. If the vehicle is severely
hung up or in a situation where great care needs to be
taken during the recovery, then nothing can do the job
better than a winch. If you are severely hung up on
something you should jack the vehicle up and stack
something under the wheels to allow the vehicle to roll
off the object without causing further damage. This
should be tried before attempting any recovery method.
CAUTION!
Pulling the vehicle off an obstacle, without first
clearing the object, may result in additional under-
body damage.
²Rock Cycling Your Vehicle± Rock cycling your ve-
hicle is one of the easiest, fastest and most commonly
used methods. This simply involves shifting yourvehicle from drive to reverse, while applying throttle
after each shift. During this process, for additional
traction, try turning your steering wheel quickly back
and forth no more than a 1/4 turn. If you are stuck in
mud, sand, or snow try spinning your tires during this
process to clean the debris from the tread and improve
the traction. You want to create a rocking motion with
the vehicle. This helps build vehicle momentum,
which hopefully gets you out. Remember to ease off
and on the accelerator before and after the shift. If after
a few rock cycles your vehicle is not free, stop and try
another method of recovery. Continuous rock cycling
will only cause unnecessary damage to your vehicle
and the environment.
STARTING AND OPERATING 267
5
Page 269 of 440
CAUTION!
Damage can occur when spinning your tires at an
excessive high speed. Do not spin your tires faster
than an indicated 30 mph (48 km/h)
²Using The Tow Hooks With A Tow Strap±Tow
straps are a quick and easy way to recover your
vehicle from minor situations if you have a secondary
vehicle which is not stuck. The tow hooks on your
vehicle are designed to take the abusive force gener-
ated during vehicle recovery. Do not use the bumper
or any other vehicle component as an attachment
point. Using tow straps requires coordination between
the two drivers. Good communication and line of sight
are required for a safe recovery. First connect the tow
strap to the correct attachment points on both vehicles.
There should be a least 20 to 30 ft. (6 to 9 m) betweenthe vehicles to allow for a safe recovery. If necessary
join two tow straps together using a 1 1/2 in. (4 cm)
hard wood dowel. This will keep the straps from
becoming knotted and is safer than using a clevis pin
if the strap breaks. Next have the tow vehicle backup,
leaving 2 to 3 ft. (61 to 91 cm) worth of slack in the
strap. Then the tow vehicle, using light throttle, should
accelerate tightening the strap providing the pulling
force needed to free the vehicle. The vehicle being
recovered should assist in the recovery, at the time of
the snap, by slowly spinning the tires in the same
direction as the pulling vehicle. After the vehicle
becomes free, the driver of the previously stuck ve-
hicle should signal they are free and should hit their
brakes stopping both vehicles. The driver of the pull-
ing vehicle should let off the throttle without using the
brakes, once signaled by the other driver. This se-
quence is important to avoid having the recovered
vehicle hit the pulling vehicle.
268 STARTING AND OPERATING
Page 270 of 440
WARNING!
Never use tow straps with end hooks or link two
straps with a clevis pin. These heavy metal objects
could become projectiles if a strap breaks, which
could cause severe injury. Never leave more than 2 to
3 ft. (61 to 91 cm) of slack in the strap. More slack
than this greatly increases the risk of injury and
vehicle damage. Always keep everyone at least 30 ft.
(9 m) away from a strapping or winching situation.
After Driving Off-Road
Off-road operation puts more stress on your vehicle than
does most on-road driving. After driving off-road, it is
always a good idea to check for damage.
²Completely inspect the underbody of your vehicle.
Check tires, body structure, steering, suspension, and
exhaust system for damage.
²Check threaded fasteners for looseness, particularly on
the chassis, drivetrain components, steering, and sus-
pension. Retighten them, if required, and torque to the
values specified in the Service Manual.
²Check for accumulations of plants or brush. These
things could be a fire hazard, or they might hide
damage to fuel lines, brake hoses, axle pinion seals,
and propeller shafts.
²After extended operation in mud, sand, water, or
similar dirty conditions, have brake drums and rotors,
brake linings, and axle yokes inspected and cleaned as
soon as possible.
²If you experience unusual vibration after driving in
mud, slush or similar conditions, check the wheels for
packed material. Packed foreign material can cause a
wheel imbalance and cleaning the wheels will correct
the situation.
STARTING AND OPERATING 269
5
Page 271 of 440
WARNING!
Abrasive material in any part of the brakes may cause
excessive wear or unpredictable braking. You might
not have full braking power when you need it to
prevent an accident. If you have been operating your
vehicle in dirty conditions, get your brakes checked
and cleaned as necessary. Failure to do so may result
is serious injury.
PARKING BRAKE
When the parking brake is applied with the
ignition on, the Brake Light in the instrument
cluster will come on.
NOTE:This light only shows that the parking brake is
on. It does not show the degree of brake application.If the parking brake is applied while the vehicle is
moving, a chime will sound to alert the driver. The chime
will sound up to 10 times or until the vehicle has
returned to a stop.
Before leaving the vehicle, make sure that the parking
brake is set. To set the parking brake, pull up firmly on
the lever. Also place the gear selector in the Park position
(automatic transaxle) or Reverse (manual transaxle). To
release the parking brake, apply the brake pedal, pull up
slightly on the lever, then depress the button on the end
of the lever and push the lever fully down toward the
floor.
NOTE:The parking brake lever will not release unless
the lever is pulled up slightly past its applied position.
270 STARTING AND OPERATING
Page 272 of 440
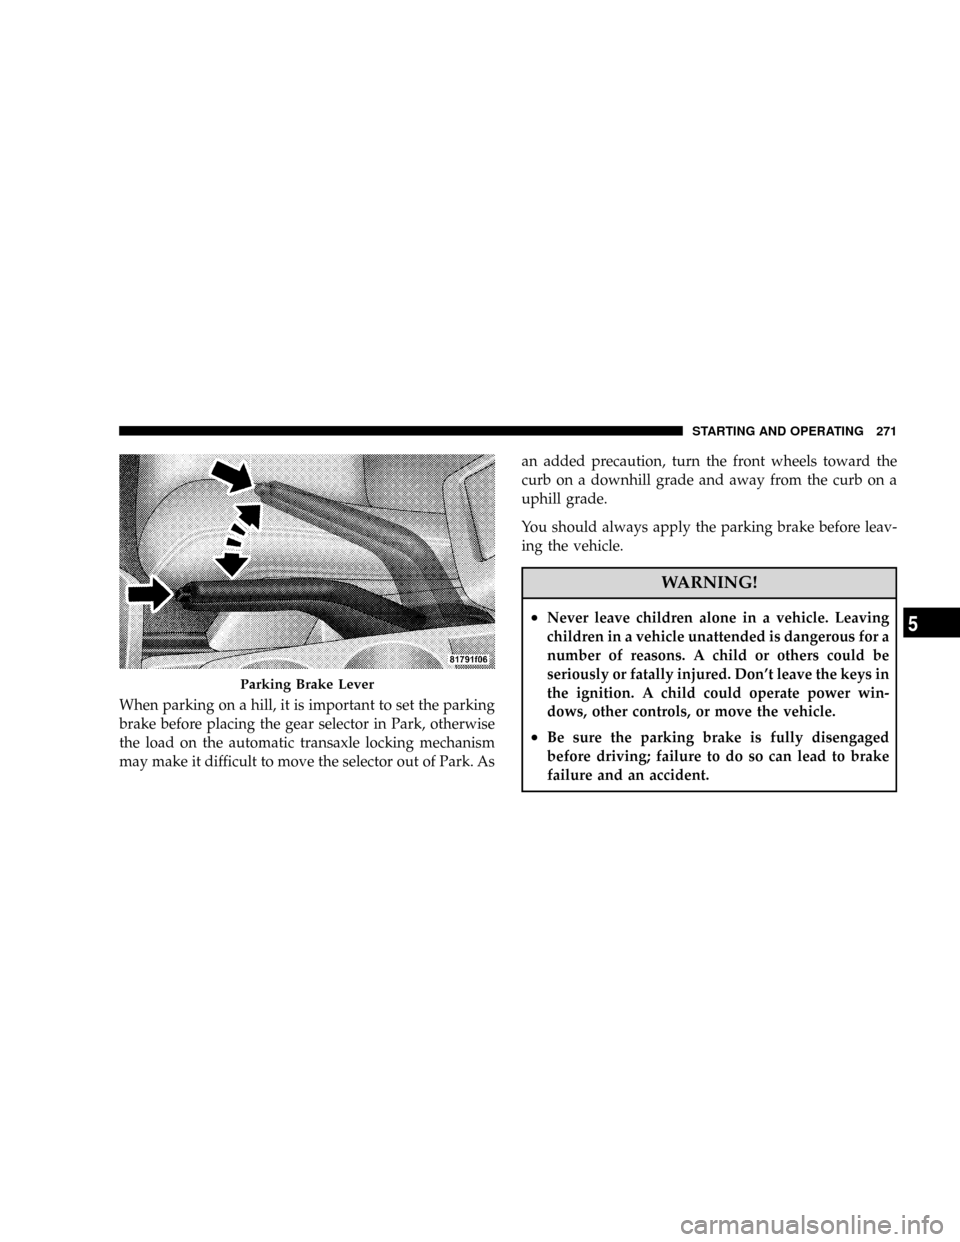
When parking on a hill, it is important to set the parking
brake before placing the gear selector in Park, otherwise
the load on the automatic transaxle locking mechanism
may make it difficult to move the selector out of Park. Asan added precaution, turn the front wheels toward the
curb on a downhill grade and away from the curb on a
uphill grade.
You should always apply the parking brake before leav-
ing the vehicle.
WARNING!
²Never leave children alone in a vehicle. Leaving
children in a vehicle unattended is dangerous for a
number of reasons. A child or others could be
seriously or fatally injured. Don't leave the keys in
the ignition. A child could operate power win-
dows, other controls, or move the vehicle.
²Be sure the parking brake is fully disengaged
before driving; failure to do so can lead to brake
failure and an accident.
Parking Brake Lever
STARTING AND OPERATING 271
5
Page 283 of 440
3) the tire size designed for your vehicle
4) the cold tire inflation pressures for the front, rear,
and spare tires.
Loading
The vehicle maximum load on the tire must not exceed
the load carrying capacity of the tire on your vehicle. You
will not exceed the tire's load carrying capacity if you
adhere to the loading conditions, tire size, and cold tire
inflation pressures specified on the ªTire and Loading
Informationº placard and in the ªVehicle Loadingº sec-
tion of this manual.
NOTE:Under a maximum loaded vehicle condition,
gross axle weight ratings (GAWR's) for the front and rear
axles must not be exceeded. For further information on
GAWR's, vehicle loading, and trailer towing, refer to the
ªVehicle Loadingº section of this manual.To determine the maximum loading conditions of your
vehicle, locate the statement ªThe combined weight of
occupants and cargo should never exceed XXX kg or XXX
lbs.º on the Tire and Loading Information placard. The
combined weight of occupants, cargo/luggage and
trailer tongue weight (if applicable) should never exceed
the weight referenced here.
Steps for Determining Correct Load Limit
1. Locate the statement ªThe combined weight of occu-
pants and cargo should never exceed XXX poundsº on
your vehicle's placard.
2. Determine the combined weight of the driver and
passengers that will be riding in your vehicle.
3. Subtract the combined weight of the driver and pas-
sengers from XXX kilograms or XXX pounds.
282 STARTING AND OPERATING
Page 284 of 440
4. The resulting figure equals the available amount of
cargo and luggage load capacity. For example, if ªXXXº
amount equals 1400 lbs. and there will be five 150 lb.
passengers in your vehicle, the amount of available cargo
and luggage load capacity is 650 lbs. (since 5 x 150 = 750,
and 1400 ± 750 = 650 lbs.)
5. Determine the combined weight of luggage and cargo
being loaded on the vehicle. That weight may not safely
exceed the available cargo and luggage load capacity
calculated in Step 4.
6. If your vehicle will be towing a trailer, load from your
trailer will be transferred to your vehicle. Consult thismanual to determine how this reduces the available
cargo and luggage load capacity of your vehicle.
NOTE:The following table shows examples on how to
calculate total load, cargo/luggage, and towing capaci-
ties of your vehicle with varying seating configurations
and number and size of occupants. This table is for
illustration purposes only and may not be accurate for
the seating and load carry capacity of your vehicle.
NOTE:For the following example, the combined weight
of occupants and cargo should never exceed 865 lbs.
(392 kg).
STARTING AND OPERATING 283
5