Page 31 of 440
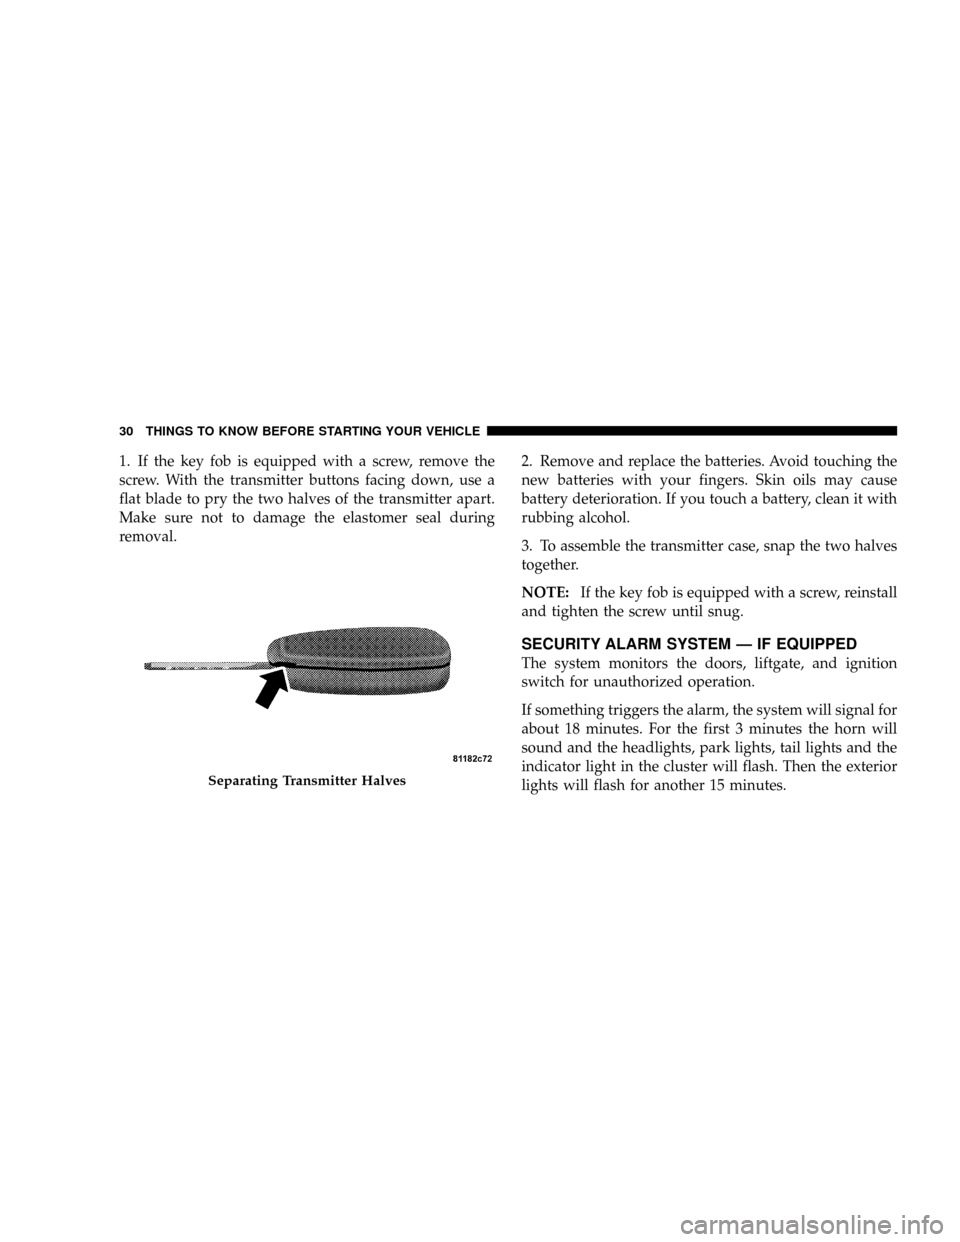
1. If the key fob is equipped with a screw, remove the
screw. With the transmitter buttons facing down, use a
flat blade to pry the two halves of the transmitter apart.
Make sure not to damage the elastomer seal during
removal.2. Remove and replace the batteries. Avoid touching the
new batteries with your fingers. Skin oils may cause
battery deterioration. If you touch a battery, clean it with
rubbing alcohol.
3. To assemble the transmitter case, snap the two halves
together.
NOTE:If the key fob is equipped with a screw, reinstall
and tighten the screw until snug.
SECURITY ALARM SYSTEM Ð IF EQUIPPED
The system monitors the doors, liftgate, and ignition
switch for unauthorized operation.
If something triggers the alarm, the system will signal for
about 18 minutes. For the first 3 minutes the horn will
sound and the headlights, park lights, tail lights and the
indicator light in the cluster will flash. Then the exterior
lights will flash for another 15 minutes.
Separating Transmitter Halves
30 THINGS TO KNOW BEFORE STARTING YOUR VEHICLE
Page 70 of 440
ENGINE BREAK-IN RECOMMENDATIONS
A long break-in period is not required for the engine in
your new vehicle.
Drive moderately during the first 300 miles (500 km).
After the initial 60 miles (100 km), speeds up to 50 or 55
mph (80 or 90 km/h) are desirable.
While cruising, brief full-throttle acceleration, within the
limits of local traffic laws, contributes to a good break-in.
Wide open throttle acceleration in low gear can be
detrimental and should be avoided.
The engine oil installed in the engine at the factory is a
high quality energy conserving type lubricant. Oil
changes should be consistent with anticipated climate
conditions under which vehicle operations will occur.
The recommended viscosity and quality grades are
shown in Section 7 of this manual. NON-DETERGENT
OR STRAIGHT MINERAL OILS MUST NEVER BE
USED.A new engine may consume some oil during its first few
thousand miles (kilometers) of operation. This should be
considered as a normal part of the break-in and not
interpreted as an indication of difficulty.
SAFETY TIPS
Exhaust Gas
WARNING!
Exhaust gases can injure or kill. They contain carbon
monoxide (CO) which is colorless and odorless.
Breathing it can make you unconscious and can
eventually poison you. To avoid breathing (CO)
follow the safety tips below.
THINGS TO KNOW BEFORE STARTING YOUR VEHICLE 69
2
Page 72 of 440
Defroster
Check operation by selecting the defrost mode and place
the blower control on high speed. You should be able to
feel the air directed against the windshield.
Periodic Safety Checks You Should Make Outside
The Vehicle
Tires
Examine tires for excessive tread wear or uneven wear
patterns. Check for stones, nails, glass, or other objects
lodged in the tread. Inspect tread and sidewall for cuts or
cracks. Check wheel nuts for tightness, and tires (includ-
ing spare) for proper pressure.
Lights
Have someone observe the operation of exterior lights
while you work the controls. Check turn signal and high
beam indicator lights on the instrument panel.
Fluid Leaks
Check area under vehicle after overnight parking for fuel,
engine coolant, oil or other fluid leaks. Also, if gasoline
fumes are detected or fuel, power steering fluid, trans-
mission fluid or brake fluid leaks are suspected, the cause
should be located and corrected immediately.
THINGS TO KNOW BEFORE STARTING YOUR VEHICLE 71
2
Page 171 of 440
4. Oil Pressure Light
Shows low engine oil pressure. The light will come
on and remain on when the ignition switch is
turned from the OFF to the ON position, and the light
will turn off after the engine is started. If the bulb does
not come on during starting, have the system checked by
an authorized dealer.
If the light comes on and remains on while driving, stop
the vehicle and shut off the engine. DO NOT OPERATE
THE VEHICLE UNTIL THE CAUSE IS CORRECTED.
The light does not show the quantity of oil in the engine.
This can be determined using the procedure shown in
Section 7.
5. Low Fuel Light
When the fuel level drops to 2 gallons, the fuel
symbol will light and a single chime will sound.6. Speedometer
Indicates vehicle speed.
7. Airbag Light
The light comes on and remains on for 6 to 8
seconds as a bulb check when the ignition
switch is first turned ON. If the light does not
come on during starting, stays on, or comes on
while driving, have the system checked by an authorized
dealer.
8. Turn Signal Indicators
The arrows will flash in unison with the exterior
turn signal, when using the turn signal lever.
9. High Beam Indicator
This light shows that the headlights are on high
beam. Push the turn signal lever away from the
steering wheel to switch the headlights from high or low
beam.
170 UNDERSTANDING YOUR INSTRUMENT PANEL
Page 174 of 440
In the event of an EBD failure, the Brake Warning Light
will turn on along with the ABS Light. Immediate repair
to the ABS system is required.
The operation of the Brake Warning Light can be checked
by turning the ignition switch from the OFF position to
the ON position. The light should illuminate for approxi-
mately two seconds. The light should then turn off unless
the parking brake is applied or a brake fault is detected.
If the light does not illuminate, have the light inspected
by an authorized dealer.
The light also will turn on when the parking brake is
applied with the ignition switch in the ON position.
NOTE:This light shows only that the parking brake is
applied. It does not show the degree of brake application.15. Transmission Over Temp Light
During sustained high speed driving on hot
days, the automatic transaxle oil may become
too hot. If this happens, the transmission over-
heat indicator light will come on and the
vehicle will slow slightly until the automatic transaxle
cools down enough to allow a return to the requested
speed. If the high speed is maintained, the overheating
will reoccur as before in a cyclic fashion.
16. Theft Alarm Light Ð If Equipped
This light will flash rapidly for several seconds when the
alarm system is arming. The light will begin to flash
slowly indicating that the system is armed.
17. Temperature Gauge
If the pointer rises to theH(red) mark, the instrument
cluster will sound a chime. Pull over and stop the vehicle.
Idle the vehicle with the air conditioner turned off until
UNDERSTANDING YOUR INSTRUMENT PANEL 173
4
Page 229 of 440
NOTE:Continuous use of the recirculate mode may
make the inside air stuffy and window fogging may
occur. Extended use of this mode is not recommended.
In cold or damp weather, the use of the Recirculate
position will cause windows to fog on the inside because
of moisture build up inside the vehicle. For maximum
defogging, select the Outside Air position.
NOTE:Recirculation Mode will not operate in floor, mix
or defrost modes.
Air Filtration System ± If Equipped
An air filter is included in the optional Security Group.
Filter media includes a particle filtration layer and acharcoal layer. The filter will reduce, but not eliminate,
diesel and agricultural smells. The filter acts only on air
coming from outside the vehicle; it does not filter air
inside the passenger compartment. See the maintenance
schedule for the filter change interval. The air filter
change interval coincides with engine oil and filter
change intervals. As with oil changes, the interval is
shorter for heavy duty service or dusty conditions. See
your authorized dealer for service.
228 UNDERSTANDING YOUR INSTRUMENT PANEL
Page 231 of 440
Window Fogging
Vehicle side windows tend to fog on the inside in mild
rainy or humid weather. To clear the windows, set mode
to the mix or defrost position. Direct the panel outlets
toward the side windows. Do not use recirculate without
A/C for long periods as fogging may occur.
Interior fogging on the windshield can be quickly re-
moved by using the defrost position.
If the fogging problem persists, clean the inside window
surfaces. The cause of undue fogging may be dirt collect-
ing on the inside surface of the glass.
NOTE:In cold weather, the use of the recircu-
late position will cause windows to fog on the
inside because of moisture build up inside thevehicle. For maximum defogging, press the recirculation
button until recirculate is off.
Summer Operation
Air conditioned vehicles must be protected with a high-
quality antifreeze coolant to provide proper corrosion
protection and to raise the boiling point of the coolant for
protection against overheating. A 50% concentration is
recommended.
Outside Air Intake
When operating the system during the winter months,
make sure the air intake, directly in front of the wind-
shield, is free of ice, slush, snow or other obstructions
such as leaves. Leaves collected in the air-intake plenum
may reduce air flow and plug the plenum water drains.
230 UNDERSTANDING YOUR INSTRUMENT PANEL
Page 249 of 440
The package includes:
²2.4L DOHC 16-Valve I4 (172 bhp @ 6000 rpm, 165 lb-ft
@ 4400 rpm)
²Second generation continuously variable transaxle
(CVT2L) with 19:1 crawl ratio
²Tow Hooks: 2 front and 1 rear
²Front engine and transaxle skid plate
²Fuel tank skid plate
²Air filtration system
²Unique springs for a 1 inch of increased ride height
²Fog lamps
²Seat height adjust
²Three-mode Electronic Stability Program (ESP)
²Hill-descent control
²Unique off-road engine calibration for optimum off-
road performance with premium fuel
²Off-road Brake Traction Control
²Unique off-road Anti-lock brake calibration
²Heavy duty cooling package (Eng/larger CVT oil
cooler, High capacity cooling fans)
²Heavy duty alternator
²Improved body sealing and high located drivetrain
component vents
²Reinforced rear lateral links
Freedom Drive II 4WD System Operation
Under normal driving conditions, the vehicle operates in
the active four wheel drive mode. Pulling up on the 4WD
lock lever activates the 4WD system and lights the amber
4WD cluster light. This commands a higher torque to the
rear wheels, for improved traction capability on slippery
248 STARTING AND OPERATING