2007 ISUZU KB P190 warning light
[x] Cancel search: warning lightPage 5183 of 6020
ELECTRICAL-BODY AND CHASSIS 8A-245
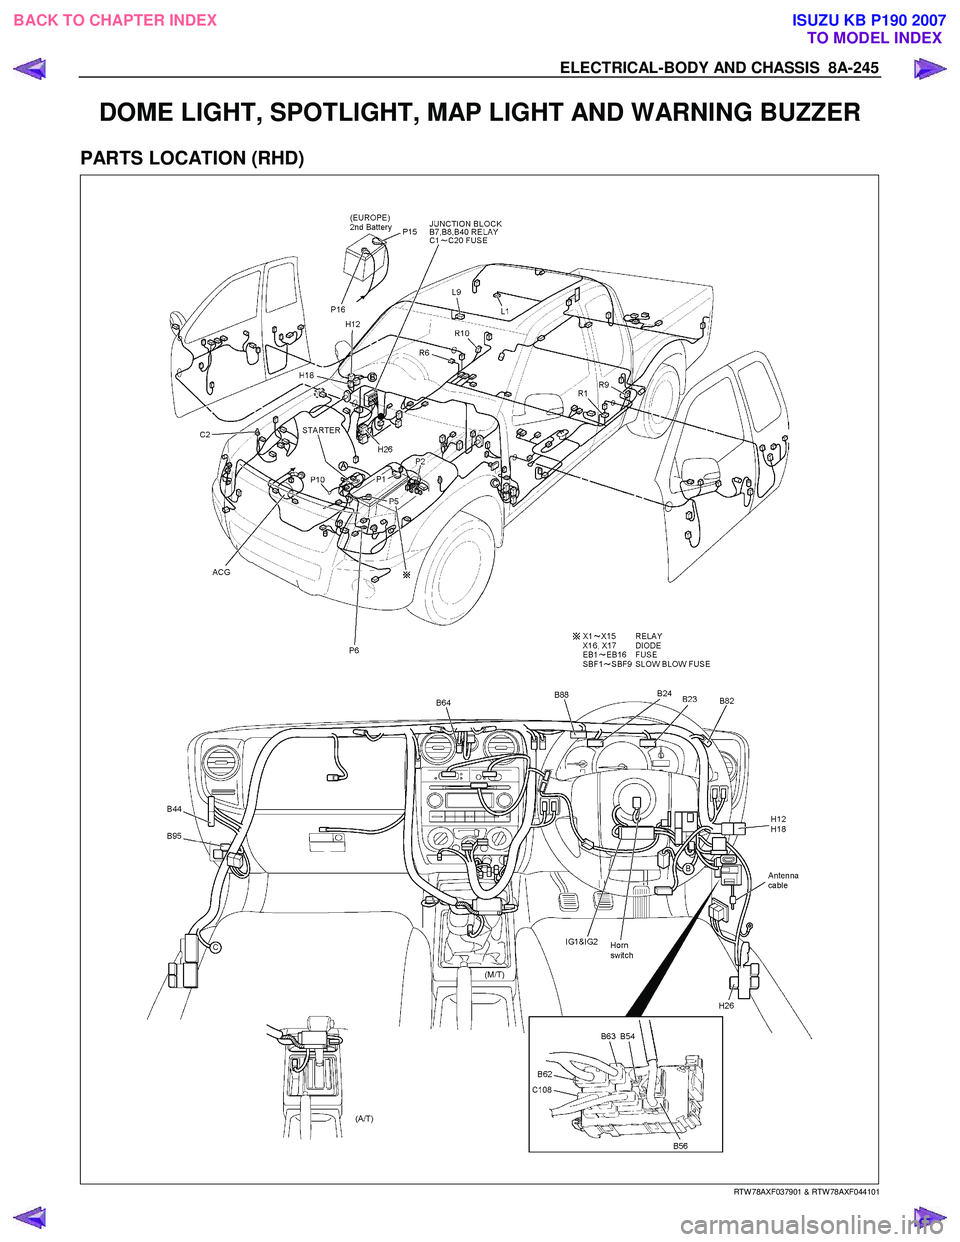
DOME LIGHT, SPOTLIGHT, MAP LIGHT AND WARNING BUZZER
PARTS LOCATION (RHD)
RTW 78AXF037901 & RTW 78AXF044101
BACK TO CHAPTER INDEX
TO MODEL INDEXISUZU KB P190 2007
Page 5241 of 6020
ELECTRICAL-BODY AND CHASSIS 8A-303
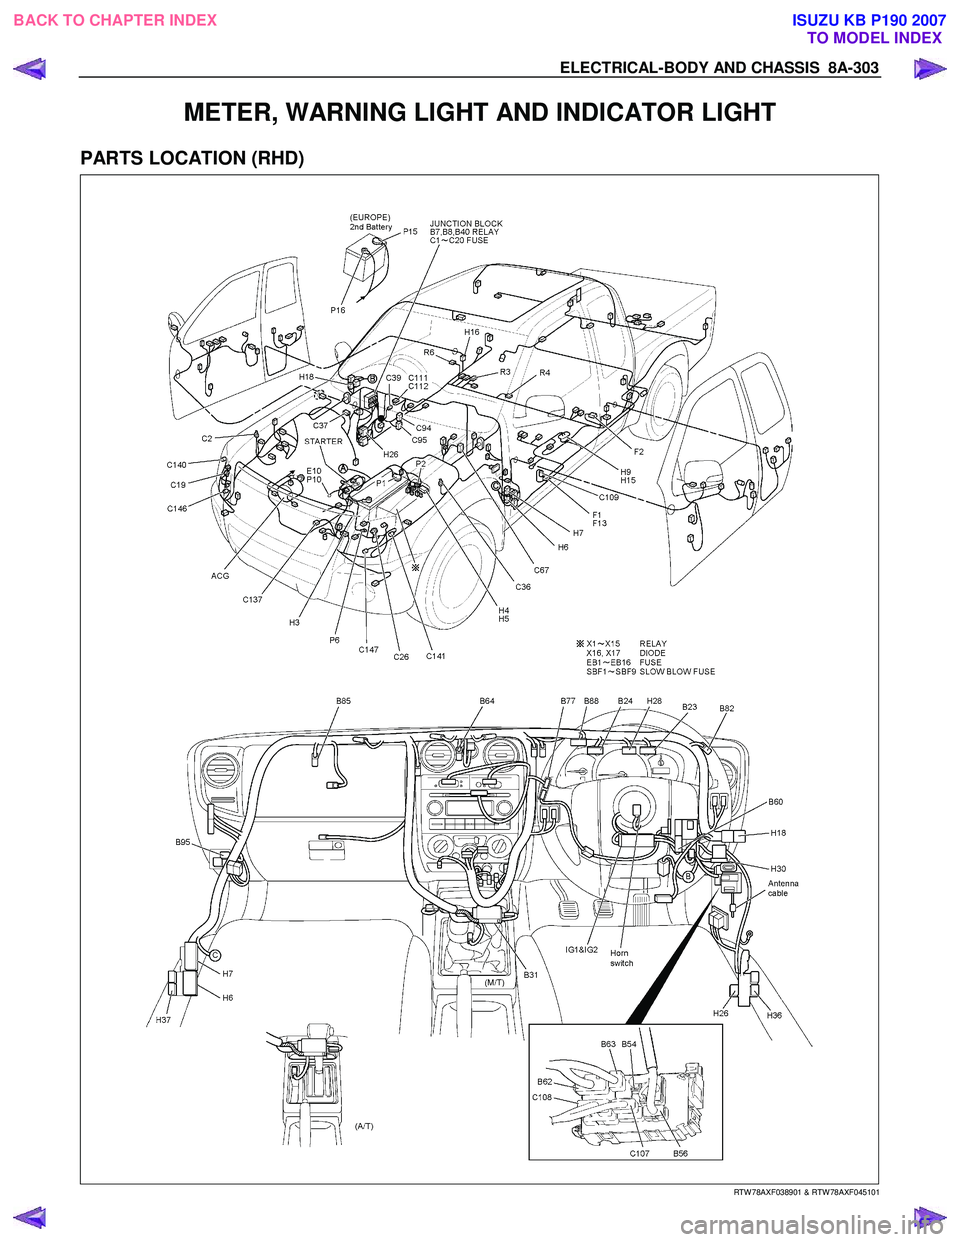
METER, WARNING LIGHT AND INDICATOR LIGHT
PARTS LOCATION (RHD)
RTW 78AXF038901 & RTW 78AXF045101
BACK TO CHAPTER INDEX
TO MODEL INDEXISUZU KB P190 2007
Page 5289 of 6020
ELECTRICAL-BODY AND CHASSIS 8A-351
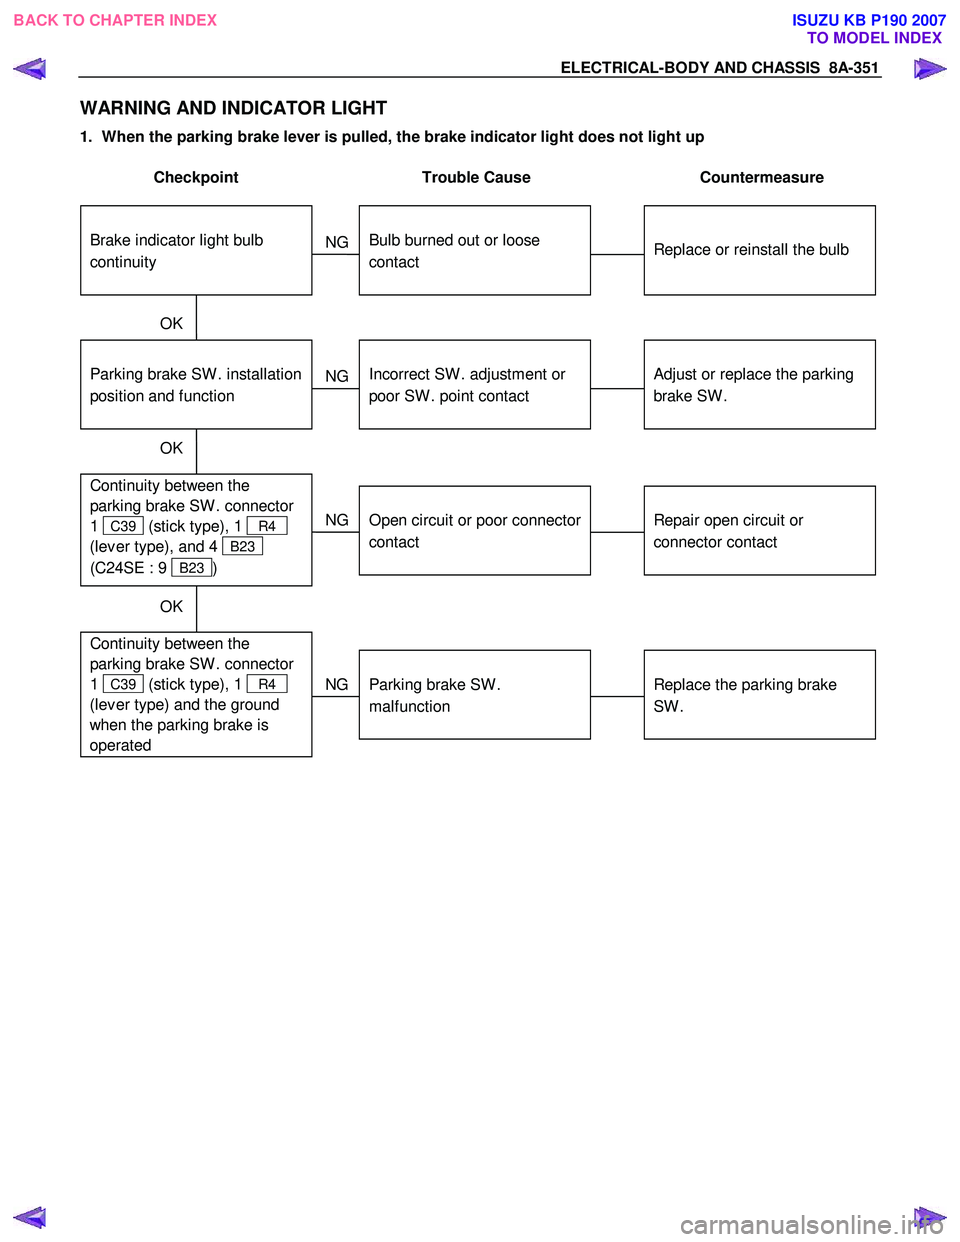
WARNING AND INDICATOR LIGHT
1. When the parking brake lever is pulled, the brake indicator light does not light up
Checkpoint Trouble Cause Countermeasure
Replace or reinstall the bulb
Bulb burned out or loose
contact
NG
Adjust or replace the parking
brake SW .
Parking brake SW . installation
position and function
Incorrect SW . adjustment or
poor SW . point contact
Continuity between the
parking brake SW . connector
1
C39 (stick type), 1 R4
(lev er type), and 4
B23
(C24SE : 9
B23 )
Repair open circuit or
connector contact
Open circuit or poor connector
contact
NG
NG
OK
OK
Brake indicator light bulb
continuity
NG
OK
Continuity between the
parking brake SW . connector
1
C39 (stick type), 1 R4
(lev er type) and the ground
when the parking brake is
operated
Replace the parking brake
SW .
Parking brake SW .
malfunction
BACK TO CHAPTER INDEX TO MODEL INDEXISUZU KB P190 2007
Page 5290 of 6020
8A-352 ELECTRICAL-BODY AND CHASSIS
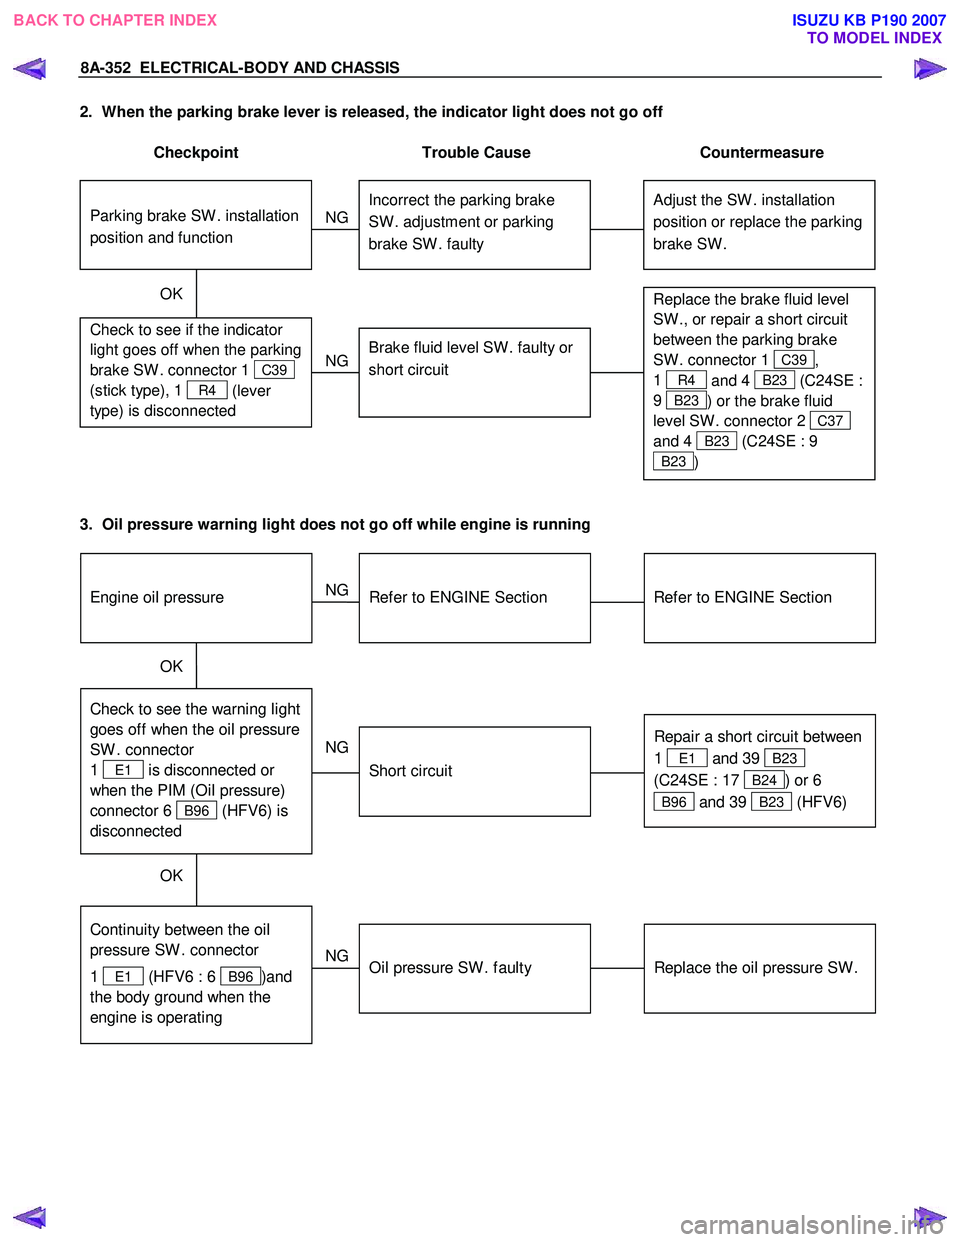
2. When the parking brake lever is released, the indicator light does not go off
Checkpoint Trouble Cause Countermeasure
Adjust the SW . installation
position or replace the parking
brake SW . Incorrect the parking brake
SW . adjustment or parking
brake SW . faulty
NG
Thermo unit malfunction
Replace the brake fluid level
SW ., or repair a short circuit
between the parking brake
SW . connector 1
C39,
1
R4 and 4 B23 (C24SE :
9
B23 ) or the brake fluid
level SW . connector 2
C37
and 4
B23 (C24SE : 9
B23 )
Check to see if the indicator
light goes off when the parking
brake SW . connector 1
C39
(stick type), 1
R4 (lever
type) is disconnected
Brake fluid level SW . faulty or
short circuit
NG
OK
Parking brake SW . installation
position and function
3. Oil pressure warning light does not go off while engine is running
Refer to ENGINE Section
Refer to ENGINE Section
NG Thermo unit malfunction
Check to see the warning light
goes off when the oil pressure
SW . connector
1
E1 is disconnected or
when the PIM (Oil pressure)
connector 6
B96 (HFV6) is
disconnected
Repair a short circuit between
1
E1 and 39 B23
(C24SE : 17
B24) or 6
B96 and 39 B23 (HFV6)
Short circuit
NG
OK
Replace the oil pressure SW .
Continuity between the oil
pressure SW . connector
1
E1 (HFV6 : 6 B96 )and
the body ground when the
engine is operating
Oil pressure SW . faulty
NG
OK
Engine oil pressure
BACK TO CHAPTER INDEX TO MODEL INDEXISUZU KB P190 2007
Page 5307 of 6020
ELECTRICAL-BODY AND CHASSIS 8A-369
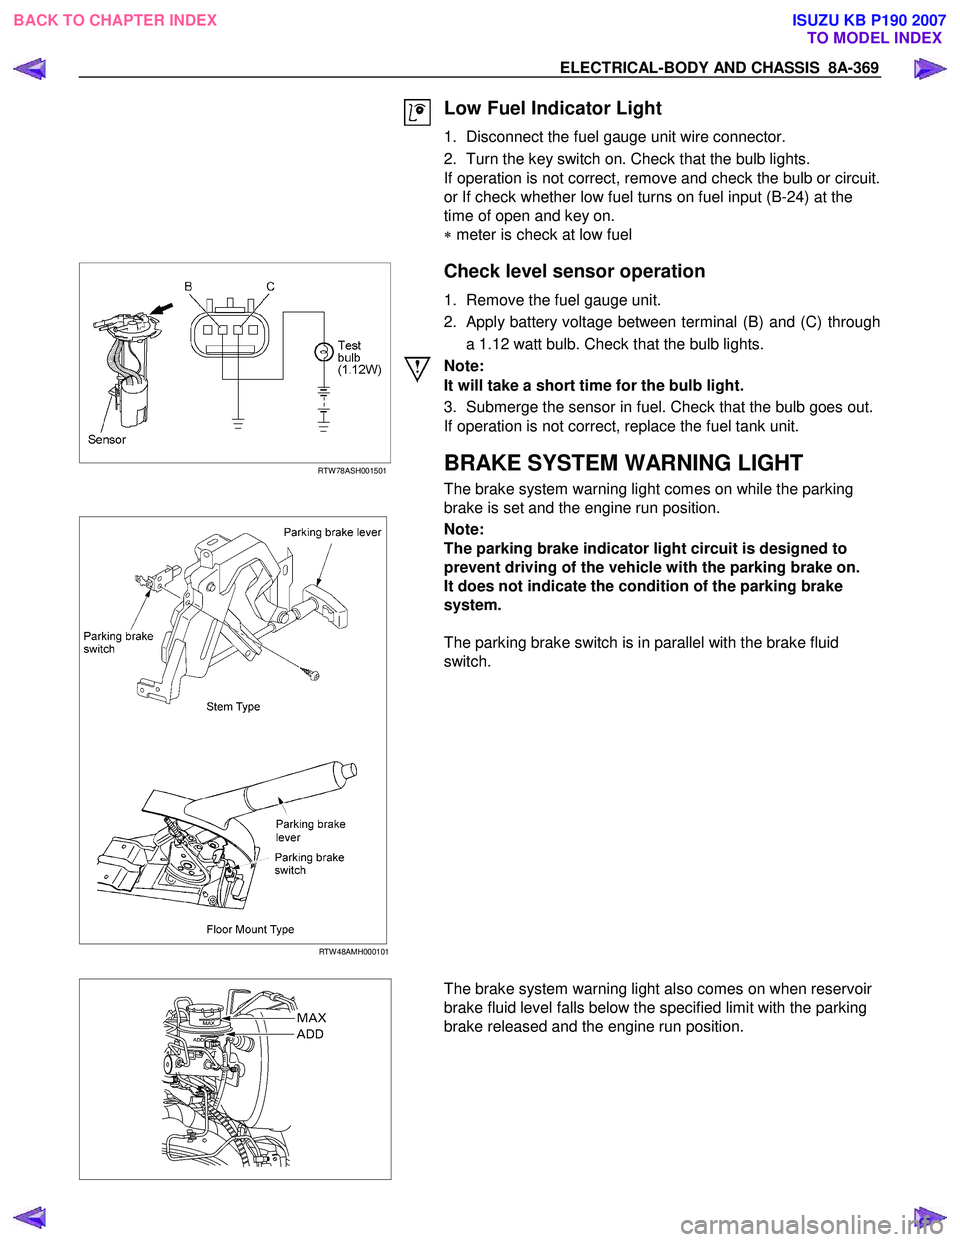
Low Fuel Indicator Light
1. Disconnect the fuel gauge unit wire connector.
2. Turn the key switch on. Check that the bulb lights.
If operation is not correct, remove and check the bulb or circuit.
or If check whether low fuel turns on fuel input (B-24) at the
time of open and key on.
∗ meter is check at low fuel
RTW 78ASH001501
Check level sensor operation
1. Remove the fuel gauge unit.
2. Apply battery voltage between terminal (B) and (C) through a 1.12 watt bulb. Check that the bulb lights.
Note:
It will take a short time for the bulb light.
3. Submerge the sensor in fuel. Check that the bulb goes out.
If operation is not correct, replace the fuel tank unit.
BRAKE SYSTEM WARNING LIGHT
The brake system warning light comes on while the parking
brake is set and the engine run position.
RTW 48AMH000101
Note:
The parking brake indicator light circuit is designed to
prevent driving of the vehicle with the parking brake on.
It does not indicate the condition of the parking brake
system.
The parking brake switch is in parallel with the brake fluid
switch.
The brake system warning light also comes on when reservoir
brake fluid level falls below the specified limit with the parking
brake released and the engine run position.
BACK TO CHAPTER INDEX TO MODEL INDEXISUZU KB P190 2007
Page 5890 of 6020
IMMOBILIZER CONTROL SYSTEM (4JK1/4JJ1/HFV6) 11A-39
Notice:Keep away another key, another transponder
key, key number plate or other metal items from the
transponder key that is going to program.
11. The on-screen displays a message "Program more Transponder Keys?" If all transponder key(s) has
been programmed, press No and go to next step. If
more transponder key(s) need to be programmed,
press Yes and repeat from previous step.
12. The on-screen displays a message "Program Transponder Keys Programming Completed
Successfully!" if all transponder key(s)
programming has been completed, then press
Confirm.
13. Turn OFF the ignition for 30 seconds.
14. Verify the engine starts using all programmed transponder key(s).
ICU Resetting Procedure
1. Install a scan tool.
2. Turn ON the ignition, with the engine OFF.
3. Select Diagnostics > Appropriate vehicle identification > Body > Immobilizer > Additional
Functions > Reset Immobilizer.
4. The on-screen displays a message "See Checking Procedure Before Programming!", then press
Confirm.
5. Input four digits of correct security code that belongs to this vehicle and follow the on-screen
instructions.
Notice: An incorrect security code input causes a
security wait time.
6. The on-screen displays a message "Warning Engine will not start after Reset!", then press
Confirm.
7. The on-screen displays a message "Reset Immobilizer Reset Completed Successfully!" if ICU
resetting has been completed, then press Confirm.
8. Turn OFF the ignition for 30 seconds.
9. Verify the engine fails to run using all transponder key(s).
ICU Programming Procedure
1. Install a scan tool.
2. Turn ON the ignition, with the engine OFF.
3. Select Diagnostics > Appropriate vehicle identification > Body > Immobilizer > Programming
> Program Immobilizer Function or Immobilizer
Link To ECM/ PIM.
4. In order to get a programming approval, the on- screen displays a message to user. Get
programming approval from the TIS 2000 using
the following procedure: a. Connect a scan tool to the terminal that
installed TIS 2000 with the latest software and
the hardware key is plugged into port.
b. Turn ON the scan tool and keep at title screen.
c. Launch the TIS application.
d. Select the Security Access at the main screen.
e. Highlight "Tech 2" on the Diagnostic Tool Selection screen and click "Next".
f. Click "Close" on the Security Access Enabled screen.
g. Turn OFF the scan tool.
h. Disconnect the scan tool from the terminal.
5. Reinstall a scan tool to the vehicle.
6. Turn ON the ignition, with the engine OFF.
7. Select Diagnostics > Appropriate vehicle identification > Body > Immobilizer > Programming
> Program Immobilizer Function or Immobilizer
Link To ECM/ PIM.
8. The on-screen displays a message "See Checking Procedure Before Programming!", then press
Confirm.
9. Select "Immobilizer Installed" or select "Imoobilizer Replaced" Yes.
10. Select "PIM or ECM Replaced" No, if displayed.
11. Input four digits of correct security code that belongs to this vehicle and follow the on-screen
instructions. The on-screen instruction may repeat
twice.
Notice: An incorrect security code input causes a
security wait time.
12. Input 17 digits of correct VIN that is based on stamped VIN or affixed VIN plate on this vehicle.
13. Operate the ignition switch by following the on- screen instructions.
Notice: Keep away another key, another transponder
key, key number plate or other metal items from the
transponder key that is going to program.
14. The on-screen displays a message "Program more Transponder Keys?" If all transponder key(s) has
been programmed, press No and go to next step. If
more transponder key(s) need to be programmed,
press Yes and repeat from previous step.
15. The on-screen displays a message "Programming Successfully!" if ICU and all transponder key(s)
programming has been completed, then press
Confirm.
16. Turn OFF the ignition for 30 seconds.
17. Verify the engine starts using all programmed transponder key(s).
ECM Resetting Procedure
1. Install a scan tool.
2. Turn ON the ignition, with the engine OFF.
BACK TO CHAPTER INDEX TO MODEL INDEX
ISUZU KB P190 2007
Page 5891 of 6020
11A-40 IMMOBILIZER CONTROL SYSTEM (4JK1/4JJ1/HFV6)
3. Select Diagnostics > Appropriate vehicleidentification > Body > Immobilizer > Additional
Functions > Reset Engine Control Module. (4JK1/
4JJ1)
Select Diagnostics > Appropriate vehicle
identification > Engine > V6 Engine >
Programming > Reset ECU. (HFV6)
4. The on-screen may display a message "See Checking Procedure Before Programming!", then
press Confirm.
5. Input four digits of correct security code that belongs to this vehicle and follow the on-screen
instructions.
Notice: An incorrect security code input causes a
security wait time.
6. The on-screen displays a message "Warning! Engine will not start after Reset!", then press
Reset.
7. The on-screen displays a message "Reset Successfully!" if ECM resetting has been
completed, then press Confirm.
8. Turn OFF the ignition for 30 seconds.
9. Verify the engine fails to run using all transponder key(s).
ECM Programming Procedure
1. Install a scan tool.
2. Turn ON the ignition, with the engine OFF.
3. Select Diagnostics > Appropriate vehicle identification > Body > Immobilizer > Programming
> Program Immobilizer Function or Immobilizer
Link To ECM/ PIM.
4. In order to get a programming approval, the on- screen displays a message to user. Get
programming approval from the TIS 2000 using
the following procedure:
a. Connect a scan tool to the terminal that installed TIS 2000 with the latest software and
the hardware key is plugged into port.
b. Turn ON the scan tool and keep at title screen.
c. Launch the TIS application.
d. Select the Security Access at the main screen.
e. Highlight "Tech 2" on the Diagnostic Tool Selection screen and click "Next".
f. Click "Close" on the Security Access Enabled screen.
g. Turn OFF the scan tool.
h. Disconnect the scan tool from the terminal.
5. Reinstall a scan tool to the vehicle.
6. Turn ON the ignition, with the engine OFF.
7. Select Diagnostics > Appropriate vehicle identification > Body > Immobilizer > Programming
> Program Immobilizer Function or Immobilizer
Link To ECM/ PIM. 8. The on-screen may display a message "See
Checking Procedure Before Programming!", then
press Confirm.
9. Select "Imoobilizer Replaced" No and select "PIM or ECM Replaced" Yes, if displayed.
10. Input four digits of correct security code that belongs to this vehicle and follow the on-screen
instructions. The on-screen instruction may repeat
twice.
Notice: An incorrect security code input causes a
security wait time.
11. Select "Engine Controller Installed" or select "ECM Replaced".
12. Operate the ignition switch by following the on- screen instructions.
13. The on-screen displays a message "Programming Successfully!" if ECM programming has been
completed, then press Confirm.
14. Turn OFF the ignition for 30 seconds.
15. Verify the engine starts using all transponder key(s).
PIM Resetting Procedure
1. Install a scan tool.
2. Turn ON the ignition, with the engine OFF.
3. Select Diagnostics > Appropriate vehicle identification > Body > Powertrain Interface
Module > Security > Reset PIM.
4. Input four digits of correct security code that belongs to this vehicle and follow the on-screen
instructions.
Notice: An incorrect security code input causes a
security wait time.
5. The on-screen displays a message "Warning! Engine will not start after Reset!", then press
Reset.
6. The on-screen displays a message "Reset Completed Successfully!" if PIM resetting has
been completed, then press Confirm.
7. Turn OFF the ignition for 30 seconds.
PIM Programming Procedure
1. Install a scan tool.
2. Turn ON the ignition, with the engine OFF.
3. Select Diagnostics > Appropriate vehicle identification > Body > Immobilizer > Programming
> Immobilizer Link To ECM/ PIM.
4. In order to get a programming approval, the onscreen displays a message to user. Get
programming approval from the TIS 2000 using
the following procedure:
BACK TO CHAPTER INDEX TO MODEL INDEX
ISUZU KB P190 2007
Page 5956 of 6020
11B-2 ANTITHEFT SYSTEM
Service Precaution
WARNING: THIS VEHICLE HAS A SUPPLEMENTAL
RESTRAINT SYSTEM (SRS). REFER TO THE SRS
COMPONENT AND WIRING LOCATION VIEW IN
ORDER TO DETERMINE WHETHER YOU ARE
PERFORMING SERVICE ON OR NEAR THE SRS
COMPONENTS OR THE SRS WIRING. WHEN YOU
ARE PERFORMING SERVICE ON OR NEAR THE
SRS COMPONENTS OR THE SRS WIRING, REFER
TO THE SRS SERVICE INFORMATION. FAILURE TO
FOLLOW WARNINGS COULD RESULT IN
POSSIBLE AIR BAG DEPLOYMENT, PERSONAL
INJURY, OR OTHERWISE UNNEEDED SRS SYSTEM
REPAIRS.
CAUTION: Always use the correct fastener in the
proper location. When you replace a fastener, use
ONLY the exact part number for that application.
ISUZU will call out those fasteners that require a
replacement after removal. ISUZU will also call out
the fasteners that require thread lockers or thread
sealant. UNLESS OTHERWISE SPECIFIED, do not
use supplemental coatings (Paints, greases, or
other corrosion inhibitors) on threaded fasteners or
fastener joint interfaces. Generally, such coatings
adversely affect the fastener torque and the joint
clamping force, and may damage the fastener.
When you install fasteners, use the correct
tightening sequence and specifications. Following
these instructions can help you avoid damage to
parts and systems.
General Description
The Antitheft system consists of the four major
components which are Antitheft Control Unit (ACU),
Antitheft horn, key (remote key), and scan tool (Tech-2).
This system can be activated by a correctly
programmed key (remote key) and starter switch is set
to OFF.
This system can be deactivated by a correctly
programmed key (remote key) connected with a
correctly programmed ACU and a correctly
programmed lCU.
W hen the vehicle doors, and engine hood are locked,
the antitheft alarm system is designed to protect your
vehicle and valuables from theft.
Any attempt to forcibly open any door, the engine hood
without using the vehicle key (or remote control) will
cause the hazard lights to flash on and off and the horn
to sound intermittently. This will continue for 30 seconds
(Hazard lamp flash; For 5 minutes) before the system
automatically shuts itself off.
Please operate the door either the key lock or remote
key after closing all doors to arm the alarm system.
Miss waning will be detected when the passenger door
is opened with locked condition and then this door is
closed.
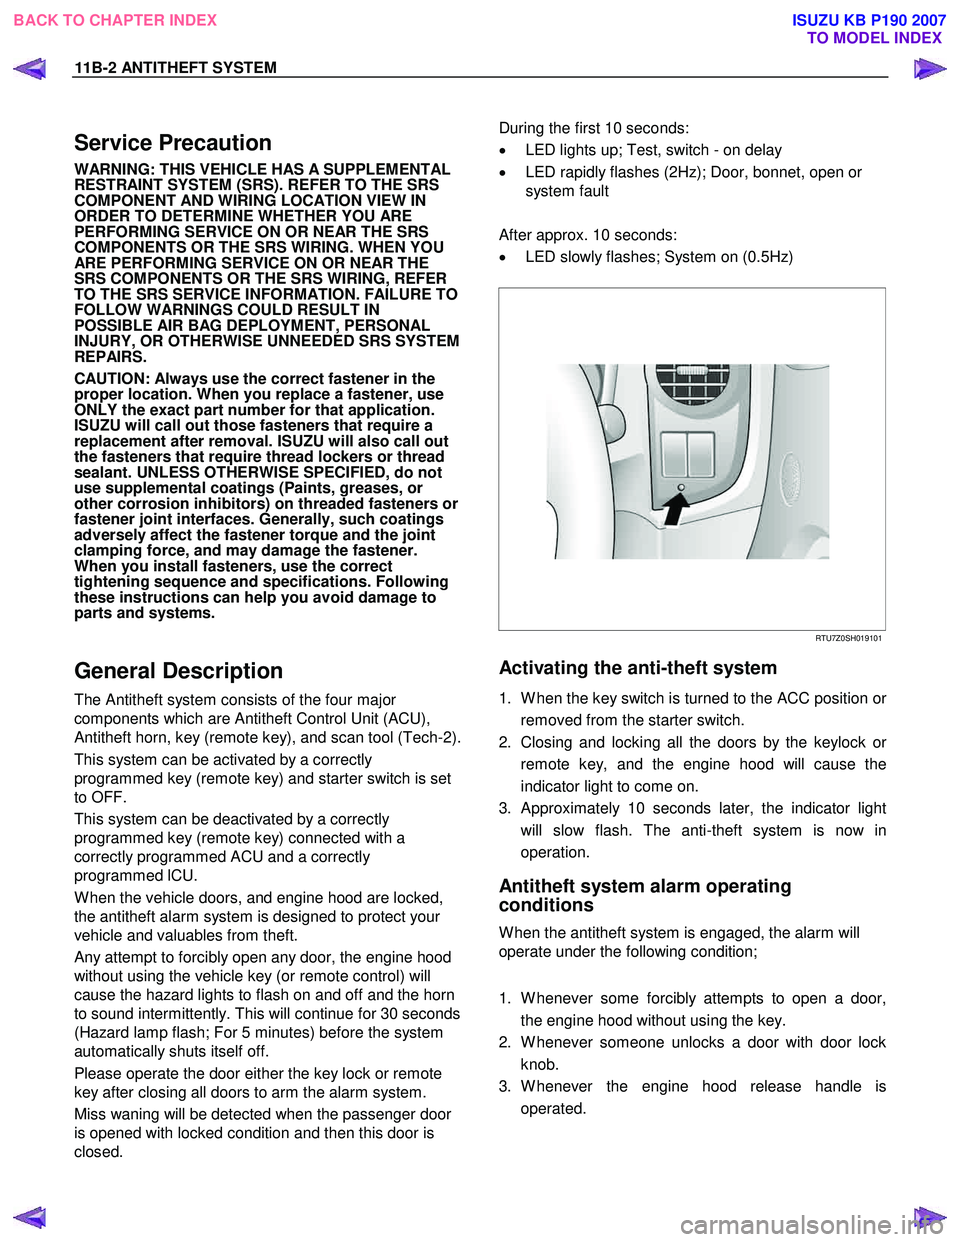
During the first 10 seconds:
• LED lights up; Test, switch - on delay
• LED rapidly flashes (2Hz); Door, bonnet, open or
system fault
After approx. 10 seconds:
• LED slowly flashes; System on (0.5Hz)
RTU7Z0SH019101
Activating the anti-theft system
1. W hen the key switch is turned to the ACC position or
removed from the starter switch.
2. Closing and locking all the doors by the keylock o
r
remote key, and the engine hood will cause the
indicator light to come on.
3. Approximately 10 seconds later, the indicator light will slow flash. The anti-theft system is now in
operation.
Antitheft system alarm operating
conditions
W hen the antitheft system is engaged, the alarm will
operate under the following condition;
1. W henever some forcibly attempts to open a door, the engine hood without using the key.
2. W henever someone unlocks a door with door lock knob.
3. W henever the engine hood release handle is operated.
BACK TO CHAPTER INDEX TO MODEL INDEX
ISUZU KB P190 2007