2007 ISUZU KB P190 ECO mode
[x] Cancel search: ECO modePage 1918 of 6020
ENGINE CONTROL SYSTEM (4JK1/4JJ1) 6E-301
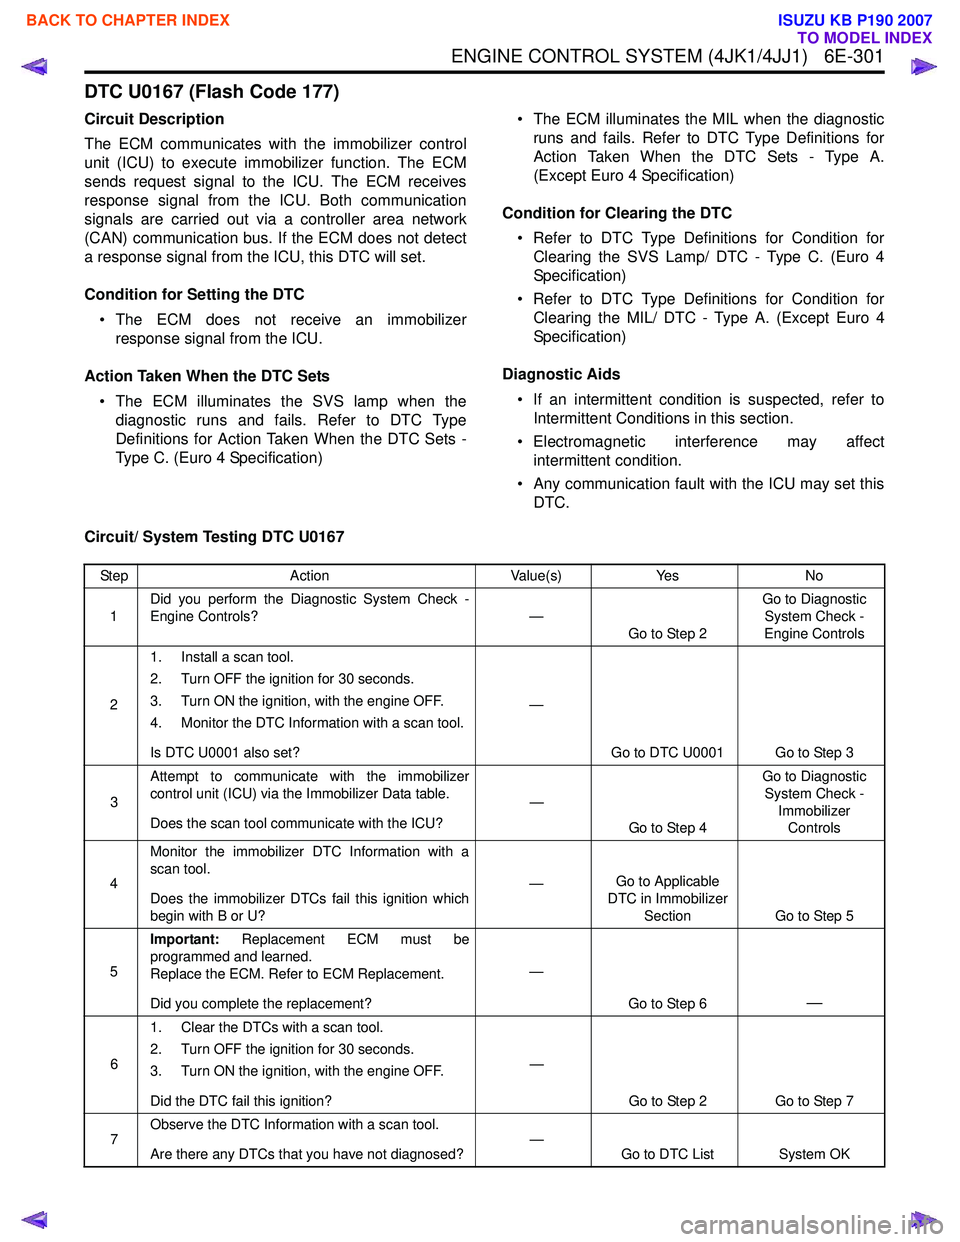
DTC U0167 (Flash Code 177)
Circuit Description
The ECM communicates with the immobilizer control
unit (ICU) to execute immobilizer function. The ECM
sends request signal to the ICU. The ECM receives
response signal from the ICU. Both communication
signals are carried out via a controller area network
(CAN) communication bus. If the ECM does not detect
a response signal from the ICU, this DTC will set.
Condition for Setting the DTC • The ECM does not receive an immobilizer response signal from the ICU.
Action Taken When the DTC Sets • The ECM illuminates the SVS lamp when the diagnostic runs and fails. Refer to DTC Type
Definitions for Action Taken When the DTC Sets -
Type C. (Euro 4 Specification) • The ECM illuminates the MIL when the diagnostic
runs and fails. Refer to DTC Type Definitions for
Action Taken When the DTC Sets - Type A.
(Except Euro 4 Specification)
Condition for Clearing the DTC • Refer to DTC Type Definitions for Condition for Clearing the SVS Lamp/ DTC - Type C. (Euro 4
Specification)
• Refer to DTC Type Definitions for Condition for Clearing the MIL/ DTC - Type A. (Except Euro 4
Specification)
Diagnostic Aids • If an intermittent condition is suspected, refer to Intermittent Conditions in this section.
• Electromagnetic interference may affect intermittent condition.
• Any communication fault with the ICU may set this DTC.
Circuit/ System Testing DTC U0167
Step Action Value(s)Yes No
1 Did you perform the Diagnostic System Check -
Engine Controls? —
Go to Step 2 Go to Diagnostic
System Check -
Engine Controls
2 1. Install a scan tool.
2. Turn OFF the ignition for 30 seconds.
3. Turn ON the ignition, with the engine OFF.
4. Monitor the DTC Information with a scan tool.
Is DTC U0001 also set? —
Go to DTC U0001 Go to Step 3
3 Attempt to communicate with the immobilizer
control unit (ICU) via the Immobilizer Data table.
Does the scan tool communicate with the ICU? —
Go to Step 4 Go to Diagnostic
System Check - Immobilizer Controls
4 Monitor the immobilizer DTC Information with a
scan tool.
Does the immobilizer DTCs fail this ignition which
begin with B or U? —
Go to Applicable
DTC in Immobilizer
Section Go to Step 5
5 Important:
Replacement ECM must be
programmed and learned.
Replace the ECM. Refer to ECM Replacement.
Did you complete the replacement? —
Go to Step 6
—
61. Clear the DTCs with a scan tool.
2. Turn OFF the ignition for 30 seconds.
3. Turn ON the ignition, with the engine OFF.
Did the DTC fail this ignition? —
Go to Step 2 Go to Step 7
7 Observe the DTC Information with a scan tool.
Are there any DTCs that you have not diagnosed? —
Go to DTC List System OK
BACK TO CHAPTER INDEX
TO MODEL INDEX
ISUZU KB P190 2007
Page 1919 of 6020

6E-302 ENGINE CONTROL SYSTEM (4JK1/4JJ1)
EGR Control System Check
Description
The EGR system recirculates a part of exhaust gas
back into the intake manifold, which results in reducing
NOx emissions. The EGR control system uses an
electronic control system to ensure both driveability
and low emission. A control current from the ECM
operates a solenoid to control the lift amount of EGR
valve. Also, an EGR position sensor is provided at the
rear of the solenoid to feed actual valve lift amount
back to the ECM for more precision control.
The EGR control starts when the conditions for engine
speed, engine coolant temperature, intake air
temperature and barometric pressure are satisfied.
Then, the valve opening is calculated according to the
engine speed, and target fuel injection quantity. Based
on this valve opening, the drive duty of the solenoid is
determined and the valve is driven accordingly. The
intake throttle valve is provided to adequate intake
manifold depression to ensure EGR gas flow. EGR Control Operation
• The engine coolant temperature (ECT) is between 5°C (41 °F) and 100 °C (212 °F).
• The intake air temperature (IAT) is more than 5 °C
(41 °F).
• The barometric pressure (BARO) is more than 90kPa (13psi).
Schematic Reference: Engine Controls Schematics
Connector End View Reference: Engine Controls
Connector End Views or ECM Connector End Views
Circuit/ System Testing EGR Control System Check
Step Action Value(s)Yes No
1 Did you perform the Diagnostic System Check -
Engine Controls? —
Go to Step 2 Go to Diagnostic
System Check -
Engine Controls
2 1. Install a scan tool.
2. Turn OFF the ignition for 30 seconds.
3. Turn ON the ignition, with the engine OFF.
4. Monitor the DTC Information with a scan tool.
Are any DTCs set in which the “Action Taken When
the DTC Sets” under that particular code states,
“The ECM inhibits EGR control”? —
Refer to Applicable DTC Go to Step 3
BACK TO CHAPTER INDEX
TO MODEL INDEX
ISUZU KB P190 2007
Page 1922 of 6020
ENGINE CONTROL SYSTEM (4JK1/4JJ1) 6E-305
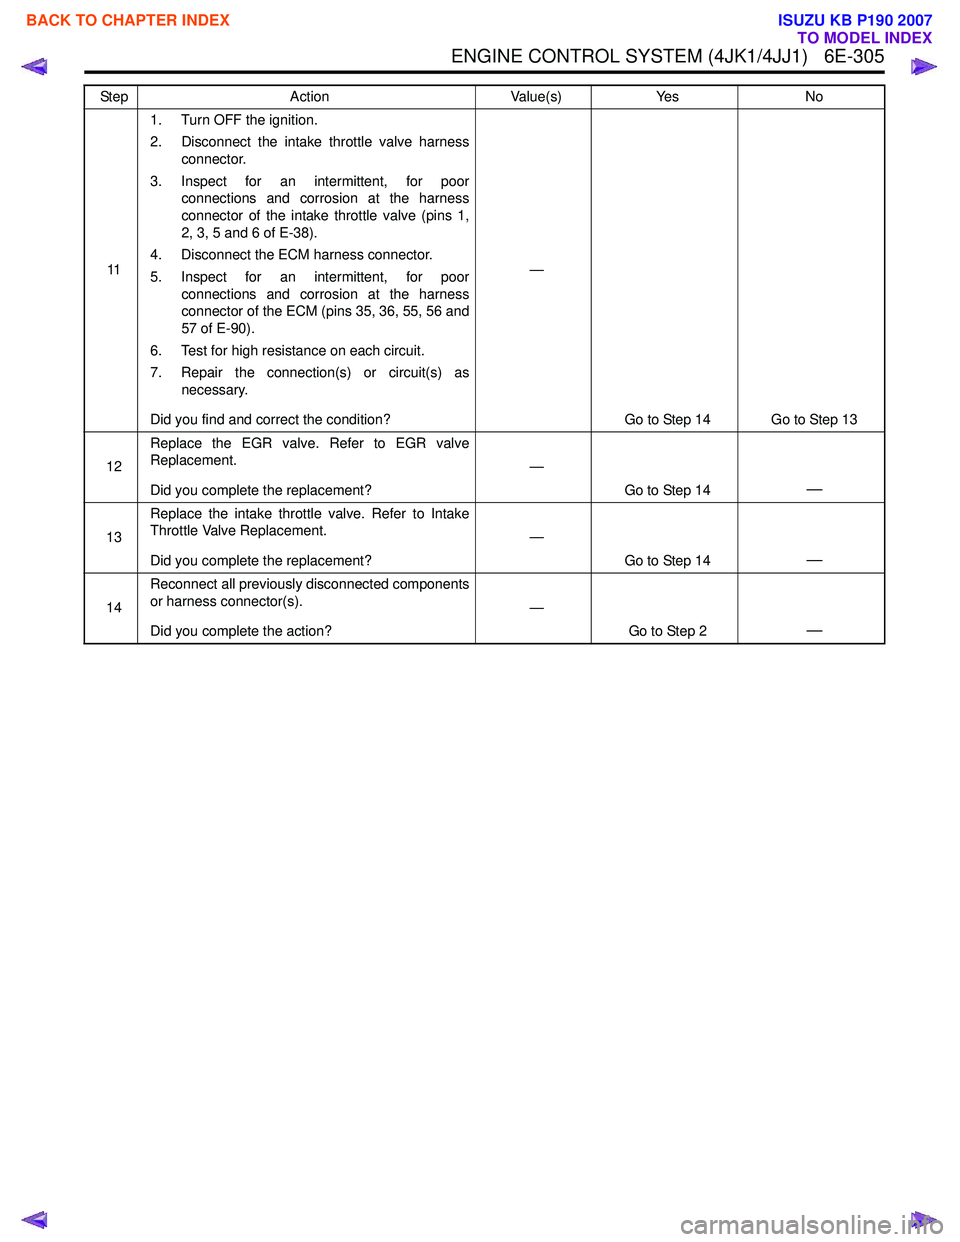
111. Turn OFF the ignition.
2. Disconnect the intake throttle valve harness connector.
3. Inspect for an intermittent, for poor connections and corrosion at the harness
connector of the intake throttle valve (pins 1,
2, 3, 5 and 6 of E-38).
4. Disconnect the ECM harness connector.
5. Inspect for an intermittent, for poor connections and corrosion at the harness
connector of the ECM (pins 35, 36, 55, 56 and
57 of E-90).
6. Test for high resistance on each circuit.
7. Repair the connection(s) or circuit(s) as necessary.
Did you find and correct the condition? —
Go to Step 14 Go to Step 13
12 Replace the EGR valve. Refer to EGR valve
Replacement.
Did you complete the replacement? —
Go to Step 14
—
13Replace the intake throttle valve. Refer to Intake
Throttle Valve Replacement.
Did you complete the replacement? —
Go to Step 14
—
14Reconnect all previously disconnected components
or harness connector(s).
Did you complete the action? —
Go to Step 2
—
Step Action Value(s)Yes No
BACK TO CHAPTER INDEX
TO MODEL INDEX
ISUZU KB P190 2007
Page 1923 of 6020
6E-306 ENGINE CONTROL SYSTEM (4JK1/4JJ1)
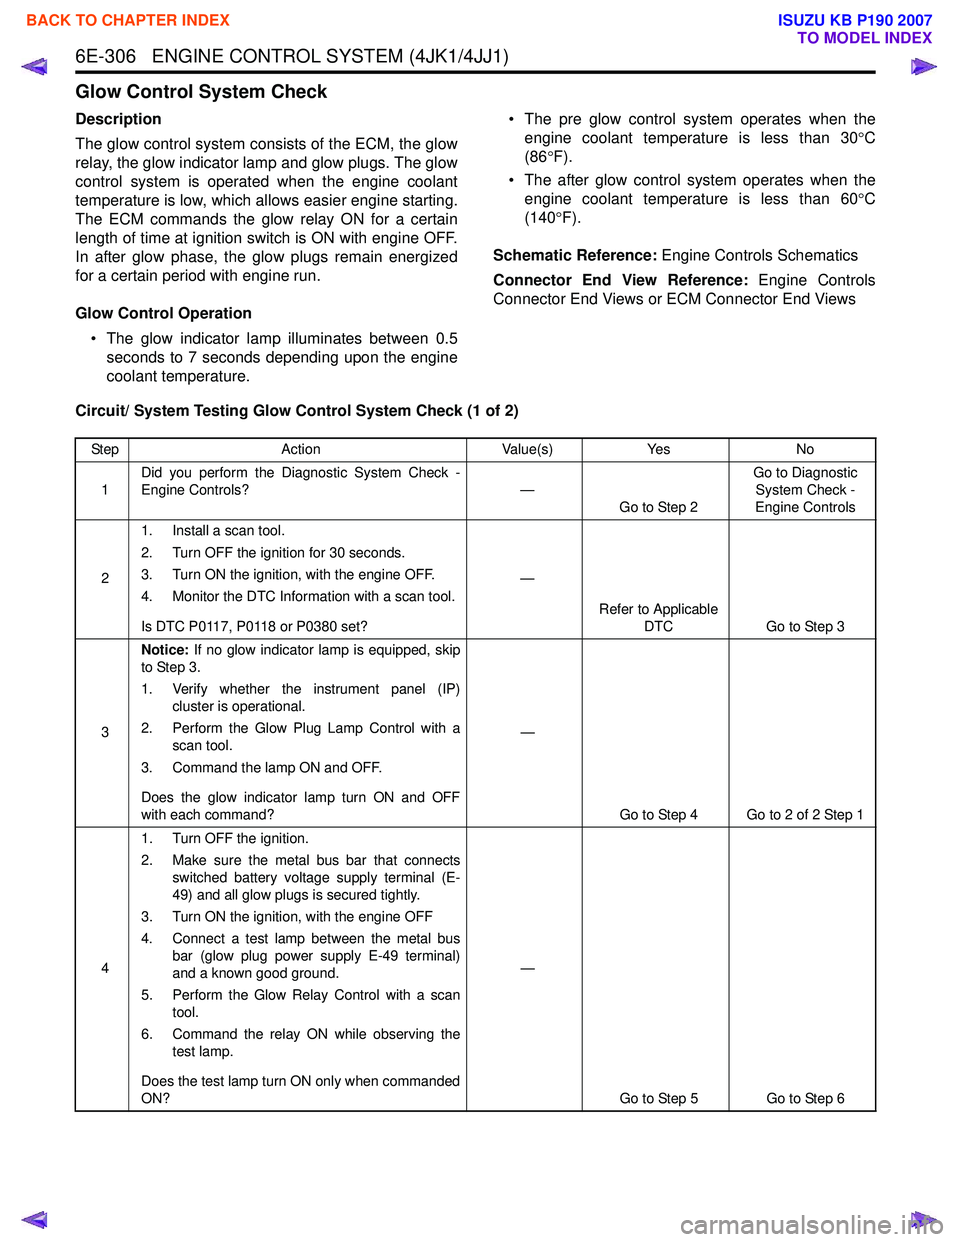
Glow Control System Check
Description
The glow control system consists of the ECM, the glow
relay, the glow indicator lamp and glow plugs. The glow
control system is operated when the engine coolant
temperature is low, which allows easier engine starting.
The ECM commands the glow relay ON for a certain
length of time at ignition switch is ON with engine OFF.
In after glow phase, the glow plugs remain energized
for a certain period with engine run.
Glow Control Operation • The glow indicator lamp illuminates between 0.5 seconds to 7 seconds depending upon the engine
coolant temperature. • The pre glow control system operates when the
engine coolant temperature is less than 30 °C
(86 °F).
• The after glow control system operates when the engine coolant temperature is less than 60 °C
(140 °F).
Schematic Reference: Engine Controls Schematics
Connector End View Reference: Engine Controls
Connector End Views or ECM Connector End Views
Circuit/ System Testing Glow Control System Check (1 of 2)
Step Action Value(s)Yes No
1 Did you perform the Diagnostic System Check -
Engine Controls? —
Go to Step 2 Go to Diagnostic
System Check -
Engine Controls
2 1. Install a scan tool.
2. Turn OFF the ignition for 30 seconds.
3. Turn ON the ignition, with the engine OFF.
4. Monitor the DTC Information with a scan tool.
Is DTC P0117, P0118 or P0380 set? —
Refer to Applicable DTC Go to Step 3
3 Notice:
If no glow indicator lamp is equipped, skip
to Step 3.
1. Verify whether the instrument panel (IP) cluster is operational.
2. Perform the Glow Plug Lamp Control with a scan tool.
3. Command the lamp ON and OFF.
Does the glow indicator lamp turn ON and OFF
with each command? —
Go to Step 4 Go to 2 of 2 Step 1
4 1. Turn OFF the ignition.
2. Make sure the metal bus bar that connects switched battery voltage supply terminal (E-
49) and all glow plugs is secured tightly.
3. Turn ON the ignition, with the engine OFF
4. Connect a test lamp between the metal bus bar (glow plug power supply E-49 terminal)
and a known good ground.
5. Perform the Glow Relay Control with a scan tool.
6. Command the relay ON while observing the test lamp.
Does the test lamp turn ON only when commanded
ON? —
Go to Step 5 Go to Step 6
BACK TO CHAPTER INDEX
TO MODEL INDEX
ISUZU KB P190 2007
Page 1924 of 6020
ENGINE CONTROL SYSTEM (4JK1/4JJ1) 6E-307
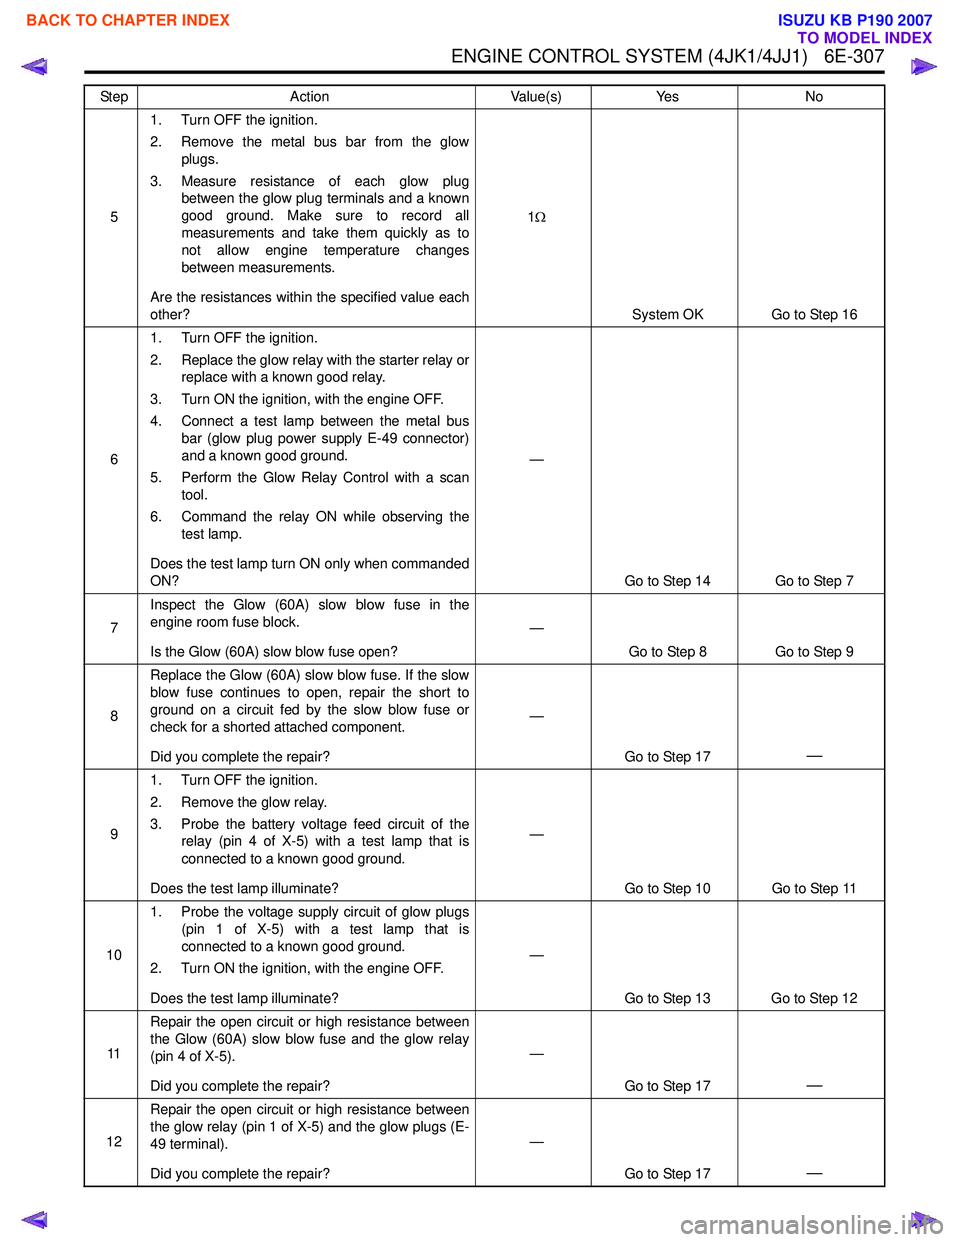
51. Turn OFF the ignition.
2. Remove the metal bus bar from the glow plugs.
3. Measure resistance of each glow plug between the glow plug terminals and a known
good ground. Make sure to record all
measurements and take them quickly as to
not allow engine temperature changes
between measurements.
Are the resistances within the specified value each
other? 1
Ω
System OK Go to Step 16
6 1. Turn OFF the ignition.
2. Replace the glow relay with the starter relay or replace with a known good relay.
3. Turn ON the ignition, with the engine OFF.
4. Connect a test lamp between the metal bus bar (glow plug power supply E-49 connector)
and a known good ground.
5. Perform the Glow Relay Control with a scan tool.
6. Command the relay ON while observing the test lamp.
Does the test lamp turn ON only when commanded
ON? —
Go to Step 14 Go to Step 7
7 Inspect the Glow (60A) slow blow fuse in the
engine room fuse block.
Is the Glow (60A) slow blow fuse open? —
Go to Step 8 Go to Step 9
8 Replace the Glow (60A) slow blow fuse. If the slow
blow fuse continues to open, repair the short to
ground on a circuit fed by the slow blow fuse or
check for a shorted attached component.
Did you complete the repair? —
Go to Step 17
—
91. Turn OFF the ignition.
2. Remove the glow relay.
3. Probe the battery voltage feed circuit of the relay (pin 4 of X-5) with a test lamp that is
connected to a known good ground.
Does the test lamp illuminate? —
Go to Step 10 Go to Step 11
10 1. Probe the voltage supply circuit of glow plugs
(pin 1 of X-5) with a test lamp that is
connected to a known good ground.
2. Turn ON the ignition, with the engine OFF.
Does the test lamp illuminate? —
Go to Step 13 Go to Step 12
11 Repair the open circuit or high resistance between
the Glow (60A) slow blow fuse and the glow relay
(pin 4 of X-5).
Did you complete the repair? —
Go to Step 17
—
12Repair the open circuit or high resistance between
the glow relay (pin 1 of X-5) and the glow plugs (E-
49 terminal).
Did you complete the repair? —
Go to Step 17
—
Step Action Value(s)Yes No
BACK TO CHAPTER INDEX
TO MODEL INDEX
ISUZU KB P190 2007
Page 1925 of 6020
6E-308 ENGINE CONTROL SYSTEM (4JK1/4JJ1)
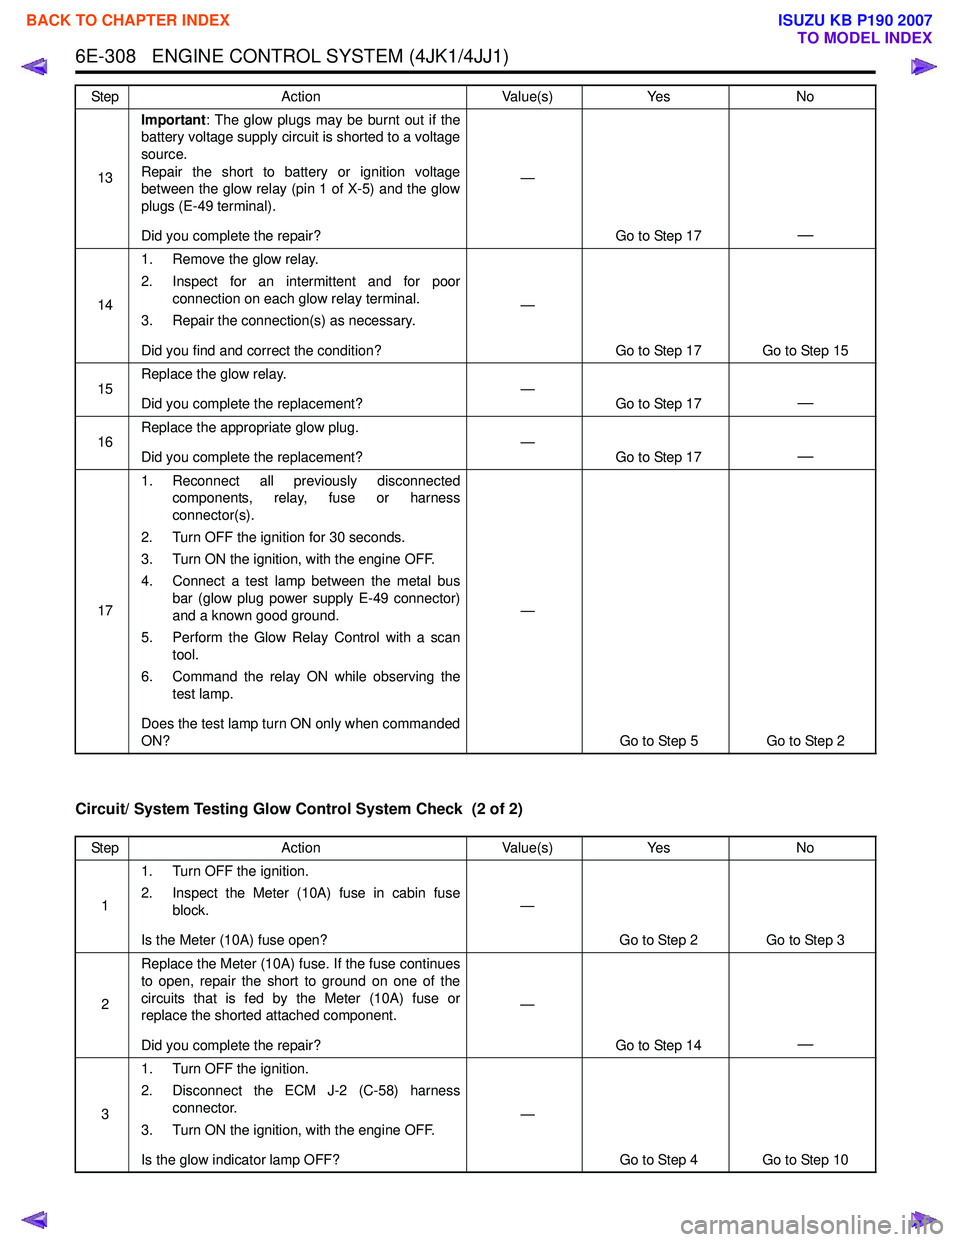
Circuit/ System Testing Glow Control System Check (2 of 2)
13Important
: The glow plugs may be burnt out if the
battery voltage supply circuit is shorted to a voltage
source.
Repair the short to battery or ignition voltage
between the glow relay (pin 1 of X-5) and the glow
plugs (E-49 terminal).
Did you complete the repair? —
Go to Step 17
—
141. Remove the glow relay.
2. Inspect for an intermittent and for poor connection on each glow relay terminal.
3. Repair the connection(s) as necessary.
Did you find and correct the condition? —
Go to Step 17 Go to Step 15
15 Replace the glow relay.
Did you complete the replacement? —
Go to Step 17
—
16Replace the appropriate glow plug.
Did you complete the replacement? —
Go to Step 17—
171. Reconnect all previously disconnected
components, relay, fuse or harness
connector(s).
2. Turn OFF the ignition for 30 seconds.
3. Turn ON the ignition, with the engine OFF.
4. Connect a test lamp between the metal bus bar (glow plug power supply E-49 connector)
and a known good ground.
5. Perform the Glow Relay Control with a scan tool.
6. Command the relay ON while observing the test lamp.
Does the test lamp turn ON only when commanded
ON? —
Go to Step 5 Go to Step 2
Step
Action Value(s)Yes No
Step Action Value(s)Yes No
1 1. Turn OFF the ignition.
2. Inspect the Meter (10A) fuse in cabin fuse block.
Is the Meter (10A) fuse open? —
Go to Step 2 Go to Step 3
2 Replace the Meter (10A) fuse. If the fuse continues
to open, repair the short to ground on one of the
circuits that is fed by the Meter (10A) fuse or
replace the shorted attached component.
Did you complete the repair? —
Go to Step 14
—
31. Turn OFF the ignition.
2. Disconnect the ECM J-2 (C-58) harness connector.
3. Turn ON the ignition, with the engine OFF.
Is the glow indicator lamp OFF? —
Go to Step 4 Go to Step 10
BACK TO CHAPTER INDEX
TO MODEL INDEX
ISUZU KB P190 2007
Page 1927 of 6020
6E-310 ENGINE CONTROL SYSTEM (4JK1/4JJ1)
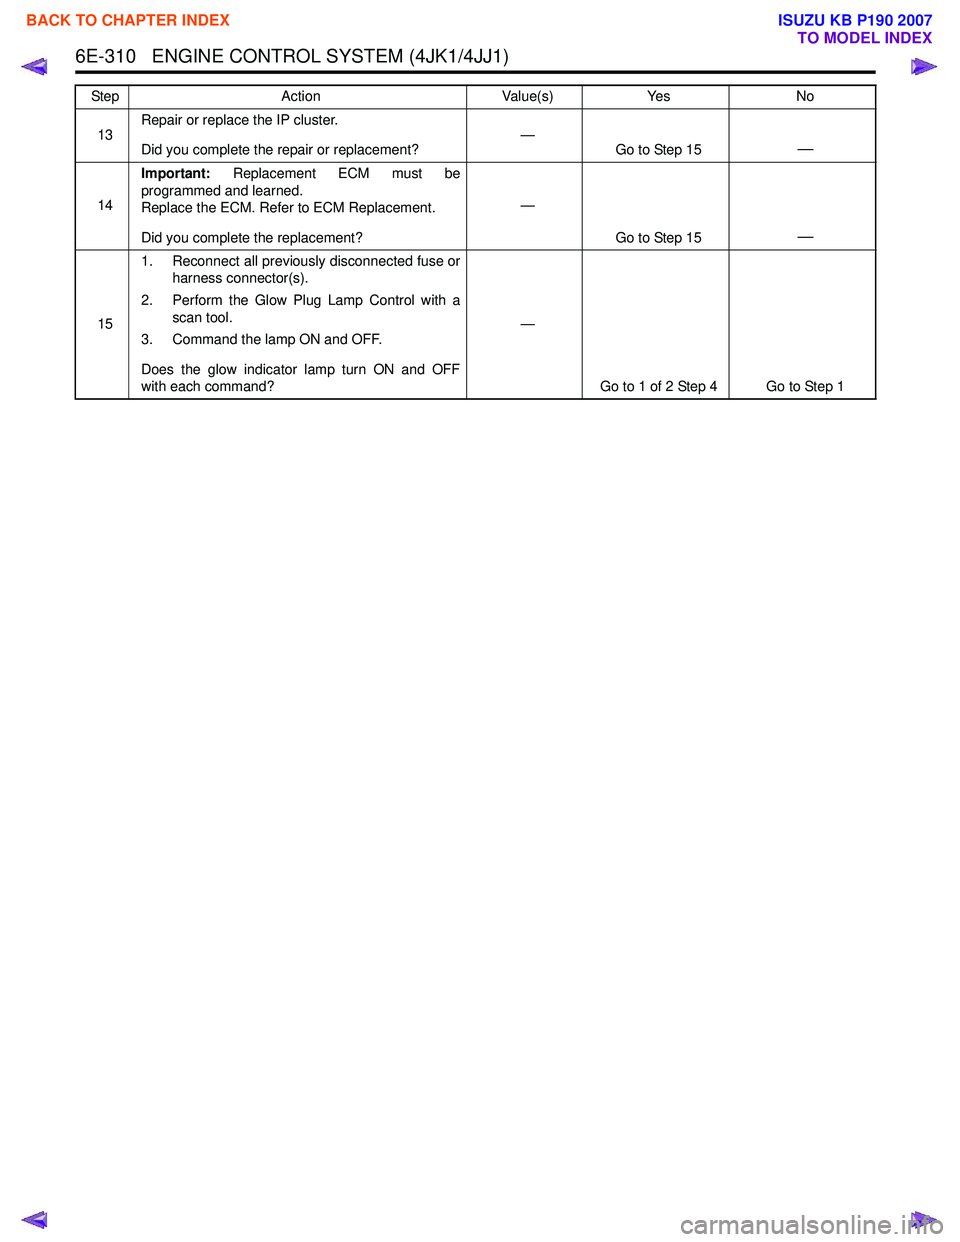
13Repair or replace the IP cluster.
Did you complete the repair or replacement? —
Go to Step 15—
14Important:
Replacement ECM must be
programmed and learned.
Replace the ECM. Refer to ECM Replacement.
Did you complete the replacement? —
Go to Step 15
—
151. Reconnect all previously disconnected fuse or
harness connector(s).
2. Perform the Glow Plug Lamp Control with a scan tool.
3. Command the lamp ON and OFF.
Does the glow indicator lamp turn ON and OFF
with each command? —
Go to 1 of 2 Step 4 Go to Step 1
Step
Action Value(s)Yes No
BACK TO CHAPTER INDEX
TO MODEL INDEX
ISUZU KB P190 2007
Page 1928 of 6020
ENGINE CONTROL SYSTEM (4JK1/4JJ1) 6E-311
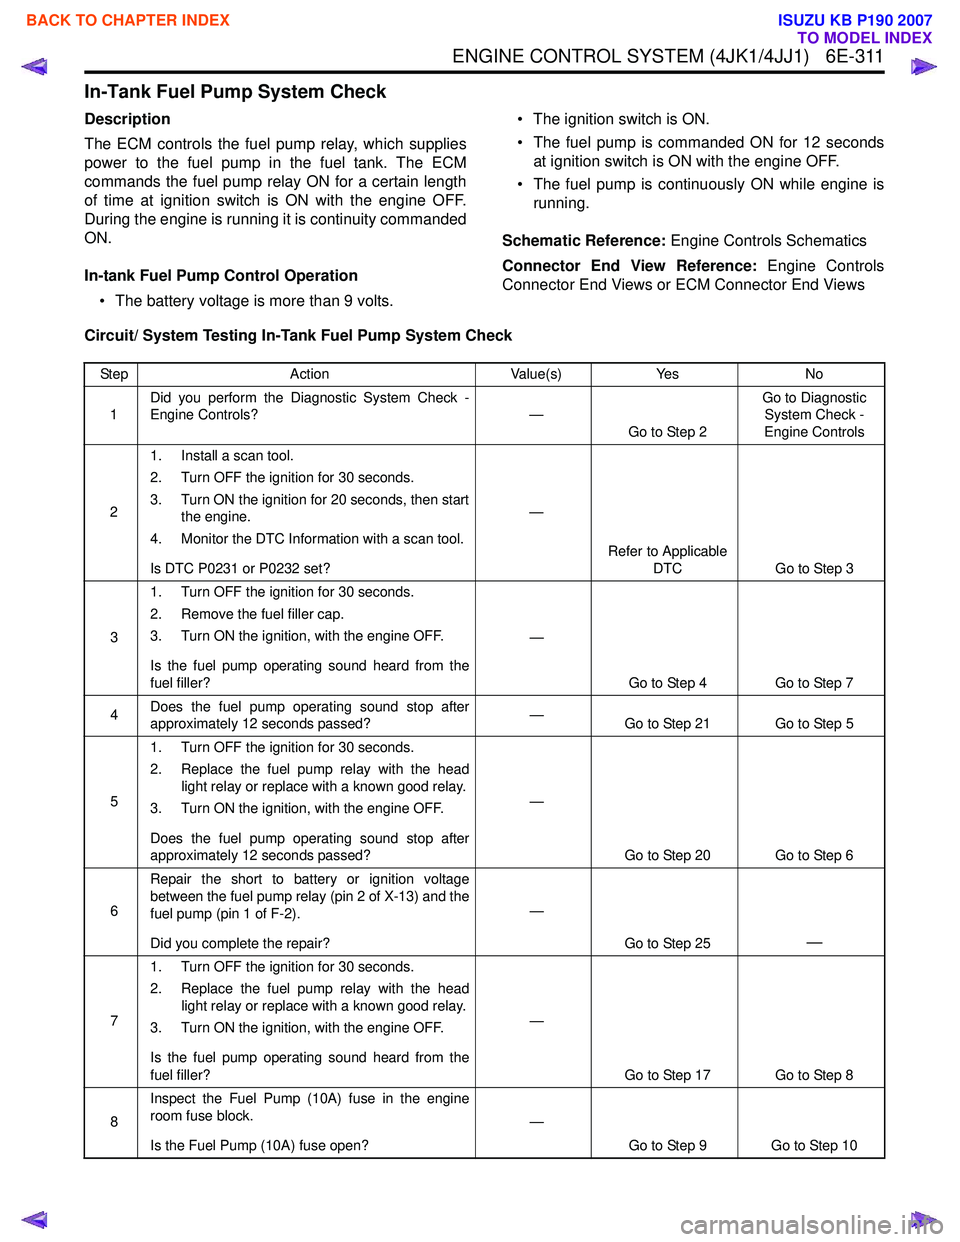
In-Tank Fuel Pump System Check
Description
The ECM controls the fuel pump relay, which supplies
power to the fuel pump in the fuel tank. The ECM
commands the fuel pump relay ON for a certain length
of time at ignition switch is ON with the engine OFF.
During the engine is running it is continuity commanded
ON.
In-tank Fuel Pump Control Operation • The battery voltage is more than 9 volts. • The ignition switch is ON.
• The fuel pump is commanded ON for 12 seconds at ignition switch is ON with the engine OFF.
• The fuel pump is continuously ON while engine is running.
Schematic Reference: Engine Controls Schematics
Connector End View Reference: Engine Controls
Connector End Views or ECM Connector End Views
Circuit/ System Testing In-Tank Fuel Pump System Check
Step Action Value(s)Yes No
1 Did you perform the Diagnostic System Check -
Engine Controls? —
Go to Step 2 Go to Diagnostic
System Check -
Engine Controls
2 1. Install a scan tool.
2. Turn OFF the ignition for 30 seconds.
3. Turn ON the ignition for 20 seconds, then start the engine.
4. Monitor the DTC Information with a scan tool.
Is DTC P0231 or P0232 set? —
Refer to Applicable DTC Go to Step 3
3 1. Turn OFF the ignition for 30 seconds.
2. Remove the fuel filler cap.
3. Turn ON the ignition, with the engine OFF.
Is the fuel pump operating sound heard from the
fuel filler? —
Go to Step 4 Go to Step 7
4 Does the fuel pump operating sound stop after
approximately 12 seconds passed? —
Go to Step 21 Go to Step 5
5 1. Turn OFF the ignition for 30 seconds.
2. Replace the fuel pump relay with the head light relay or replace with a known good relay.
3. Turn ON the ignition, with the engine OFF.
Does the fuel pump operating sound stop after
approximately 12 seconds passed? —
Go to Step 20 Go to Step 6
6 Repair the short to battery or ignition voltage
between the fuel pump relay (pin 2 of X-13) and the
fuel pump (pin 1 of F-2).
Did you complete the repair? —
Go to Step 25
—
71. Turn OFF the ignition for 30 seconds.
2. Replace the fuel pump relay with the head light relay or replace with a known good relay.
3. Turn ON the ignition, with the engine OFF.
Is the fuel pump operating sound heard from the
fuel filler? —
Go to Step 17 Go to Step 8
8 Inspect the Fuel Pump (10A) fuse in the engine
room fuse block.
Is the Fuel Pump (10A) fuse open? —
Go to Step 9 Go to Step 10
BACK TO CHAPTER INDEX
TO MODEL INDEX
ISUZU KB P190 2007