2007 ISUZU KB P190 check engine
[x] Cancel search: check enginePage 1929 of 6020
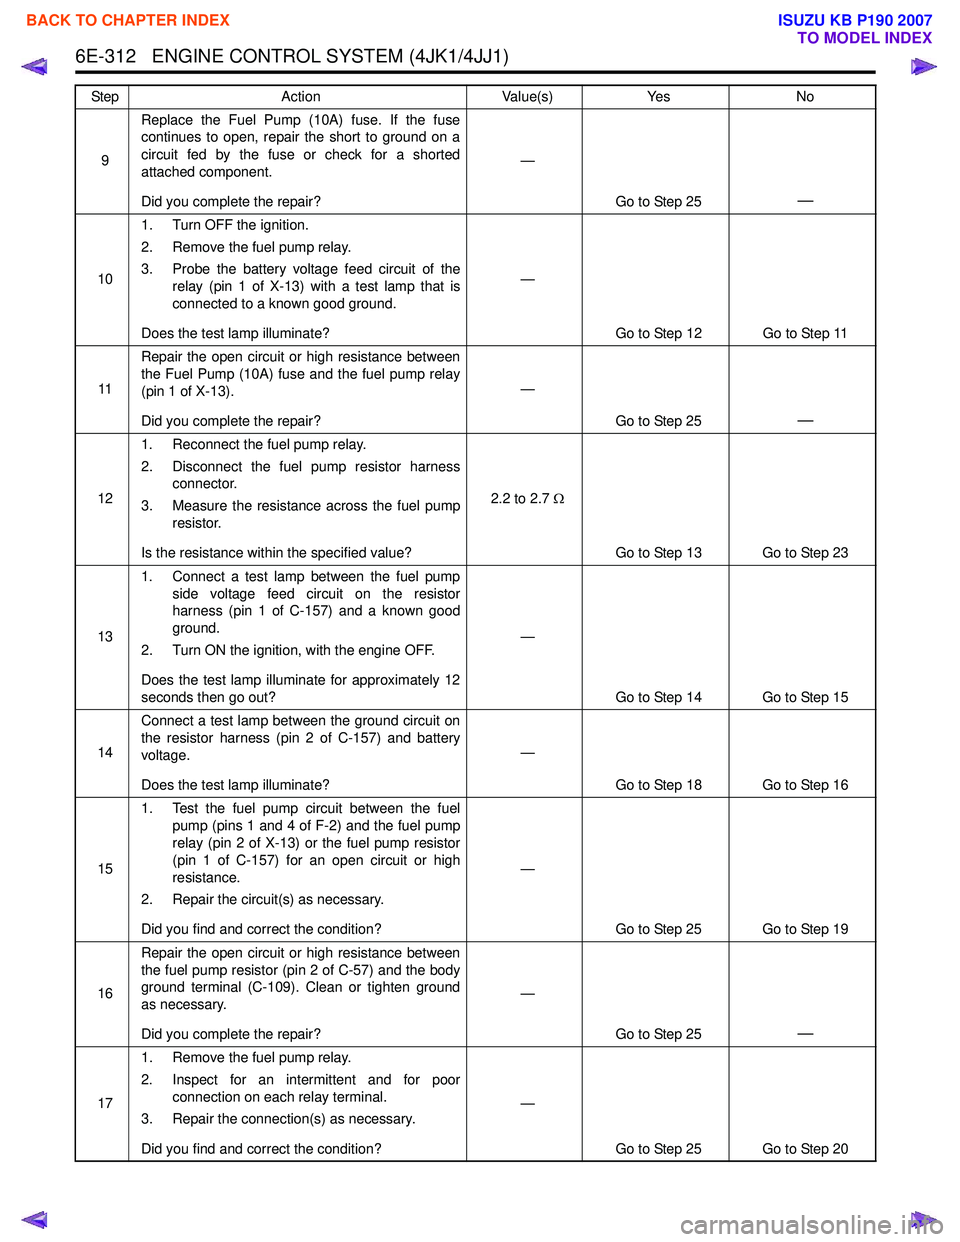
6E-312 ENGINE CONTROL SYSTEM (4JK1/4JJ1)
9Replace the Fuel Pump (10A) fuse. If the fuse
continues to open, repair the short to ground on a
circuit fed by the fuse or check for a shorted
attached component.
Did you complete the repair? —
Go to Step 25
—
101. Turn OFF the ignition.
2. Remove the fuel pump relay.
3. Probe the battery voltage feed circuit of the relay (pin 1 of X-13) with a test lamp that is
connected to a known good ground.
Does the test lamp illuminate? —
Go to Step 12 Go to Step 11
11 Repair the open circuit or high resistance between
the Fuel Pump (10A) fuse and the fuel pump relay
(pin 1 of X-13).
Did you complete the repair? —
Go to Step 25
—
121. Reconnect the fuel pump relay.
2. Disconnect the fuel pump resistor harness connector.
3. Measure the resistance across the fuel pump resistor.
Is the resistance within the specified value? 2.2 to 2.7
Ω
Go to Step 13 Go to Step 23
13 1. Connect a test lamp between the fuel pump
side voltage feed circuit on the resistor
harness (pin 1 of C-157) and a known good
ground.
2. Turn ON the ignition, with the engine OFF.
Does the test lamp illuminate for approximately 12
seconds then go out? —
Go to Step 14 Go to Step 15
14 Connect a test lamp between the ground circuit on
the resistor harness (pin 2 of C-157) and battery
voltage.
Does the test lamp illuminate? —
Go to Step 18 Go to Step 16
15 1. Test the fuel pump circuit between the fuel
pump (pins 1 and 4 of F-2) and the fuel pump
relay (pin 2 of X-13) or the fuel pump resistor
(pin 1 of C-157) for an open circuit or high
resistance.
2. Repair the circuit(s) as necessary.
Did you find and correct the condition? —
Go to Step 25 Go to Step 19
16 Repair the open circuit or high resistance between
the fuel pump resistor (pin 2 of C-57) and the body
ground terminal (C-109). Clean or tighten ground
as necessary.
Did you complete the repair? —
Go to Step 25
—
171. Remove the fuel pump relay.
2. Inspect for an intermittent and for poor connection on each relay terminal.
3. Repair the connection(s) as necessary.
Did you find and correct the condition? —
Go to Step 25 Go to Step 20
Step
Action Value(s)Yes No
BACK TO CHAPTER INDEX
TO MODEL INDEX
ISUZU KB P190 2007
Page 1930 of 6020
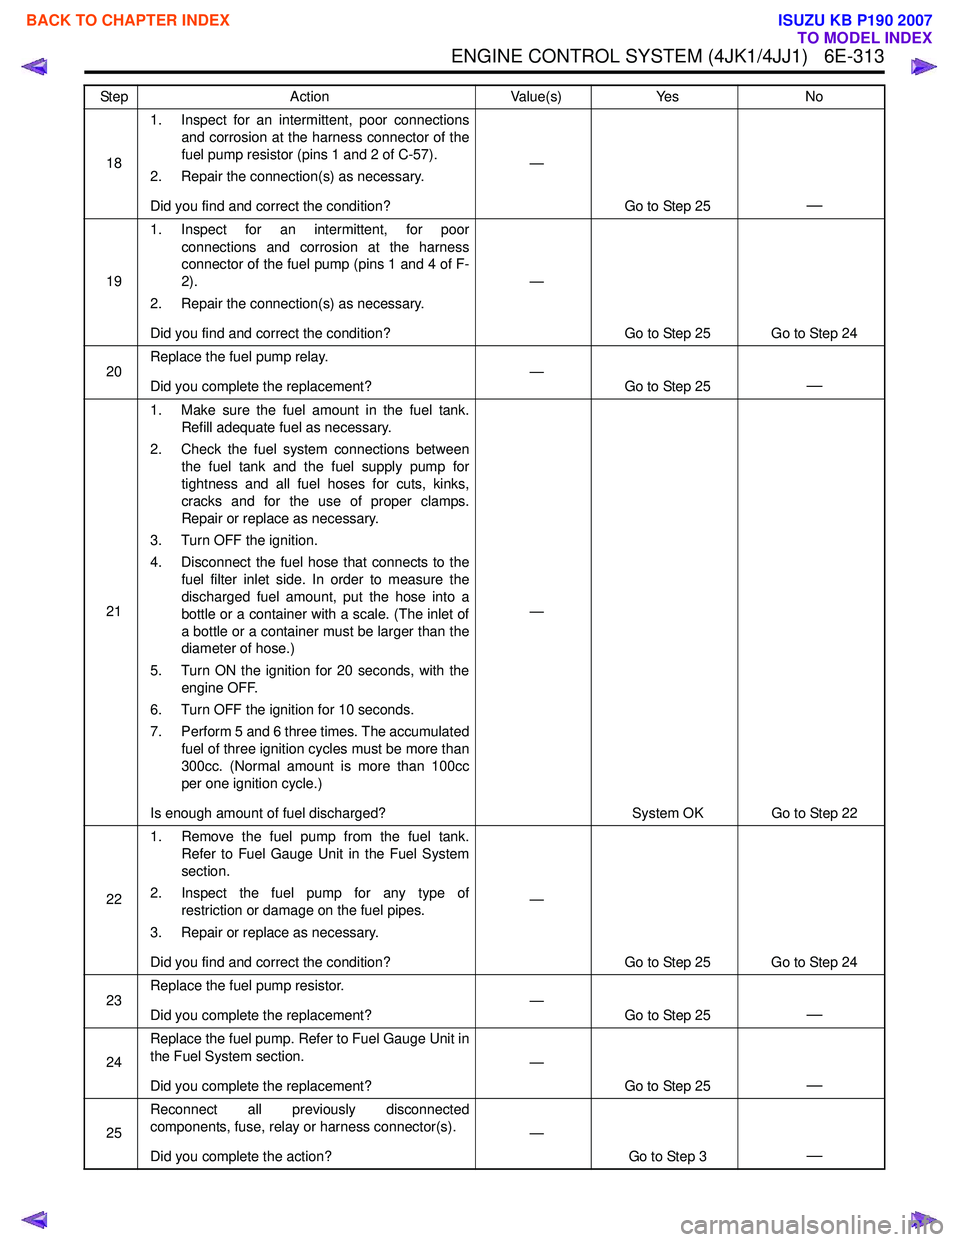
ENGINE CONTROL SYSTEM (4JK1/4JJ1) 6E-313
181. Inspect for an intermittent, poor connections
and corrosion at the harness connector of the
fuel pump resistor (pins 1 and 2 of C-57).
2. Repair the connection(s) as necessary.
Did you find and correct the condition? —
Go to Step 25
—
191. Inspect for an intermittent, for poor
connections and corrosion at the harness
connector of the fuel pump (pins 1 and 4 of F-
2).
2. Repair the connection(s) as necessary.
Did you find and correct the condition? —
Go to Step 25 Go to Step 24
20 Replace the fuel pump relay.
Did you complete the replacement? —
Go to Step 25
—
211. Make sure the fuel amount in the fuel tank.
Refill adequate fuel as necessary.
2. Check the fuel system connections between the fuel tank and the fuel supply pump for
tightness and all fuel hoses for cuts, kinks,
cracks and for the use of proper clamps.
Repair or replace as necessary.
3. Turn OFF the ignition.
4. Disconnect the fuel hose that connects to the fuel filter inlet side. In order to measure the
discharged fuel amount, put the hose into a
bottle or a container with a scale. (The inlet of
a bottle or a container must be larger than the
diameter of hose.)
5. Turn ON the ignition for 20 seconds, with the engine OFF.
6. Turn OFF the ignition for 10 seconds.
7. Perform 5 and 6 three times. The accumulated fuel of three ignition cycles must be more than
300cc. (Normal amount is more than 100cc
per one ignition cycle.)
Is enough amount of fuel discharged? —
System OK Go to Step 22
22 1. Remove the fuel pump from the fuel tank.
Refer to Fuel Gauge Unit in the Fuel System
section.
2. Inspect the fuel pump for any type of restriction or damage on the fuel pipes.
3. Repair or replace as necessary.
Did you find and correct the condition? —
Go to Step 25 Go to Step 24
23 Replace the fuel pump resistor.
Did you complete the replacement? —
Go to Step 25
—
24Replace the fuel pump. Refer to Fuel Gauge Unit in
the Fuel System section.
Did you complete the replacement? —
Go to Step 25
—
25Reconnect all previously disconnected
components, fuse, relay or harness connector(s).
Did you complete the action? —
Go to Step 3
—
Step Action Value(s)Yes No
BACK TO CHAPTER INDEX
TO MODEL INDEX
ISUZU KB P190 2007
Page 1931 of 6020
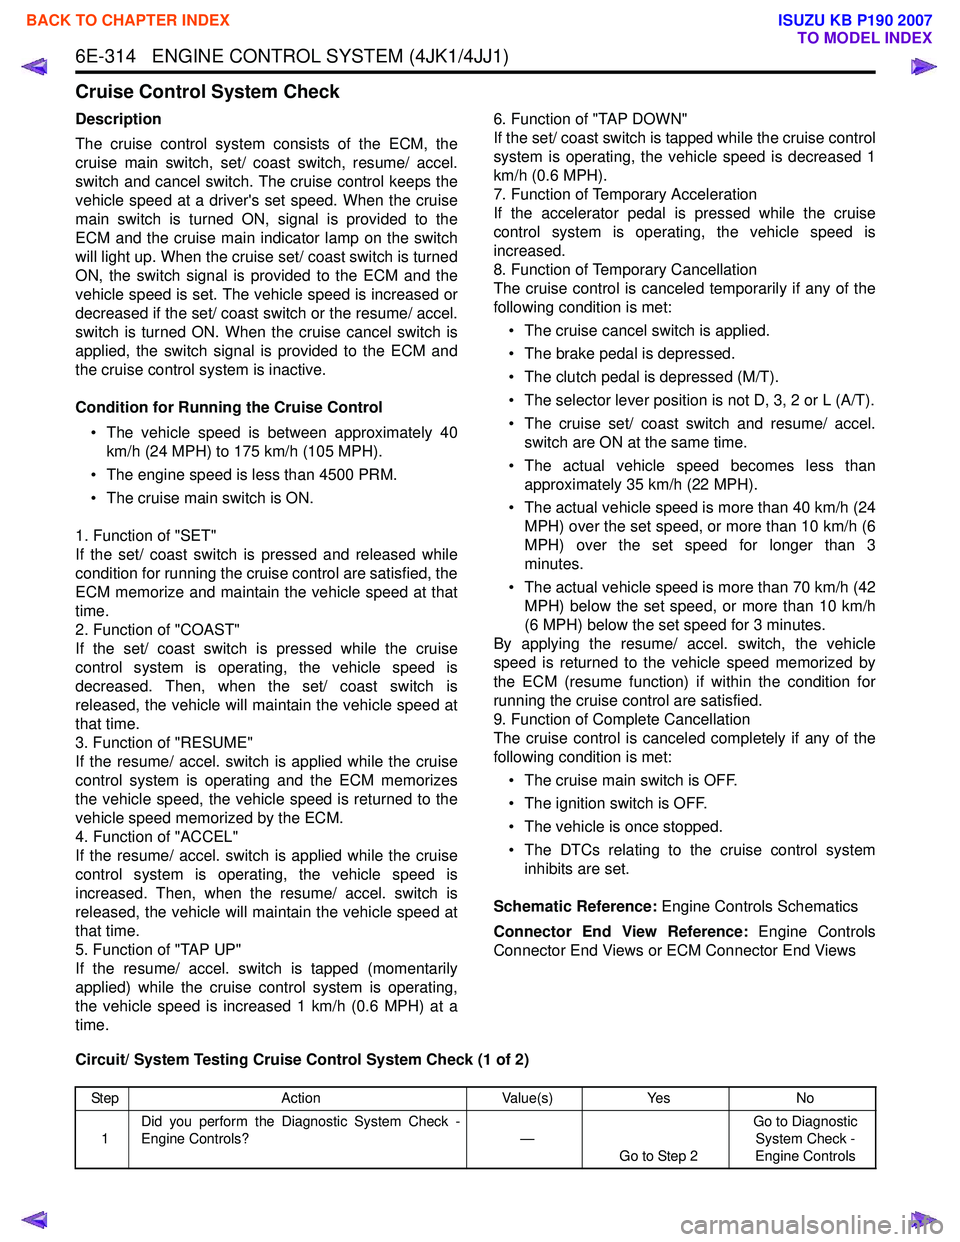
6E-314 ENGINE CONTROL SYSTEM (4JK1/4JJ1)
Cruise Control System Check
Description
The cruise control system consists of the ECM, the
cruise main switch, set/ coast switch, resume/ accel.
switch and cancel switch. The cruise control keeps the
vehicle speed at a driver's set speed. When the cruise
main switch is turned ON, signal is provided to the
ECM and the cruise main indicator lamp on the switch
will light up. When the cruise set/ coast switch is turned
ON, the switch signal is provided to the ECM and the
vehicle speed is set. The vehicle speed is increased or
decreased if the set/ coast switch or the resume/ accel.
switch is turned ON. When the cruise cancel switch is
applied, the switch signal is provided to the ECM and
the cruise control system is inactive.
Condition for Running the Cruise Control • The vehicle speed is between approximately 40 km/h (24 MPH) to 175 km/h (105 MPH).
• The engine speed is less than 4500 PRM.
• The cruise main switch is ON.
1. Function of "SET"
If the set/ coast switch is pressed and released while
condition for running the cruise control are satisfied, the
ECM memorize and maintain the vehicle speed at that
time.
2. Function of "COAST"
If the set/ coast switch is pressed while the cruise
control system is operating, the vehicle speed is
decreased. Then, when the set/ coast switch is
released, the vehicle will maintain the vehicle speed at
that time.
3. Function of "RESUME"
If the resume/ accel. switch is applied while the cruise
control system is operating and the ECM memorizes
the vehicle speed, the vehicle speed is returned to the
vehicle speed memorized by the ECM.
4. Function of "ACCEL"
If the resume/ accel. switch is applied while the cruise
control system is operating, the vehicle speed is
increased. Then, when the resume/ accel. switch is
released, the vehicle will maintain the vehicle speed at
that time.
5. Function of "TAP UP"
If the resume/ accel. switch is tapped (momentarily
applied) while the cruise control system is operating,
the vehicle speed is increased 1 km/h (0.6 MPH) at a
time. 6. Function of "TAP DOWN"
If the set/ coast switch is tapped while the cruise control
system is operating, the vehicle speed is decreased 1
km/h (0.6 MPH).
7. Function of Temporary Acceleration
If the accelerator pedal is pressed while the cruise
control system is operating, the vehicle speed is
increased.
8. Function of Temporary Cancellation
The cruise control is canceled temporarily if any of the
following condition is met:
• The cruise cancel switch is applied.
• The brake pedal is depressed.
• The clutch pedal is depressed (M/T).
• The selector lever position is not D, 3, 2 or L (A/T).
• The cruise set/ coast switch and resume/ accel. switch are ON at the same time.
• The actual vehicle speed becomes less than approximately 35 km/h (22 MPH).
• The actual vehicle speed is more than 40 km/h (24 MPH) over the set speed, or more than 10 km/h (6
MPH) over the set speed for longer than 3
minutes.
• The actual vehicle speed is more than 70 km/h (42 MPH) below the set speed, or more than 10 km/h
(6 MPH) below the set speed for 3 minutes.
By applying the resume/ accel. switch, the vehicle
speed is returned to the vehicle speed memorized by
the ECM (resume function) if within the condition for
running the cruise control are satisfied.
9. Function of Complete Cancellation
The cruise control is canceled completely if any of the
following condition is met:
• The cruise main switch is OFF.
• The ignition switch is OFF.
• The vehicle is once stopped.
• The DTCs relating to the cruise control system inhibits are set.
Schematic Reference: Engine Controls Schematics
Connector End View Reference: Engine Controls
Connector End Views or ECM Connector End Views
Circuit/ System Testing Cruise Control System Check (1 of 2)
Step Action Value(s)Yes No
1 Did you perform the Diagnostic System Check -
Engine Controls? —
Go to Step 2 Go to Diagnostic
System Check -
Engine Controls
BACK TO CHAPTER INDEX
TO MODEL INDEX
ISUZU KB P190 2007
Page 1935 of 6020
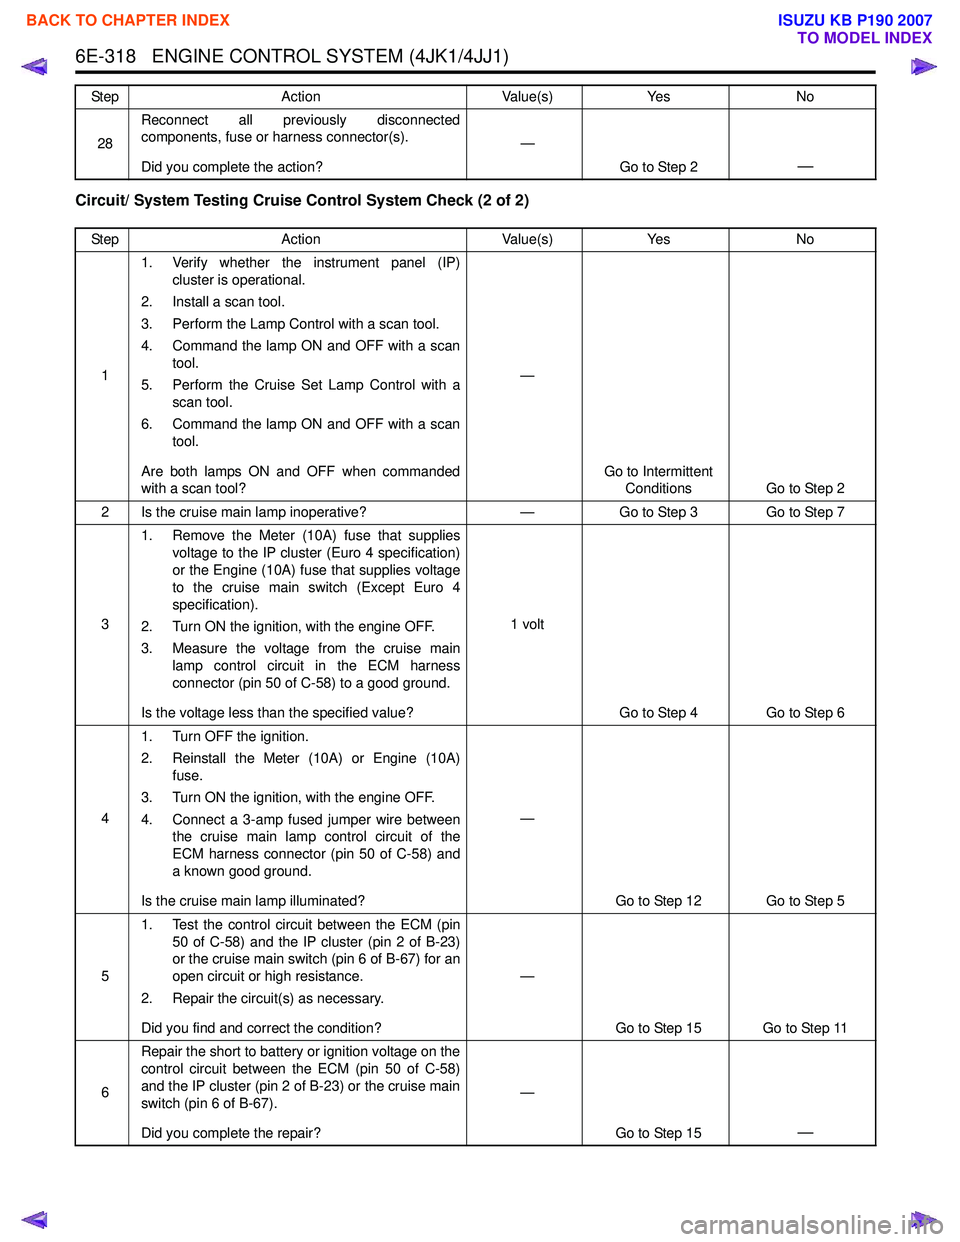
6E-318 ENGINE CONTROL SYSTEM (4JK1/4JJ1)
Circuit/ System Testing Cruise Control System Check (2 of 2)
28Reconnect all previously disconnected
components, fuse or harness connector(s).
Did you complete the action? —
Go to Step 2
—
Step Action Value(s)Yes No
1 1. Verify whether the instrument panel (IP)
cluster is operational.
2. Install a scan tool.
3. Perform the Lamp Control with a scan tool.
4. Command the lamp ON and OFF with a scan tool.
5. Perform the Cruise Set Lamp Control with a scan tool.
6. Command the lamp ON and OFF with a scan tool.
Are both lamps ON and OFF when commanded
with a scan tool? —
Go to Intermittent Conditions Go to Step 2
2 Is the cruise main lamp inoperative? —Go to Step 3 Go to Step 7
3 1. Remove the Meter (10A) fuse that supplies
voltage to the IP cluster (Euro 4 specification)
or the Engine (10A) fuse that supplies voltage
to the cruise main switch (Except Euro 4
specification).
2. Turn ON the ignition, with the engine OFF.
3. Measure the voltage from the cruise main lamp control circuit in the ECM harness
connector (pin 50 of C-58) to a good ground.
Is the voltage less than the specified value? 1 volt
Go to Step 4 Go to Step 6
4 1. Turn OFF the ignition.
2. Reinstall the Meter (10A) or Engine (10A) fuse.
3. Turn ON the ignition, with the engine OFF.
4. Connect a 3-amp fused jumper wire between the cruise main lamp control circuit of the
ECM harness connector (pin 50 of C-58) and
a known good ground.
Is the cruise main lamp illuminated? —
Go to Step 12 Go to Step 5
5 1. Test the control circuit between the ECM (pin
50 of C-58) and the IP cluster (pin 2 of B-23)
or the cruise main switch (pin 6 of B-67) for an
open circuit or high resistance.
2. Repair the circuit(s) as necessary.
Did you find and correct the condition? —
Go to Step 15 Go to Step 11
6 Repair the short to battery or ignition voltage on the
control circuit between the ECM (pin 50 of C-58)
and the IP cluster (pin 2 of B-23) or the cruise main
switch (pin 6 of B-67).
Did you complete the repair? —
Go to Step 15
—
Step Action Value(s)Yes No
BACK TO CHAPTER INDEX
TO MODEL INDEX
ISUZU KB P190 2007
Page 1937 of 6020
6E-320 ENGINE CONTROL SYSTEM (4JK1/4JJ1)
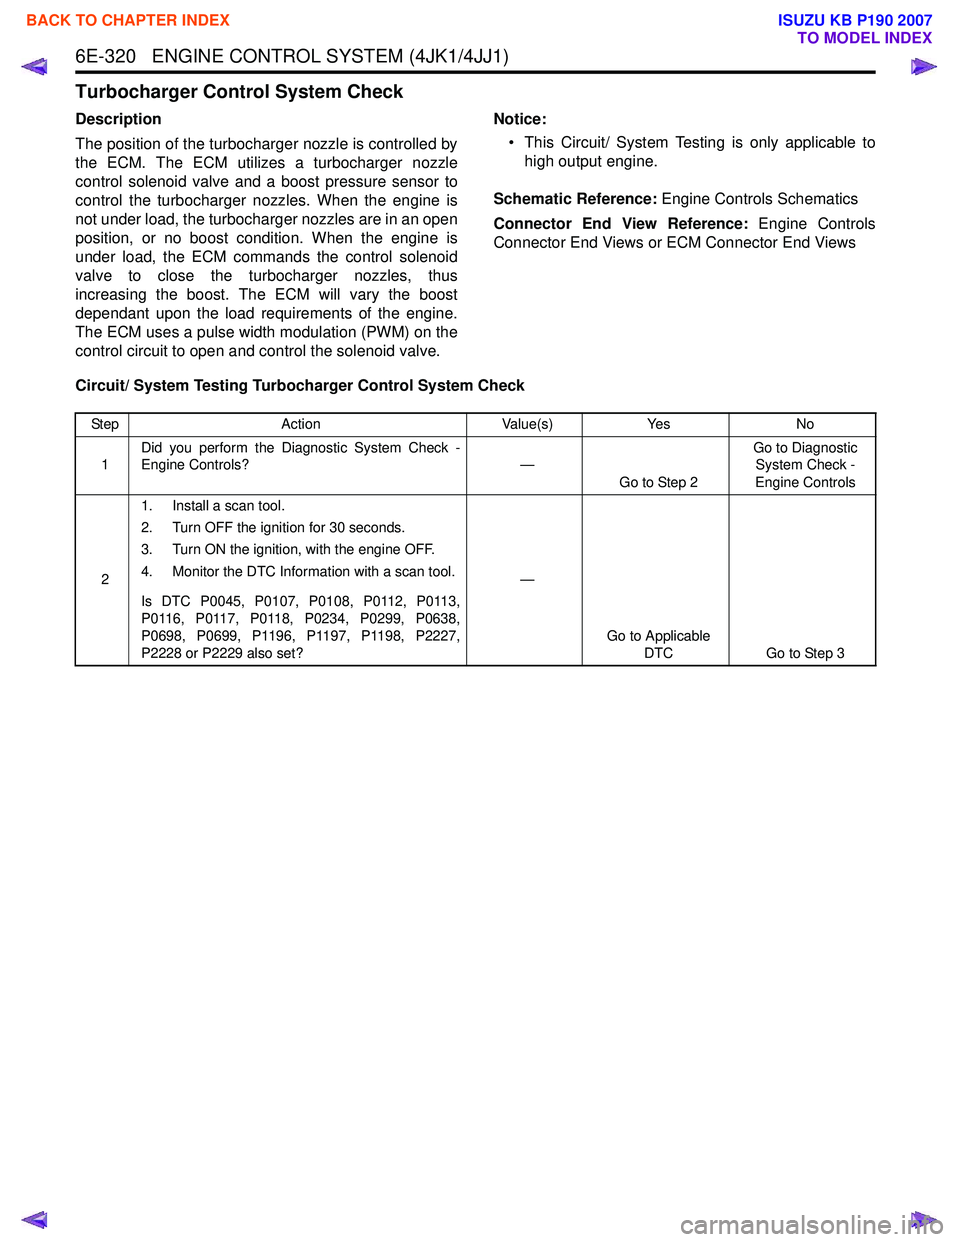
Turbocharger Control System Check
Description
The position of the turbocharger nozzle is controlled by
the ECM. The ECM utilizes a turbocharger nozzle
control solenoid valve and a boost pressure sensor to
control the turbocharger nozzles. When the engine is
not under load, the turbocharger nozzles are in an open
position, or no boost condition. When the engine is
under load, the ECM commands the control solenoid
valve to close the turbocharger nozzles, thus
increasing the boost. The ECM will vary the boost
dependant upon the load requirements of the engine.
The ECM uses a pulse width modulation (PWM) on the
control circuit to open and control the solenoid valve. Notice:
• This Circuit/ System Testing is only applicable to high output engine.
Schematic Reference: Engine Controls Schematics
Connector End View Reference: Engine Controls
Connector End Views or ECM Connector End Views
Circuit/ System Testing Turbocharger Control System Check
Step Action Value(s)Yes No
1 Did you perform the Diagnostic System Check -
Engine Controls? —
Go to Step 2 Go to Diagnostic
System Check -
Engine Controls
2 1. Install a scan tool.
2. Turn OFF the ignition for 30 seconds.
3. Turn ON the ignition, with the engine OFF.
4. Monitor the DTC Information with a scan tool.
Is DTC P0045, P0107, P0108, P0112, P0113,
P0116, P0117, P0118, P0234, P0299, P0638,
P0698, P0699, P1196, P1197, P1198, P2227,
P2228 or P2229 also set? —
Go to Applicable DTC Go to Step 3
BACK TO CHAPTER INDEX
TO MODEL INDEX
ISUZU KB P190 2007
Page 1938 of 6020

ENGINE CONTROL SYSTEM (4JK1/4JJ1) 6E-321
31. Inspect the following conditions:
• Air leakage around the boost pressuresensor objects that block the sensor hole.
• Air leaking around any of the air induction tubing between the turbocharger and
intake manifold. Check for damaged
components and for loose clamps.
• Misrouted, disconnected or kinked turbocharger nozzle control actuator
vacuum hoses. Refer to Vacuum Hose
Routing Diagram in this section for
correct routing.
• Turbine shaft binding causing lower turbocharger spinning speeds. Refer to
the Turbocharger in engine mechanical
section for diagnosis.
• Turbocharger nozzle control actuator for a stuck condition or slow movement.
Refer to Turbocharger in engine
mechanical section for testing.
• Intake throttle valve sticking. Perform the Intake Throttle Solenoid Control with a
scan tool.
• Restricted air cleaner element, restricted or collapsed air tubing between the air
cleaner and the boost pressure sensor.
• Oil in the air induction tubing causing an incorrect boost pressure sensor signal.
When there is adhesion of oil inside of
tubing, intercooler or turbocharger it
needs to be wiped off.
2. Repair the condition as necessary.
Did you find and correct the condition? —
Go to Step 8 Go to Step 4
4 1. Place the transmission in Neutral and set the
parking brake.
2. Accelerate the engine between idle and W.O.T. (accelerator pedal full travel) many
times while observing the Desired Boost
Pressure and Boost Pressure parameter with
a scan tool.
3. Drive the vehicle that the engine speed is more than 2000 RPM and the Calculated
Engine Load parameter reaches at least 50%
for longer than 10 seconds (such as
acceleration on ramp) while comparing the
Boost Pressure to the Desired Boost
Pressure.
Does the Boost Pressure parameter follow within
the specified value? ±
20 kPa ( ±3
psi)
System OK Go to Step 5
Step
Action Value(s)Yes No
BACK TO CHAPTER INDEX
TO MODEL INDEX
ISUZU KB P190 2007
Page 1940 of 6020
ENGINE CONTROL SYSTEM (4JK1/4JJ1) 6E-323
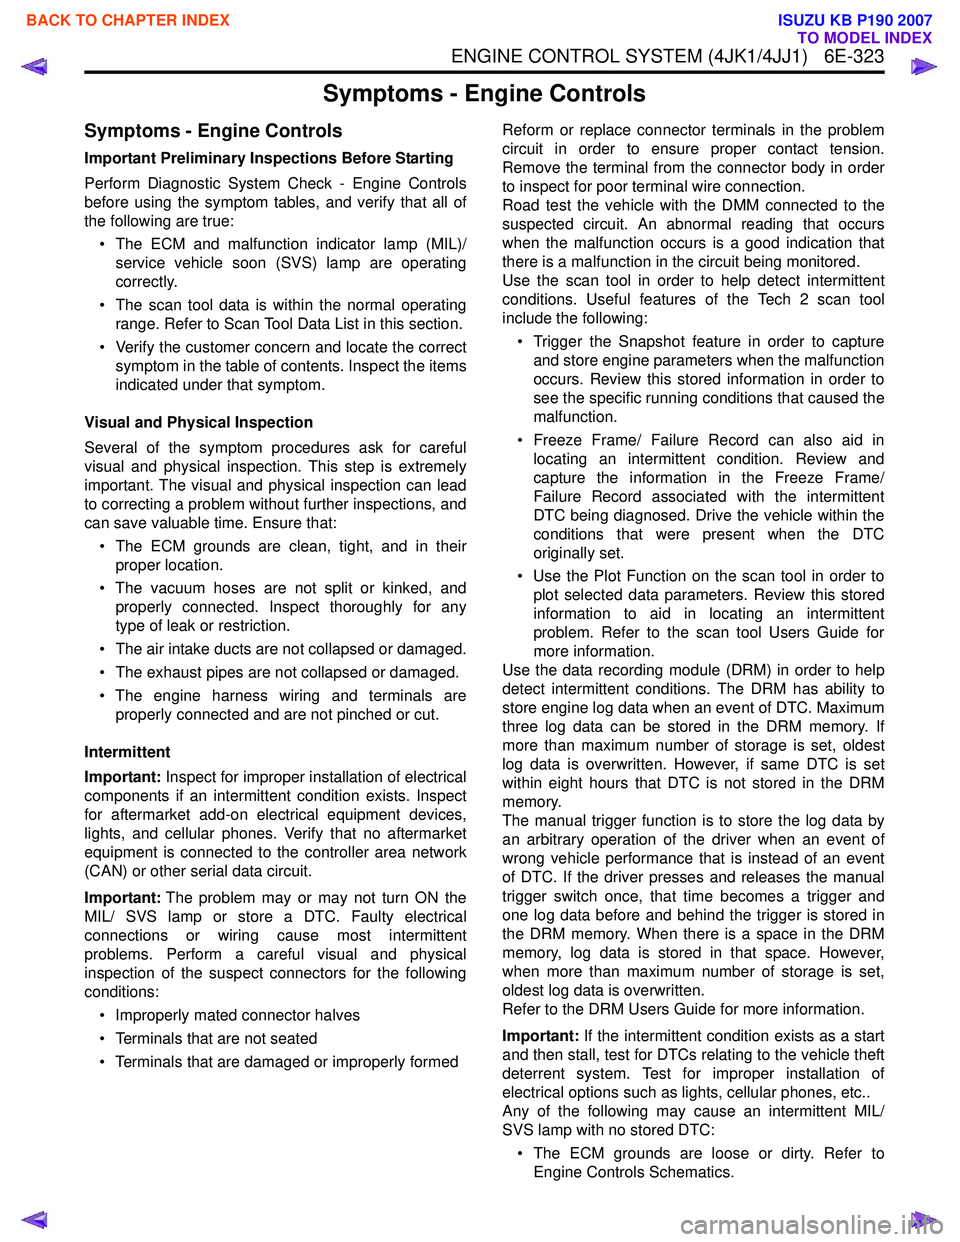
Symptoms - Engine Controls
Symptoms - Engine Controls
Important Preliminary Inspections Before Starting
Perform Diagnostic System Check - Engine Controls
before using the symptom tables, and verify that all of
the following are true:
• The ECM and malfunction indicator lamp (MIL)/ service vehicle soon (SVS) lamp are operating
correctly.
• The scan tool data is within the normal operating range. Refer to Scan Tool Data List in this section.
• Verify the customer concern and locate the correct symptom in the table of contents. Inspect the items
indicated under that symptom.
Visual and Physical Inspection
Several of the symptom procedures ask for careful
visual and physical inspection. This step is extremely
important. The visual and physical inspection can lead
to correcting a problem without further inspections, and
can save valuable time. Ensure that:
• The ECM grounds are clean, tight, and in their proper location.
• The vacuum hoses are not split or kinked, and properly connected. Inspect thoroughly for any
type of leak or restriction.
• The air intake ducts are not collapsed or damaged.
• The exhaust pipes are not collapsed or damaged.
• The engine harness wiring and terminals are properly connected and are not pinched or cut.
Intermittent
Important: Inspect for improper installation of electrical
components if an intermittent condition exists. Inspect
for aftermarket add-on electrical equipment devices,
lights, and cellular phones. Verify that no aftermarket
equipment is connected to the controller area network
(CAN) or other serial data circuit.
Important: The problem may or may not turn ON the
MIL/ SVS lamp or store a DTC. Faulty electrical
connections or wiring cause most intermittent
problems. Perform a careful visual and physical
inspection of the suspect connectors for the following
conditions:
• Improperly mated connector halves
• Terminals that are not seated
• Terminals that are damaged or improperly formed Reform or replace connector terminals in the problem
circuit in order to ensure proper contact tension.
Remove the terminal from the connector body in order
to inspect for poor terminal wire connection.
Road test the vehicle with the DMM connected to the
suspected circuit. An abnormal reading that occurs
when the malfunction occurs is a good indication that
there is a malfunction in the circuit being monitored.
Use the scan tool in order to help detect intermittent
conditions. Useful features of the Tech 2 scan tool
include the following:
• Trigger the Snapshot feature in order to capture and store engine parameters when the malfunction
occurs. Review this stored information in order to
see the specific running conditions that caused the
malfunction.
• Freeze Frame/ Failure Record can also aid in locating an intermittent condition. Review and
capture the information in the Freeze Frame/
Failure Record associated with the intermittent
DTC being diagnosed. Drive the vehicle within the
conditions that were present when the DTC
originally set.
• Use the Plot Function on the scan tool in order to plot selected data parameters. Review this stored
information to aid in locating an intermittent
problem. Refer to the scan tool Users Guide for
more information.
Use the data recording module (DRM) in order to help
detect intermittent conditions. The DRM has ability to
store engine log data when an event of DTC. Maximum
three log data can be stored in the DRM memory. If
more than maximum number of storage is set, oldest
log data is overwritten. However, if same DTC is set
within eight hours that DTC is not stored in the DRM
memory.
The manual trigger function is to store the log data by
an arbitrary operation of the driver when an event of
wrong vehicle performance that is instead of an event
of DTC. If the driver presses and releases the manual
trigger switch once, that time becomes a trigger and
one log data before and behind the trigger is stored in
the DRM memory. When there is a space in the DRM
memory, log data is stored in that space. However,
when more than maximum number of storage is set,
oldest log data is overwritten.
Refer to the DRM Users Guide for more information.
Important: If the intermittent condition exists as a start
and then stall, test for DTCs relating to the vehicle theft
deterrent system. Test for improper installation of
electrical options such as lights, cellular phones, etc..
Any of the following may cause an intermittent MIL/
SVS lamp with no stored DTC:
• The ECM grounds are loose or dirty. Refer to Engine Controls Schematics.
BACK TO CHAPTER INDEX
TO MODEL INDEX
ISUZU KB P190 2007
Page 1941 of 6020

6E-324 ENGINE CONTROL SYSTEM (4JK1/4JJ1)
• The MIL/ SVS lamp circuit intermittently shorted toground
• Electrical system interference caused by a malfunctioning relay, ECM driven solenoid, or
switch. The electrical component can cause a
sharp electrical surge. Normally, the problem will
occur when the malfunctioning component is
operating.
• There are any open diodes.
Important: The following symptom tables contain
groups of possible causes for each symptom. The
order of these procedures is not important. If the scan
tool readings do not indicate the problems, then
proceed in a logical order, easiest to check or most
likely to cause first. In order to determine if a specific
vehicle is using a particular system or component, refer
to Engine Controls Schematics for an application.
Use the following tables when diagnosing a symptom
complaint:
• Intermittent Conditions
• Hard Start
• Rough, Unstable, or Incorrect Idle and Stalling
• High Idle Speed
•Cuts Out
• Surges
• Lack of Power, Sluggishness or Sponginess
• Hesitation, Sag or Stumble
• Abnormal Combustion Noise
• Poor Fuel Economy
• Excessive Smoke (Black Smoke)
• Excessive Smoke (White Smoke)
BACK TO CHAPTER INDEX
TO MODEL INDEX
ISUZU KB P190 2007