Page 1457 of 6020

ENGINE MECHANICAL (4JK1/4JJ1) 6A-97
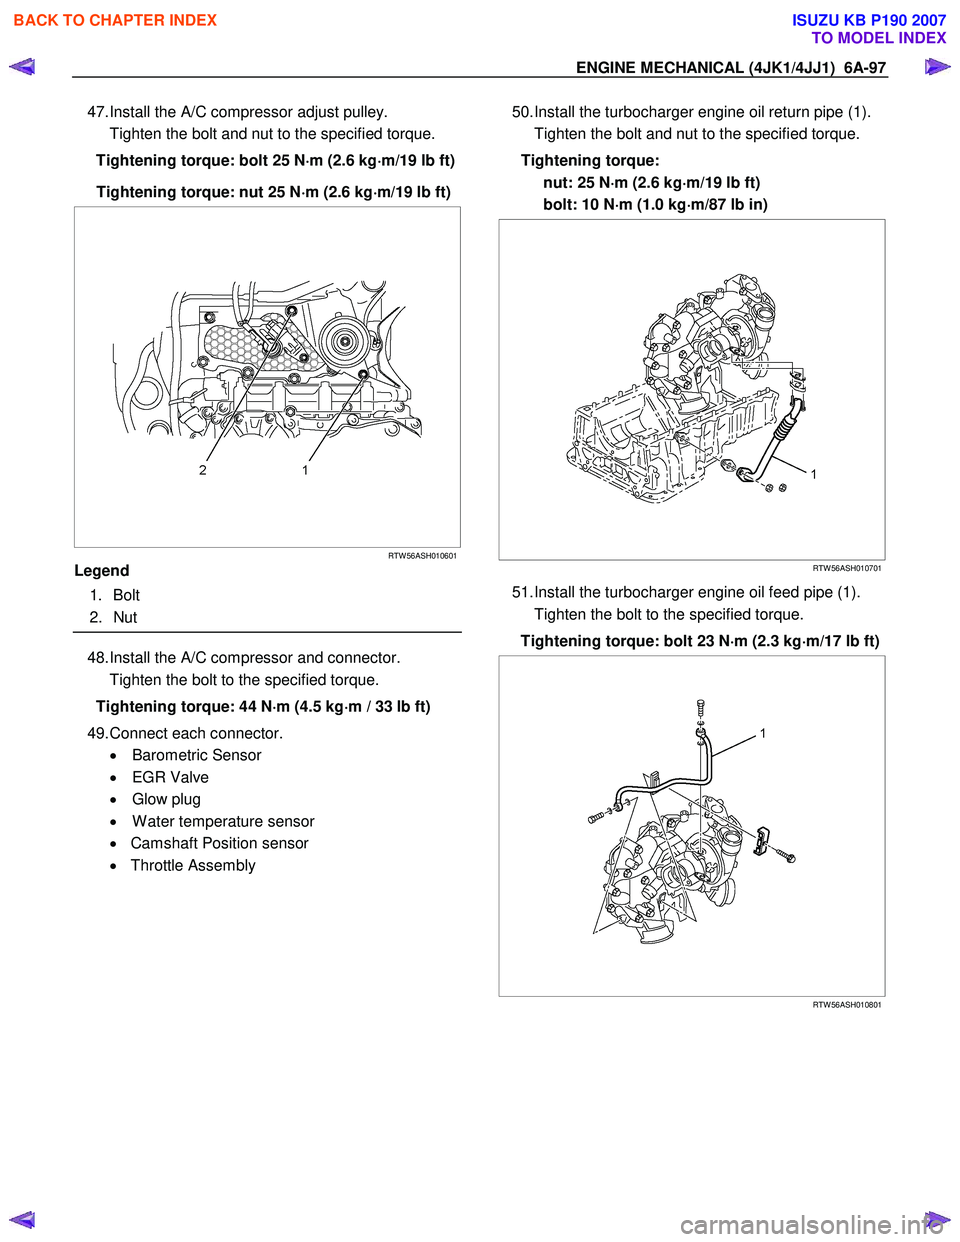
47. Install the A/C compressor adjust pulley.
Tighten the bolt and nut to the specified torque.
Tightening torque: bolt 25 N ⋅
⋅⋅
⋅
m (2.6 kg ⋅
⋅⋅
⋅
m/19 lb ft)
Tightening torque: nut 25 N ⋅
⋅⋅
⋅
m (2.6 kg ⋅
⋅⋅
⋅
m/19 lb ft)
RTW 56ASH010601
Legend
1. Bolt
2. Nut
48. Install the A/C compressor and connector.
Tighten the bolt to the specified torque.
Tightening torque: 44 N ⋅
⋅⋅
⋅
m (4.5 kg ⋅
⋅⋅
⋅
m / 33 lb ft)
49. Connect each connector. • Barometric Sensor
• EGR Valve
• Glow plug
• W ater temperature sensor
• Camshaft Position sensor
• Throttle Assembly
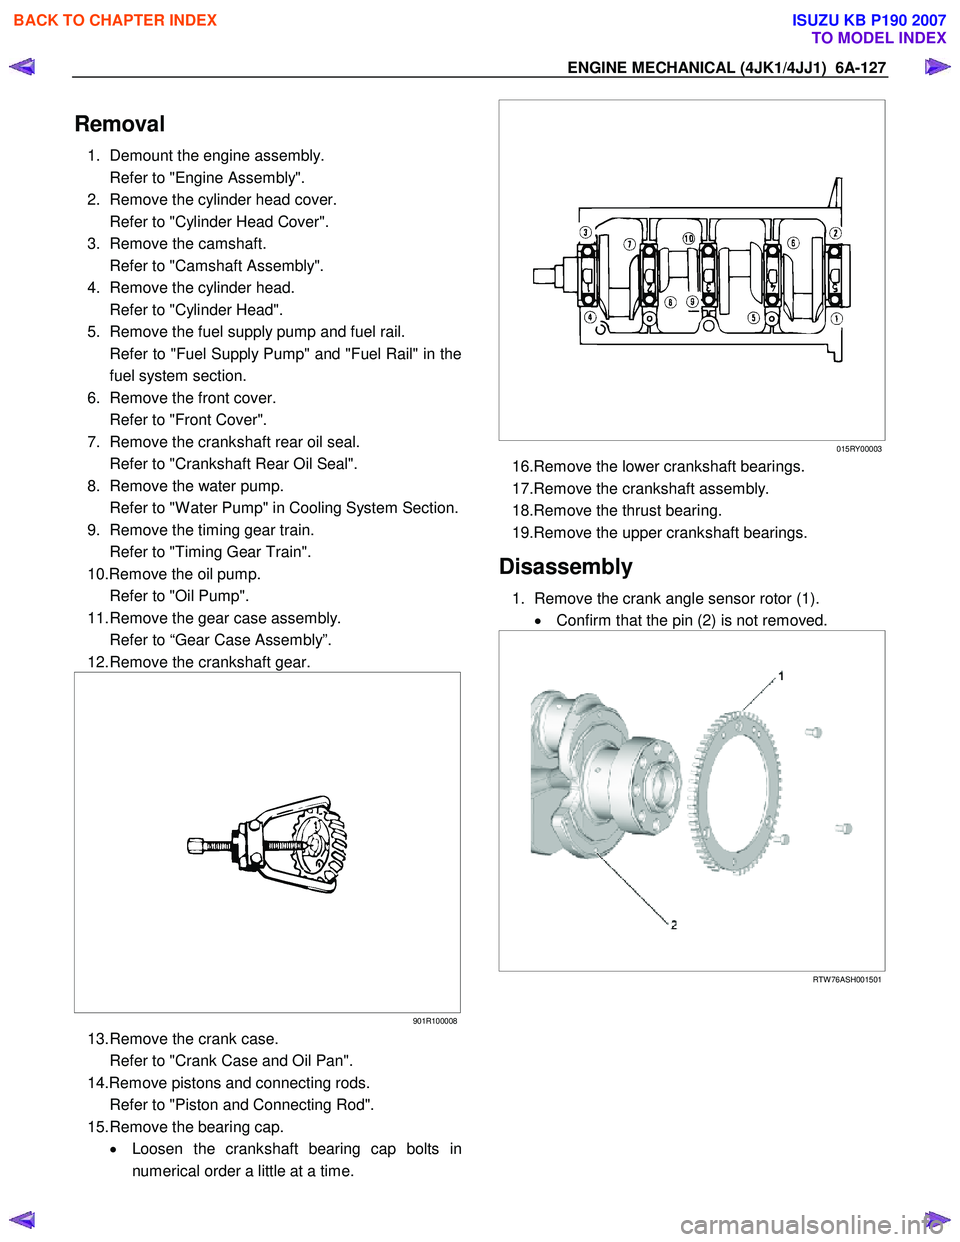
50. Install the turbocharger engine oil return pipe (1).
Tighten the bolt and nut to the specified torque.
Tightening torque: nut: 25 N ⋅
⋅⋅
⋅
m (2.6 kg ⋅
⋅⋅
⋅
m/19 lb ft)
bolt: 10 N ⋅
⋅⋅
⋅
m (1.0 kg ⋅
⋅⋅
⋅
m/87 lb in)
RTW 56ASH010701
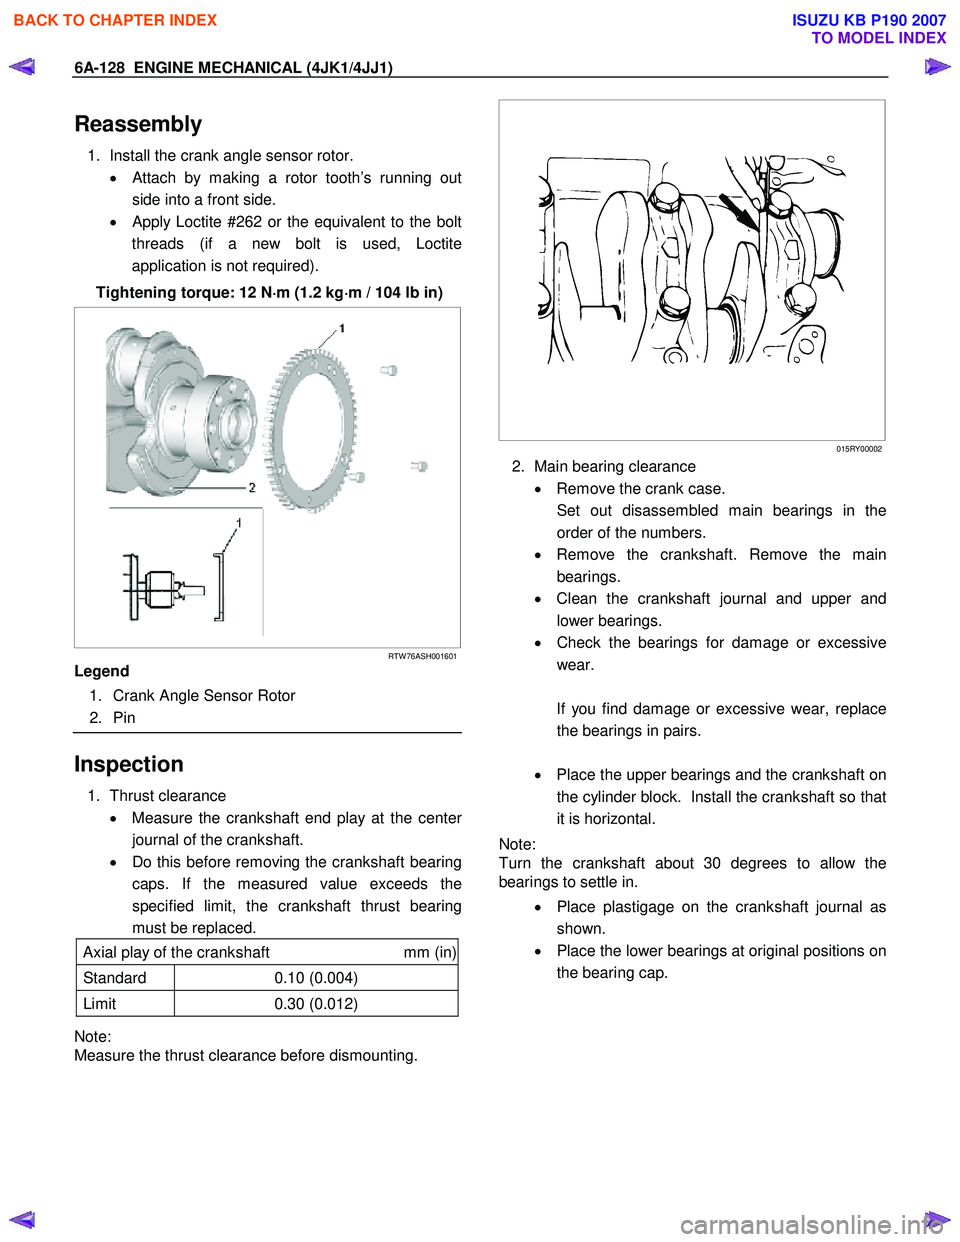
51. Install the turbocharger engine oil feed pipe (1).
Tighten the bolt to the specified torque.
Tightening torque: bolt 23 N ⋅
⋅⋅
⋅
m (2.3 kg ⋅
⋅⋅
⋅
m/17 lb ft)
RTW 56ASH010801
BACK TO CHAPTER INDEX
TO MODEL INDEX
ISUZU KB P190 2007
Page 1459 of 6020
ENGINE MECHANICAL (4JK1/4JJ1) 6A-99
67.Install the intercooler (High output).
• Install the intercooler.
• Install the two intake hoses.
• Connect the BARO sensor harness connector.
68. Install the intake hose.
RTW 56ASH022501
Legend
1. Intake Hose for Intercooler and Intake Throttle
2. Intake Duct for Turbocharger and Air Cleaner
3. Intake Hose for Turbocharger and Intercooler
69. Install the engine head cover.
70. Replenish the coolant.
BACK TO CHAPTER INDEX
TO MODEL INDEX
ISUZU KB P190 2007
Page 1487 of 6020

ENGINE MECHANICAL (4JK1/4JJ1) 6A-127
Removal
1. Demount the engine assembly.
Refer to "Engine Assembly".
2. Remove the cylinder head cover.
Refer to "Cylinder Head Cover".
3. Remove the camshaft.
Refer to "Camshaft Assembly".
4. Remove the cylinder head.
Refer to "Cylinder Head".
5. Remove the fuel supply pump and fuel rail.
Refer to "Fuel Supply Pump" and "Fuel Rail" in the fuel system section.
6. Remove the front cover.
Refer to "Front Cover".
7. Remove the crankshaft rear oil seal.
Refer to "Crankshaft Rear Oil Seal".
8. Remove the water pump.
Refer to "W ater Pump" in Cooling System Section.
9. Remove the timing gear train.
Refer to "Timing Gear Train".
10.Remove the oil pump.
Refer to "Oil Pump".
11. Remove the gear case assembly.
Refer to “Gear Case Assembly”.
12. Remove the crankshaft gear.
901R100008
13. Remove the crank case.
Refer to "Crank Case and Oil Pan".
14.Remove pistons and connecting rods.
Refer to "Piston and Connecting Rod".
15. Remove the bearing cap. • Loosen the crankshaft bearing cap bolts in
numerical order a little at a time.
015RY00003
16.Remove the lower crankshaft bearings.
17.Remove the crankshaft assembly.
18.Remove the thrust bearing.
19.Remove the upper crankshaft bearings.
Disassembly
1. Remove the crank angle sensor rotor (1). • Confirm that the pin (2) is not removed.
RTW 76ASH001501
BACK TO CHAPTER INDEX
TO MODEL INDEX
ISUZU KB P190 2007
Page 1488 of 6020

6A-128 ENGINE MECHANICAL (4JK1/4JJ1)
Reassembly
1. Install the crank angle sensor rotor.
• Attach by making a rotor tooth’s running out
side into a front side.
•
Apply Loctite #262 or the equivalent to the bolt
threads (if a new bolt is used, Loctite
application is not required).
Tightening torque: 12 N ⋅
⋅⋅
⋅
m (1.2 kg ⋅
⋅⋅
⋅
m / 104 lb in)
RTW 76ASH001601
Legend
1. Crank Angle Sensor Rotor
2. Pin
Inspection
1. Thrust clearance
• Measure the crankshaft end play at the cente
r
journal of the crankshaft.
• Do this before removing the crankshaft bearing
caps. If the measured value exceeds the
specified limit, the crankshaft thrust bearing
must be replaced.
Axial play of the crankshaft mm (in)
Standard 0.10 (0.004)
Limit 0.30 (0.012)
Note:
Measure the thrust clearance before dismounting.
015RY00002
2. Main bearing clearance
• Remove the crank case.
Set out disassembled main bearings in the order of the numbers.
• Remove the crankshaft. Remove the main
bearings.
• Clean the crankshaft journal and upper and
lower bearings.
• Check the bearings for damage or excessive
wear.
If you find damage or excessive wear, replace the bearings in pairs.
• Place the upper bearings and the crankshaft on
the cylinder block. Install the crankshaft so that
it is horizontal.
Note:
Turn the crankshaft about 30 degrees to allow the
bearings to settle in.
• Place plastigage on the crankshaft journal as
shown.
• Place the lower bearings at original positions on
the bearing cap.
BACK TO CHAPTER INDEX
TO MODEL INDEX
ISUZU KB P190 2007
Page 1529 of 6020
6B-6 ENGINE COOLING (4JK1/4JJ1)
Diagnosis
Engine Cooling Trouble
Condition Possible Cause Correction
Low Engine Coolant level Replenish
Thermo meter unit faulty Replace
Faulty thermostat Replace
Faulty Engine Coolant temperature
sensor Repair or replace
Clogged radiator
Clean or replace
Faulty radiator cap Replace
Low engine oil level or use of
improper engine oil Replenish or change oil
Clogged exhaust system
Clean exhaust system or replace
faulty parts
Faulty Throttle Position sensor Replace throttle valve assembly
Open or shorted Throttle Position
sensor circuit Repair or replace
Engine overheating
Damaged cylinder head gasket Replace
Engine overcooling Faulty thermostat Replace
Faulty thermostat Replace Engine slow to warm–up
Thermo unit faulty Replace
BACK TO CHAPTER INDEX
TO MODEL INDEX
ISUZU KB P190 2007
Page 1542 of 6020

FUEL SYSTEM (4JK1/4JJ1) 6C-1
SECTION 6C
FUEL SYSTEM
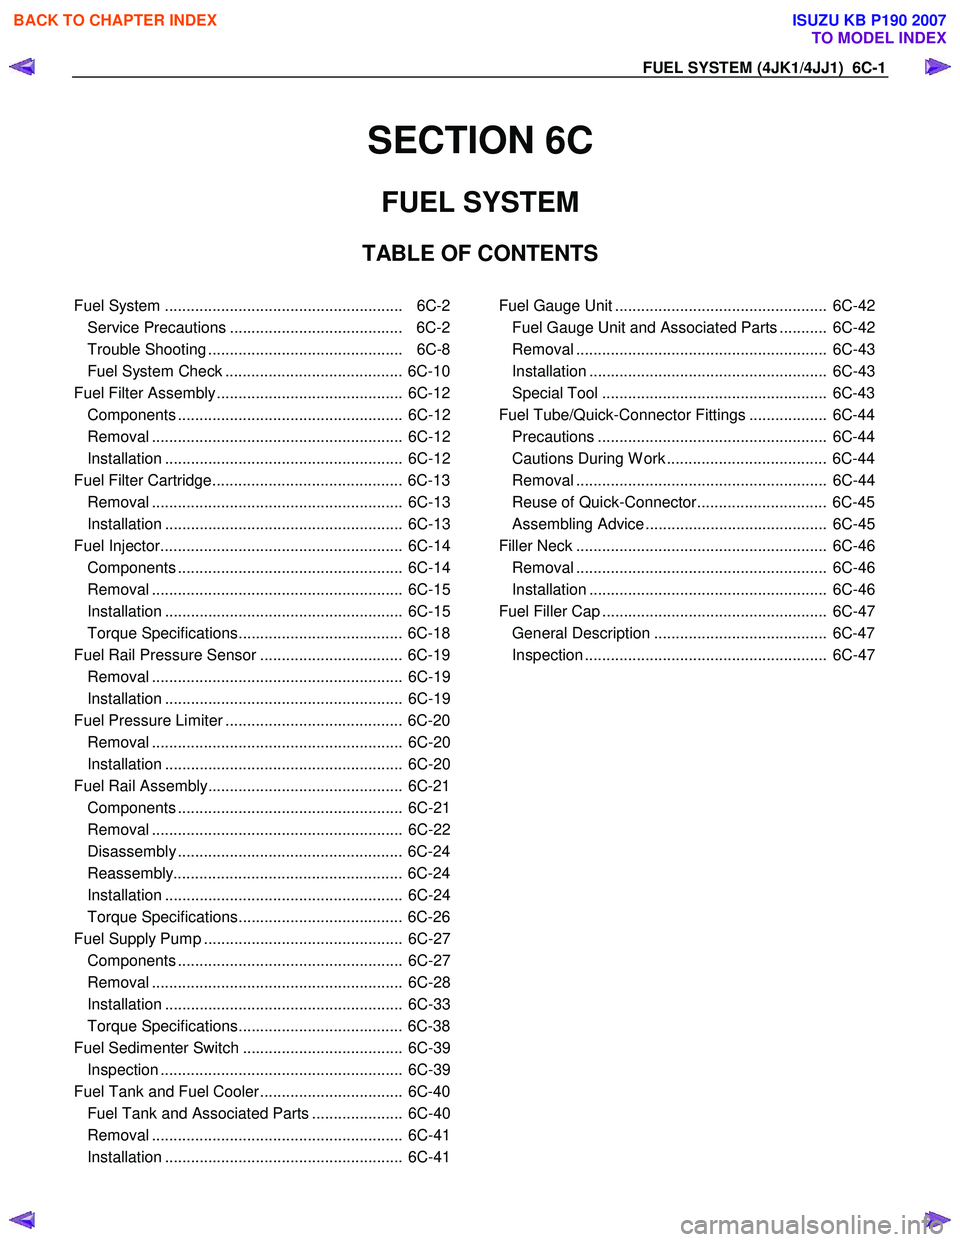
TABLE OF CONTENTS
Fuel System ....................................................... 6C-2 Service Precautions ........................................ 6C-2
Trouble Shooting ............................................. 6C-8
Fuel System Check ......................................... 6C-10
Fuel Filter Assembly ........................................... 6C-12 Components .................................................... 6C-12
Removal .......................................................... 6C-12
Installation ....................................................... 6C-12
Fuel Filter Cartridge............................................ 6C-13 Removal .......................................................... 6C-13
Installation ....................................................... 6C-13
Fuel Injector........................................................ 6C-14 Components .................................................... 6C-14
Removal .......................................................... 6C-15
Installation ....................................................... 6C-15
Torque Specifications...................................... 6C-18
Fuel Rail Pressure Sensor ................................. 6C-19 Removal .......................................................... 6C-19
Installation ....................................................... 6C-19
Fuel Pressure Limiter ......................................... 6C-20 Removal .......................................................... 6C-20
Installation ....................................................... 6C-20
Fuel Rail Assembly............................................. 6C-21 Components .................................................... 6C-21
Removal .......................................................... 6C-22
Disassembly .................................................... 6C-24
Reassembly..................................................... 6C-24
Installation ....................................................... 6C-24
Torque Specifications...................................... 6C-26
Fuel Supply Pump .............................................. 6C-27 Components .................................................... 6C-27
Removal .......................................................... 6C-28
Installation ....................................................... 6C-33
Torque Specifications...................................... 6C-38
Fuel Sedimenter Switch ..................................... 6C-39 Inspection ........................................................ 6C-39
Fuel Tank and Fuel Cooler ................................. 6C-40 Fuel Tank and Associated Parts ..................... 6C-40
Removal .......................................................... 6C-41
Installation ....................................................... 6C-41
Fuel Gauge Unit ................................................. 6C-42 Fuel Gauge Unit and Associated Parts ........... 6C-42
Removal .......................................................... 6C-43
Installation ....................................................... 6C-43
Special Tool .................................................... 6C-43
Fuel Tube/Quick-Connector Fittings .................. 6C-44 Precautions ..................................................... 6C-44
Cautions During W ork ..................................... 6C-44
Removal .......................................................... 6C-44
Reuse of Quick-Connector.............................. 6C-45
Assembling Advice .......................................... 6C-45
Filler Neck .......................................................... 6C-46 Removal .......................................................... 6C-46
Installation ....................................................... 6C-46
Fuel Filler Cap .................................................... 6C-47 General Description ........................................ 6C-47
Inspection ........................................................ 6C-47
BACK TO CHAPTER INDEX
TO MODEL INDEX
ISUZU KB P190 2007
Page 1545 of 6020
6C-4 FUEL SYSTEM (4JK1/4JJ1)
Fuel rail assembly
RTW 76CLF000601
Legend 1. Fuel Pressure Limiter
2. Fuel Rail Pressure Sensor
BACK TO CHAPTER INDEX
TO MODEL INDEX
ISUZU KB P190 2007
Page 1546 of 6020
FUEL SYSTEM (4JK1/4JJ1) 6C-5
Fuel supply pump
RTW 56CLF000301
Legend 1. Fuel Temperature Sensor
2. Suction Control Valve
3. High Pressure Pipe
4. Camshaft Key
5. Camshaft Nut
BACK TO CHAPTER INDEX
TO MODEL INDEX
ISUZU KB P190 2007