2007 ISUZU KB P190 stop start
[x] Cancel search: stop startPage 1157 of 6020
Engine Control System (4JH1) 6E-123
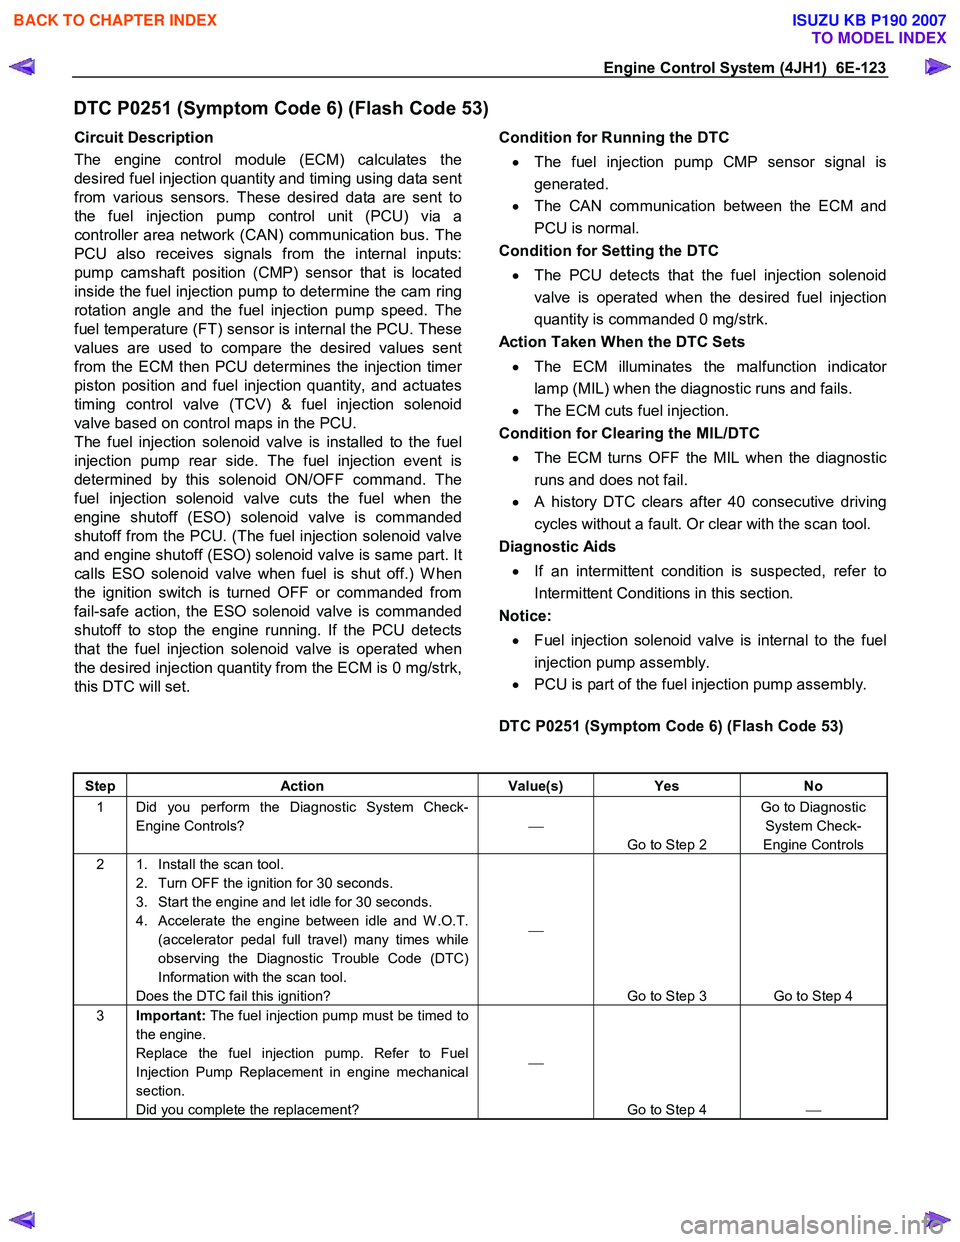
DTC P0251 (Symptom Code 6) (Flash Code 53)
Circuit Description
The engine control module (ECM) calculates the
desired fuel injection quantity and timing using data sent
from various sensors. These desired data are sent to
the fuel injection pump control unit (PCU) via a
controller area network (CAN) communication bus. The
PCU also receives signals from the internal inputs:
pump camshaft position (CMP) sensor that is located
inside the fuel injection pump to determine the cam ring
rotation angle and the fuel injection pump speed. The
fuel temperature (FT) sensor is internal the PCU. These
values are used to compare the desired values sent
from the ECM then PCU determines the injection time
r
piston position and fuel injection quantity, and actuates
timing control valve (TCV) & fuel injection solenoid
valve based on control maps in the PCU.
The fuel injection solenoid valve is installed to the fuel
injection pump rear side. The fuel injection event is
determined by this solenoid ON/OFF command. The
fuel injection solenoid valve cuts the fuel when the
engine shutoff (ESO) solenoid valve is commanded
shutoff from the PCU. (The fuel injection solenoid valve
and engine shutoff (ESO) solenoid valve is same part. It
calls ESO solenoid valve when fuel is shut off.) W hen
the ignition switch is turned OFF or commanded from
fail-safe action, the ESO solenoid valve is commanded
shutoff to stop the engine running. If the PCU detects
that the fuel injection solenoid valve is operated when
the desired injection quantity from the ECM is 0 mg/strk,
this DTC will set.
Condition for Running the DTC
• The fuel injection pump CMP sensor signal is
generated.
• The CAN communication between the ECM and
PCU is normal.
Condition for Setting the DTC
• The PCU detects that the fuel injection solenoid
valve is operated when the desired fuel injection
quantity is commanded 0 mg/strk.
Action Taken When the DTC Sets
• The ECM illuminates the malfunction indicator
lamp (MIL) when the diagnostic runs and fails.
• The ECM cuts fuel injection.
Condition for Clearing the MIL/DTC
• The ECM turns OFF the MIL when the diagnostic
runs and does not fail.
• A history DTC clears after 40 consecutive driving
cycles without a fault. Or clear with the scan tool.
Diagnostic Aids
• If an intermittent condition is suspected, refer to
Intermittent Conditions in this section.
Notice:
• Fuel injection solenoid valve is internal to the fuel
injection pump assembly.
• PCU is part of the fuel injection pump assembly.
DTC P0251 (Symptom Code 6) (Flash Code 53)
Step Action Value(s) Yes No
1 Did you perform the Diagnostic System Check-
Engine Controls?
Go to Step 2 Go to Diagnostic
System Check-
Engine Controls
2 1. Install the scan tool. 2. Turn OFF the ignition for 30 seconds.
3. Start the engine and let idle for 30 seconds.
4. Accelerate the engine between idle and W .O.T. (accelerator pedal full travel) many times while
observing the Diagnostic Trouble Code (DTC)
Information with the scan tool.
Does the DTC fail this ignition?
Go to Step 3 Go to Step 4
3 Important: The fuel injection pump must be timed to
the engine.
Replace the fuel injection pump. Refer to Fuel
Injection Pump Replacement in engine mechanical
section.
Did you complete the replacement?
Go to Step 4
BACK TO CHAPTER INDEX
TO MODEL INDEX
ISUZU KB P190 2007
Page 1260 of 6020
6E-226 Engine Control System (4JH1)
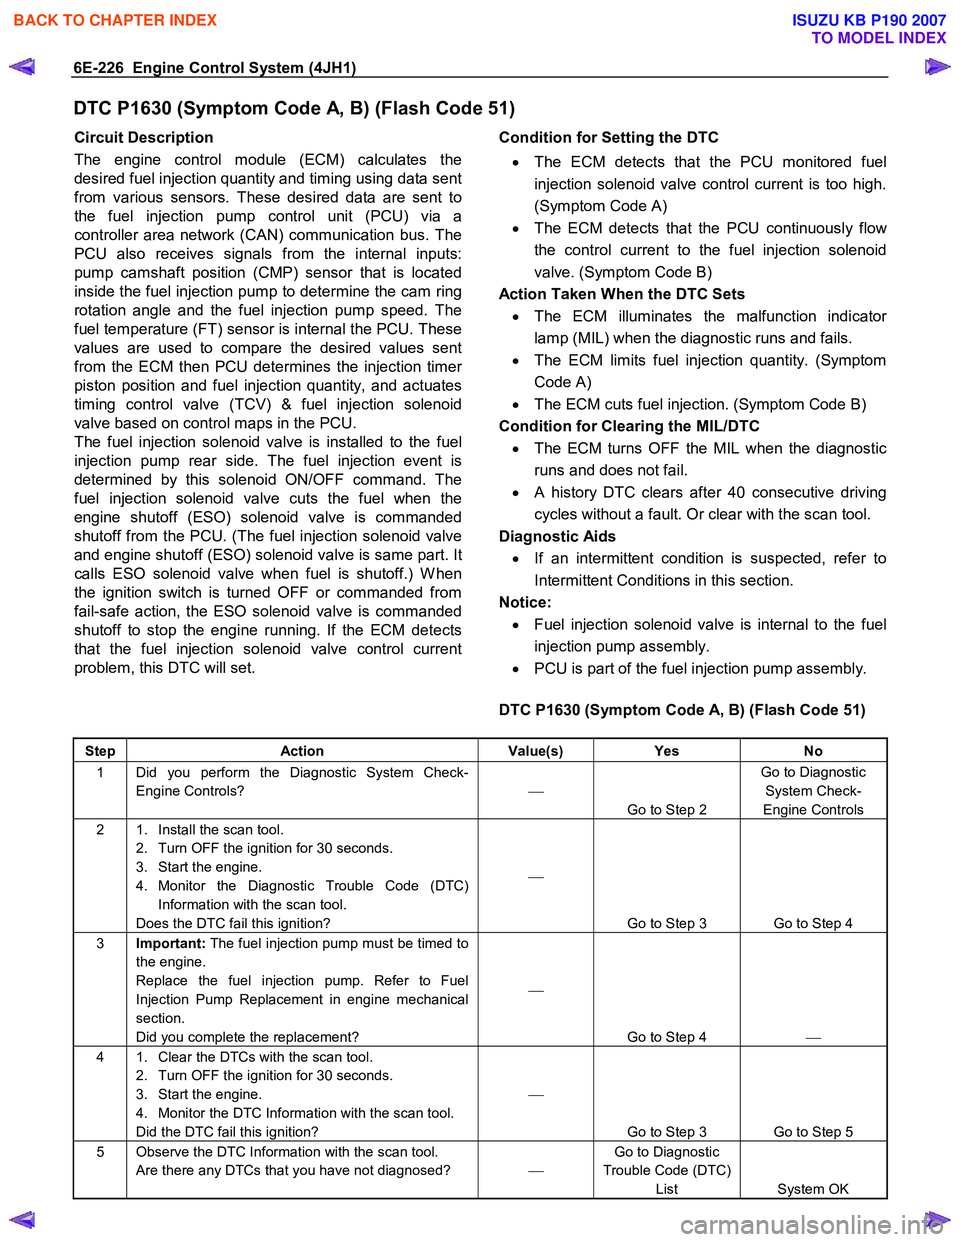
DTC P1630 (Symptom Code A, B) (Flash Code 51)
Circuit Description
The engine control module (ECM) calculates the
desired fuel injection quantity and timing using data sent
from various sensors. These desired data are sent to
the fuel injection pump control unit (PCU) via a
controller area network (CAN) communication bus. The
PCU also receives signals from the internal inputs:
pump camshaft position (CMP) sensor that is located
inside the fuel injection pump to determine the cam ring
rotation angle and the fuel injection pump speed. The
fuel temperature (FT) sensor is internal the PCU. These
values are used to compare the desired values sent
from the ECM then PCU determines the injection time
r
piston position and fuel injection quantity, and actuates
timing control valve (TCV) & fuel injection solenoid
valve based on control maps in the PCU.
The fuel injection solenoid valve is installed to the fuel
injection pump rear side. The fuel injection event is
determined by this solenoid ON/OFF command. The
fuel injection solenoid valve cuts the fuel when the
engine shutoff (ESO) solenoid valve is commanded
shutoff from the PCU. (The fuel injection solenoid valve
and engine shutoff (ESO) solenoid valve is same part. It
calls ESO solenoid valve when fuel is shutoff.) W hen
the ignition switch is turned OFF or commanded from
fail-safe action, the ESO solenoid valve is commanded
shutoff to stop the engine running. If the ECM detects
that the fuel injection solenoid valve control current
problem, this DTC will set.
Condition for Setting the DTC
• The ECM detects that the PCU monitored fuel
injection solenoid valve control current is too high.
(Symptom Code A)
• The ECM detects that the PCU continuously flo
w
the control current to the fuel injection solenoid
valve. (Symptom Code B)
Action Taken When the DTC Sets • The ECM illuminates the malfunction indicato
r
lamp (MIL) when the diagnostic runs and fails.
• The ECM limits fuel injection quantity. (Symptom
Code A)
• The ECM cuts fuel injection. (Symptom Code B)
Condition for Clearing the MIL/DTC • The ECM turns OFF the MIL when the diagnostic
runs and does not fail.
• A history DTC clears after 40 consecutive driving
cycles without a fault. Or clear with the scan tool.
Diagnostic Aids
• If an intermittent condition is suspected, refer to
Intermittent Conditions in this section.
Notice:
• Fuel injection solenoid valve is internal to the fuel
injection pump assembly.
• PCU is part of the fuel injection pump assembly.
DTC P1630 (Symptom Code A, B) (Flash Code 51)
Step Action Value(s) Yes No
1 Did you perform the Diagnostic System Check-
Engine Controls?
Go to Step 2 Go to Diagnostic
System Check-
Engine Controls
2 1. Install the scan tool. 2. Turn OFF the ignition for 30 seconds.
3. Start the engine.
4. Monitor the Diagnostic Trouble Code (DTC) Information with the scan tool.
Does the DTC fail this ignition?
Go to Step 3 Go to Step 4
3 Important: The fuel injection pump must be timed to
the engine.
Replace the fuel injection pump. Refer to Fuel
Injection Pump Replacement in engine mechanical
section.
Did you complete the replacement?
Go to Step 4
4 1. Clear the DTCs with the scan tool.
2. Turn OFF the ignition for 30 seconds.
3. Start the engine.
4. Monitor the DTC Information with the scan tool.
Did the DTC fail this ignition?
Go to Step 3 Go to Step 5
5 Observe the DTC Information with the scan tool. Are there any DTCs that you have not diagnosed? Go to Diagnostic
Trouble Code (DTC) List System OK
BACK TO CHAPTER INDEX
TO MODEL INDEX
ISUZU KB P190 2007
Page 1302 of 6020
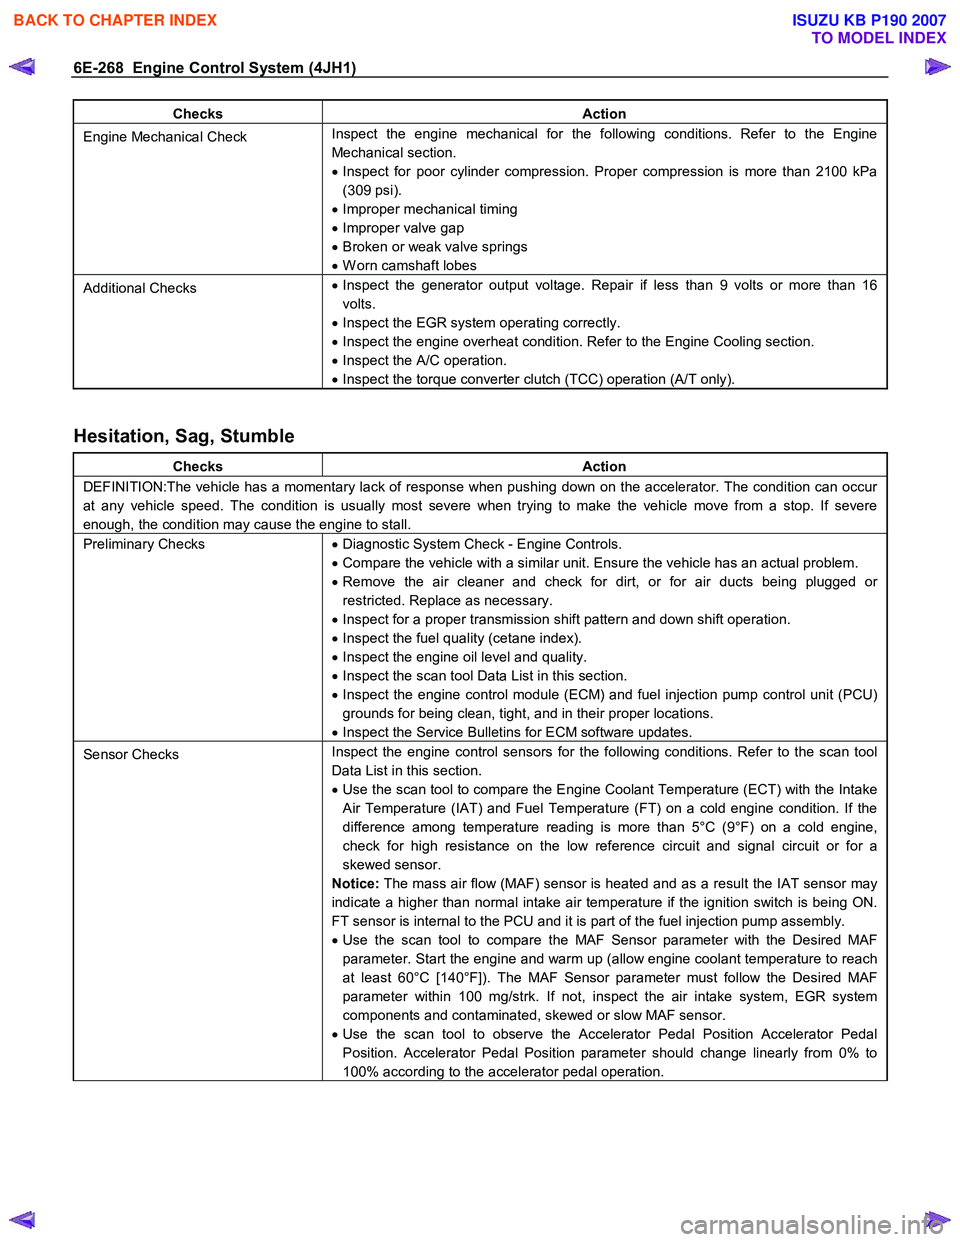
6E-268 Engine Control System (4JH1)
Checks Action
Engine Mechanical Check Inspect the engine mechanical for the following conditions. Refer to the Engine
Mechanical section.
• Inspect for poor cylinder compression. Proper compression is more than 2100 kPa
(309 psi).
• Improper mechanical timing
• Improper valve gap
• Broken or weak valve springs
• W orn camshaft lobes
Additional Checks •
Inspect the generator output voltage. Repair if less than 9 volts or more than 16
volts.
• Inspect the EGR system operating correctly.
• Inspect the engine overheat condition. Refer to the Engine Cooling section.
• Inspect the A/C operation.
• Inspect the torque converter clutch (TCC) operation (A/T only).
Hesitation, Sag, Stumble
Checks Action
DEFINITION:The vehicle has a momentary lack of response when pushing down on the accelerator. The condition can occur
at any vehicle speed. The condition is usually most severe when trying to make the vehicle move from a stop. If severe
enough, the condition may cause the engine to stall.
Preliminary Checks • Diagnostic System Check - Engine Controls.
• Compare the vehicle with a similar unit. Ensure the vehicle has an actual problem.
• Remove the air cleaner and check for dirt, or for air ducts being plugged or
restricted. Replace as necessary.
• Inspect for a proper transmission shift pattern and down shift operation.
• Inspect the fuel quality (cetane index).
• Inspect the engine oil level and quality.
• Inspect the scan tool Data List in this section.
• Inspect the engine control module (ECM) and fuel injection pump control unit (PCU)
grounds for being clean, tight, and in their proper locations.
• Inspect the Service Bulletins for ECM software updates.
Sensor Checks Inspect the engine control sensors for the following conditions. Refer to the scan tool
Data List in this section.
• Use the scan tool to compare the Engine Coolant Temperature (ECT) with the Intake
Air Temperature (IAT) and Fuel Temperature (FT) on a cold engine condition. If the
difference among temperature reading is more than 5°C (9°F) on a cold engine,
check for high resistance on the low reference circuit and signal circuit or for a
skewed sensor.
Notice: The mass air flow (MAF) sensor is heated and as a result the IAT sensor may
indicate a higher than normal intake air temperature if the ignition switch is being ON.
FT sensor is internal to the PCU and it is part of the fuel injection pump assembly.
• Use the scan tool to compare the MAF Sensor parameter with the Desired MAF
parameter. Start the engine and warm up (allow engine coolant temperature to reach
at least 60°C [140°F]). The MAF Sensor parameter must follow the Desired MAF
parameter within 100 mg/strk. If not, inspect the air intake system, EGR system
components and contaminated, skewed or slow MAF sensor.
• Use the scan tool to observe the Accelerator Pedal Position Accelerator Pedal
Position. Accelerator Pedal Position parameter should change linearly from 0% to
100% according to the accelerator pedal operation.
BACK TO CHAPTER INDEX
TO MODEL INDEX
ISUZU KB P190 2007
Page 1329 of 6020
Engine Control System (4JH1) 6E-295
The timing control valve (TCV) acts as a variable
throttle, using the rapid opening and closing (cycling)
of the valve needle in the TCV.
At normal operation,
the TCV controls the pressure acting on the annula
r
chamber so that the hydraulic stopper cam move to
any position, from the retard position to the advance
position. At this time, the duty ratio is set by the fuel
injection pump control unit (PCU).
When control current flows to the TCV coil, the valve
needle opens and the fuel annular chamber flows
through the orifice to the feed pump inlet.
Consequently, the pressure of the annular chambe
r
decreases and the hydraulic stopper is moved to the
retard side.
When control current to the TCV coil is cut, the valve
needle closes and the return passage is closed.
Consequently, the pressure of the annular chambe
r
increases and the hydraulic stopper is moved to the
advance side.
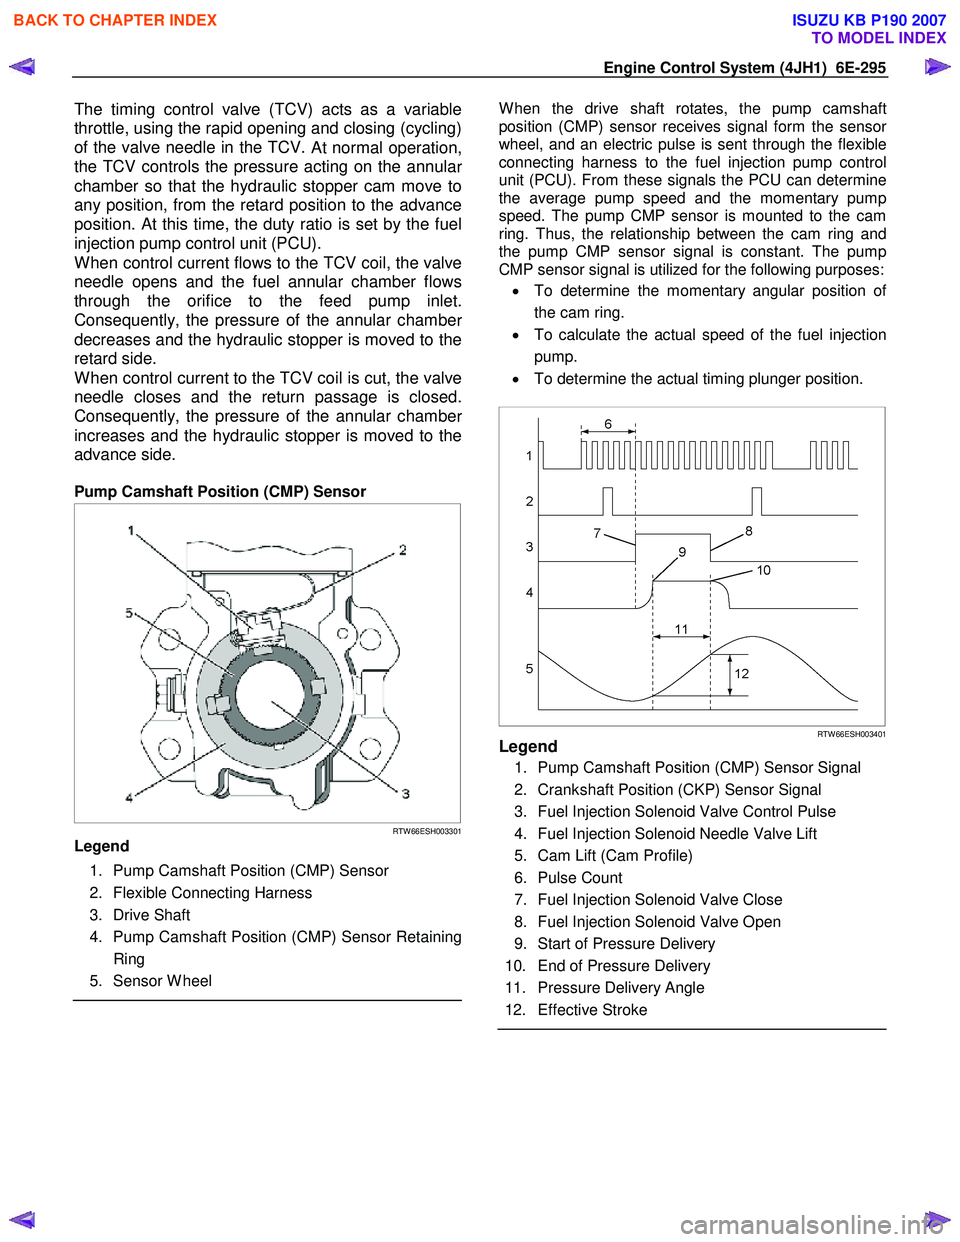
Pump Camshaft Position (CMP) Sensor
RTW 66ESH003301
Legend
1. Pump Camshaft Position (CMP) Sensor
2. Flexible Connecting Harness
3. Drive Shaft
4. Pump Camshaft Position (CMP) Sensor Retaining Ring
5. Sensor W heel
W hen the drive shaft rotates, the pump camshaft
position (CMP) sensor receives signal form the senso
r
wheel, and an electric pulse is sent through the flexible
connecting harness to the fuel injection pump control
unit (PCU). From these signals the PCU can determine
the average pump speed and the momentary pump
speed. The pump CMP sensor is mounted to the cam
ring. Thus, the relationship between the cam ring and
the pump CMP sensor signal is constant. The pump
CMP sensor signal is utilized for the following purposes:
• To determine the momentary angular position o
f
the cam ring.
• To calculate the actual speed of the fuel injection
pump.
• To determine the actual timing plunger position.
RTW 66ESH003401Legend
1. Pump Camshaft Position (CMP) Sensor Signal
2. Crankshaft Position (CKP) Sensor Signal
3. Fuel Injection Solenoid Valve Control Pulse
4. Fuel Injection Solenoid Needle Valve Lift
5. Cam Lift (Cam Profile)
6. Pulse Count
7. Fuel Injection Solenoid Valve Close
8. Fuel Injection Solenoid Valve Open
9. Start of Pressure Delivery
10. End of Pressure Delivery
11. Pressure Delivery Angle
12. Effective Stroke
BACK TO CHAPTER INDEX
TO MODEL INDEX
ISUZU KB P190 2007
Page 1472 of 6020
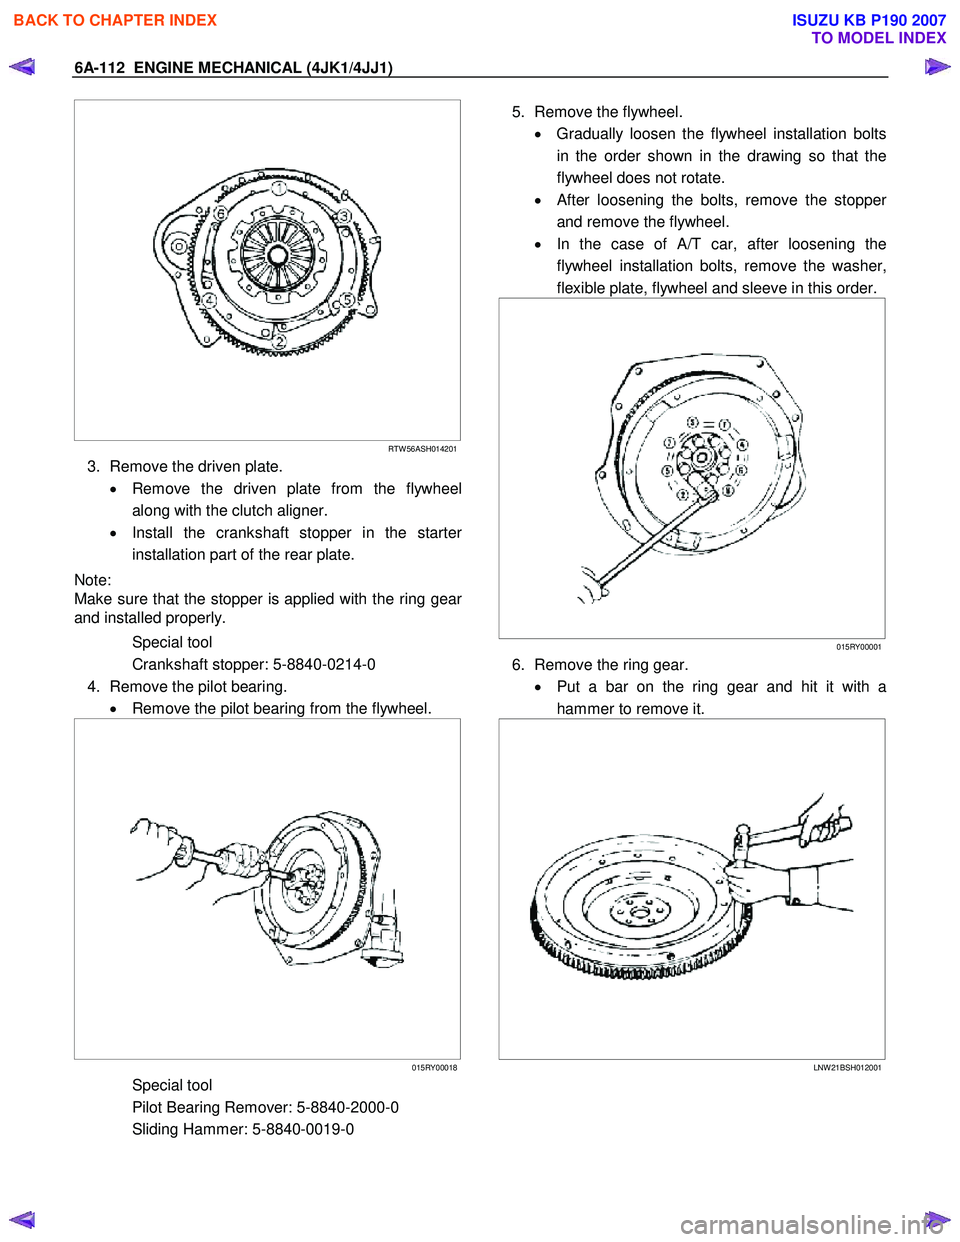
6A-112 ENGINE MECHANICAL (4JK1/4JJ1)
RTW 56ASH014201
3. Remove the driven plate.
• Remove the driven plate from the flywheel
along with the clutch aligner.
• Install the crankshaft stopper in the starte
r
installation part of the rear plate.
Note:
Make sure that the stopper is applied with the ring gea
r
and installed properly.
Special tool
Crankshaft stopper: 5-8840-0214-0
4. Remove the pilot bearing. • Remove the pilot bearing from the flywheel.
015RY00018
Special tool
Pilot Bearing Remover: 5-8840-2000-0
Sliding Hammer: 5-8840-0019-0
5. Remove the flywheel.
• Gradually loosen the flywheel installation bolts
in the order shown in the drawing so that the
flywheel does not rotate.
•
After loosening the bolts, remove the stopper
and remove the flywheel.
• In the case of A/T car, after loosening the
flywheel installation bolts, remove the washer,
flexible plate, flywheel and sleeve in this order.
015RY00001
6. Remove the ring gear.
• Put a bar on the ring gear and hit it with a
hammer to remove it.
LNW 21BSH012001
BACK TO CHAPTER INDEX
TO MODEL INDEX
ISUZU KB P190 2007
Page 1474 of 6020
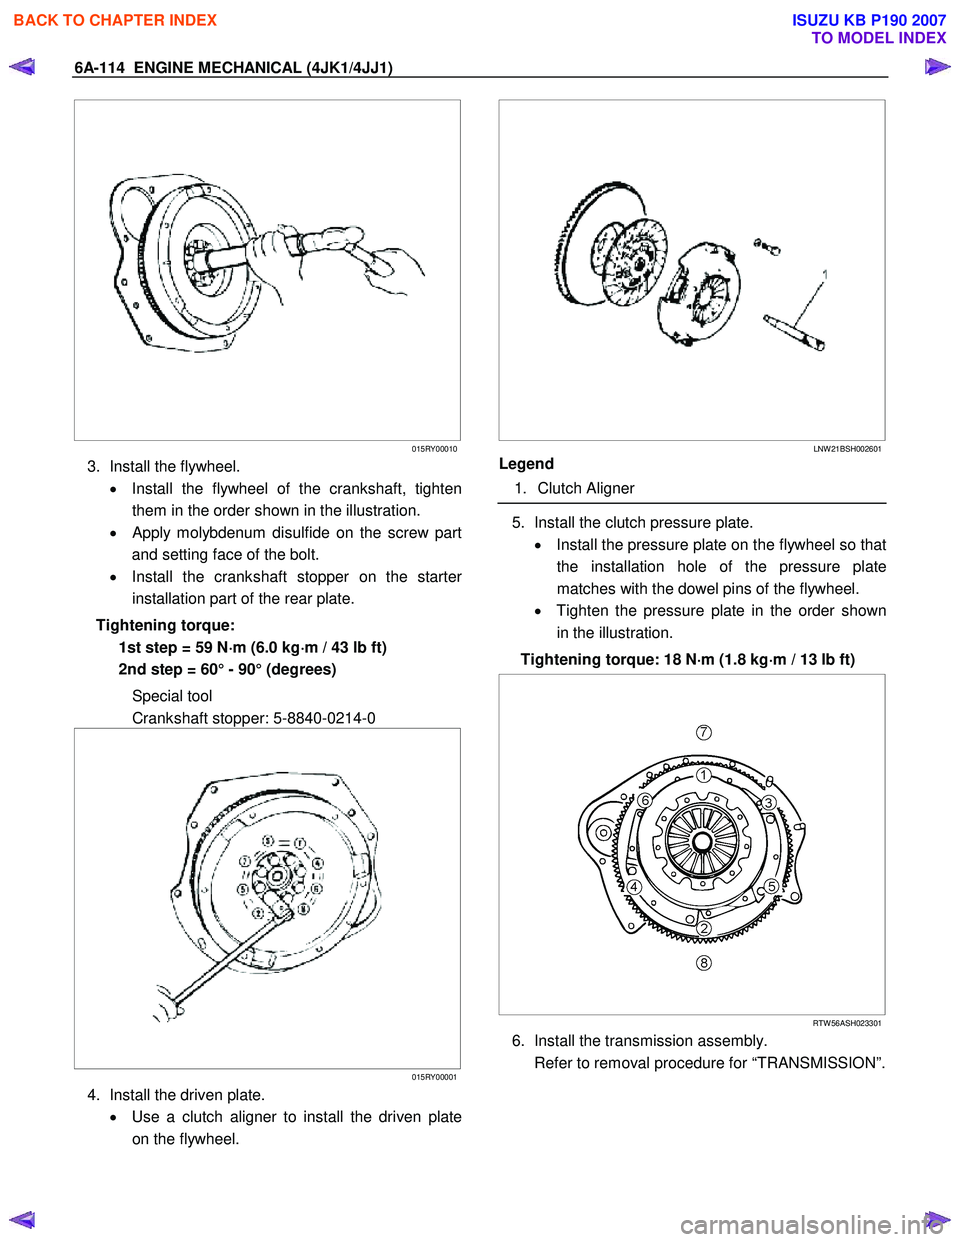
6A-114 ENGINE MECHANICAL (4JK1/4JJ1)
015RY00010
3. Install the flywheel.
• Install the flywheel of the crankshaft, tighten
them in the order shown in the illustration.
•
Apply molybdenum disulfide on the screw part
and setting face of the bolt.
• Install the crankshaft stopper on the starte
r
installation part of the rear plate.
Tightening torque: 1st step = 59 N ⋅
⋅⋅
⋅
m (6.0 kg ⋅
⋅⋅
⋅
m / 43 lb ft)
2nd step = 60° - 90° (degrees)
Special tool
Crankshaft stopper: 5-8840-0214-0
015RY00001
4. Install the driven plate.
• Use a clutch aligner to install the driven plate
on the flywheel.
LNW 21BSH002601
Legend
1. Clutch Aligner
5. Install the clutch pressure plate.
• Install the pressure plate on the flywheel so that
the installation hole of the pressure plate
matches with the dowel pins of the flywheel.
• Tighten the pressure plate in the order shown
in the illustration.
Tightening torque: 18 N ⋅
⋅⋅
⋅
m (1.8 kg ⋅
⋅⋅
⋅
m / 13 lb ft)
RTW 56ASH023301
6. Install the transmission assembly.
Refer to removal procedure for “TRANSMISSION”.
BACK TO CHAPTER INDEX
TO MODEL INDEX
ISUZU KB P190 2007
Page 1501 of 6020
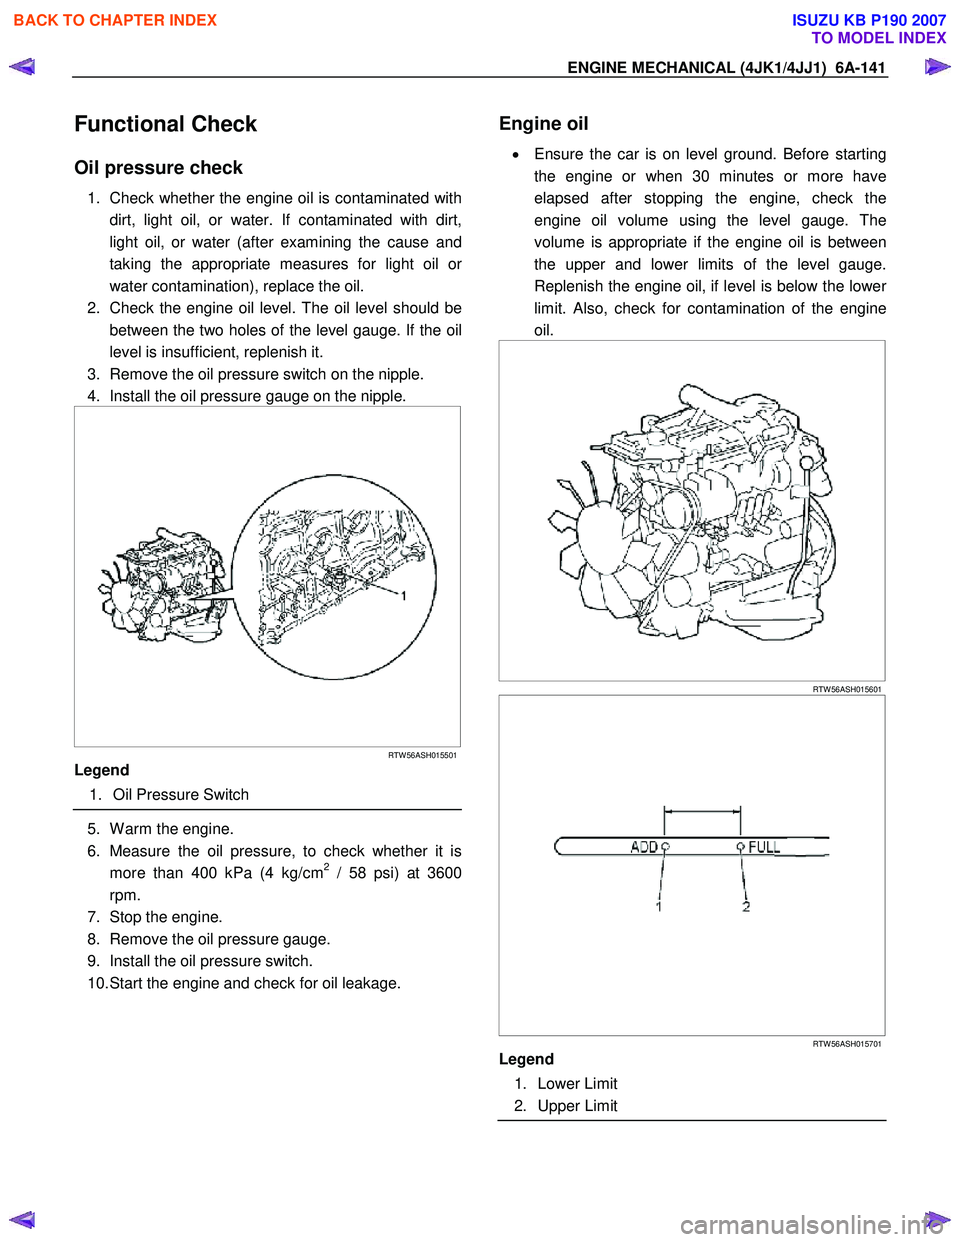
ENGINE MECHANICAL (4JK1/4JJ1) 6A-141
Functional Check
Oil pressure check
1. Check whether the engine oil is contaminated with
dirt, light oil, or water. If contaminated with dirt,
light oil, or water (after examining the cause and
taking the appropriate measures for light oil o
r
water contamination), replace the oil.
2. Check the engine oil level. The oil level should be between the two holes of the level gauge. If the oil
level is insufficient, replenish it.
3. Remove the oil pressure switch on the nipple.
4. Install the oil pressure gauge on the nipple.
RTW 56ASH015501
Legend
1. Oil Pressure Switch
5. W arm the engine.
6. Measure the oil pressure, to check whether it is more than 400 kPa (4 kg/cm
2 / 58 psi) at 3600
rpm.
7. Stop the engine.
8. Remove the oil pressure gauge.
9. Install the oil pressure switch.
10. Start the engine and check for oil leakage.
Engine oil
•
Ensure the car is on level ground. Before starting
the engine or when 30 minutes or more have
elapsed after stopping the engine, check the
engine oil volume using the level gauge. The
volume is appropriate if the engine oil is between
the upper and lower limits of the level gauge.
Replenish the engine oil, if level is below the lowe
r
limit. Also, check for contamination of the engine
oil.
RTW 56ASH015601
RTW 56ASH015701
Legend
1. Lower Limit
2. Upper Limit
BACK TO CHAPTER INDEX
TO MODEL INDEX
ISUZU KB P190 2007
Page 1530 of 6020
ENGINE COOLING (4JK1/4JJ1) 6B-7
Draining and Refilling Cooling System
Before draining the cooling system, inspect the system
and perform any necessary service to ensure that it is
clean, does not leak and is in proper working order.
The engine coolant (EC) level should be between the
“MIN" and “MAX" lines of the reserve tank when the
engine is cold. If low, check for leakage and add EC up
to the “MAX" line.
There should not be any excessive deposit of rust o
r
scales around the radiator cap or radiator filler hole, and
the EC should also be free from oil.
Replace the EC if excessively dirty.
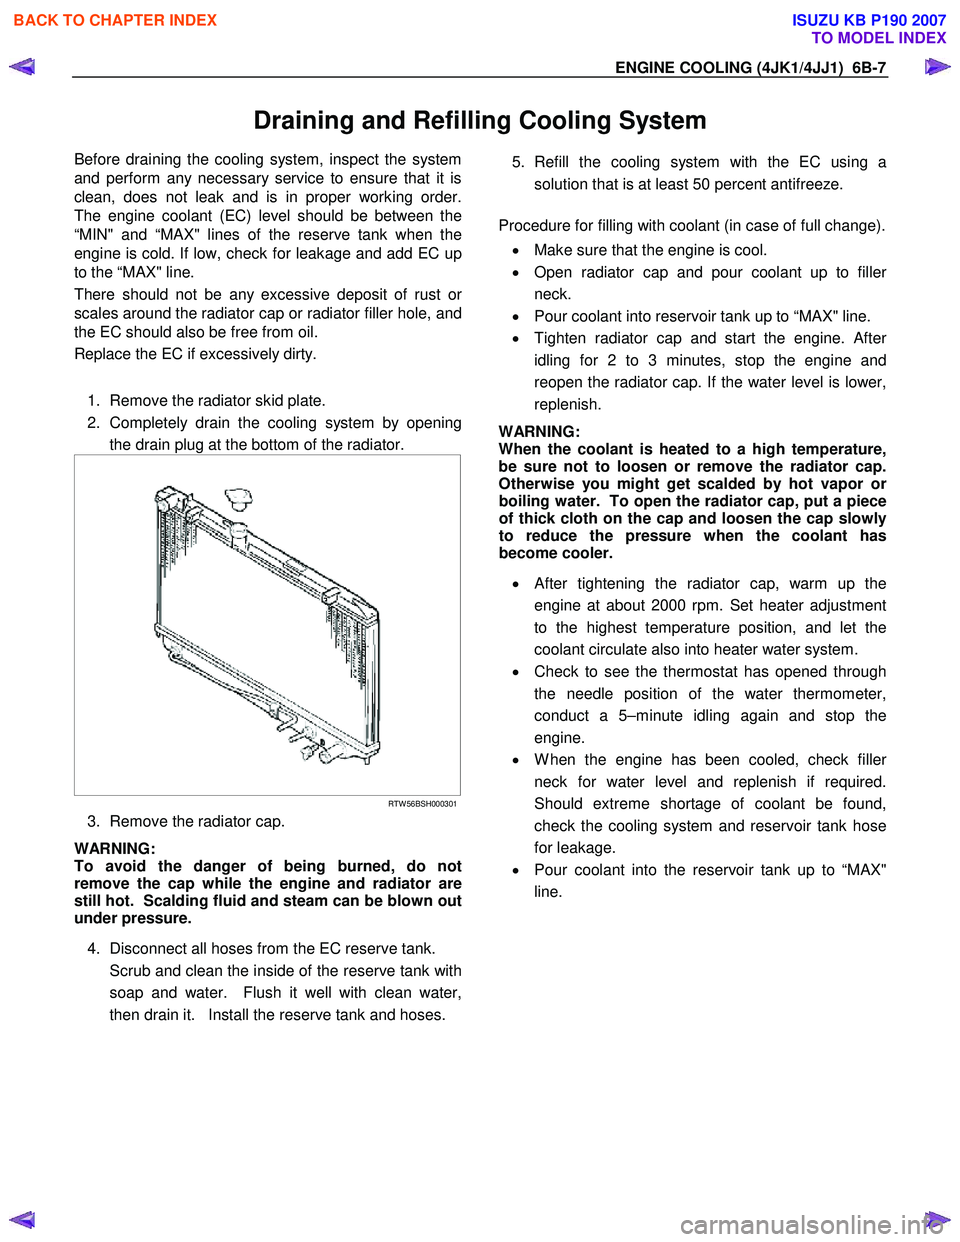
1. Remove the radiator skid plate.
2. Completely drain the cooling system by opening the drain plug at the bottom of the radiator.
RTW 56BSH000301
3. Remove the radiator cap.
WARNING:
To avoid the danger of being burned, do not
remove the cap while the engine and radiator are
still hot. Scalding fluid and steam can be blown out
under pressure.
4. Disconnect all hoses from the EC reserve tank.
Scrub and clean the inside of the reserve tank with soap and water. Flush it well with clean water,
then drain it. Install the reserve tank and hoses.
5. Refill the cooling system with the EC using a
solution that is at least 50 percent antifreeze.
Procedure for filling with coolant (in case of full change).
• Make sure that the engine is cool.
• Open radiator cap and pour coolant up to fille
r
neck.
• Pour coolant into reservoir tank up to “MAX" line.
• Tighten radiator cap and start the engine. Afte
r
idling for 2 to 3 minutes, stop the engine and
reopen the radiator cap. If the water level is lower,
replenish.
WARNING:
When the coolant is heated to a high temperature,
be sure not to loosen or remove the radiator cap.
Otherwise you might get scalded by hot vapor o
r
boiling water. To open the radiator cap, put a piece
of thick cloth on the cap and loosen the cap slowly
to reduce the pressure when the coolant has
become cooler.
• After tightening the radiator cap, warm up the
engine at about 2000 rpm. Set heater adjustment
to the highest temperature position, and let the
coolant circulate also into heater water system.
• Check to see the thermostat has opened through
the needle position of the water thermometer,
conduct a 5–minute idling again and stop the
engine.
• W hen the engine has been cooled, check fille
r
neck for water level and replenish if required.
Should extreme shortage of coolant be found,
check the cooling system and reservoir tank hose
for leakage.
• Pour coolant into the reservoir tank up to “MAX"
line.
BACK TO CHAPTER INDEX
TO MODEL INDEX
ISUZU KB P190 2007