2007 ISUZU KB P190 ignition
[x] Cancel search: ignitionPage 5740 of 6020
9A1-58 RESTRAINT CONTROL SYSTEM
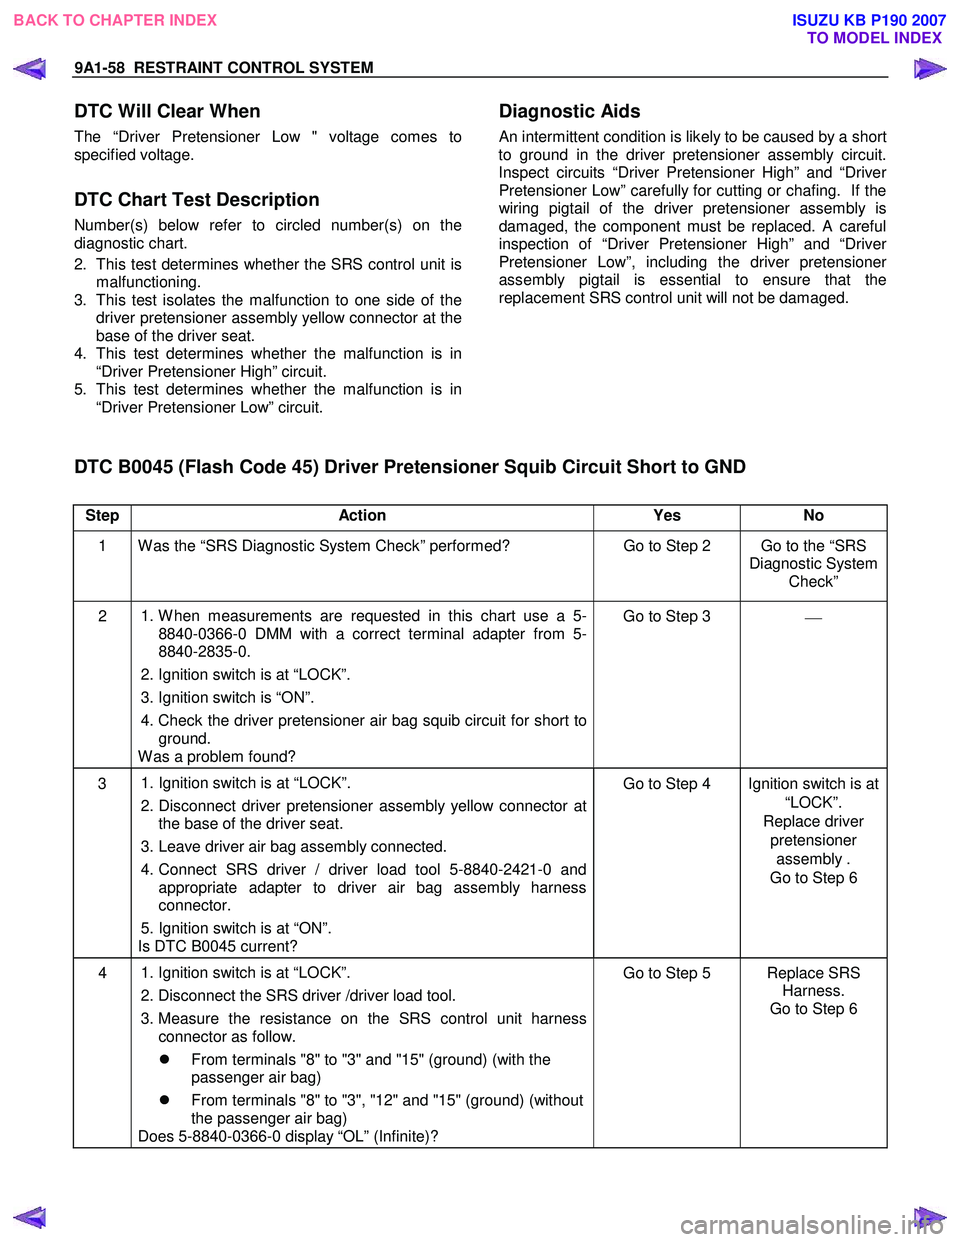
DTC Will Clear When
The “Driver Pretensioner Low " voltage comes to
specified voltage.
DTC Chart Test Description
Number(s) below refer to circled number(s) on the
diagnostic chart.
2. This test determines whether the SRS control unit is malfunctioning.
3. This test isolates the malfunction to one side of the driver pretensioner assembly yellow connector at the
base of the driver seat.
4. This test determines whether the malfunction is in “Driver Pretensioner High” circuit.
5. This test determines whether the malfunction is in “Driver Pretensioner Low” circuit.
Diagnostic Aids
An intermittent condition is likely to be caused by a short
to ground in the driver pretensioner assembly circuit.
Inspect circuits “Driver Pretensioner High” and “Drive
r
Pretensioner Low” carefully for cutting or chafing. If the
wiring pigtail of the driver pretensioner assembly is
damaged, the component must be replaced. A careful
inspection of “Driver Pretensioner High” and “Drive
r
Pretensioner Low”, including the driver pretensione
r
assembly pigtail is essential to ensure that the
replacement SRS control unit will not be damaged.
DTC B0045 (Flash Code 45) Driver Pretensioner Squib Circuit Short to GND
Step Action Yes No
1 W as the “SRS Diagnostic System Check” performed? Go to Step 2 Go to the “SRS
Diagnostic System Check”
2 1. W hen measurements are requested in this chart use a 5-
8840-0366-0 DMM with a correct terminal adapter from 5-
8840-2835-0.
2. Ignition switch is at “LOCK”.
3. Ignition switch is “ON”.
4. Check the driver pretensioner air bag squib circuit for short to ground.
W as a problem found? Go to Step 3
3
1. Ignition switch is at “LOCK”.
2. Disconnect driver pretensioner assembly yellow connector at
the base of the driver seat.
3. Leave driver air bag assembly connected.
4. Connect SRS driver / driver load tool 5-8840-2421-0 and
appropriate adapter to driver air bag assembly harness
connector.
5. Ignition switch is at “ON”.
Is DTC B0045 current? Go to Step 4 Ignition switch is at
“LOCK”.
Replace driver pretensioner assembly .
Go to Step 6
4 1. Ignition switch is at “LOCK”.
2. Disconnect the SRS driver /driver load tool.
3. Measure the resistance on the SRS control unit harness connector as follow.
�z From terminals "8" to "3" and "15" (ground) (with the
passenger air bag)
�z From terminals "8" to "3", "12" and "15" (ground) (without
the passenger air bag)
Does 5-8840-0366-0 display “OL” (Infinite)? Go to Step 5 Replace SRS
Harness.
Go to Step 6
BACK TO CHAPTER INDEX TO MODEL INDEX
ISUZU KB P190 2007
Page 5742 of 6020
9A1-60 RESTRAINT CONTROL SYSTEM
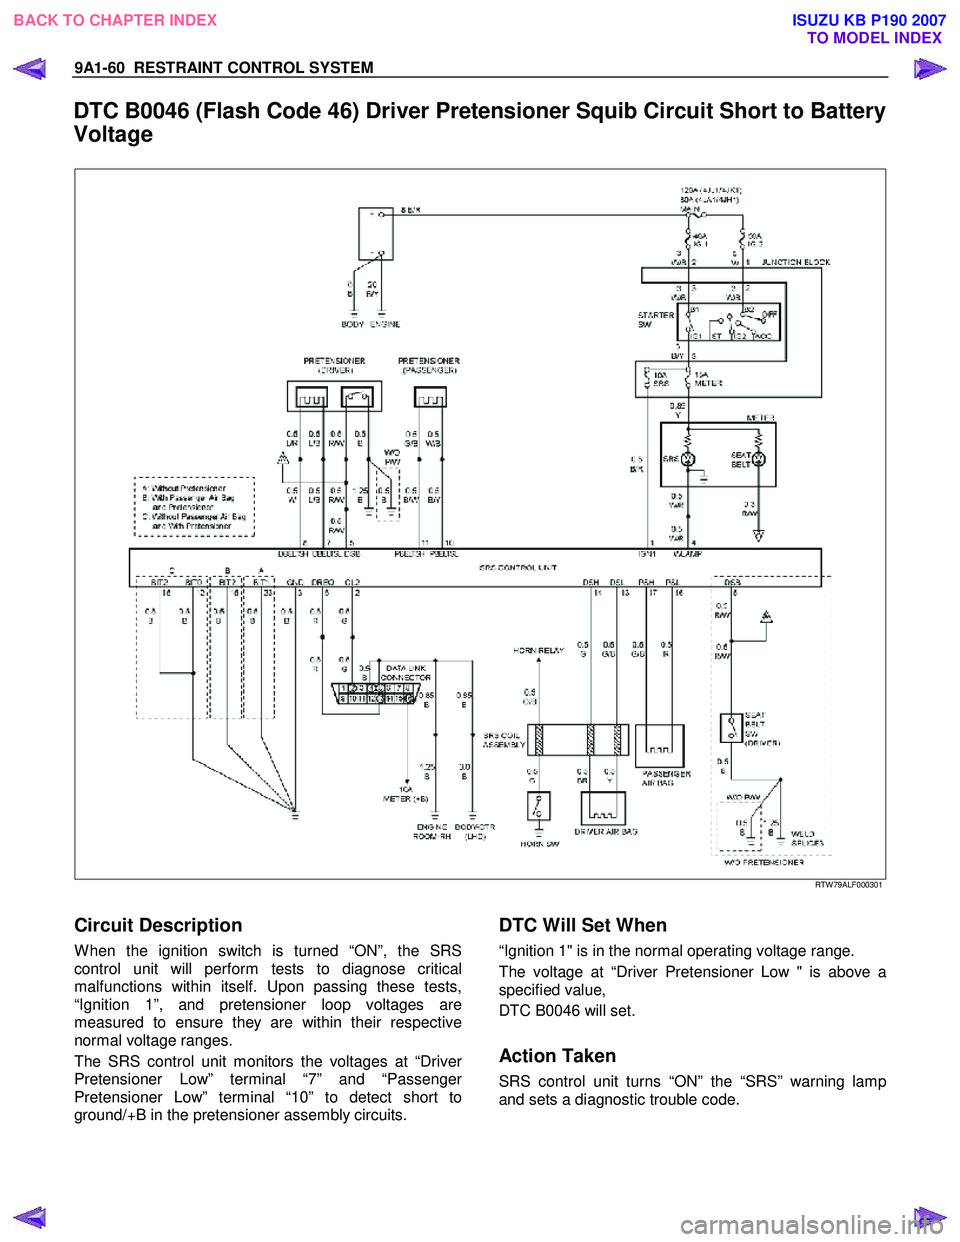
DTC B0046 (Flash Code 46) Driver Pretensioner Squib Circuit Short to Battery
Voltage
RTW 79ALF000301
Circuit Description
W hen the ignition switch is turned “ON”, the SRS
control unit will perform tests to diagnose critical
malfunctions within itself. Upon passing these tests,
“Ignition 1”, and pretensioner loop voltages are
measured to ensure they are within their respective
normal voltage ranges.
The SRS control unit monitors the voltages at “Drive
r
Pretensioner Low” terminal “7” and “Passenger
Pretensioner Low” terminal “10” to detect short to
ground/+B in the pretensioner assembly circuits.
DTC Will Set When
“Ignition 1" is in the normal operating voltage range.
The voltage at “Driver Pretensioner Low " is above a
specified value,
DTC B0046 will set.
Action Taken
SRS control unit turns “ON” the “SRS” warning lamp
and sets a diagnostic trouble code.
BACK TO CHAPTER INDEX TO MODEL INDEX
ISUZU KB P190 2007
Page 5743 of 6020
RESTRAINT CONTROL SYSTEM 9A1-61
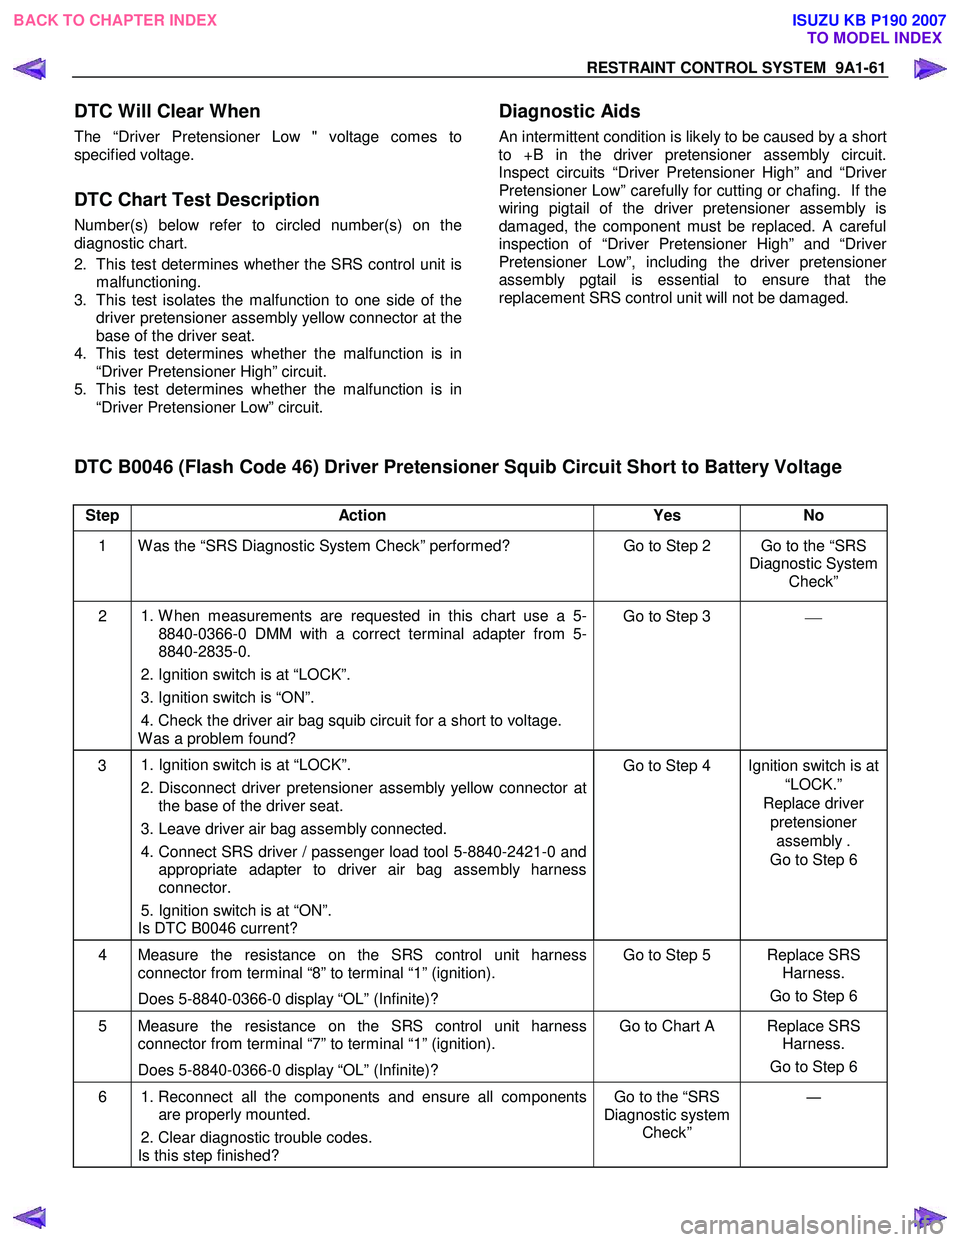
DTC Will Clear When
The “Driver Pretensioner Low " voltage comes to
specified voltage.
DTC Chart Test Description
Number(s) below refer to circled number(s) on the
diagnostic chart.
2. This test determines whether the SRS control unit is malfunctioning.
3. This test isolates the malfunction to one side of the driver pretensioner assembly yellow connector at the
base of the driver seat.
4. This test determines whether the malfunction is in “Driver Pretensioner High” circuit.
5. This test determines whether the malfunction is in “Driver Pretensioner Low” circuit.
Diagnostic Aids
An intermittent condition is likely to be caused by a short
to +B in the driver pretensioner assembly circuit.
Inspect circuits “Driver Pretensioner High” and “Drive
r
Pretensioner Low” carefully for cutting or chafing. If the
wiring pigtail of the driver pretensioner assembly is
damaged, the component must be replaced. A careful
inspection of “Driver Pretensioner High” and “Drive
r
Pretensioner Low”, including the driver pretensione
r
assembly pgtail is essential to ensure that the
replacement SRS control unit will not be damaged.
DTC B0046 (Flash Code 46) Driver Pretensioner Squib Circuit Short to Battery Voltage
Step Action Yes No
1 W as the “SRS Diagnostic System Check” performed? Go to Step 2 Go to the “SRS
Diagnostic System Check”
2 1. W hen measurements are requested in this chart use a 5-
8840-0366-0 DMM with a correct terminal adapter from 5-
8840-2835-0.
2. Ignition switch is at “LOCK”.
3. Ignition switch is “ON”.
4. Check the driver air bag squib circuit for a short to voltage.
W as a problem found? Go to Step 3
3
1. Ignition switch is at “LOCK”.
2. Disconnect driver pretensioner assembly yellow connector at
the base of the driver seat.
3. Leave driver air bag assembly connected.
4. Connect SRS driver / passenger load tool 5-8840-2421-0 and
appropriate adapter to driver air bag assembly harness
connector.
5. Ignition switch is at “ON”.
Is DTC B0046 current? Go to Step 4 Ignition switch is at
“LOCK.”
Replace driver pretensioner assembly .
Go to Step 6
4 Measure the resistance on the SRS control unit harness
connector from terminal “8” to terminal “1” (ignition).
Does 5-8840-0366-0 display “OL” (Infinite)? Go to Step 5 Replace SRS
Harness.
Go to Step 6
5 Measure the resistance on the SRS control unit harness connector from terminal “7” to terminal “1” (ignition).
Does 5-8840-0366-0 display “OL” (Infinite)? Go to Chart A Replace SRS
Harness.
Go to Step 6
6 1. Reconnect all the components and ensure all components
are properly mounted.
2. Clear diagnostic trouble codes.
Is this step finished? Go to the “SRS
Diagnostic system Check” ―
BACK TO CHAPTER INDEX
TO MODEL INDEX
ISUZU KB P190 2007
Page 5745 of 6020
RESTRAINT CONTROL SYSTEM 9A1-63
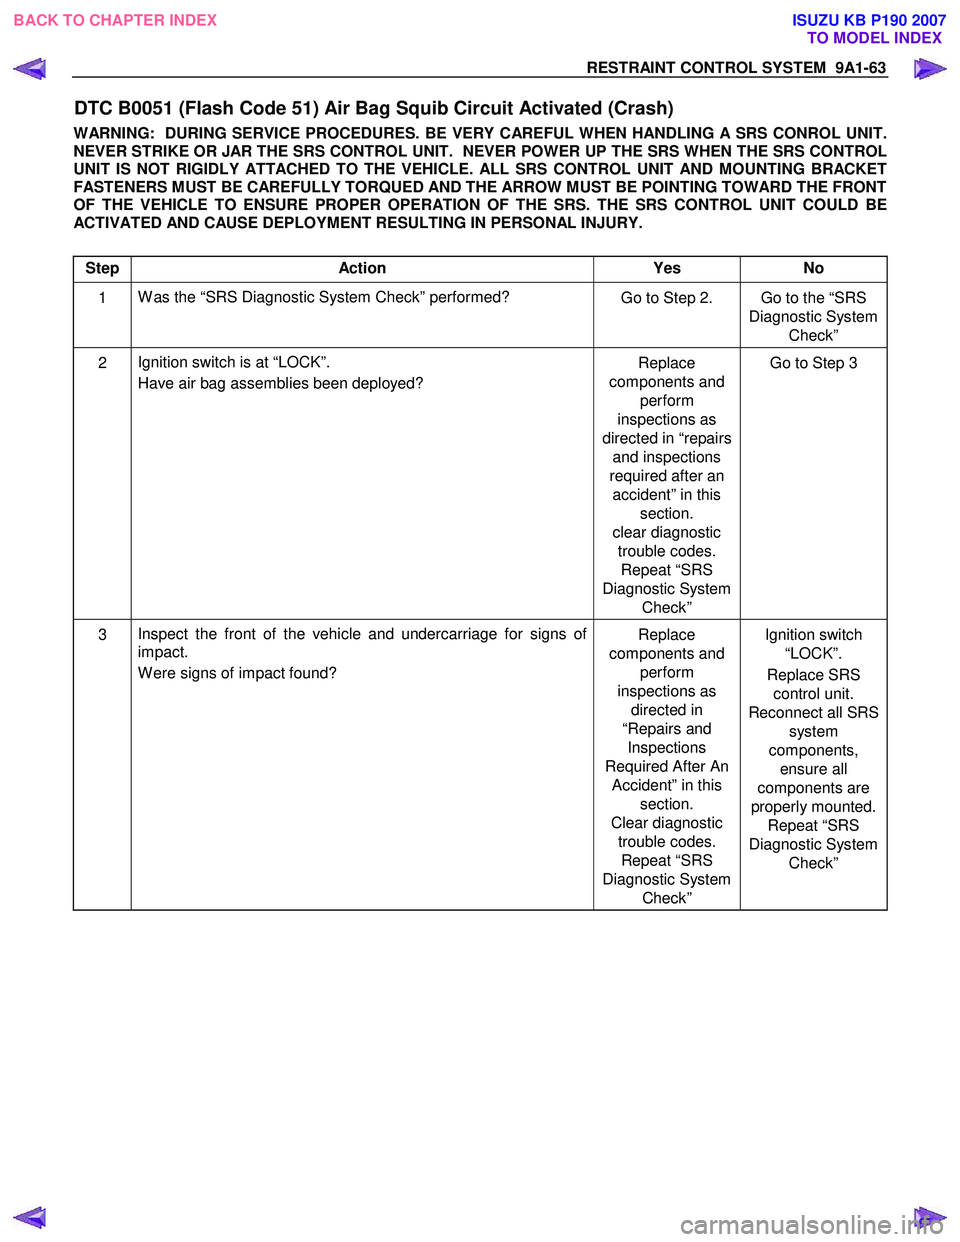
DTC B0051 (Flash Code 51) Air Bag Squib Circuit Activated (Crash)
WARNING: DURING SERVICE PROCEDURES. BE VERY CAREFUL WHEN HANDLING A SRS CONROL UNIT.
NEVER STRIKE OR JAR THE SRS CONTROL UNIT. NEVER POWER UP THE SRS WHEN THE SRS CONTROL
UNIT IS NOT RIGIDLY ATTACHED TO THE VEHICLE. ALL SRS CONTROL UNIT AND MOUNTING BRACKET
FASTENERS MUST BE CAREFULLY TORQUED AND THE ARROW MUST BE POINTING TOWARD THE FRONT
OF THE VEHICLE TO ENSURE PROPER OPERATION OF THE SRS. THE SRS CONTROL UNIT COULD BE
ACTIVATED AND CAUSE DEPLOYMENT RESULTING IN PERSONAL INJURY.
Step Action Yes No
1 W as the “SRS Diagnostic System Check” performed?
Go to Step 2. Go to the “SRS
Diagnostic System Check”
2 Ignition switch is at “LOCK”.
Have air bag assemblies been deployed? Replace
components and perform
inspections as
directed in “repairs and inspections
required after an accident” in this section.
clear diagnostic trouble codes. Repeat “SRS
Diagnostic System Check” Go to Step 3
3
Inspect the front of the vehicle and undercarriage for signs of
impact.
W ere signs of impact found? Replace
components and perform
inspections as directed in
“Repairs and Inspections
Required After An Accident” in this section.
Clear diagnostic trouble codes. Repeat “SRS
Diagnostic System Check” Ignition switch
“LOCK”.
Replace SRS control unit.
Reconnect all SRS system
components, ensure all
components are
properly mounted. Repeat “SRS
Diagnostic System Check”
BACK TO CHAPTER INDEX TO MODEL INDEX
ISUZU KB P190 2007
Page 5747 of 6020
RESTRAINT CONTROL SYSTEM 9A1-65
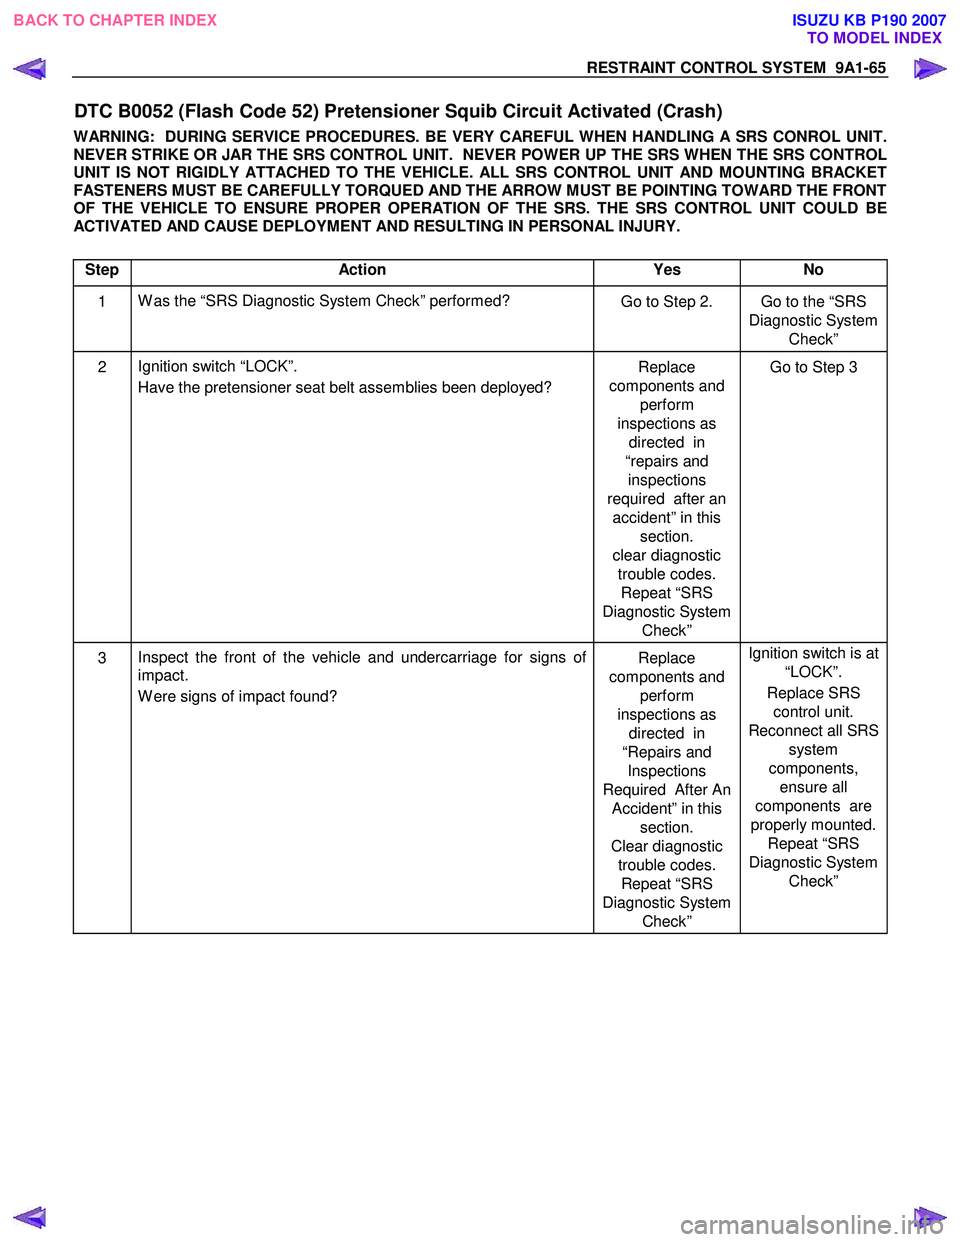
DTC B0052 (Flash Code 52) Pretensioner Squib Circuit Activated (Crash)
WARNING: DURING SERVICE PROCEDURES. BE VERY CAREFUL WHEN HANDLING A SRS CONROL UNIT.
NEVER STRIKE OR JAR THE SRS CONTROL UNIT. NEVER POWER UP THE SRS WHEN THE SRS CONTROL
UNIT IS NOT RIGIDLY ATTACHED TO THE VEHICLE. ALL SRS CONTROL UNIT AND MOUNTING BRACKET
FASTENERS MUST BE CAREFULLY TORQUED AND THE ARROW MUST BE POINTING TOWARD THE FRONT
OF THE VEHICLE TO ENSURE PROPER OPERATION OF THE SRS. THE SRS CONTROL UNIT COULD BE
ACTIVATED AND CAUSE DEPLOYMENT AND RESULTING IN PERSONAL INJURY.
Step Action Yes No
1 W as the “SRS Diagnostic System Check” performed?
Go to Step 2. Go to the “SRS
Diagnostic System Check”
2 Ignition switch “LOCK”.
Have the pretensioner seat belt assemblies been deployed? Replace
components and perform
inspections as directed in
“repairs and inspections
required after an accident” in this section.
clear diagnostic trouble codes. Repeat “SRS
Diagnostic System Check” Go to Step 3
3
Inspect the front of the vehicle and undercarriage for signs of
impact.
W ere signs of impact found? Replace
components and perform
inspections as directed in
“Repairs and Inspections
Required After An Accident” in this section.
Clear diagnostic trouble codes. Repeat “SRS
Diagnostic System Check” Ignition switch is at
“LOCK”.
Replace SRS control unit.
Reconnect all SRS system
components, ensure all
components are
properly mounted. Repeat “SRS
Diagnostic System Check”
BACK TO CHAPTER INDEX TO MODEL INDEX
ISUZU KB P190 2007
Page 5749 of 6020
RESTRAINT CONTROL SYSTEM 9A1-67
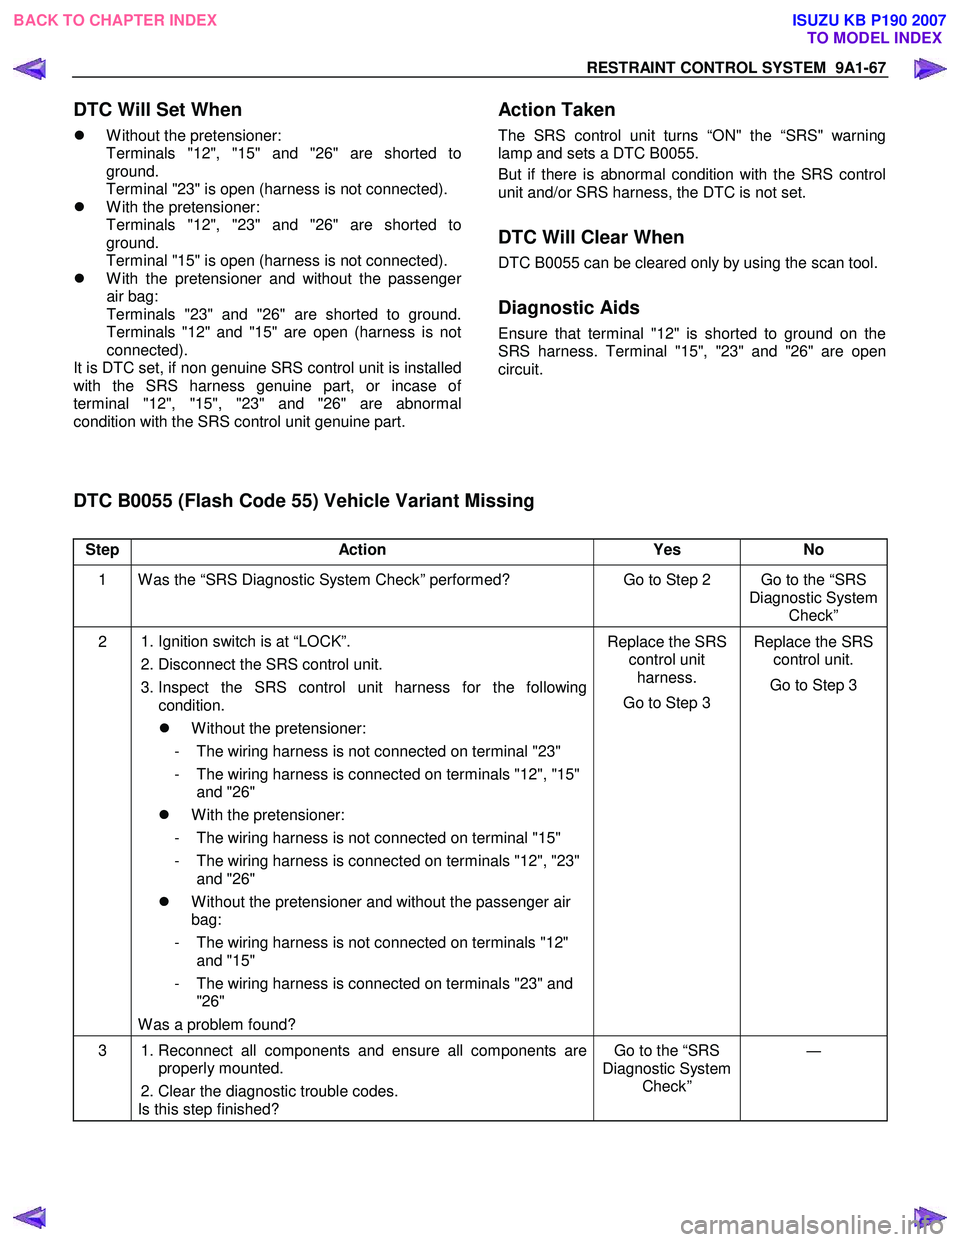
Step Action Yes No
1 W as the “SRS Diagnostic System Check” performed? Go to Step 2 Go to the “SRS
Diagnostic System Check”
2 1. Ignition switch is at “LOCK”.
2. Disconnect the SRS control unit.
3. Inspect the SRS control unit harness for the following condition.
�z W ithout the pretensioner:
- The wiring harness is not connected on terminal "23"
- The wiring harness is connected on terminals "12", "15" and "26"
�z W ith the pretensioner:
- The wiring harness is not connected on terminal "15"
- The wiring harness is connected on terminals "12", "23" and "26"
�z W ithout the pretensioner and without the passenger air
bag:
- The wiring harness is not connected on terminals "12" and "15"
- The wiring harness is connected on terminals "23" and "26"
W as a problem found? Replace the SRS
control unit harness.
Go to Step 3 Replace the SRS
control unit.
Go to Step 3
3 1. Reconnect all components and ensure all components are
properly mounted.
2. Clear the diagnostic trouble codes.
Is this step finished? Go to the “SRS
Diagnostic System Check” ―
DTC Will Set When
�z W ithout the pretensioner:
Terminals "12", "15" and "26" are shorted to
ground.
Terminal "23" is open (harness is not connected).
�z W ith the pretensioner:
Terminals "12", "23" and "26" are shorted to
ground.
Terminal "15" is open (harness is not connected).
�z W ith the pretensioner and without the passenge
r
air bag:
Terminals "23" and "26" are shorted to ground.
Terminals "12" and "15" are open (harness is not
connected).
It is DTC set, if non genuine SRS control unit is installed
with the SRS harness genuine part, or incase o
f
terminal "12", "15", "23" and "26" are abnormal
condition with the SRS control unit genuine part.
Action Taken
The SRS control unit turns “ON" the “SRS" warning
lamp and sets a DTC B0055.
But if there is abnormal condition with the SRS control
unit and/or SRS harness, the DTC is not set.
DTC Will Clear When
DTC B0055 can be cleared only by using the scan tool.
Diagnostic Aids
Ensure that terminal "12" is shorted to ground on the
SRS harness. Terminal "15", "23" and "26" are open
circuit.
DTC B0055 (Flash Code 55) Vehicle Variant Missing
BACK TO CHAPTER INDEX TO MODEL INDEX
ISUZU KB P190 2007
Page 5750 of 6020
9A1-68 RESTRAINT CONTROL SYSTEM
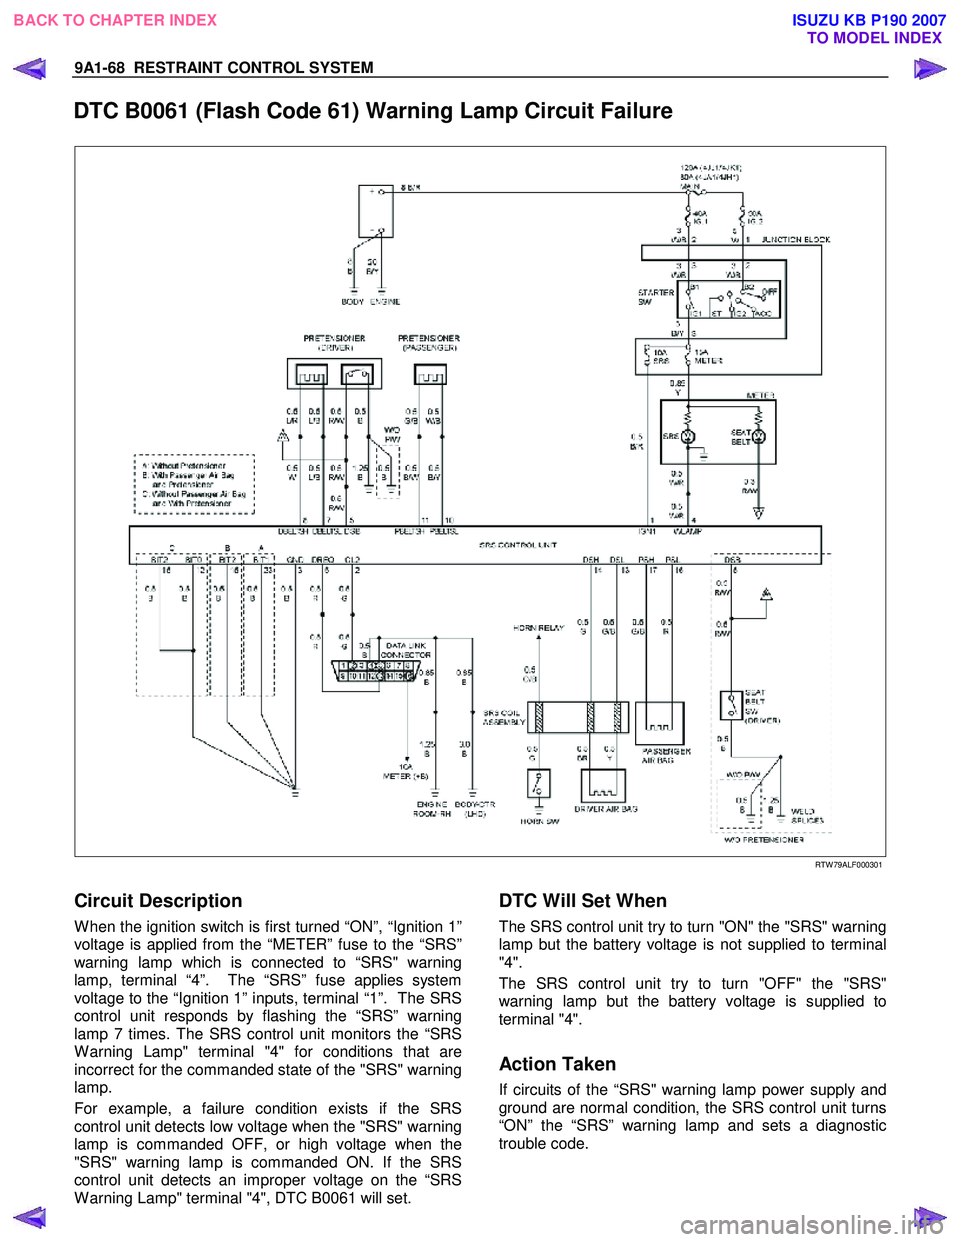
DTC B0061 (Flash Code 61) Warning Lamp Circuit Failure
RTW 79ALF000301
Circuit Description
W hen the ignition switch is first turned “ON”, “Ignition 1”
voltage is applied from the “METER” fuse to the “SRS”
warning lamp which is connected to “SRS" warning
lamp, terminal “4”. The “SRS” fuse applies system
voltage to the “Ignition 1” inputs, terminal “1”. The SRS
control unit responds by flashing the “SRS” warning
lamp 7 times. The SRS control unit monitors the “SRS
W arning Lamp" terminal "4" for conditions that are
incorrect for the commanded state of the "SRS" warning
lamp.
For example, a failure condition exists if the SRS
control unit detects low voltage when the "SRS" warning
lamp is commanded OFF, or high voltage when the
"SRS" warning lamp is commanded ON. If the SRS
control unit detects an improper voltage on the “SRS
W arning Lamp" terminal "4", DTC B0061 will set.
DTC Will Set When
The SRS control unit try to turn "ON" the "SRS" warning
lamp but the battery voltage is not supplied to terminal
"4".
The SRS control unit try to turn "OFF" the "SRS"
warning lamp but the battery voltage is supplied to
terminal "4".
Action Taken
If circuits of the “SRS" warning lamp power supply and
ground are normal condition, the SRS control unit turns
“ON” the “SRS” warning lamp and sets a diagnostic
trouble code.
BACK TO CHAPTER INDEX TO MODEL INDEX
ISUZU KB P190 2007
Page 5751 of 6020
RESTRAINT CONTROL SYSTEM 9A1-69
DTC Will Clear When
The malfunction is no longer occurring and the ignition
is turned to “LOCK”.
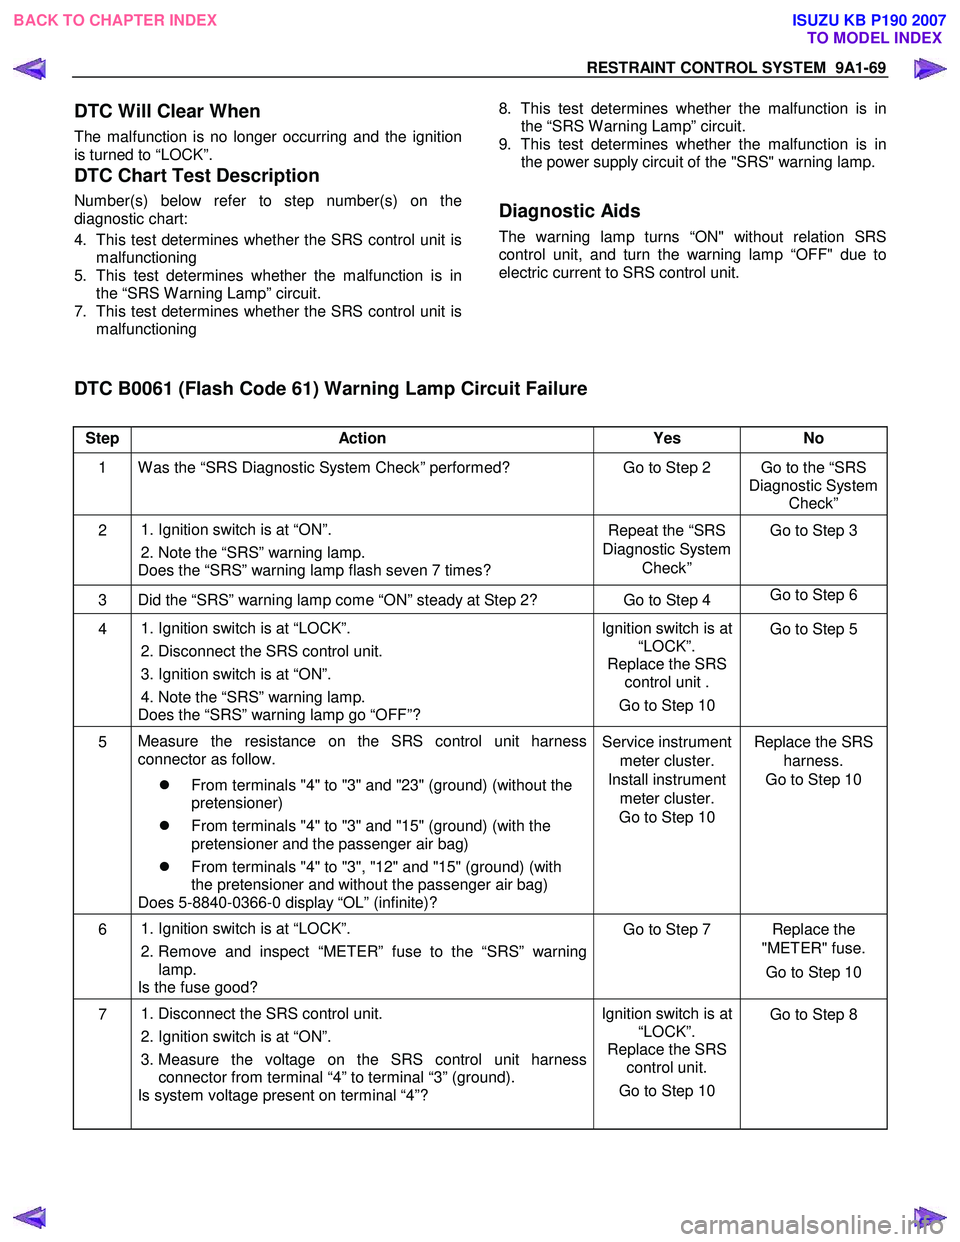
DTC Chart Test Description
Number(s) below refer to step number(s) on the
diagnostic chart:
4. This test determines whether the SRS control unit is malfunctioning
5. This test determines whether the malfunction is in the “SRS W arning Lamp” circuit.
7. This test determines whether the SRS control unit is malfunctioning
8. This test determines whether the malfunction is in
the “SRS W arning Lamp” circuit.
9. This test determines whether the malfunction is in the power supply circuit of the "SRS" warning lamp.
Diagnostic Aids
The warning lamp turns “ON" without relation SRS
control unit, and turn the warning lamp “OFF" due to
electric current to SRS control unit.
DTC B0061 (Flash Code 61) Warning Lamp Circuit Failure
Step Action Yes No
1 W as the “SRS Diagnostic System Check” performed? Go to Step 2 Go to the “SRS
Diagnostic System Check”
2
1. Ignition switch is at “ON”.
2. Note the “SRS” warning lamp.
Does the “SRS” warning lamp flash seven 7 times? Repeat the “SRS
Diagnostic System Check” Go to Step 3
3 Did the “SRS” warning lamp come “ON” steady at Step 2? Go to Step 4
Go to Step 6
4
1. Ignition switch is at “LOCK”.
2. Disconnect the SRS control unit.
3. Ignition switch is at “ON”.
4. Note the “SRS” warning lamp.
Does the “SRS” warning lamp go “OFF”? Ignition switch is at
“LOCK”.
Replace the SRS control unit .
Go to Step 10 Go to Step 5
5
Measure the resistance on the SRS control unit harness
connector as follow.
�z From terminals "4" to "3" and "23" (ground) (without the
pretensioner)
�z From terminals "4" to "3" and "15" (ground) (with the
pretensioner and the passenger air bag)
�z From terminals "4" to "3", "12" and "15" (ground) (with
the pretensioner and without the passenger air bag)
Does 5-8840-0366-0 display “OL” (infinite)? Service instrument
meter cluster.
Install instrument meter cluster.
Go to Step 10 Replace the SRS
harness.
Go to Step 10
6
1. Ignition switch is at “LOCK”.
2. Remove and inspect “METER” fuse to the “SRS” warning lamp.
Is the fuse good? Go to Step 7 Replace the
"METER" fuse.
Go to Step 10
7 1. Disconnect the SRS control unit.
2. Ignition switch is at “ON”.
3. Measure the voltage on the SRS control unit harness connector from terminal “4” to terminal “3” (ground).
Is system voltage present on terminal “4”? Ignition switch is at
“LOCK”.
Replace the SRS control unit.
Go to Step 10
Go to Step 8
BACK TO CHAPTER INDEX
TO MODEL INDEX
ISUZU KB P190 2007