Page 5099 of 6020

ELECTRICAL-BODY AND CHASSIS 8A-161
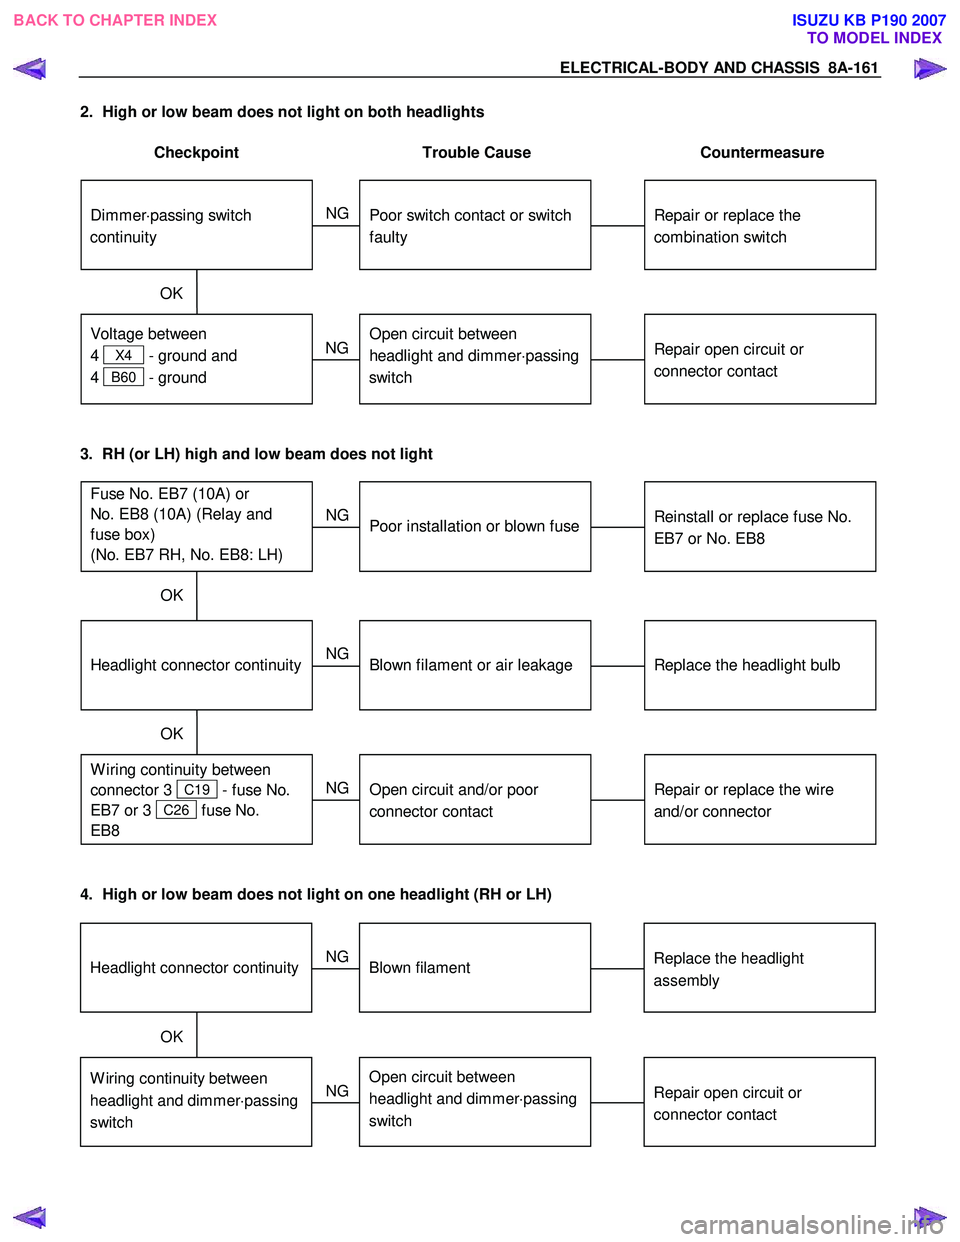
2. High or low beam does not light on both headlights
Checkpoint Trouble Cause Countermeasure
Repair or replace the
combination switch
Dimmer ⋅passing switch
continuity
Poor switch contact or switch
faulty
NG
Repair open circuit or
connector contact
Voltage between
4
X4 - ground and
4
B60 - ground
Open circuit between
headlight and dimmer ⋅passing
switch
NG
OK
3. RH (or LH) high and low beam does not light
Replace the headlight bulb
Headlight connector continuity
Blown filament or air leakage
NG
Repair or replace the wire
and/or connector
W iring continuity between
connector 3
C19 - fuse No.
EB7 or 3
C26 fuse No.
EB8
Open circuit and/or poor
connector contact
NG
OK
Reinstall or replace fuse No.
EB7 or No. EB8
Fuse No. EB7 (10A) or
No. EB8 (10A) (Relay and
fuse box)
(No. EB7 RH, No. EB8: LH)
Poor installation or blown fuse
NG
OK
4. High or low beam does not light on one headlight (RH or LH)
Replace the headlight
assemblyHeadlight connector continuityBlown filament
NG
Repair open circuit or
connector contactW iring continuity between
headlight and dimmer ⋅passing
switchOpen circuit between
headlight and dimmer ⋅passing
switch
NG
OK
BACK TO CHAPTER INDEX
TO MODEL INDEXISUZU KB P190 2007
Page 5100 of 6020

8A-162 ELECTRICAL-BODY AND CHASSIS
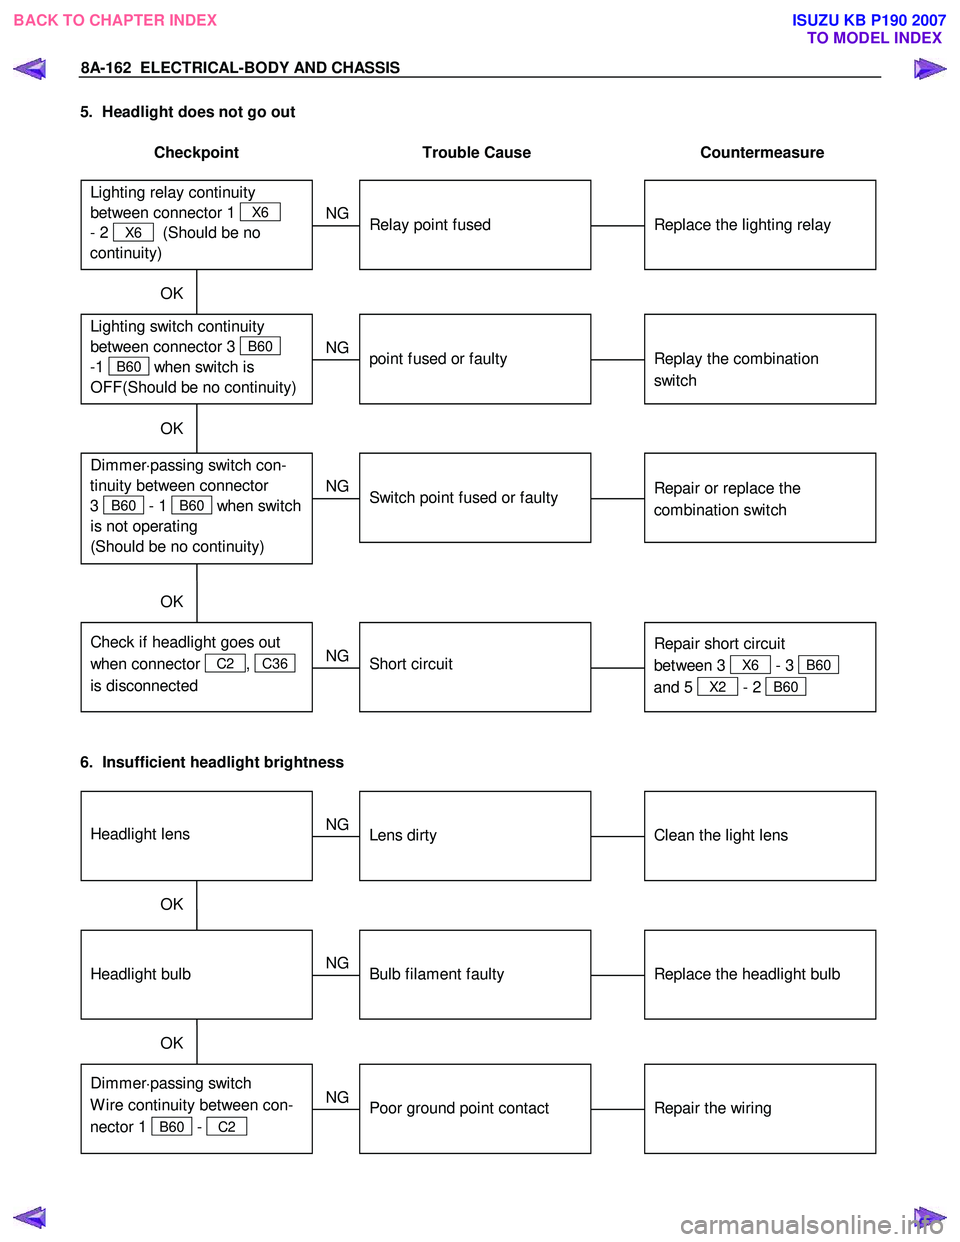
5. Headlight does not go out
Checkpoint Trouble Cause Countermeasure
Replace the lighting relay
Lighting relay continuity
between connector 1
X6
- 2
X6 (Should be no
continuity)
Relay point fused
NG
Replay the combination
switch Lighting switch continuity
between connector 3
B60
-1
B60 when switch is
OFF(S hould be no continuity)
point fused or faulty
NG
OK
OK
Repair or replace the
combination switch
Dimmer ⋅passing switch con-
tinuity between connector
3
B60 - 1 B60 when switch
is not operating
(Should be no continuity)
Switch point fused or faulty
NG
Repair short circuit
between 3
X6 - 3 B60
and 5
X2 - 2 B60
Check if headlight goes out
when connector
C2 , C36
is disconnected
Short circuit
NG
OK
6. Insufficient headlight brightness
Replace the headlight bulb
Headlight bulb
Bulb filament faulty
NG
Repair the wiring
Dimmer ⋅passing switch
W ire continuity between con-
nector 1
B60 - C2
Poor ground point contact
NG
OK
Clean the light lens
Headlight lens
Lens dirty
NG
OK
BACK TO CHAPTER INDEX
TO MODEL INDEXISUZU KB P190 2007
Page 5101 of 6020
ELECTRICAL-BODY AND CHASSIS 8A-163
7. Passing light does not function when dimmer switch is operated
Checkpoint Trouble Cause Countermeasure
Repair or replace the dimmer
switch
Dimmer switch
Poor switch point contact
NG
Repair open circuit between
3
X6 - 3 B60
Voltage between
3
B60 - ground (Should
be battery v oltage present)
Open circuit
NG
OK
8. Headlight beam does not change when dimmer switch is operated
Repair or replace the dimmer
switchDimmer switchLoose beam lever or foreign
material in switch
NG
BACK TO CHAPTER INDEX TO MODEL INDEXISUZU KB P190 2007
Page 5102 of 6020
8A-164 ELECTRICAL-BODY AND CHASSIS
TAIL LIGHT, LICENSE PLATE LIGHT, CLEARANCE LIGHT
1. All lights do not light
Checkpoint Trouble Cause Countermeasure
Repair or replace the
combination switch
Lighting switch continuity
between connector
2
B60 - 1 B60
Poor switch point or connector
contact
NG
Reinstall or replace the tail
relay
Tail relay
Poor relay contact or relay
faulty
NG
OK
Reinstall or replace the fuse
No. EB12 (LH), EB11 (RH)
Fuse No. EB12 (LH) or EB11
(RH) (10A, Relay and fuse
box)
Poor fuse contact or blown
NG
OK
2. Tail light does not light
Replace the bulb or repair
connector contact
Tail light bulb continuity
Bulb burned out or poor
connector contact
NG
Repair open circuit or
connector contact
Continuity between connector
3
F5 - 4 F5 (RH)
or 3
F6 - 4 F6 (LH)
Open circuit or poor connector
contact
NG
OK
BACK TO CHAPTER INDEX
TO MODEL INDEXISUZU KB P190 2007
Page 5103 of 6020
ELECTRICAL-BODY AND CHASSIS 8A-165
3. License plate light does not light
Checkpoint Trouble Cause Countermeasure
Repair open circuit or
connector contact
Continuity between
connector 1
T4 - 2 T4 or 1
T3 - 2 T3
Open circuit or poor connector
contact
NG
Replace the bulb or repair
connector contact
License plate light bulb
continuity
Bulb burned out or poor
connector contact
NG
OK
4. Clearance light does not light
Replace the bulb or repair
connector contactClearance light bulb continuityBulb burned out or poor
connector contact
NG
BACK TO CHAPTER INDEX TO MODEL INDEXISUZU KB P190 2007
Page 5106 of 6020
8A-168 ELECTRICAL-BODY AND CHASSIS
HALOGEN HEADLIGHT BULB (B type)
Removal
1. Open the bonnet.
2. Disconnect the headlight bulb connectors.
RTW 580SH000101
3. Turn the bulb counterclockwise to remove it.
Installation
To install the headlight, follow the removal procedure in
reverse order.
Pay close attention to the important points mentioned in the
following paragraphs.
Connector
Be absolutely sure that the headlight connector is securely
connected.
This will prevent a contact and an open circuit.
BACK TO CHAPTER INDEX TO MODEL INDEXISUZU KB P190 2007
Page 5107 of 6020

ELECTRICAL-BODY AND CHASSIS 8A-169
Installation
Follow the removal procedure in the reverse order to install the
headlight.
Pay close attention to the important points mentioned in the
following paragraphs.
Connector
Be absolutely sure that the headlight connector is securely
connected.
This will prevent a contact and an open circuit.
RTW 780SH000901
This illustration is based on RHD model
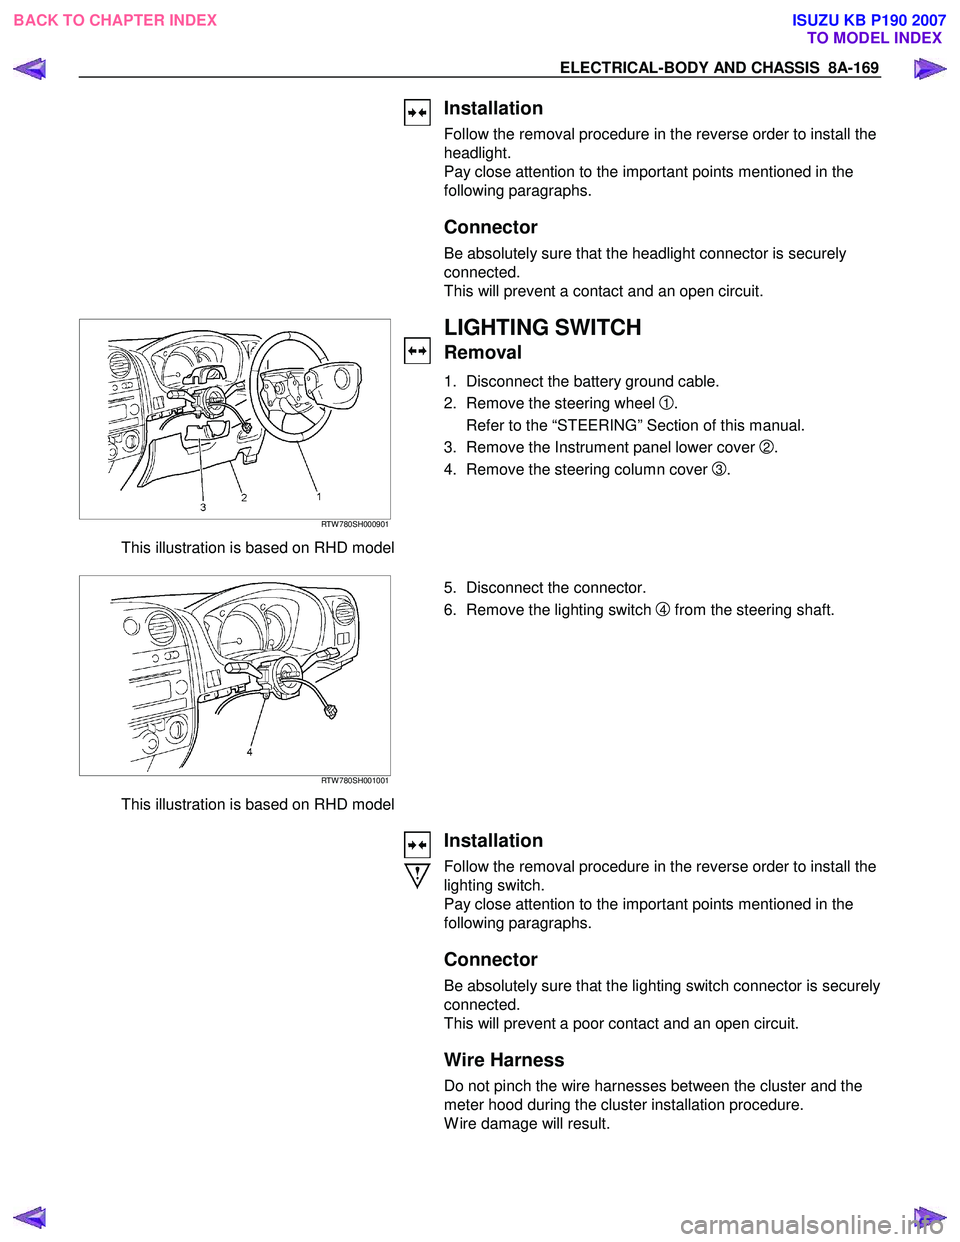
LIGHTING SWITCH
Removal
1. Disconnect the battery ground cable.
2. Remove the steering wheel
1.
Refer to the “STEERING” Section of this manual.
3. Remove the Instrument panel lower cover
2.
4. Remove the steering column cover
3.
RTW 780SH001001
This illustration is based on RHD model
5. Disconnect the connector.
6. Remove the lighting switch
4 from the steering shaft.
Installation
Follow the removal procedure in the reverse order to install the
lighting switch.
Pay close attention to the important points mentioned in the
following paragraphs.
Connector
Be absolutely sure that the lighting switch connector is securely
connected.
This will prevent a poor contact and an open circuit.
Wire Harness
Do not pinch the wire harnesses between the cluster and the
meter hood during the cluster installation procedure.
W ire damage will result.
BACK TO CHAPTER INDEX TO MODEL INDEXISUZU KB P190 2007
Page 5108 of 6020
8A-170 ELECTRICAL-BODY AND CHASSIS
FRONT TURN SIGNAL LIGHT BULB
(A type)
Removal
HALOGEN STD TYPE RTW 78ASH000201
1. Turn the socket counterclockwise to disconnect it from the
front turn signal light housing.
2. Turn the bulb
1 counterclockwise to remove it.
1
HALOGEN PROJECTOR TYPE RTW 78ASH001001
FRONT COMBINATION LIGHT
ASSEMBLY (B type)
Removal
1. Open the bonnet.
RTW 580SH000901
2. Remove the bolt of front combination light assembly
3. Disconnect the front combination light harness connector.
4. Remove the front combination light assembly.
Installation
To install the front combination light assembly follow the
removal procedure in the reverse order.
Connector
Be absolutely sure that the front combination light harness
connector is correctly installed.
This will prevent a poor contact and an open circuit.
BACK TO CHAPTER INDEX TO MODEL INDEXISUZU KB P190 2007