Page 2028 of 6020

6A-14 ENGINE MECHANICAL (C24SE)
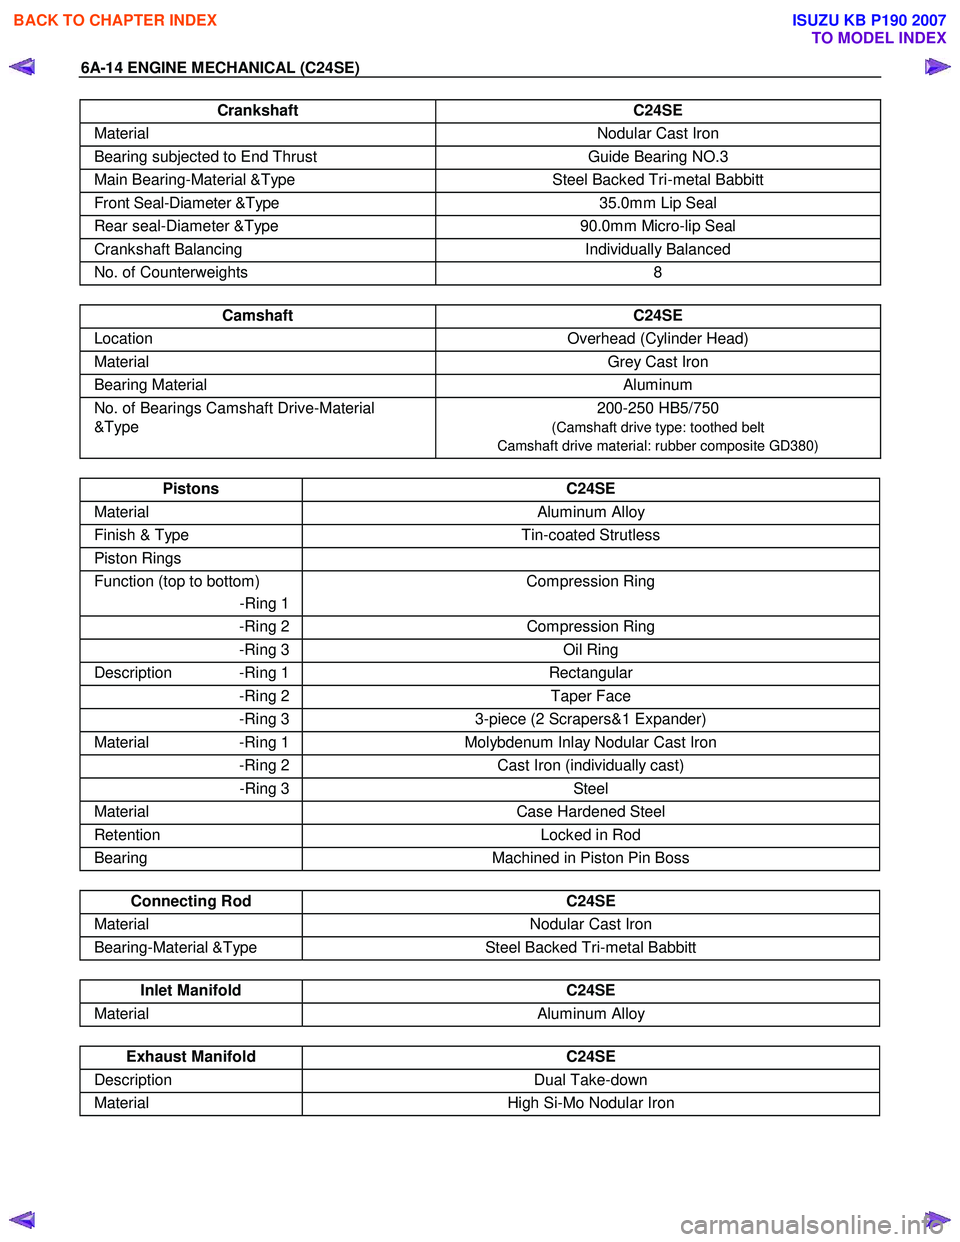
Crankshaft C24SE
Material Nodular Cast Iron
Bearing subjected to End Thrust Guide Bearing NO.3
Main Bearing-Material &Type Steel Backed Tri-metal Babbitt
Front Seal-Diameter &Type 35.0mm Lip Seal
Rear seal-Diameter &Type 90.0mm Micro-lip Seal
Crankshaft Balancing Individually Balanced
No. of Counterweights 8
Camshaft C24SE
Location Overhead (Cylinder Head)
Material Grey Cast Iron
Bearing Material Aluminum
No. of Bearings Camshaft Drive-Material
&Type 200-250 HB5/750
(Camshaft drive type: toothed belt
Camshaft drive material: rubber composite GD380)
Pistons C24SE
Material Aluminum Alloy
Finish & Type Tin-coated Strutless
Piston Rings
Function (top to bottom)
-Ring 1 Compression Ring
-Ring 2 Compression Ring
-Ring 3 Oil Ring
Description -Ring 1 Rectangular
-Ring 2 Taper Face
-Ring 3 3-piece (2 Scrapers&1 Expander)
Material -Ring 1 Molybdenum Inlay Nodular Cast Iron
-Ring 2 Cast Iron (individually cast)
-Ring 3 Steel
Material Case Hardened Steel
Retention Locked in Rod
Bearing Machined in Piston Pin Boss
Connecting Rod C24SE
Material Nodular Cast Iron
Bearing-Material &Type Steel Backed Tri-metal Babbitt
Inlet Manifold C24SE
Material Aluminum Alloy
Exhaust Manifold C24SE
Description Dual Take-down
Material High Si-Mo Nodular Iron
BACK TO CHAPTER INDEX
TO MODEL INDEX
ISUZU KB P190 2007
Page 2029 of 6020
ENGINE MECHANICAL (C24SE) 6A-15
Engine Specification Matrix for destination
04 HEO FOR TF MODEL:
VEHICLE MODEL TFR/S 2.4L
Major Description
AUSTRALIA, CHILE,
GULF, NEW
ZEALAND, SAUDI ARABIA, SOUTH AFRICA COLOMBIA, COSTA
RICA, EQUADOR, GUATEMALA BOLIVIA, GENERAL
EXPORT, PERU, VENEZUELA
VEHICLE TYPE 4× 2 4x4 4 ×2 4 ×4 4 ×2
VEHICLE IDENT. CODE TX TY TX TY TX
ENGINE TYPE C24SE ← ←
FUEL CONTROL SYSYTEM CLOSE LOOP CLOSED LOOP OPEN LOOP
COMPRESSION RATIO 9.6:1 ← ←
FUEL OCTANE(ROD) 91RON 85RON 80RON
FUEL TYPE UN-LEADED UN-LEADED LEADED
HO2 YES YES YES NO
EVAP CANISTER YES YES YES YES
PURGE CONTROL
SOLENOID YES
YES YES YES
CHECK & RELIEF VALVE YES YES YES YES
ECM YES YES YES YES
EXHAUST SYSTEM
FRONT PIPE
SILENCER
TW C YES YES YES NO
CO ADJUSTMENT NO NO NO YES
Refer to 6A-77 Refer to 6A-77 Refer to 6A-77
BACK TO CHAPTER INDEX
TO MODEL INDEX
ISUZU KB P190 2007
Page 2030 of 6020
6A-16 ENGINE MECHANICAL (C24SE)
CRANKCASE VENTILATION SYSTEM
The Engine Ventilation System passes crankcase vapours, via the Engine Vent Pipe, to the Cam Support Cover,
where separation of oil and exhaust gases occur. The oil drains into the Cylinder Head, via the Camshaft Support.
The gases pass through the Primary and Secondary Vent Hoses to the intake system, and are consumed during
the combustion process.
BACK TO CHAPTER INDEX
TO MODEL INDEX
ISUZU KB P190 2007
Page 2031 of 6020
ENGINE MECHANICAL (C24SE) 6A-17
ENGINE ASSEMBLY & LOOSE PARTS
Loose Parts
1 Alternator
2 P/S Pivot Spacer
3 P/S Adjusting Screw
4 P/S Adjusting Plate
5 P/S Adjusting Nut
6 Alternator & Fan Drive Belt
7 A/C Compressor Drive Belt
8 P/S Pump Drive Belt
9 Tensioner Bolt
10 Tensioner Pulley
11 Pulley Dust Shield Cover
12 Pulley Spacer
13 A/C Compressor Bracket
14 Pulley Bolt
15 Fan Pulley
16 Cooling Fan
Engine Assembly
20 C24SE
BACK TO CHAPTER INDEX
TO MODEL INDEX
ISUZU KB P190 2007
Page 2032 of 6020
6A-18 ENGINE MECHANICAL (C24SE)
OPERATIONS ON ENGINE AGGREGATES
Engine Damping Blocks (Engine Without
Transmission)
Removal
1. Remove bonnet.
2. Remove radiator.
3. Remove air inlet hose.
4. Remove power steering pump drive belt and power steering pump from engine.
5. Remove all cable connections, hoses and lines from
engine.
6. Remove accelerator cable from inlet pipe.
7. Remove exhaust pipe from manifold.
8. Remove lower nine bolts and transmission from engine
block.
9. Remove clutch slave cylinder and allow to hang free.
10. Remove starter from engine block.
11. Remove upper bolts of left and right engine mounting
from damping blocks.
12. Raise engine slightly.
13. Remove lower bolts of left and right damping blocks.
14. Remove damping blocks.
BACK TO CHAPTER INDEX
TO MODEL INDEX
ISUZU KB P190 2007
Page 2033 of 6020

ENGINE MECHANICAL (C24SE) 6A-19
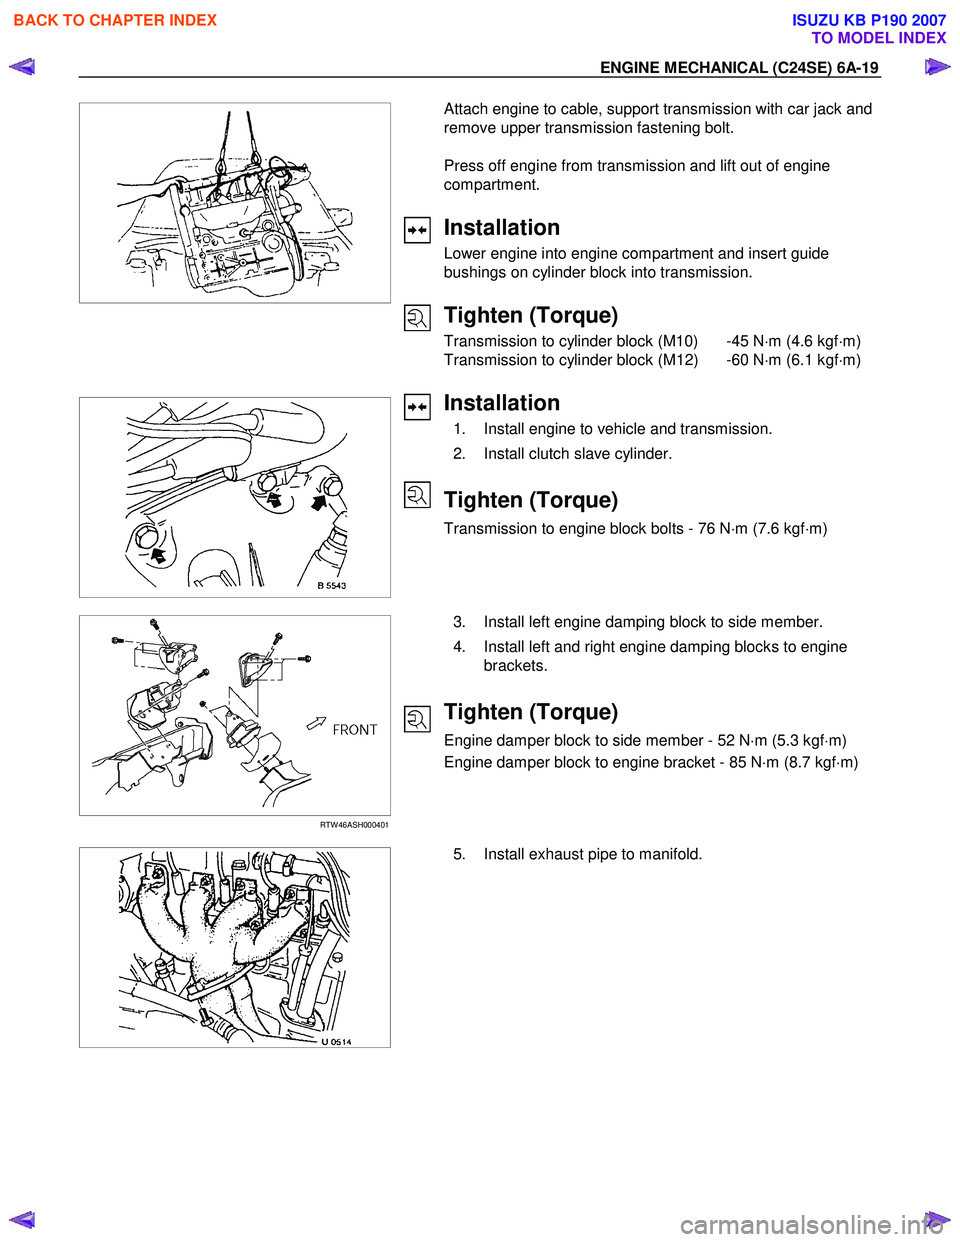
Attach engine to cable, support transmission with car jack and
remove upper transmission fastening bolt.
Press off engine from transmission and lift out of engine
compartment.
Installation
Lower engine into engine compartment and insert guide
bushings on cylinder block into transmission.
Tighten (Torque)
Transmission to cylinder block (M10) -45 N ⋅m (4.6 kgf ⋅m)
Transmission to cylinder block (M12) -60 N ⋅m (6.1 kgf ⋅m)
Installation
1. Install engine to vehicle and transmission.
2. Install clutch slave cylinder.
Tighten (Torque)
Transmission to engine block bolts - 76 N ⋅m (7.6 kgf ⋅m)
RTW 46ASH000401
3. Install left engine damping block to side member.
4. Install left and right engine damping blocks to engine brackets.
Tighten (Torque)
Engine damper block to side member - 52 N ⋅m (5.3 kgf ⋅m)
Engine damper block to engine bracket - 85 N ⋅m (8.7 kgf ⋅m)
5. Install exhaust pipe to manifold.
BACK TO CHAPTER INDEX
TO MODEL INDEX
ISUZU KB P190 2007
Page 2034 of 6020
6A-20 ENGINE MECHANICAL (C24SE)
6. Install power steering pump and V-belt.
Adjust
Adjust power steering pump V-belt tension according to the
corresponding operation.
Installation
7. Install radiator according to the corresponding operation.
8. Install air inlet hose.
9. Install all electrical cable connections, hoses and lines to engine.
10. Install accelerator cable from inlet pipe.
11. Install bonnet.
Inspection
1. Check engine oil level.
2. Fill up cooling system and bleed according to the corresponding operation.
BACK TO CHAPTER INDEX
TO MODEL INDEX
ISUZU KB P190 2007
Page 2035 of 6020

ENGINE MECHANICAL (C24SE) 6A-21
Toothed Belt and Timing Check
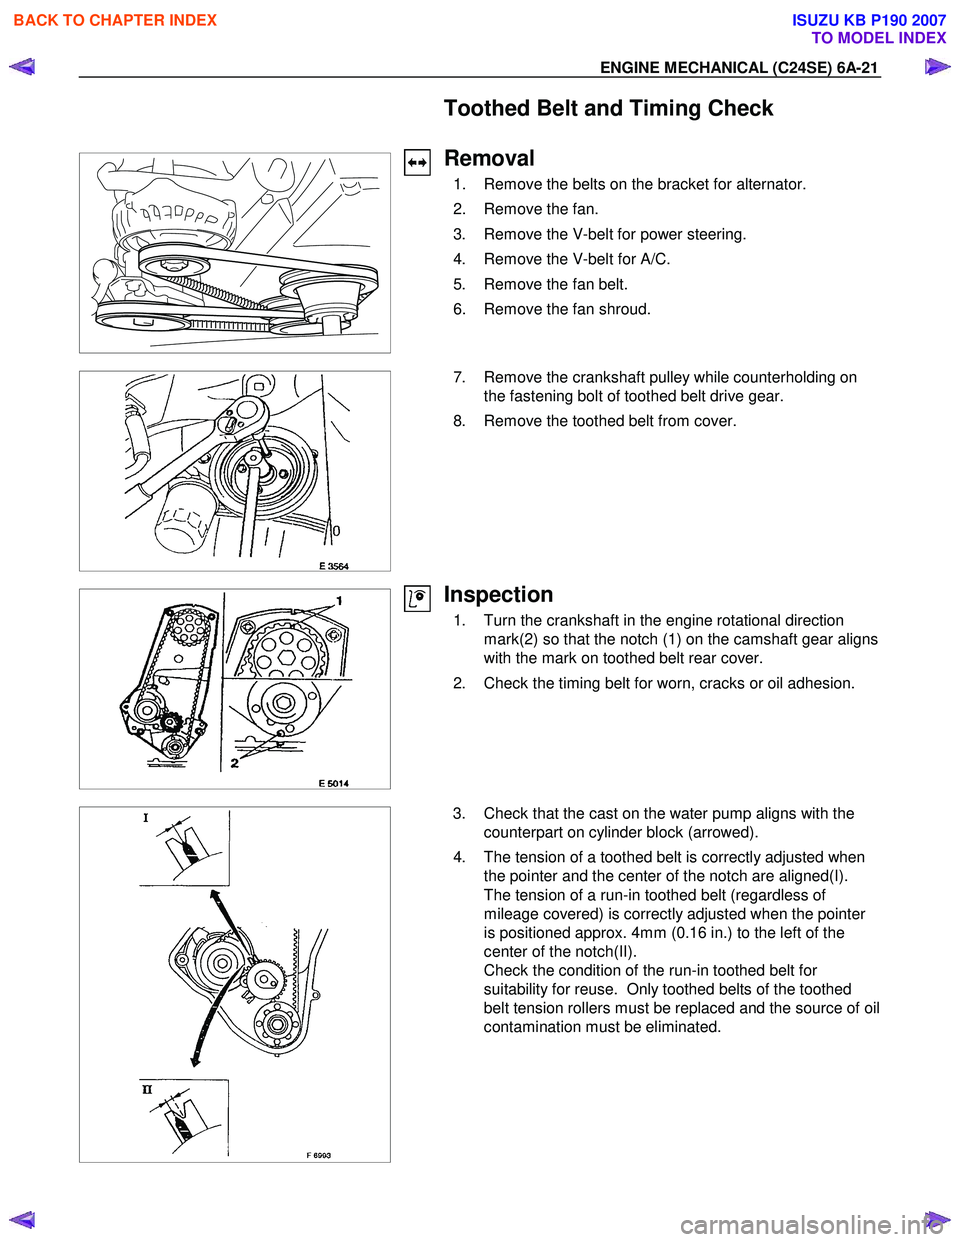
Removal
1. Remove the belts on the bracket for alternator.
2. Remove the fan.
3. Remove the V-belt for power steering.
4. Remove the V-belt for A/C.
5. Remove the fan belt.
6. Remove the fan shroud.
7. Remove the crankshaft pulley while counterholding on
the fastening bolt of toothed belt drive gear.
8. Remove the toothed belt from cover.
Inspection
1. Turn the crankshaft in the engine rotational direction mark(2) so that the notch (1) on the camshaft gear aligns
with the mark on toothed belt rear cover.
2. Check the timing belt for worn, cracks or oil adhesion.
3. Check that the cast on the water pump aligns with the counterpart on cylinder block (arrowed).
4. The tension of a toothed belt is correctly adjusted when the pointer and the center of the notch are aligned(I).
The tension of a run-in toothed belt (regardless of
mileage covered) is correctly adjusted when the pointer
is positioned approx. 4mm (0.16 in.) to the left of the
center of the notch(II).
Check the condition of the run-in toothed belt for
suitability for reuse. Only toothed belts of the toothed
belt tension rollers must be replaced and the source of oil
contamination must be eliminated.
BACK TO CHAPTER INDEX
TO MODEL INDEX
ISUZU KB P190 2007