Page 4760 of 6020
Manual Transmission (MUX) 7B1-41
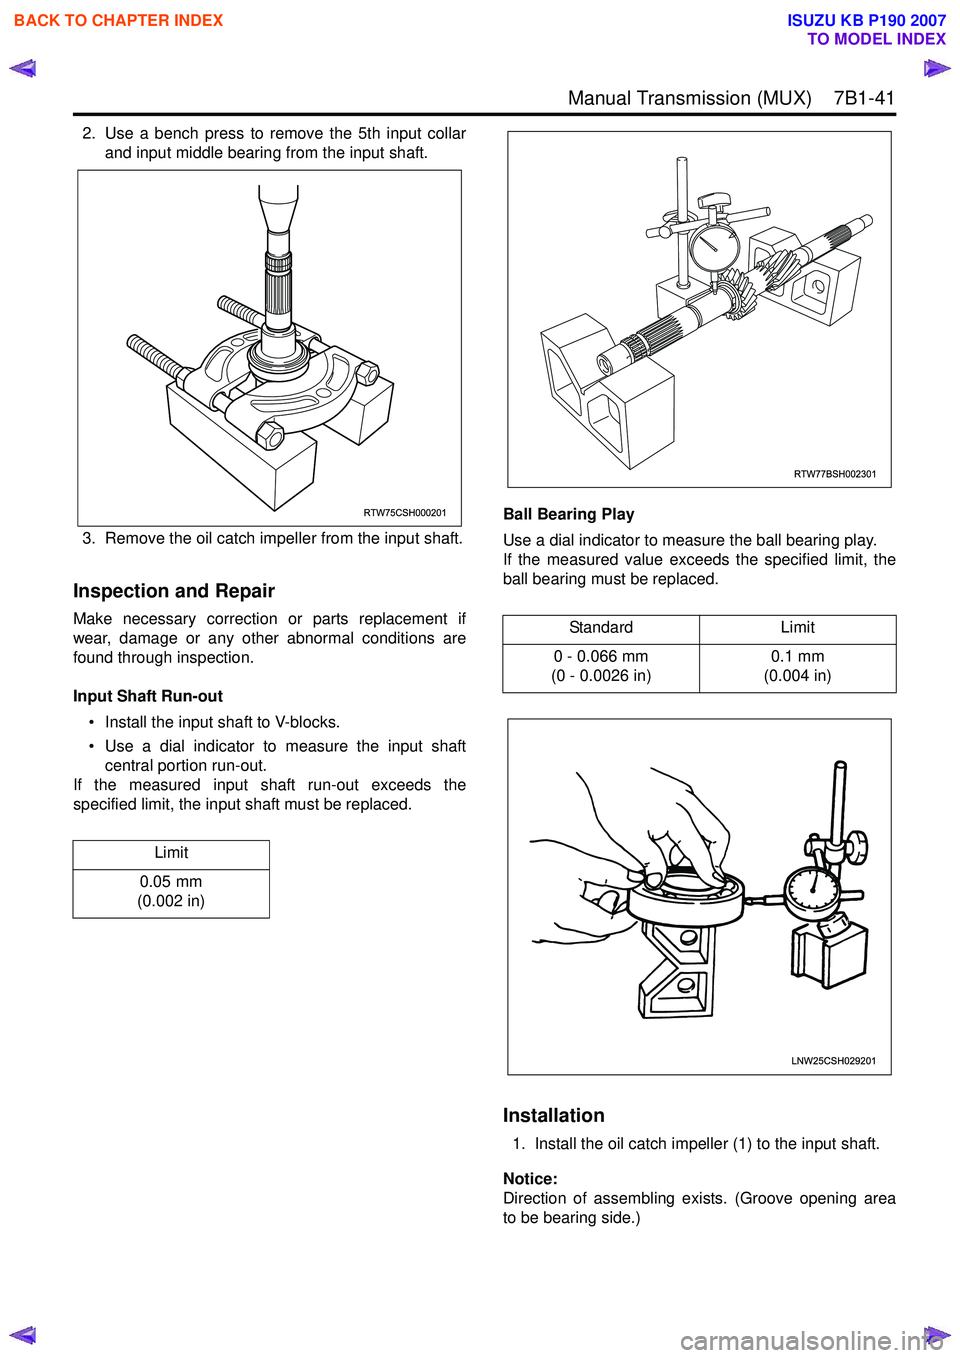
2. Use a bench press to remove the 5th input collarand input middle bearing from the input shaft.
3. Remove the oil catch impeller from the input shaft.
Inspection and Repair
Make necessary correction or parts replacement if
wear, damage or any other abnormal conditions are
found through inspection.
Input Shaft Run-out • Install the input shaft to V-blocks.
• Use a dial indicator to measure the input shaft central portion run-out.
If the measured input shaft run-out exceeds the
specified limit, the input shaft must be replaced. Ball Bearing Play
Use a dial indicator to measure the ball bearing play.
If the measured value exceeds the specified limit, the
ball bearing must be replaced.
Installation
1. Install the oil catch impeller (1) to the input shaft.
Notice:
Direction of assembling exists. (Groove opening area
to be bearing side.)
Limit
0.05 mm
(0.002 in)
RTW75CSH000201
Standard Limit
0 - 0.066 mm
(0 - 0.0026 in) 0.1 mm
(0.004 in)
RTW77BSH002301
LNW25CSH029201
BACK TO CHAPTER INDEX
TO MODEL INDEX
ISUZU KB P190 2007
Page 4762 of 6020
Manual Transmission (MUX) 7B1-43
Counter Shaft Assembly
Component
Legend1. Reverse counter snap ring
2. Counter front roller bearing outer race
3. Counter front roller bearing inner race
4. Reverse synchronizer assembly
5. Reverse block ring
6. Reverse counter gear assembly
7. Reverse counter gear needle bearing
8. 1st counter snap ring
9. 1st counter collar
10. 1st counter gear assembly 11. 1st counter gear needle bearing
12. 1st-2nd inside ring
13. 1st-2nd outside ring
14. 1st-2nd block ring
15. 1st-2nd synchronizer assembly
16. 2nd counter gear assembly
17. 2nd counter gear needle bearing
18. Counter shaft
19. Counter middle roller bearing inner race
Removal
1. Use a pair of snap ring pliers to remove the reverse counter snap ring.
2. Remove the counter front roller bearing outer race.
RTW77BLF001601
1 2 3 4 5 6 7
8 9 10 11
12
13
19
18
17
16
12
13
14
15
14
BACK TO CHAPTER INDEX
TO MODEL INDEX
ISUZU KB P190 2007
Page 4763 of 6020
7B1-44 Manual Transmission (MUX)
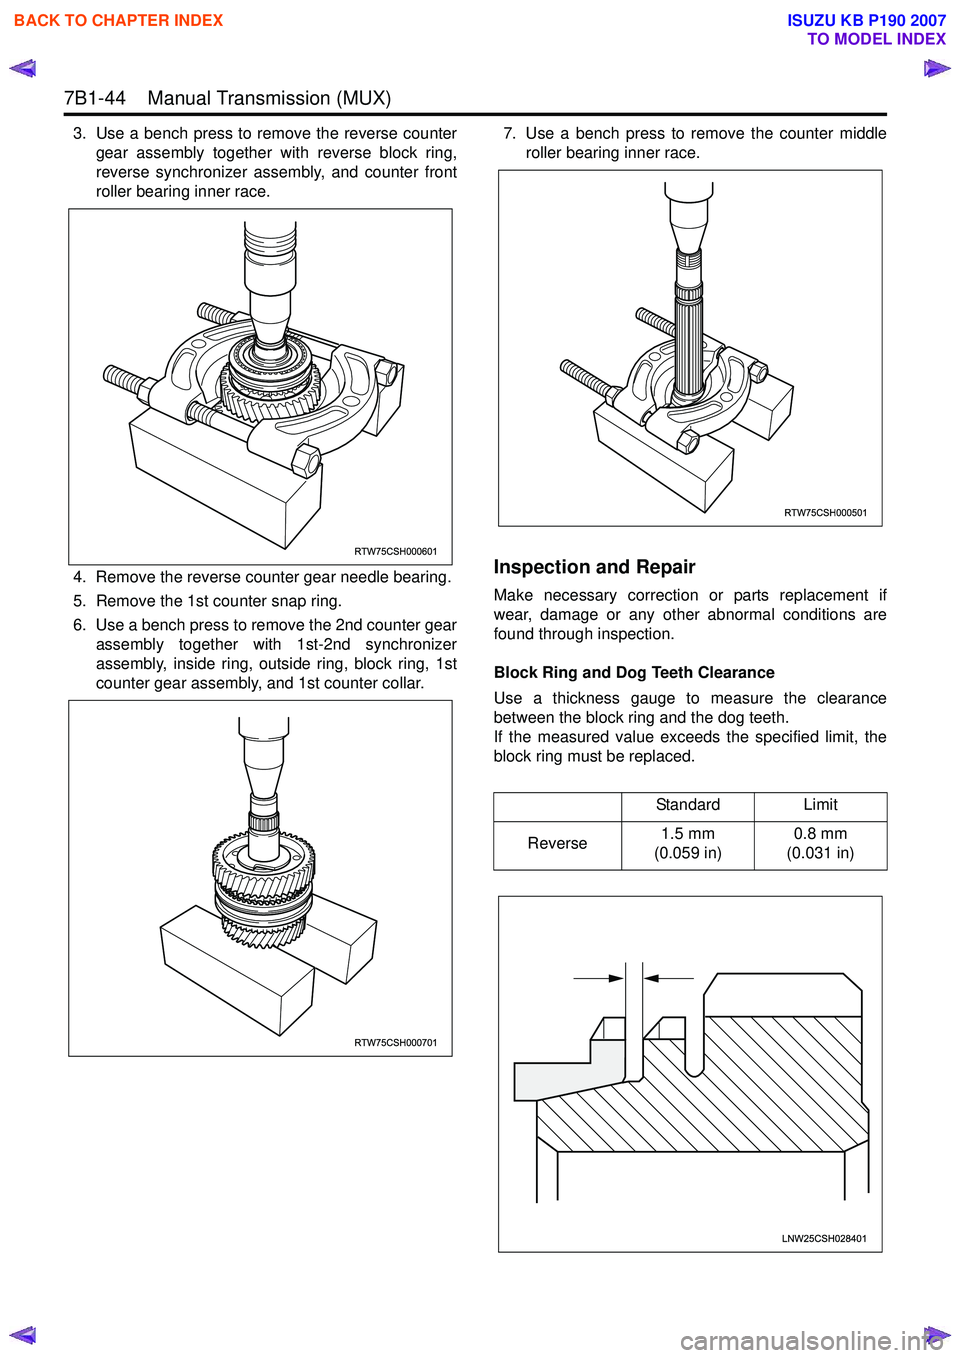
3. Use a bench press to remove the reverse countergear assembly together with reverse block ring,
reverse synchronizer assembly, and counter front
roller bearing inner race.
4. Remove the reverse counter gear needle bearing.
5. Remove the 1st counter snap ring.
6. Use a bench press to remove the 2nd counter gear assembly together with 1st-2nd synchronizer
assembly, inside ring, outside ring, block ring, 1st
counter gear assembly, and 1st counter collar. 7. Use a bench press to remove the counter middle
roller bearing inner race.
Inspection and Repair
Make necessary correction or parts replacement if
wear, damage or any other abnormal conditions are
found through inspection.
Block Ring and Dog Teeth Clearance
Use a thickness gauge to measure the clearance
between the block ring and the dog teeth.
If the measured value exceeds the specified limit, the
block ring must be replaced.
RTW75CSH000601
RTW75CSH000701
Standard Limit
Reverse 1.5 mm
(0.059 in) 0.8 mm
(0.031 in)
RTW75CSH000501
LNW25CSH028401
BACK TO CHAPTER INDEX
TO MODEL INDEX
ISUZU KB P190 2007
Page 4764 of 6020
Manual Transmission (MUX) 7B1-45
1st-2nd Synchronizer (3-CONE)
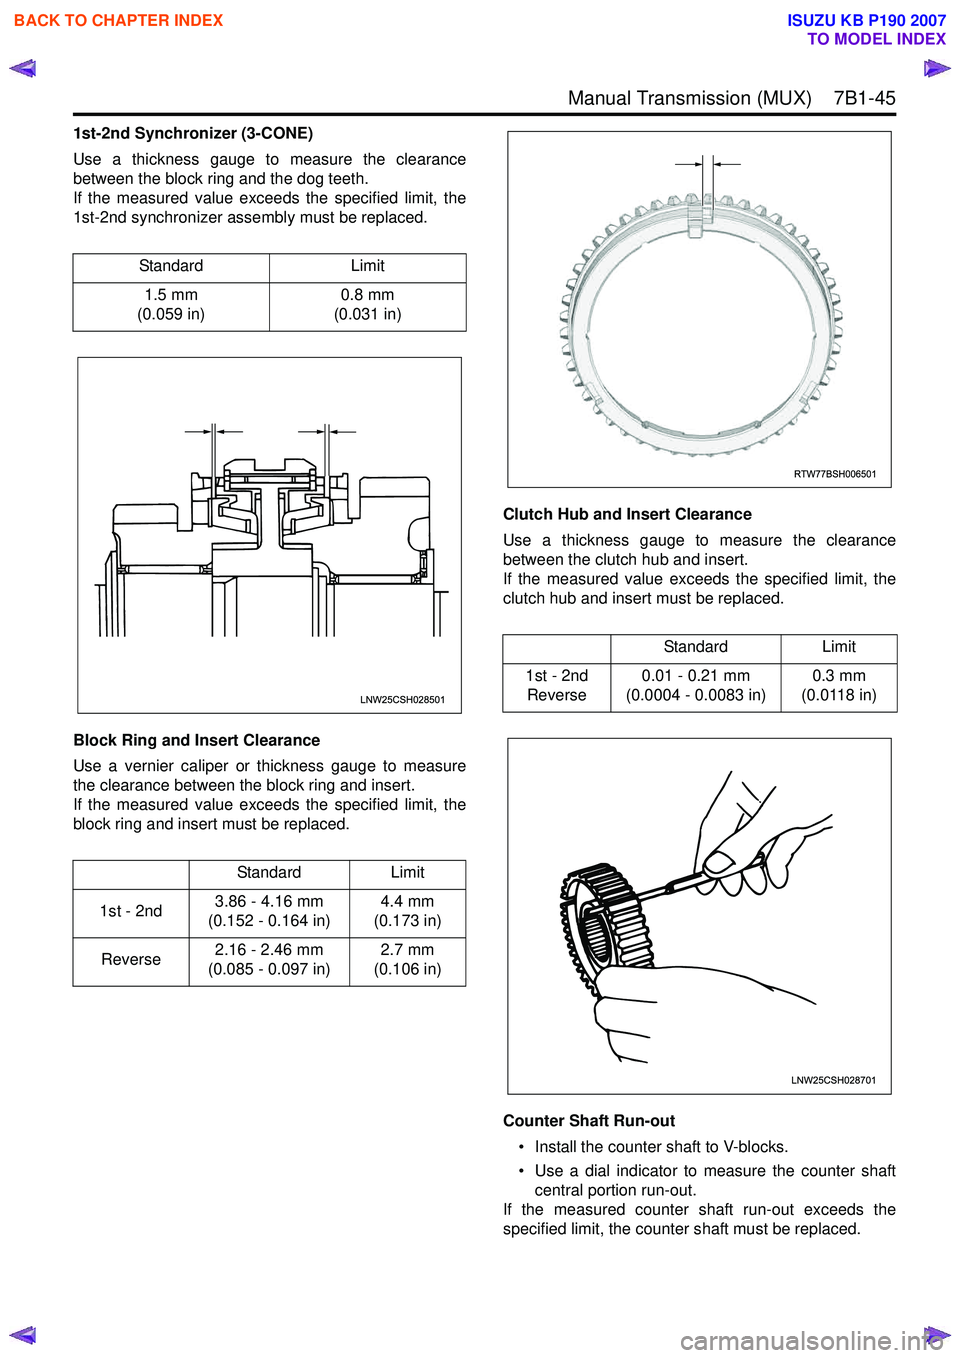
Use a thickness gauge to measure the clearance
between the block ring and the dog teeth.
If the measured value exceeds the specified limit, the
1st-2nd synchronizer assembly must be replaced.
Block Ring and Insert Clearance
Use a vernier caliper or thickness gauge to measure
the clearance between the block ring and insert.
If the measured value exceeds the specified limit, the
block ring and insert must be replaced. Clutch Hub and Insert Clearance
Use a thickness gauge to measure the clearance
between the clutch hub and insert.
If the measured value exceeds the specified limit, the
clutch hub and insert must be replaced.
Counter Shaft Run-out • Install the counter shaft to V-blocks.
• Use a dial indicator to measure the counter shaft central portion run-out.
If the measured counter shaft run-out exceeds the
specified limit, the counter shaft must be replaced.
Standard Limit
1.5 mm
(0.059 in) 0.8 mm
(0.031 in)
Standard Limit
1st - 2nd 3.86 - 4.16 mm
(0.152 - 0.164 in) 4.4 mm
(0.173 in)
Reverse 2.16 - 2.46 mm
(0.085 - 0.097 in) 2.7 mm
(0.106 in)
LNW25CSH028501
Standard Limit
1st - 2nd Reverse 0.01 - 0.21 mm
(0.0004 - 0.0083 in) 0.3 mm
(0.0118 in)
RTW77BSH006501
LNW25CSH028701
BACK TO CHAPTER INDEX
TO MODEL INDEX
ISUZU KB P190 2007
Page 4766 of 6020
Manual Transmission (MUX) 7B1-47
Installation
1. Install the needle bearing, 2nd counter gearassembly, 2nd inside ring, 2nd outside ring, and
2nd block ring.
• Apply engine oil to the needle bearing and gear internal surface.
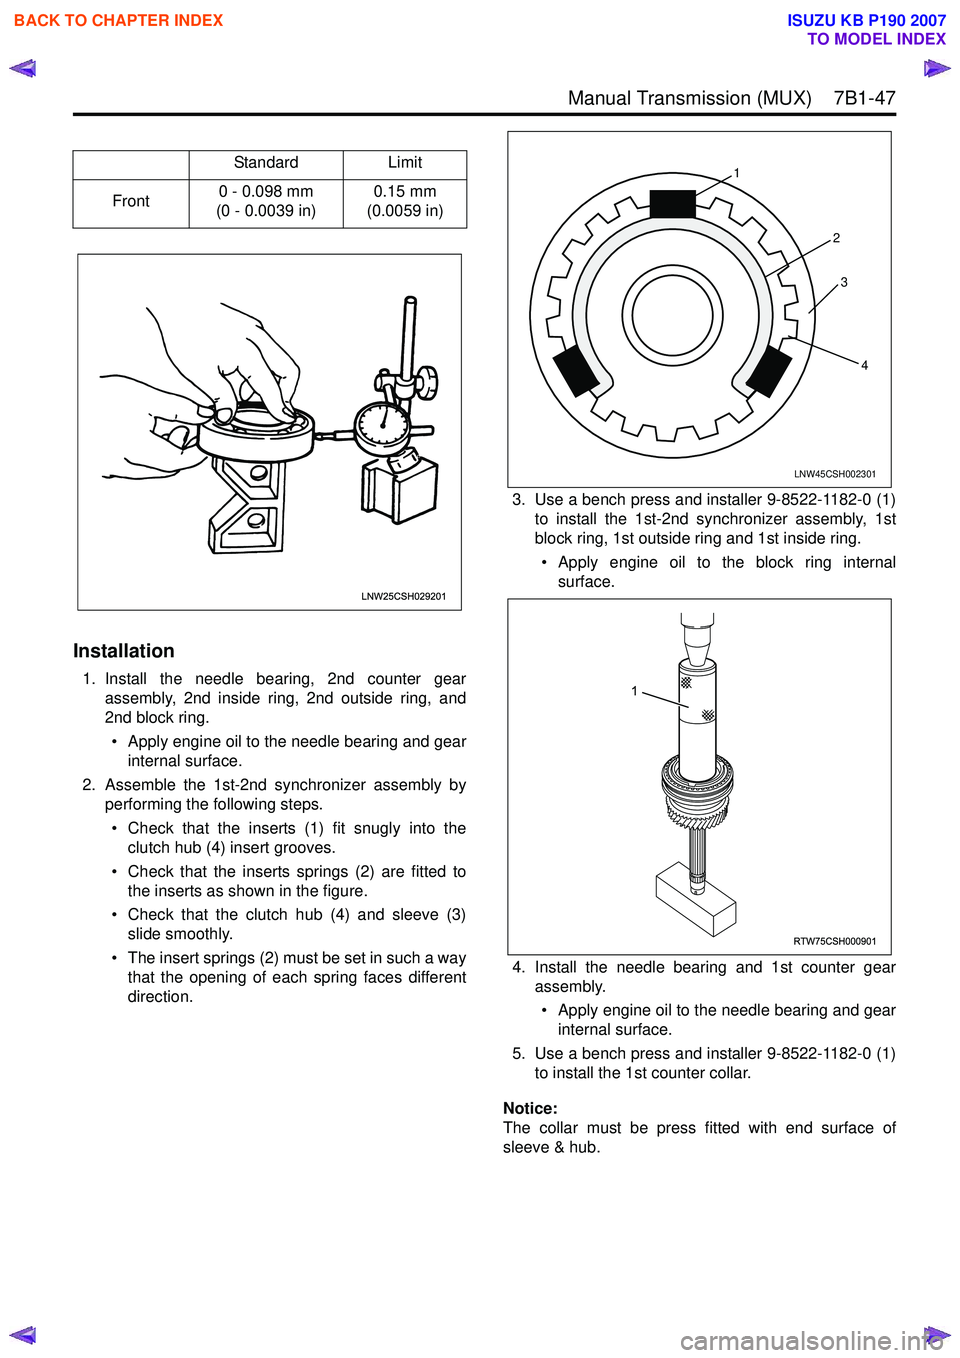
2. Assemble the 1st-2nd synchronizer assembly by performing the following steps.
• Check that the inserts (1) fit snugly into the clutch hub (4) insert grooves.
• Check that the inserts springs (2) are fitted to the inserts as shown in the figure.
• Check that the clutch hub (4) and sleeve (3) slide smoothly.
• The insert springs (2) must be set in such a way that the opening of each spring faces different
direction. 3. Use a bench press and installer 9-8522-1182-0 (1)
to install the 1st-2nd synchronizer assembly, 1st
block ring, 1st outside ring and 1st inside ring.
• Apply engine oil to the block ring internal surface.
4. Install the needle bearing and 1st counter gear assembly.
• Apply engine oil to the needle bearing and gear internal surface.
5. Use a bench press and installer 9-8522-1182-0 (1) to install the 1st counter collar.
Notice:
The collar must be press fitted with end surface of
sleeve & hub.
Standard
Limit
Front 0 - 0.098 mm
(0 - 0.0039 in) 0.15 mm
(0.0059 in)
LNW25CSH029201
LNW45CSH002301
1
23
4
RTW75CSH000901
1
BACK TO CHAPTER INDEX
TO MODEL INDEX
ISUZU KB P190 2007
Page 4767 of 6020
7B1-48 Manual Transmission (MUX)
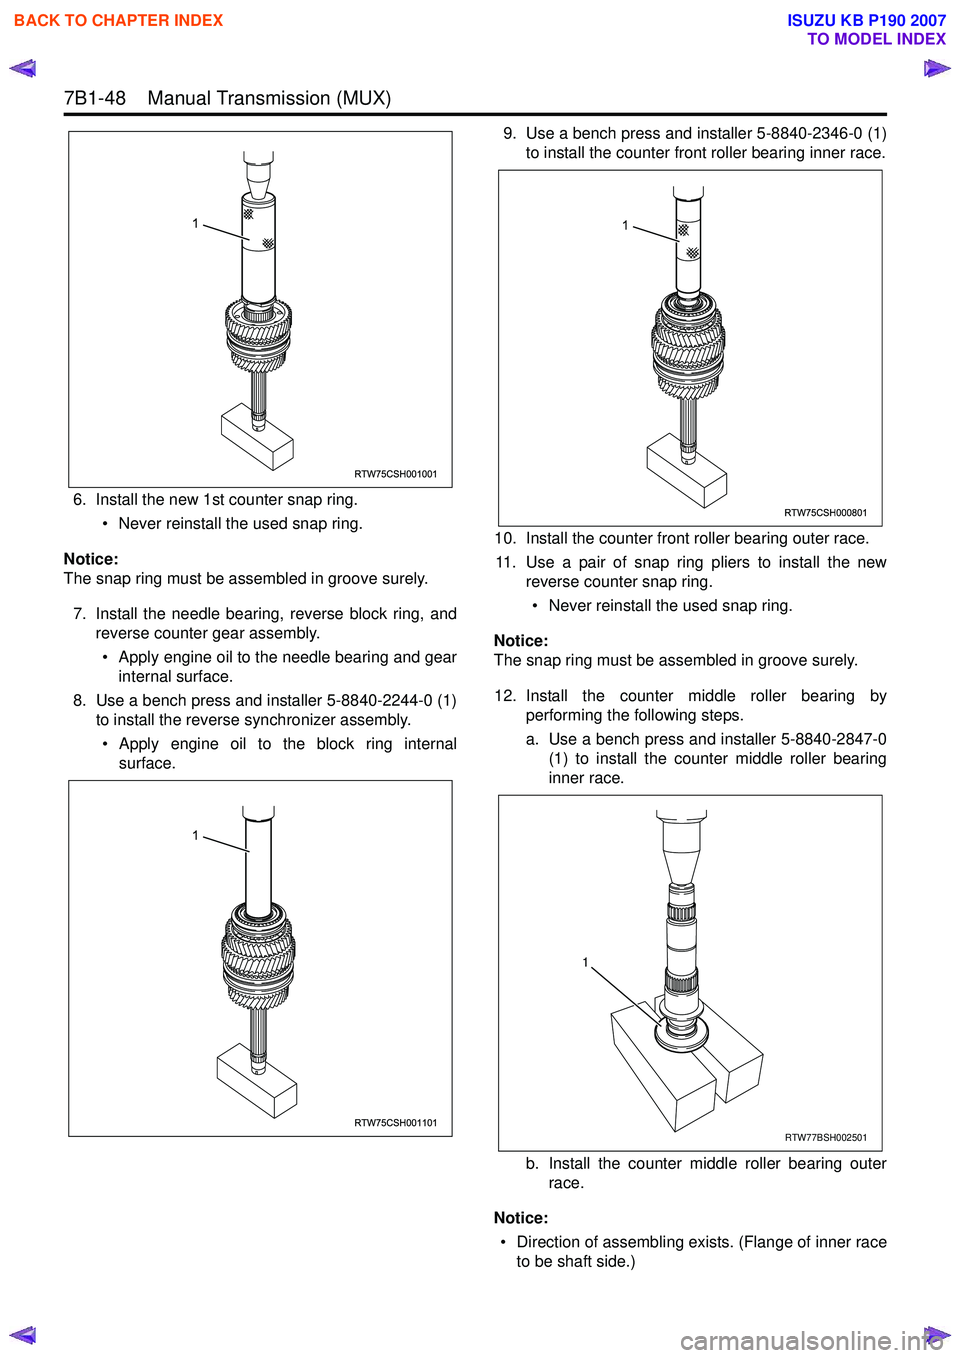
6. Install the new 1st counter snap ring.• Never reinstall the used snap ring.
Notice:
The snap ring must be assembled in groove surely.
7. Install the needle bearing, reverse block ring, and reverse counter gear assembly.
• Apply engine oil to the needle bearing and gear internal surface.
8. Use a bench press and installer 5-8840-2244-0 (1) to install the reverse synchronizer assembly.
• Apply engine oil to the block ring internal surface. 9. Use a bench press and installer 5-8840-2346-0 (1)
to install the counter front roller bearing inner race.
10. Install the counter front roller bearing outer race. 11. Use a pair of snap ring pliers to install the new reverse counter snap ring.
• Never reinstall the used snap ring.
Notice:
The snap ring must be assembled in groove surely.
12. Install the counter middle roller bearing by performing the following steps.
a. Use a bench press and installer 5-8840-2847-0 (1) to install the counter middle roller bearing
inner race.
b. Install the counter middle roller bearing outer race.
Notice: • Direction of assembling exists. (Flange of inner race to be shaft side.)
RTW75CSH001001
1
RTW75CSH001101
1
RTW75CSH000801
1
RTW77BSH002501
1
BACK TO CHAPTER INDEX
TO MODEL INDEX
ISUZU KB P190 2007
Page 4770 of 6020
Manual Transmission (MUX) 7B1-51
Shift & Select Rod Assembly
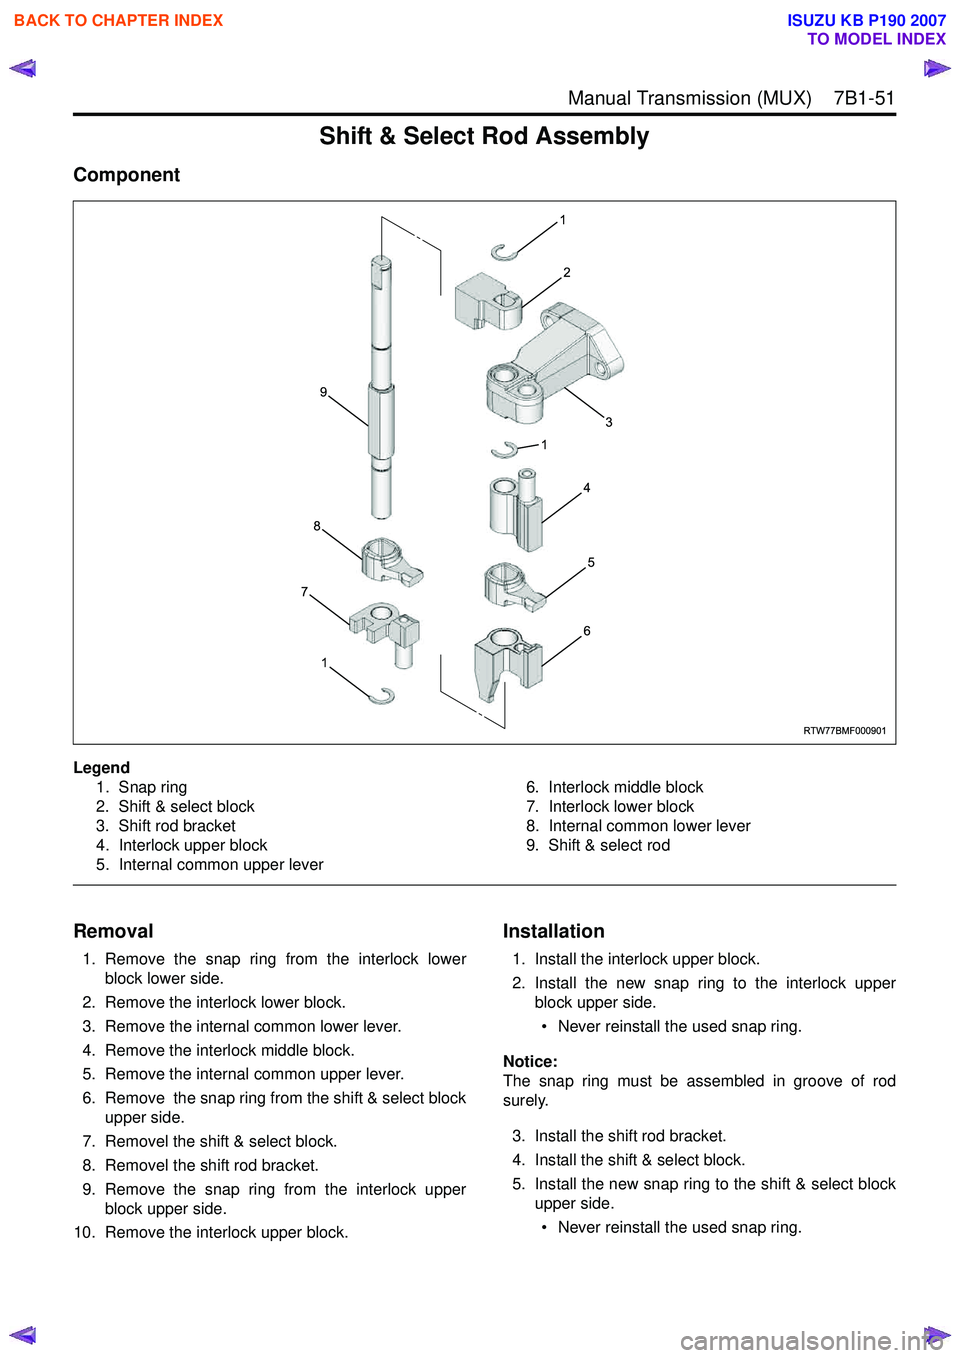
Component
Legend1. Snap ring
2. Shift & select block
3. Shift rod bracket
4. Interlock upper block
5. Internal common upper lever 6. Interlock middle block
7. Interlock lower block
8. Internal common lower lever
9. Shift & select rod
Removal
1. Remove the snap ring from the interlock lower block lower side.
2. Remove the interlock lower block.
3. Remove the internal common lower lever.
4. Remove the interlock middle block.
5. Remove the internal common upper lever.
6. Remove the snap ring from the shift & select block upper side.
7. Removel the shift & select block.
8. Removel the shift rod bracket.
9. Remove the snap ring from the interlock upper block upper side.
10. Remove the interlock upper block.
Installation
1. Install the interlock upper block.
2. Install the new snap ring to the interlock upper block upper side.
• Never reinstall the used snap ring.
Notice:
The snap ring must be assembled in groove of rod
surely.
3. Install the shift rod bracket.
4. Install the shift & select block.
5. Install the new snap ring to the shift & select block upper side.
• Never reinstall the used snap ring.
RTW77BMF000901
1
2
3
1
4
5
6
1
7
8
9
BACK TO CHAPTER INDEX
TO MODEL INDEX
ISUZU KB P190 2007
Page 4771 of 6020
7B1-52 Manual Transmission (MUX)
Notice:
The snap ring must be assembled in groove of rod
surely.
6. Install the internal common upper lever.
7. Install the interlock middle block.
8. Install the internal common lower lever.
9. Install the interlock lower block.
10. Install the new snap ring to the interlock lower block lower side.
• Never reinstall the used snap ring.
Notice:
The snap ring must be assembled in groove of rod
surely.
BACK TO CHAPTER INDEX
TO MODEL INDEX
ISUZU KB P190 2007