2007 INFINITI QX56 lock
[x] Cancel search: lockPage 2584 of 3061
REAR FINAL DRIVE ASSEMBLY
RFD-27
< SERVICE INFORMATION >
C
E
F
G
H
I
J
K
L
MA
B
RFD
N
O
P
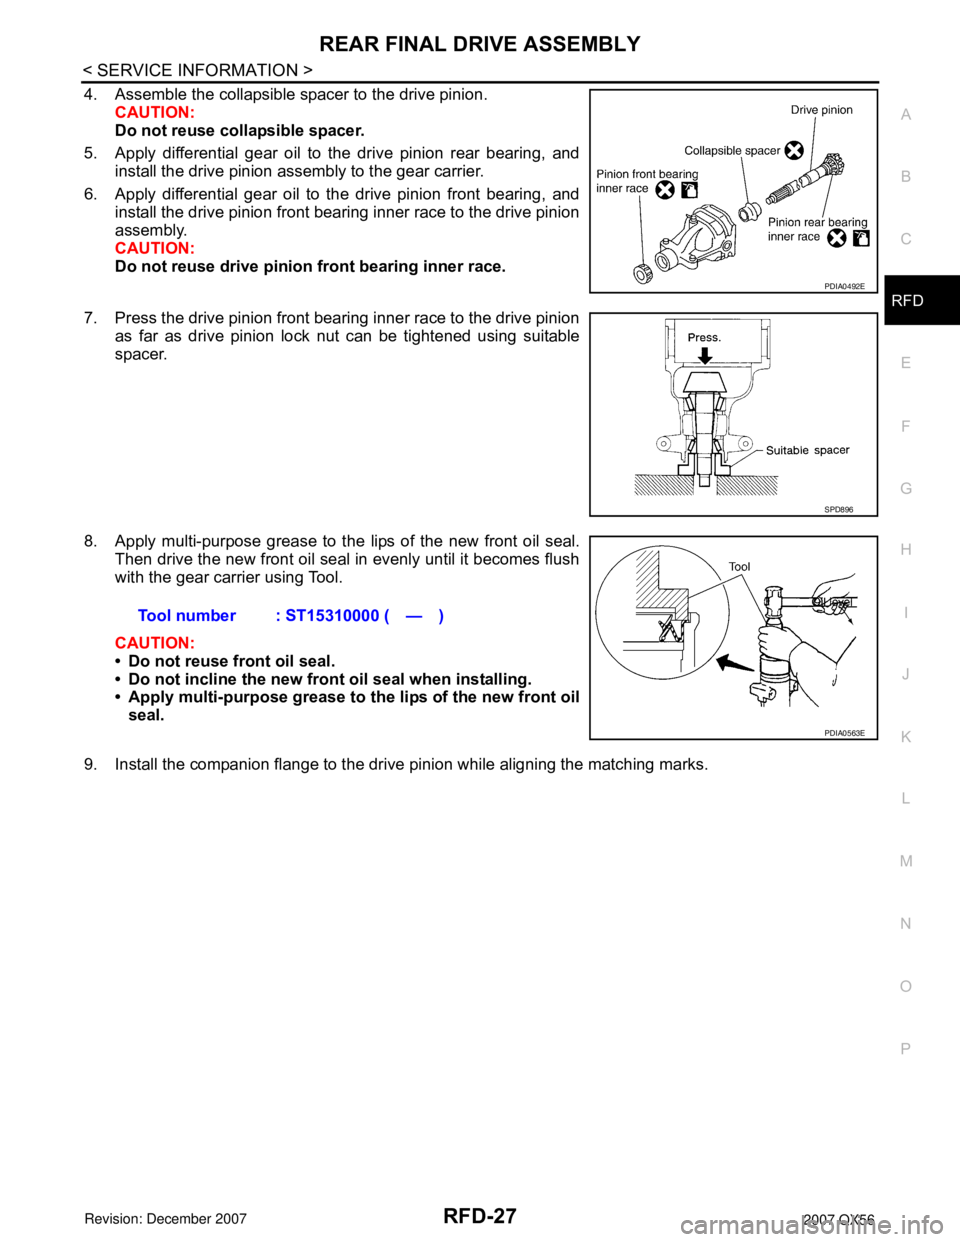
4. Assemble the collapsible spacer to the drive pinion.
CAUTION:
Do not reuse collapsible spacer.
5. Apply differential gear oil to the drive pinion rear bearing, and
install the drive pinion assembly to the gear carrier.
6. Apply differential gear oil to the drive pinion front bearing, and
install the drive pinion front bearing inner race to the drive pinion
assembly.
CAUTION:
Do not reuse drive pinion front bearing inner race.
7. Press the drive pinion front bearing inner race to the drive pinion
as far as drive pinion lock nut can be tightened using suitable
spacer.
8. Apply multi-purpose grease to the lips of the new front oil seal.
Then drive the new front oil seal in evenly until it becomes flush
with the gear carrier using Tool.
CAUTION:
• Do not reuse front oil seal.
• Do not incline the new front oil seal when installing.
• Apply multi-purpose grease to the lips of the new front oil
seal.
9. Install the companion flange to the drive pinion while aligning the matching marks.
PDIA0492E
SPD896
Tool number : ST15310000 ( — )
PDIA0563E
Page 2585 of 3061
RFD-28
< SERVICE INFORMATION >
REAR FINAL DRIVE ASSEMBLY
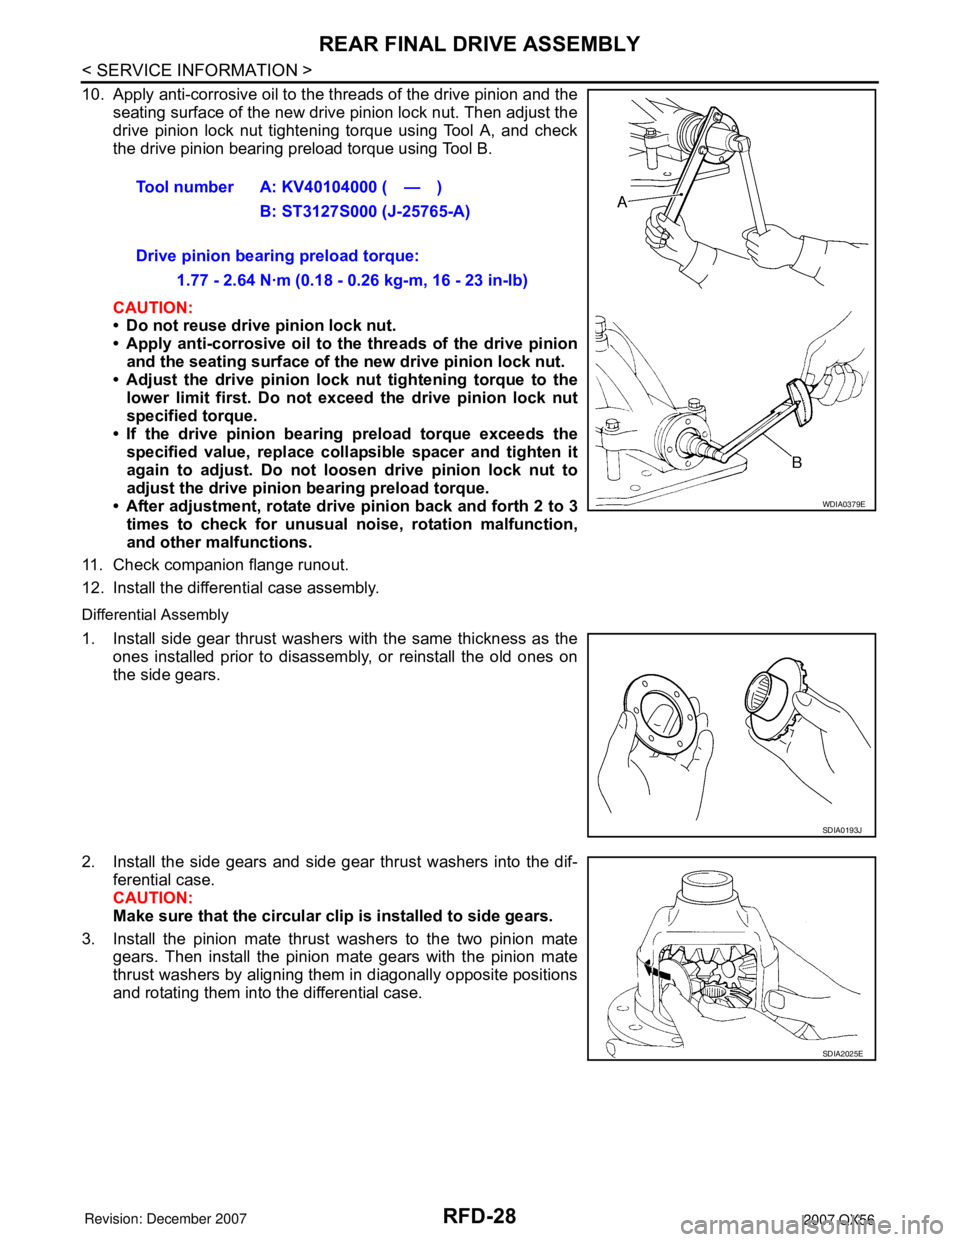
10. Apply anti-corrosive oil to the threads of the drive pinion and the
seating surface of the new drive pinion lock nut. Then adjust the
drive pinion lock nut tightening torque using Tool A, and check
the drive pinion bearing preload torque using Tool B.
CAUTION:
• Do not reuse drive pinion lock nut.
• Apply anti-corrosive oil to the threads of the drive pinion
and the seating surface of the new drive pinion lock nut.
• Adjust the drive pinion lock nut tightening torque to the
lower limit first. Do not exceed the drive pinion lock nut
specified torque.
• If the drive pinion bearing preload torque exceeds the
specified value, replace collapsible spacer and tighten it
again to adjust. Do not loosen drive pinion lock nut to
adjust the drive pinion bearing preload torque.
• After adjustment, rotate drive pinion back and forth 2 to 3
times to check for unusual noise, rotation malfunction,
and other malfunctions.
11. Check companion flange runout.
12. Install the differential case assembly.
Differential Assembly
1. Install side gear thrust washers with the same thickness as the
ones installed prior to disassembly, or reinstall the old ones on
the side gears.
2. Install the side gears and side gear thrust washers into the dif-
ferential case.
CAUTION:
Make sure that the circular clip is installed to side gears.
3. Install the pinion mate thrust washers to the two pinion mate
gears. Then install the pinion mate gears with the pinion mate
thrust washers by aligning them in diagonally opposite positions
and rotating them into the differential case.Tool number A: KV40104000 ( — )
B: ST3127S000 (J-25765-A)
Drive pinion bearing preload torque:
1.77 - 2.64 N·m (0.18 - 0.26 kg-m, 16 - 23 in-lb)
WDIA0379E
SDIA0193J
SDIA2025E
Page 2586 of 3061
REAR FINAL DRIVE ASSEMBLY
RFD-29
< SERVICE INFORMATION >
C
E
F
G
H
I
J
K
L
MA
B
RFD
N
O
P
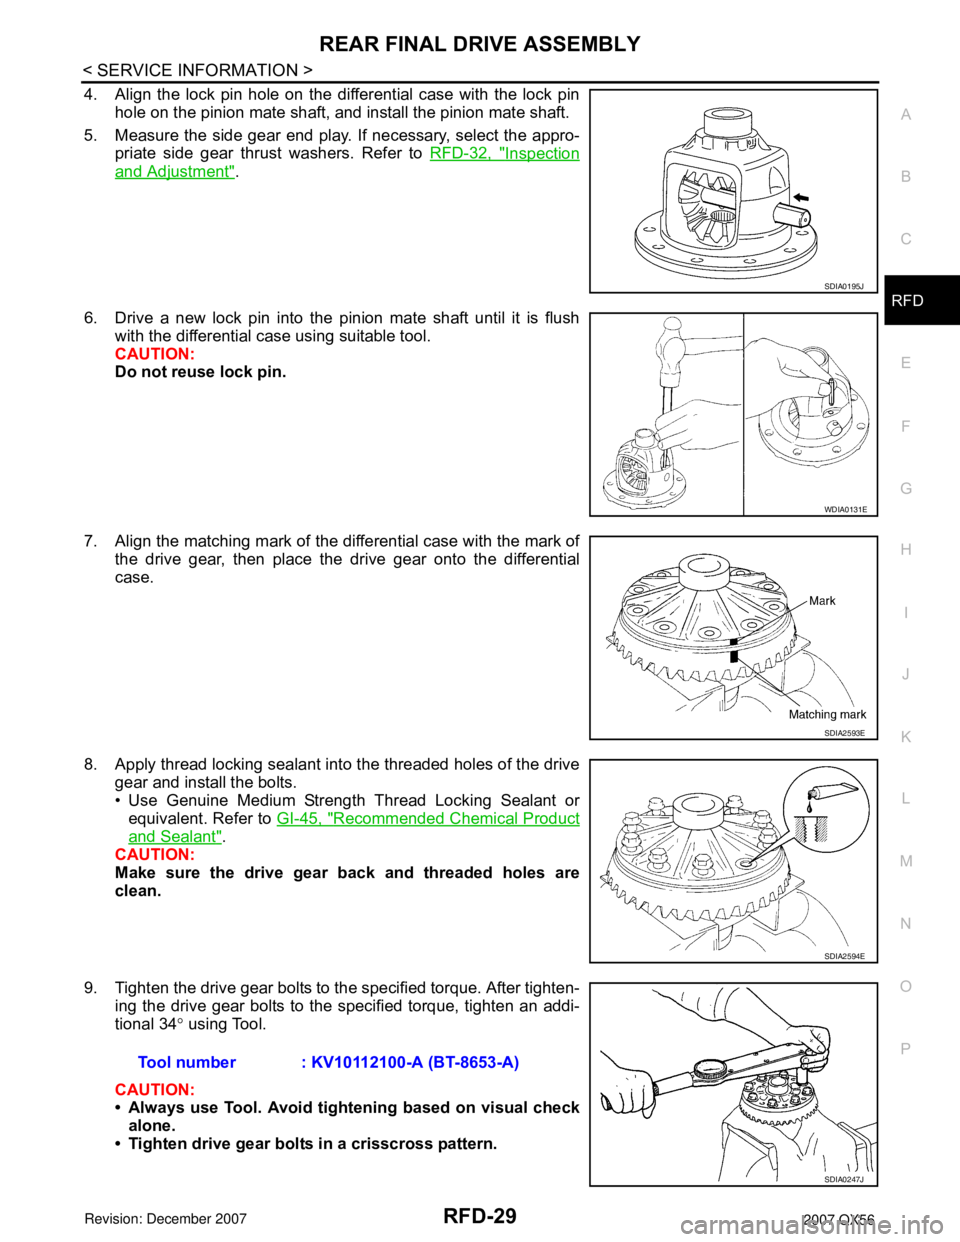
4. Align the lock pin hole on the differential case with the lock pin
hole on the pinion mate shaft, and install the pinion mate shaft.
5. Measure the side gear end play. If necessary, select the appro-
priate side gear thrust washers. Refer to RFD-32, "
Inspection
and Adjustment".
6. Drive a new lock pin into the pinion mate shaft until it is flush
with the differential case using suitable tool.
CAUTION:
Do not reuse lock pin.
7. Align the matching mark of the differential case with the mark of
the drive gear, then place the drive gear onto the differential
case.
8. Apply thread locking sealant into the threaded holes of the drive
gear and install the bolts.
• Use Genuine Medium Strength Thread Locking Sealant or
equivalent. Refer to GI-45, "
Recommended Chemical Product
and Sealant".
CAUTION:
Make sure the drive gear back and threaded holes are
clean.
9. Tighten the drive gear bolts to the specified torque. After tighten-
ing the drive gear bolts to the specified torque, tighten an addi-
tional 34° using Tool.
CAUTION:
• Always use Tool. Avoid tightening based on visual check
alone.
• Tighten drive gear bolts in a crisscross pattern.
SDIA0195J
WDIA0131E
SDIA2593E
SDIA2594E
Tool number : KV10112100-A (BT-8653-A)
SDIA0247J
Page 2602 of 3061
RSU-12
< SERVICE INFORMATION >
TROUBLE DIAGNOSIS
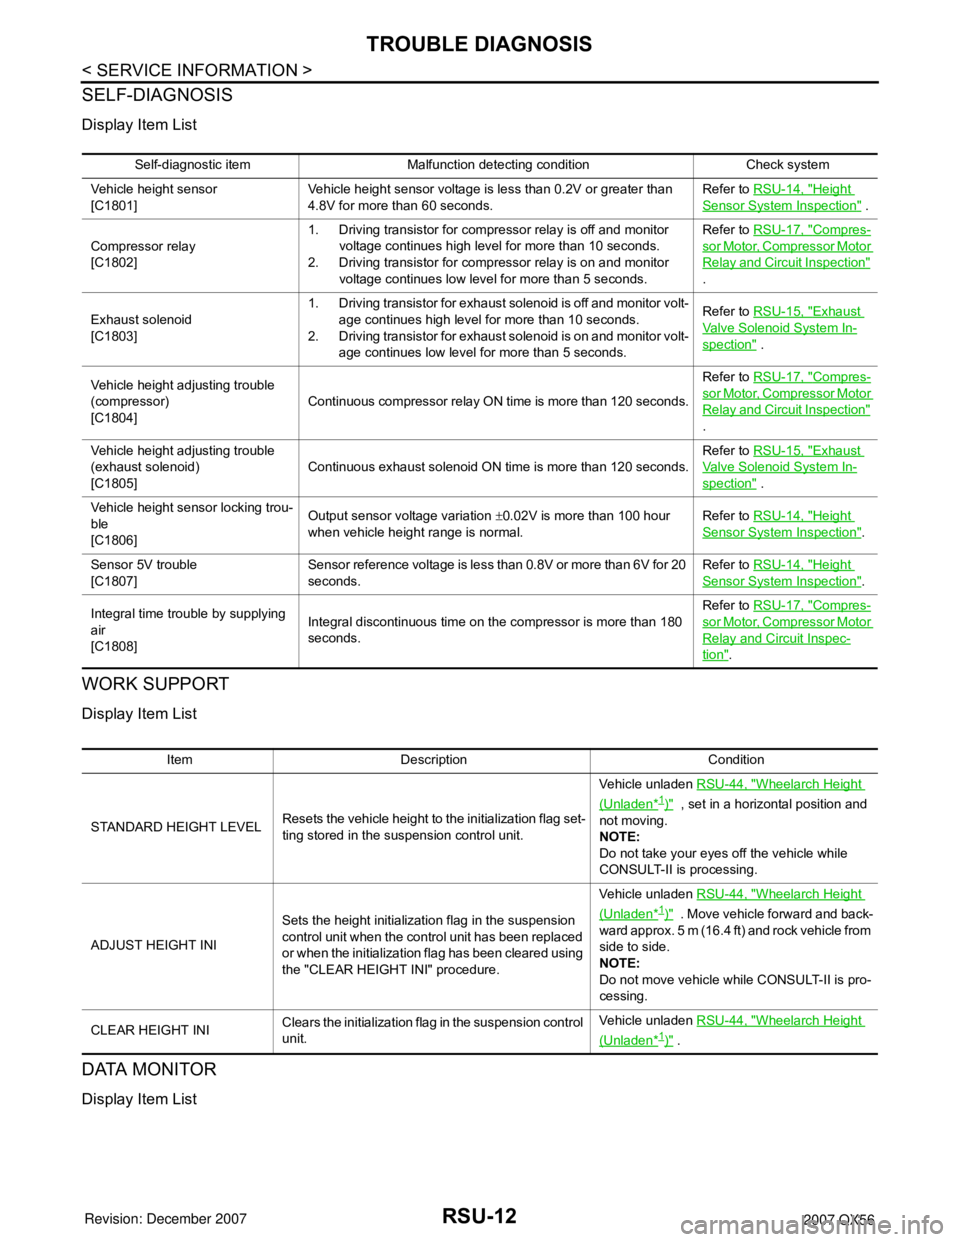
SELF-DIAGNOSIS
Display Item List
WORK SUPPORT
Display Item List
DATA MONITOR
Display Item List
Self-diagnostic item Malfunction detecting condition Check system
Vehicle height sensor
[C1801]Vehicle height sensor voltage is less than 0.2V or greater than
4.8V for more than 60 seconds.Refer to RSU-14, "
Height
Sensor System Inspection" .
Compressor relay
[C1802]1. Driving transistor for compressor relay is off and monitor
voltage continues high level for more than 10 seconds.
2. Driving transistor for compressor relay is on and monitor
voltage continues low level for more than 5 seconds.Refer to RSU-17, "
Compres-
sor Motor, Compressor Motor
Relay and Circuit Inspection"
.
Exhaust solenoid
[C1803]1. Driving transistor for exhaust solenoid is off and monitor volt-
age continues high level for more than 10 seconds.
2. Driving transistor for exhaust solenoid is on and monitor volt-
age continues low level for more than 5 seconds.Refer to RSU-15, "
Exhaust
Valve Solenoid System In-
spection" .
Vehicle height adjusting trouble
(compressor)
[C1804]Continuous compressor relay ON time is more than 120 seconds.Refer to RSU-17, "
Compres-
sor Motor, Compressor Motor
Relay and Circuit Inspection"
.
Vehicle height adjusting trouble
(exhaust solenoid)
[C1805]Continuous exhaust solenoid ON time is more than 120 seconds.Refer to RSU-15, "
Exhaust
Valve Solenoid System In-
spection" .
Vehicle height sensor locking trou-
ble
[C1806]Output sensor voltage variation ±0.02V is more than 100 hour
when vehicle height range is normal.Refer to RSU-14, "
Height
Sensor System Inspection".
Sensor 5V trouble
[C1807]Sensor reference voltage is less than 0.8V or more than 6V for 20
seconds.Refer to RSU-14, "
Height
Sensor System Inspection".
Integral time trouble by supplying
air
[C1808]Integral discontinuous time on the compressor is more than 180
seconds.Refer to RSU-17, "
Compres-
sor Motor, Compressor Motor
Relay and Circuit Inspec-
tion".
Item Description Condition
STANDARD HEIGHT LEVELResets the vehicle height to the initialization flag set-
ting stored in the suspension control unit.Vehicle unladen RSU-44, "
Wheelarch Height
(Unladen*1)" , set in a horizontal position and
not moving.
NOTE:
Do not take your eyes off the vehicle while
CONSULT-II is processing.
ADJUST HEIGHT INISets the height initialization flag in the suspension
control unit when the control unit has been replaced
or when the initialization flag has been cleared using
the "CLEAR HEIGHT INI" procedure.Vehicle unladen RSU-44, "
Wheelarch Height
(Unladen*1)" . Move vehicle forward and back-
ward approx. 5 m (16.4 ft) and rock vehicle from
side to side.
NOTE:
Do not move vehicle while CONSULT-II is pro-
cessing.
CLEAR HEIGHT INIClears the initialization flag in the suspension control
unit.Vehicle unladen RSU-44, "
Wheelarch Height
(Unladen*1)" .
Page 2617 of 3061
REAR SUSPENSION MEMBER
RSU-27
< SERVICE INFORMATION >
C
D
F
G
H
I
J
K
L
MA
B
RSU
N
O
P
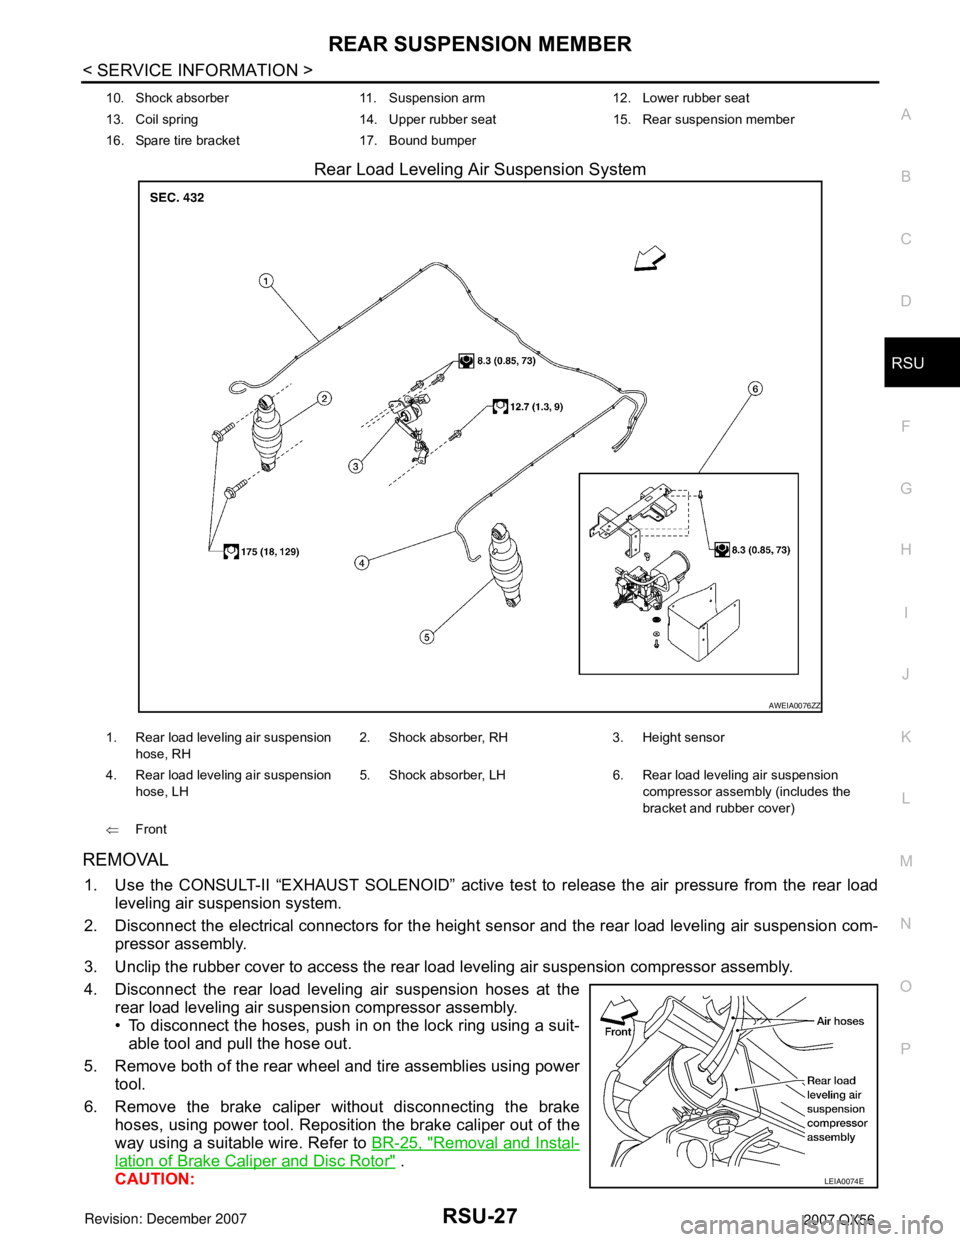
Rear Load Leveling Air Suspension System
REMOVAL
1. Use the CONSULT-II “EXHAUST SOLENOID” active test to release the air pressure from the rear load
leveling air suspension system.
2. Disconnect the electrical connectors for the height sensor and the rear load leveling air suspension com-
pressor assembly.
3. Unclip the rubber cover to access the rear load leveling air suspension compressor assembly.
4. Disconnect the rear load leveling air suspension hoses at the
rear load leveling air suspension compressor assembly.
• To disconnect the hoses, push in on the lock ring using a suit-
able tool and pull the hose out.
5. Remove both of the rear wheel and tire assemblies using power
tool.
6. Remove the brake caliper without disconnecting the brake
hoses, using power tool. Reposition the brake caliper out of the
way using a suitable wire. Refer to BR-25, "
Removal and Instal-
lation of Brake Caliper and Disc Rotor" .
CAUTION:
10. Shock absorber 11. Suspension arm 12. Lower rubber seat
13. Coil spring 14. Upper rubber seat 15. Rear suspension member
16. Spare tire bracket 17. Bound bumper
AWEIA0076ZZ
1. Rear load leveling air suspension
hose, RH2. Shock absorber, RH 3. Height sensor
4. Rear load leveling air suspension
hose, LH5. Shock absorber, LH 6. Rear load leveling air suspension
compressor assembly (includes the
bracket and rubber cover)
⇐Front
LEIA0074E
Page 2619 of 3061
REAR SUSPENSION MEMBER
RSU-29
< SERVICE INFORMATION >
C
D
F
G
H
I
J
K
L
MA
B
RSU
N
O
P
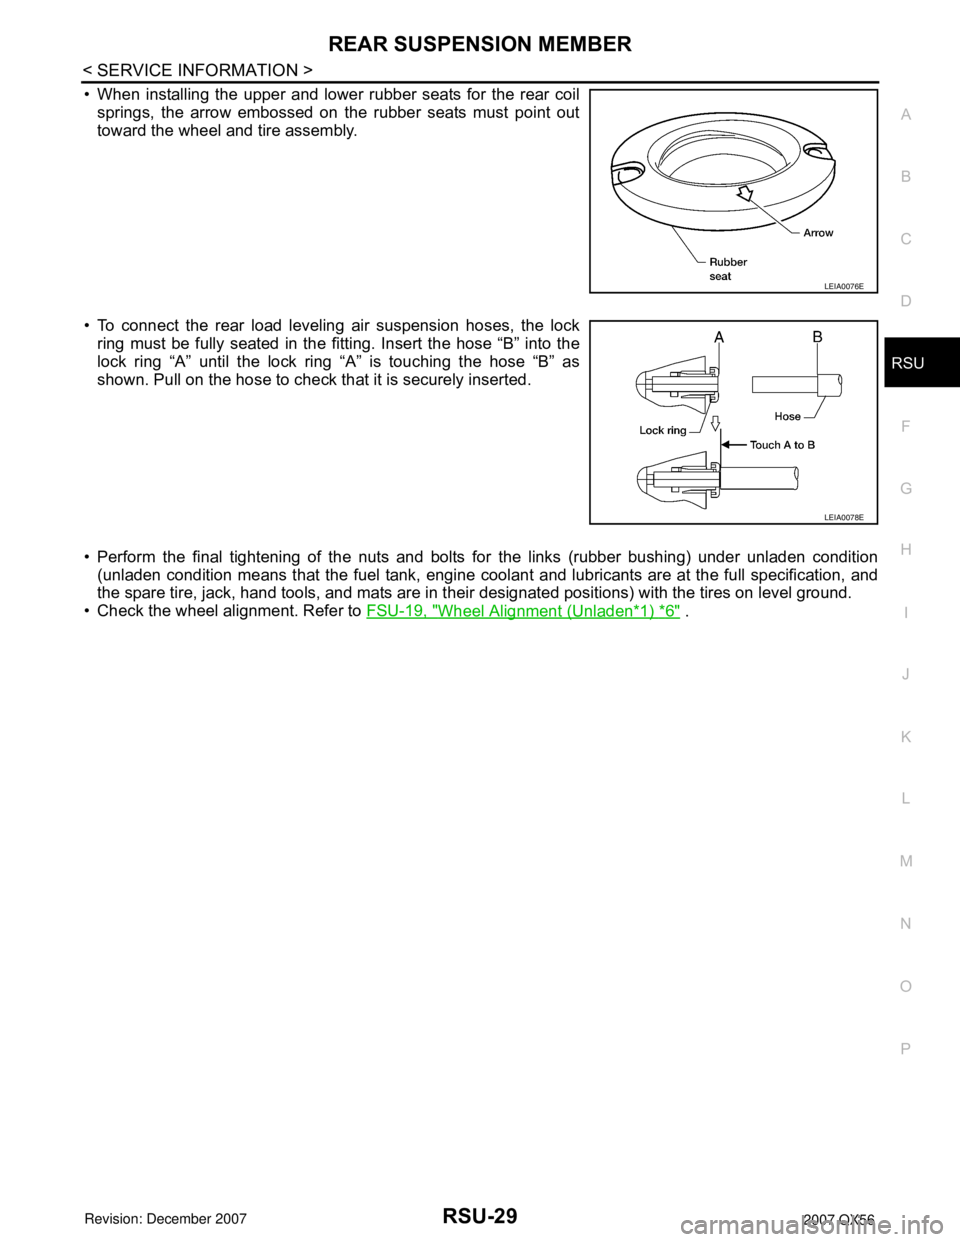
• When installing the upper and lower rubber seats for the rear coil
springs, the arrow embossed on the rubber seats must point out
toward the wheel and tire assembly.
• To connect the rear load leveling air suspension hoses, the lock
ring must be fully seated in the fitting. Insert the hose “B” into the
lock ring “A” until the lock ring “A” is touching the hose “B” as
shown. Pull on the hose to check that it is securely inserted.
• Perform the final tightening of the nuts and bolts for the links (rubber bushing) under unladen condition
(unladen condition means that the fuel tank, engine coolant and lubricants are at the full specification, and
the spare tire, jack, hand tools, and mats are in their designated positions) with the tires on level ground.
• Check the wheel alignment. Refer to FSU-19, "
Wheel Alignment (Unladen*1) *6" .
LEIA0076E
LEIA0078E
Page 2620 of 3061
RSU-30
< SERVICE INFORMATION >
SHOCK ABSORBER
SHOCK ABSORBER
Removal and InstallationINFOID:0000000003532673
REMOVAL
1. Remove the wheel and tire assembly using power tool. Refer to WT-7, "Rotation".
2. Use CONSULT-II “EXHAUST SOLENOID” active test to release the air pressure from the rear load level-
ing air suspension system.
3. Remove the four clips and remove the rear fender protector, front.
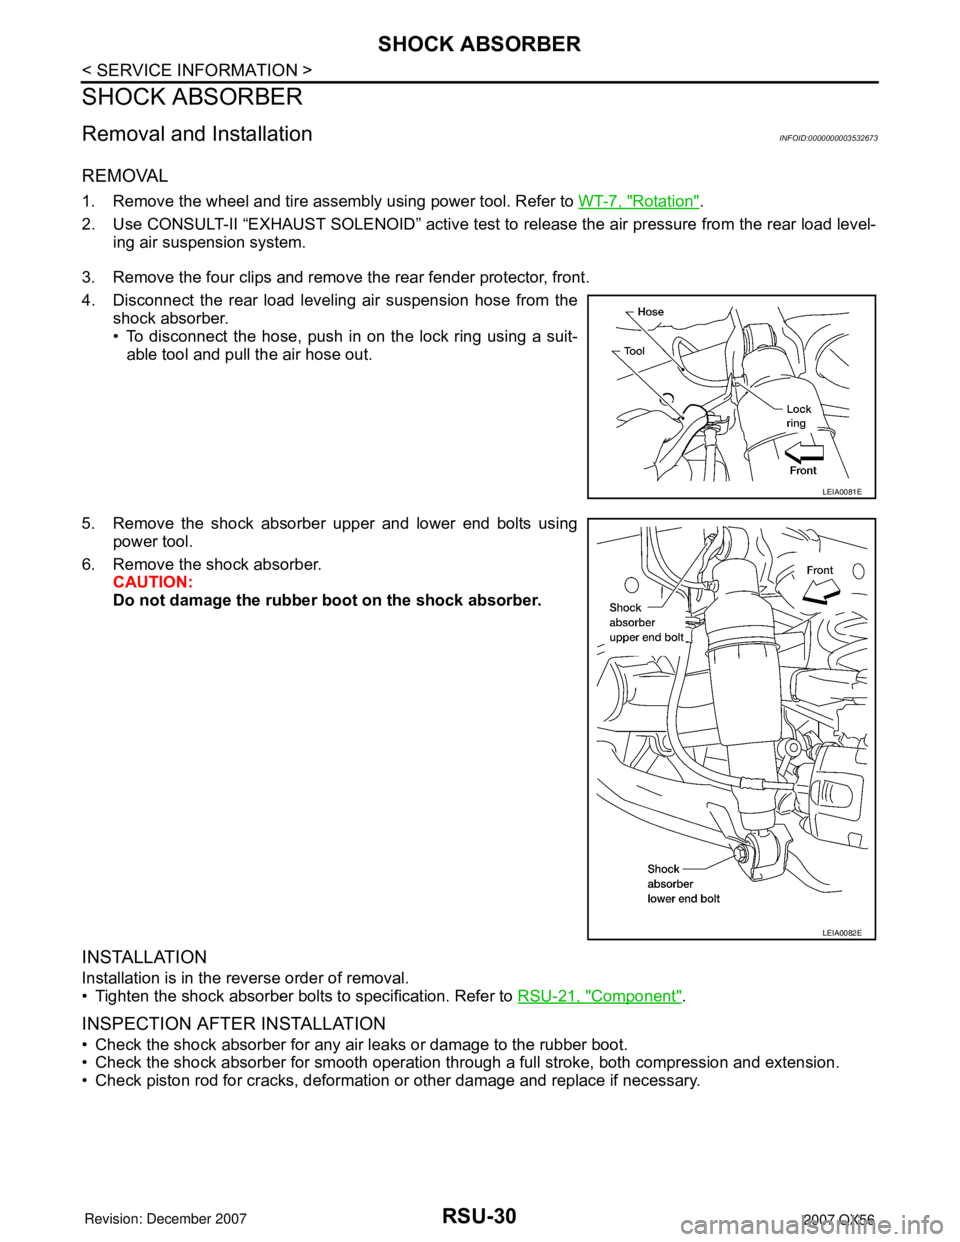
4. Disconnect the rear load leveling air suspension hose from the
shock absorber.
• To disconnect the hose, push in on the lock ring using a suit-
able tool and pull the air hose out.
5. Remove the shock absorber upper and lower end bolts using
power tool.
6. Remove the shock absorber.
CAUTION:
Do not damage the rubber boot on the shock absorber.
INSTALLATION
Installation is in the reverse order of removal.
• Tighten the shock absorber bolts to specification. Refer to RSU-21, "
Component".
INSPECTION AFTER INSTALLATION
• Check the shock absorber for any air leaks or damage to the rubber boot.
• Check the shock absorber for smooth operation through a full stroke, both compression and extension.
• Check piston rod for cracks, deformation or other damage and replace if necessary.
LEIA0081E
LEIA0082E
Page 2628 of 3061
RSU-38
< SERVICE INFORMATION >
REAR LOAD LEVELING AIR SUSPENSION COMPRESSOR ASSEMBLY
REAR LOAD LEVELING AIR SUSPENSION COMPRESSOR ASSEMBLY
Removal and InstallationINFOID:0000000003532678
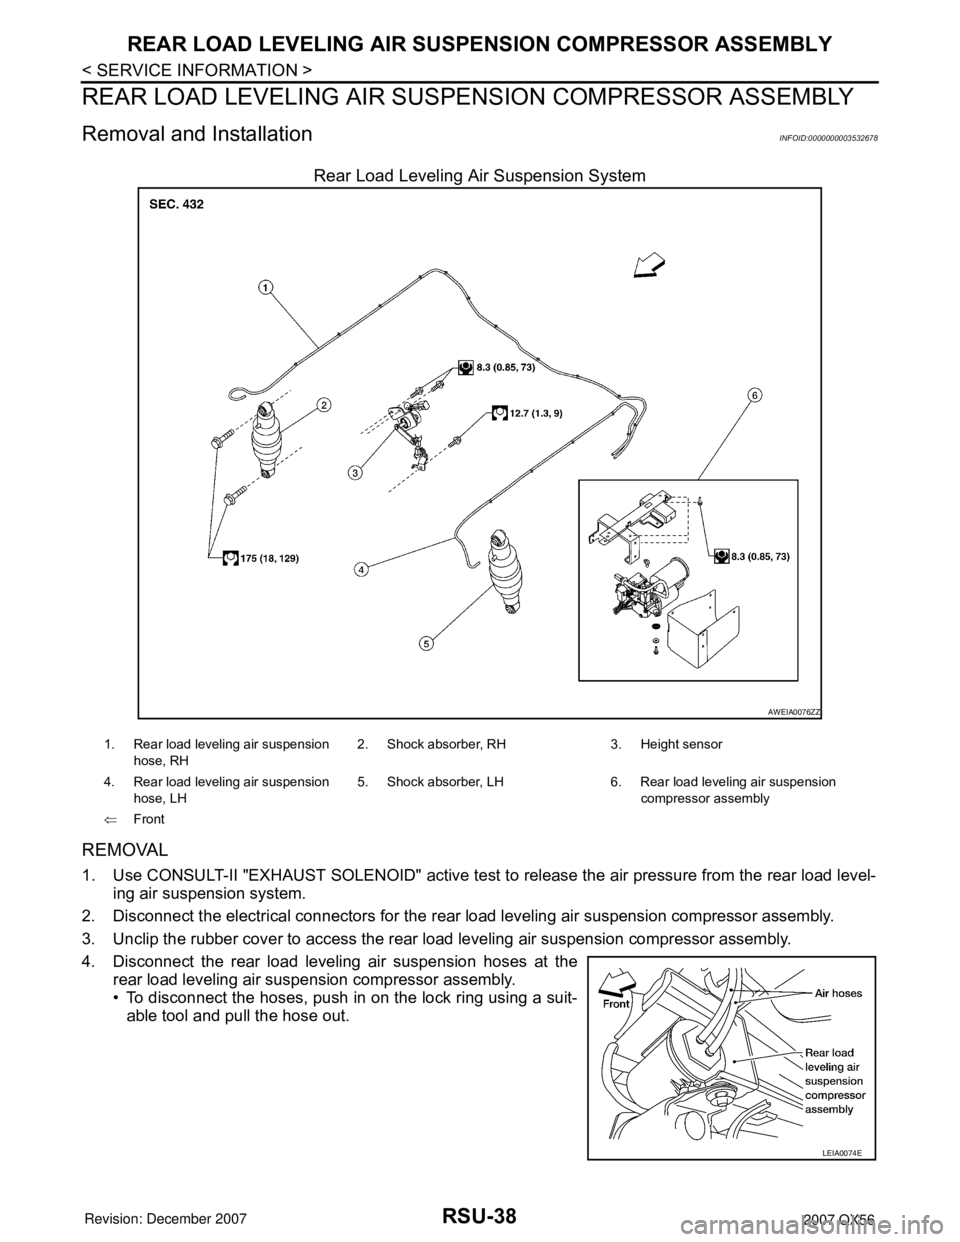
Rear Load Leveling Air Suspension System
REMOVAL
1. Use CONSULT-II "EXHAUST SOLENOID" active test to release the air pressure from the rear load level-
ing air suspension system.
2. Disconnect the electrical connectors for the rear load leveling air suspension compressor assembly.
3. Unclip the rubber cover to access the rear load leveling air suspension compressor assembly.
4. Disconnect the rear load leveling air suspension hoses at the
rear load leveling air suspension compressor assembly.
• To disconnect the hoses, push in on the lock ring using a suit-
able tool and pull the hose out.
AWEIA0076ZZ
1. Rear load leveling air suspension
hose, RH2. Shock absorber, RH 3. Height sensor
4. Rear load leveling air suspension
hose, LH5. Shock absorber, LH 6. Rear load leveling air suspension
compressor assembly
⇐Front
LEIA0074E