2007 INFINITI QX56 fuel cap
[x] Cancel search: fuel capPage 1501 of 3061
EC-418
< SERVICE INFORMATION >
DTC P0456 EVAP CONTROL SYSTEM
3.CHECK FUEL FILLER CAP FUNCTION
Check for air releasing sound while opening the fuel filler cap.
OK or NG
OK >> GO TO 5.
NG >> GO TO 4.
4.CHECK FUEL TANK VACUUM RELIEF VALVE
Refer to EC-35, "
Component Inspection" .
OK or NG
OK >> GO TO 5.
NG >> Replace fuel filler cap with a genuine one.
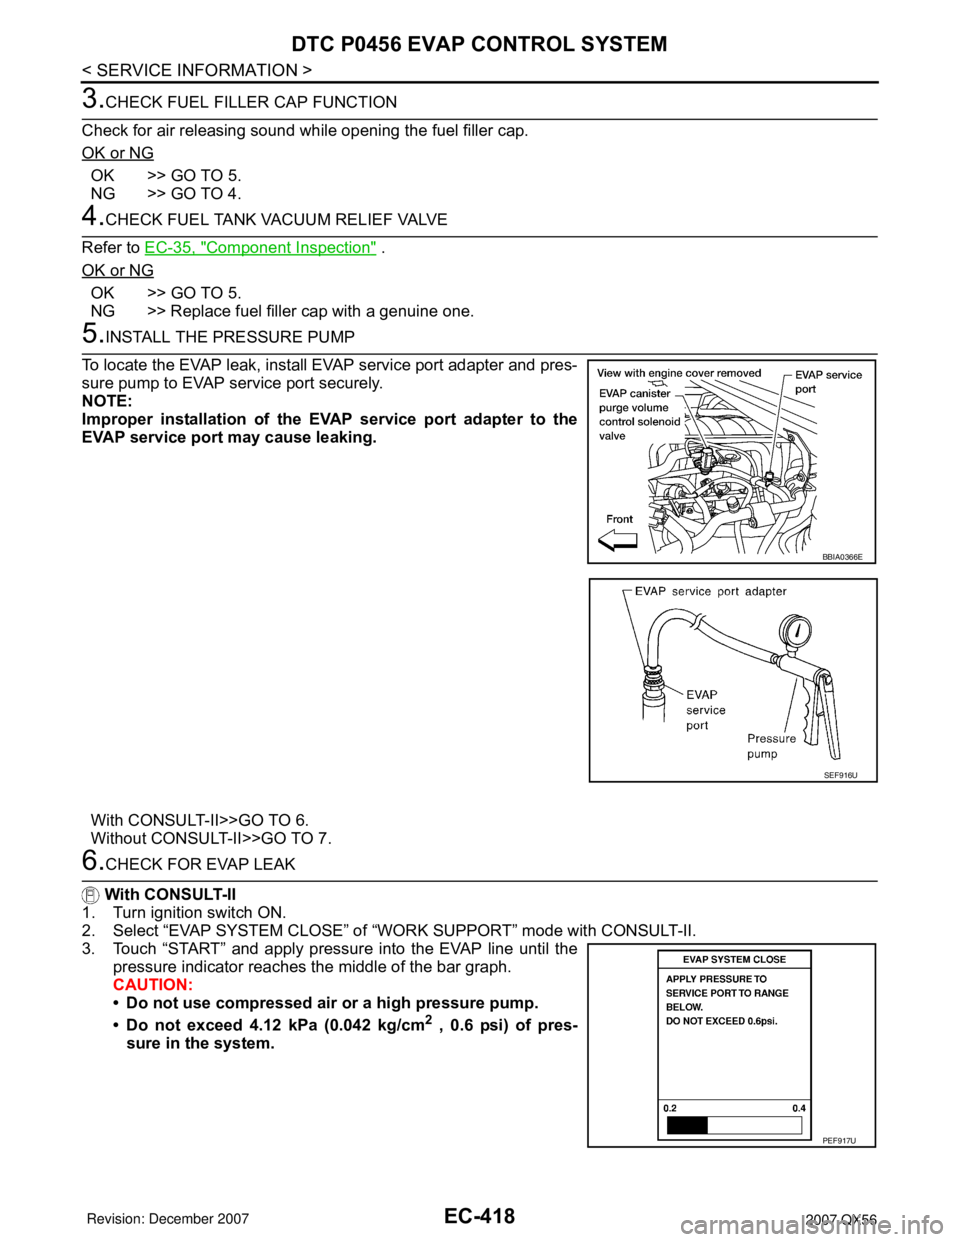
5.INSTALL THE PRESSURE PUMP
To locate the EVAP leak, install EVAP service port adapter and pres-
sure pump to EVAP service port securely.
NOTE:
Improper installation of the EVAP service port adapter to the
EVAP service port may cause leaking.
With CONSULT-II>>GO TO 6.
Without CONSULT-II>>GO TO 7.
6.CHECK FOR EVAP LEAK
With CONSULT-II
1. Turn ignition switch ON.
2. Select “EVAP SYSTEM CLOSE” of “WORK SUPPORT” mode with CONSULT-II.
3. Touch “START” and apply pressure into the EVAP line until the
pressure indicator reaches the middle of the bar graph.
CAUTION:
• Do not use compressed air or a high pressure pump.
• Do not exceed 4.12 kPa (0.042 kg/cm
2 , 0.6 psi) of pres-
sure in the system.
BBIA0366E
SEF916U
PEF917U
Page 1671 of 3061
EC-588
< SERVICE INFORMATION >
DTC P2A00, P2A03 A/F SENSOR 1
DTC P2A00, P2A03 A/F SENSOR 1
Component DescriptionINFOID:0000000003532141
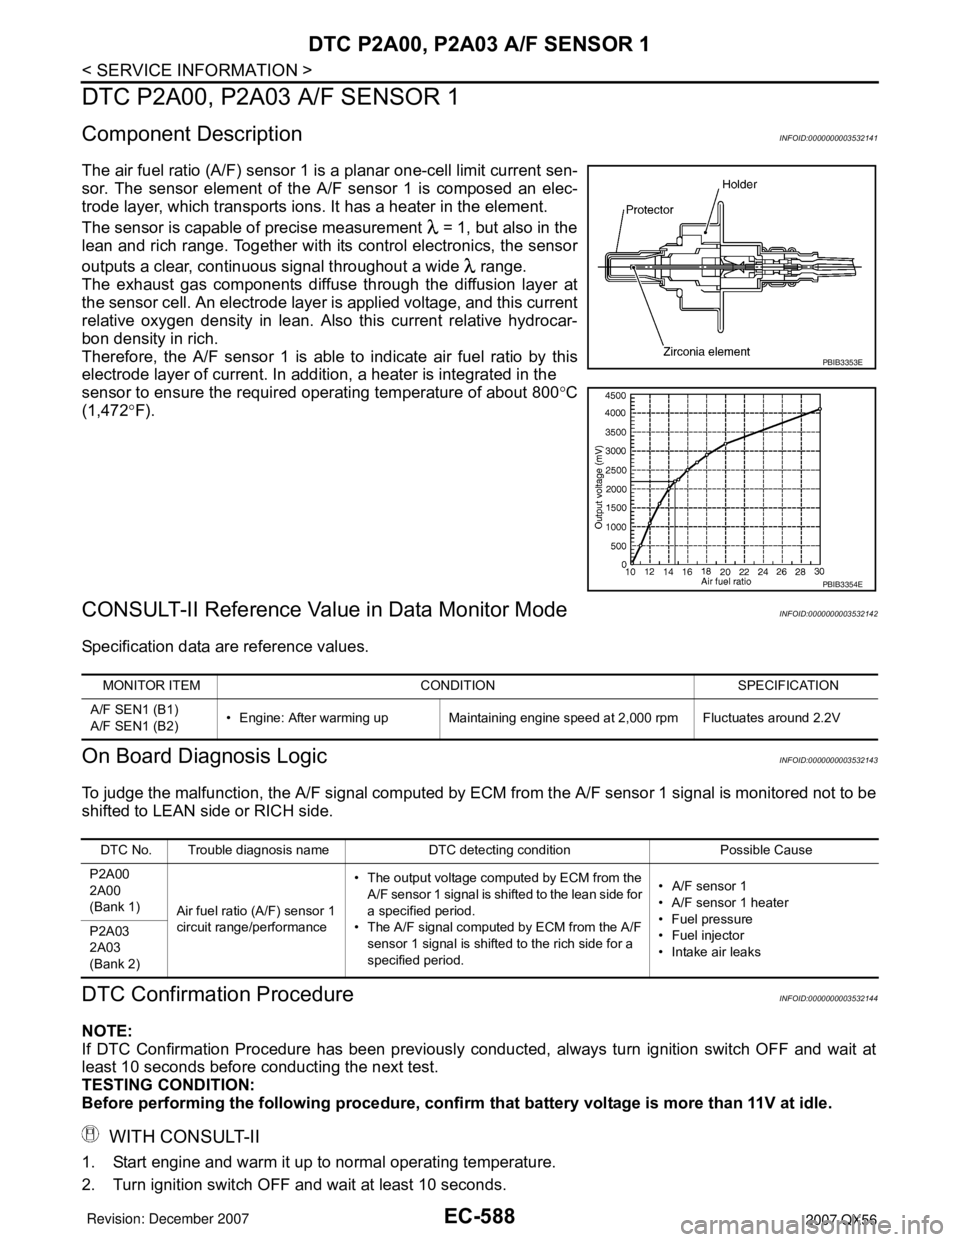
The air fuel ratio (A/F) sensor 1 is a planar one-cell limit current sen-
sor. The sensor element of the A/F sensor 1 is composed an elec-
trode layer, which transports ions. It has a heater in the element.
The sensor is capable of precise measurement = 1, but also in the
lean and rich range. Together with its control electronics, the sensor
outputs a clear, continuous signal throughout a wide range.
The exhaust gas components diffuse through the diffusion layer at
the sensor cell. An electrode layer is applied voltage, and this current
relative oxygen density in lean. Also this current relative hydrocar-
bon density in rich.
Therefore, the A/F sensor 1 is able to indicate air fuel ratio by this
electrode layer of current. In addition, a heater is integrated in the
sensor to ensure the required operating temperature of about 800°C
(1,472°F).
CONSULT-II Reference Value in Data Monitor ModeINFOID:0000000003532142
Specification data are reference values.
On Board Diagnosis LogicINFOID:0000000003532143
To judge the malfunction, the A/F signal computed by ECM from the A/F sensor 1 signal is monitored not to be
shifted to LEAN side or RICH side.
DTC Confirmation ProcedureINFOID:0000000003532144
NOTE:
If DTC Confirmation Procedure has been previously conducted, always turn ignition switch OFF and wait at
least 10 seconds before conducting the next test.
TESTING CONDITION:
Before performing the following procedure, confirm that battery voltage is more than 11V at idle.
WITH CONSULT-II
1. Start engine and warm it up to normal operating temperature.
2. Turn ignition switch OFF and wait at least 10 seconds.
PBIB3353E
PBIB3354E
MONITOR ITEM CONDITION SPECIFICATION
A/F SEN1 (B1)
A/F SEN1 (B2)• Engine: After warming up Maintaining engine speed at 2,000 rpm Fluctuates around 2.2V
DTC No. Trouble diagnosis name DTC detecting condition Possible Cause
P2A00
2A00
(Bank 1)
Air fuel ratio (A/F) sensor 1
circuit range/performance• The output voltage computed by ECM from the
A/F sensor 1 signal is shifted to the lean side for
a specified period.
• The A/F signal computed by ECM from the A/F
sensor 1 signal is shifted to the rich side for a
specified period.• A/F sensor 1
• A/F sensor 1 heater
• Fuel pressure
• Fuel injector
• Intake air leaks P2A03
2A03
(Bank 2)
Page 1774 of 3061
EM-4
< SERVICE INFORMATION >
PRECAUTIONS
• Release air within route when refilling after draining engine coolant.
• Before starting engine, apply fuel pressure to fuel lines with turning ignition switch ON (with engine stopped).
Then make sure that there are no leaks at fuel line connections.
• After repairing, start engine and increase engine s peed to check engine coolant, fuel, oil, and exhaust sys-
tems for leakage.
Parts Requiring Angular TighteningINFOID:0000000003531514
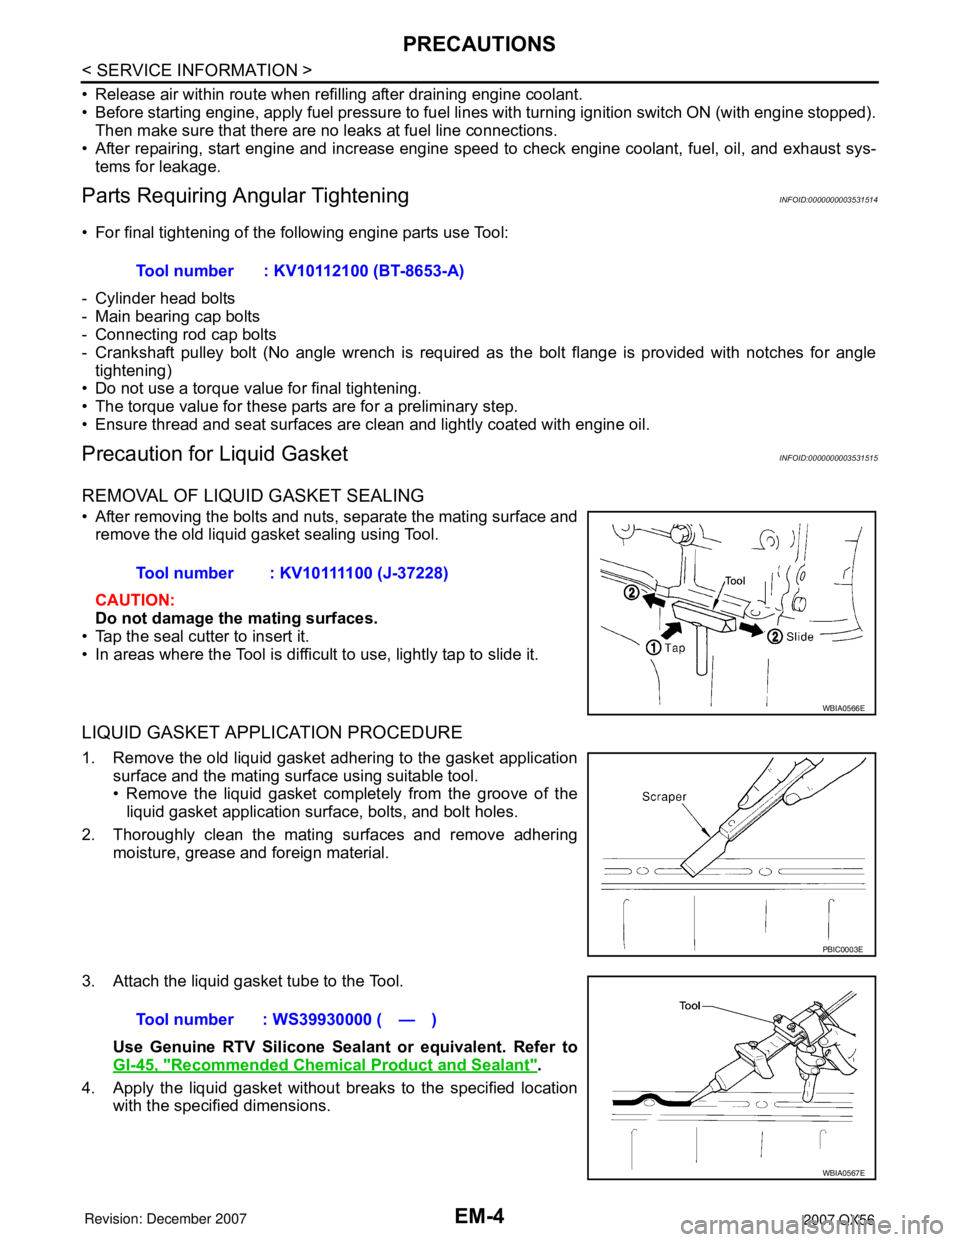
• For final tightening of the following engine parts use Tool:
- Cylinder head bolts
- Main bearing cap bolts
- Connecting rod cap bolts
- Crankshaft pulley bolt (No angle wrench is required as the bolt flange is provided with notches for angle tightening)
• Do not use a torque value for final tightening.
• The torque value for these parts are for a preliminary step.
• Ensure thread and seat surfaces are clean and lightly coated with engine oil.
Precaution for Liquid GasketINFOID:0000000003531515
REMOVAL OF LIQUID GASKET SEALING
• After removing the bolts and nuts, separate the mating surface and
remove the old liquid gasket sealing using Tool.
CAUTION:
Do not damage the mating surfaces.
• Tap the seal cutter to insert it.
• In areas where the Tool is difficult to use, lightly tap to slide it.
LIQUID GASKET APPLICATION PROCEDURE
1. Remove the old liquid gasket adhering to the gasket application surface and the mating surface using suitable tool.
• Remove the liquid gasket completely from the groove of theliquid gasket application surface, bolts, and bolt holes.
2. Thoroughly clean the mating surfaces and remove adhering moisture, grease and foreign material.
3. Attach the liquid gasket tube to the Tool. Use Genuine RTV Silicone Seal ant or equivalent. Refer to
GI-45, "
Recommended Chemical Product and Sealant".
4. Apply the liquid gasket without breaks to the specified location with the specified dimensions.Tool number : KV10112100 (BT-8653-A)
Tool number : KV10111100 (J-37228)
WBIA0566E
PBIC0003E
Tool number : WS39930000 ( — )
WBIA0567E
Page 1776 of 3061
EM-6
< SERVICE INFORMATION >
PREPARATION
PREPARATION
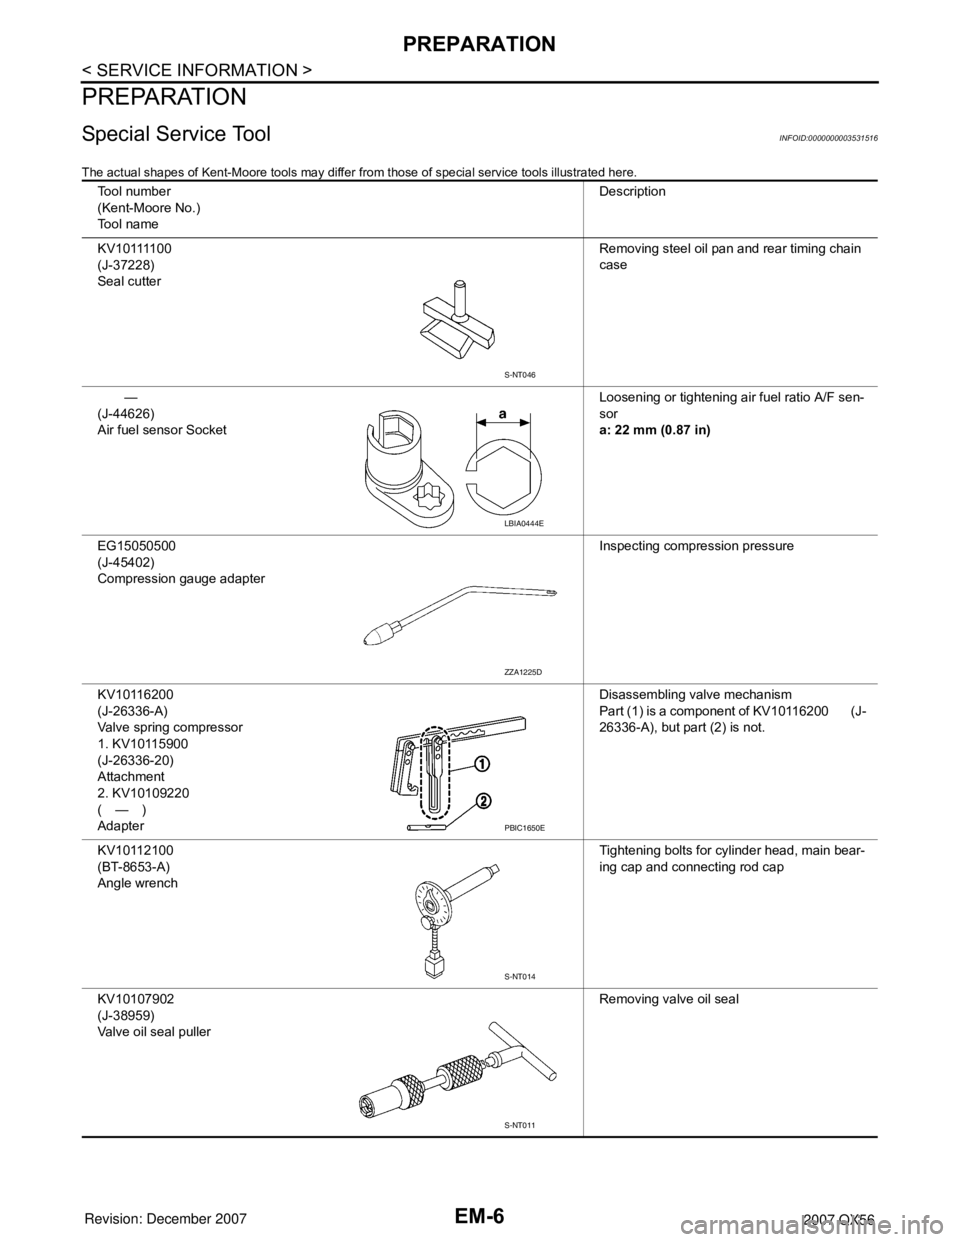
Special Service ToolINFOID:0000000003531516
The actual shapes of Kent-Moore tools may differ from those of special service tools illustrated here.
Tool number
(Kent-Moore No.)
Tool name Description
K V 1 0 1111 0 0
(J-37228)
Seal cutter Removing steel oil pan and rear timing chain
case
—
(J-44626)
Air fuel sensor Socket Loosening or tightening air fuel ratio A/F sen-
sor
a: 22 mm (0.87 in)
EG15050500
(J-45402)
Compression gauge adapter Inspecting compression pressure
KV10116200
(J-26336-A)
Valve spring compressor
1. KV10115900
(J-26336-20)
Attachment
2. KV10109220
(—)
Adapter Disassembling valve mechanism
Part (1) is a component of KV10116200 (J-
26336-A), but part (2) is not.
KV10112100
(BT-8653-A)
Angle wrench Tightening bolts for cylinder head, main bear-
ing cap and connecting rod cap
KV10107902
(J-38959)
Valve oil seal puller Removing valve oil seal
S-NT046
LBIA0444E
ZZA1225D
PBIC1650E
S-NT014
S-NT011
Page 1788 of 3061
EM-18
< SERVICE INFORMATION >
INTAKE MANIFOLD
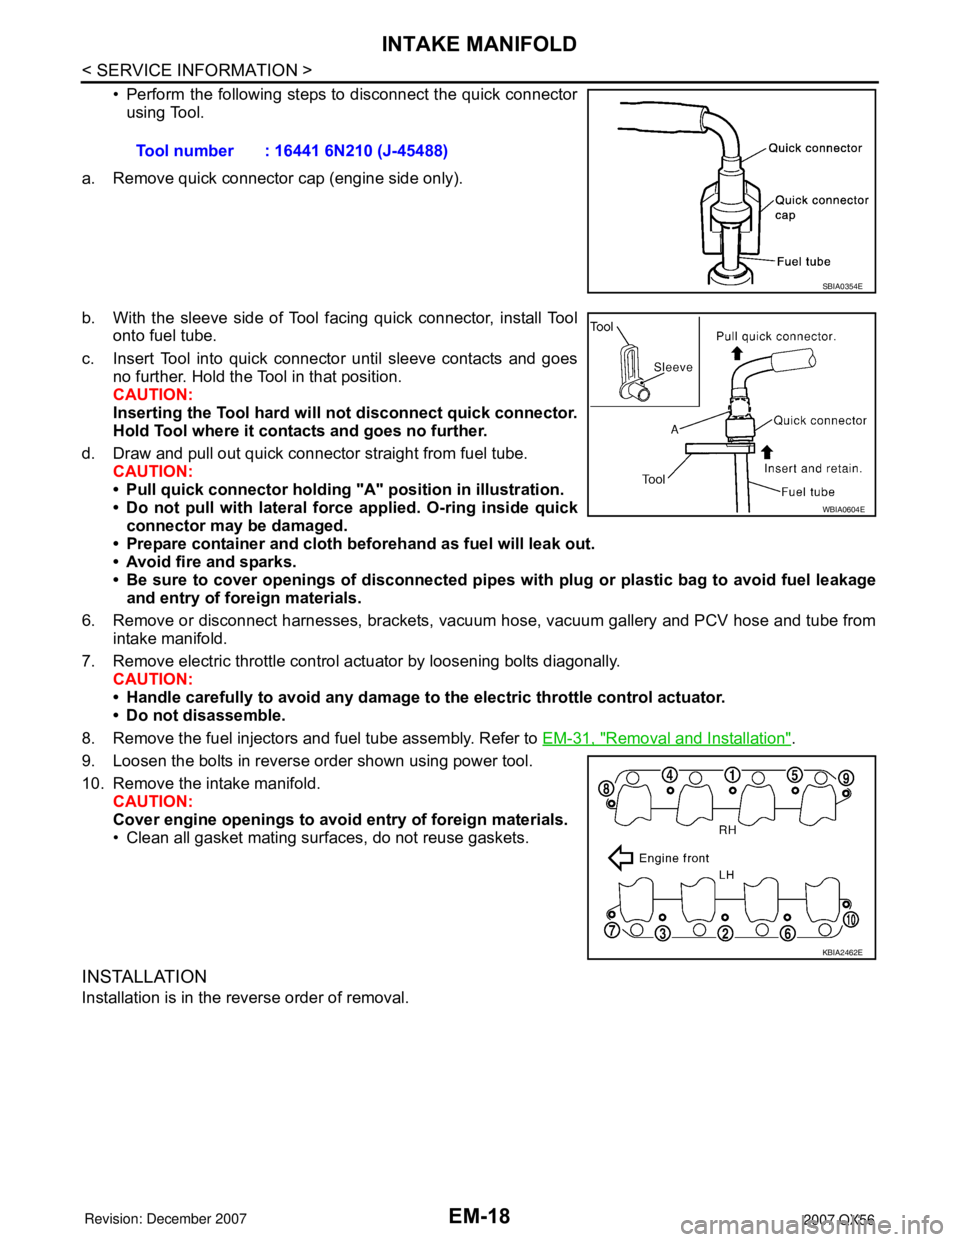
• Perform the following steps to disconnect the quick connectorusing Tool.
a. Remove quick connector cap (engine side only).
b. With the sleeve side of Tool facing quick connector, install Tool onto fuel tube.
c. Insert Tool into quick connector until sleeve contacts and goes no further. Hold the Tool in that position.
CAUTION:
Inserting the Tool hard will no t disconnect quick connector.
Hold Tool where it cont acts and goes no further.
d. Draw and pull out quick connector straight from fuel tube. CAUTION:
• Pull quick connector holding "A" position in illustration.
• Do not pull with lateral force applied. O-ring inside quickconnector may be damaged.
• Prepare container and cloth beforehand as fuel will leak out.
• Avoid fire and sparks.
• Be sure to cover openings of disconnected pipes with plug or plastic bag to avoid fuel leakage
and entry of foreign materials.
6. Remove or disconnect harnesses, brackets, vacuum hose, vacuum gallery and PCV hose and tube from intake manifold.
7. Remove electric throttle control actuator by loosening bolts diagonally. CAUTION:
• Handle carefully to avoid any damage to the electric throttle control actuator.
• Do not disassemble.
8. Remove the fuel injectors and fuel tube assembly. Refer to EM-31, "
Removal and Installation".
9. Loosen the bolts in reverse order shown using power tool.
10. Remove the intake manifold. CAUTION:
Cover engine openings to avoid entry of foreign materials.
• Clean all gasket mating surfaces, do not reuse gaskets.
INSTALLATION
Installation is in the reverse order of removal. Tool number : 16441 6N210 (J-45488)
SBIA0354E
WBIA0604E
KBIA2462E
Page 1789 of 3061
INTAKE MANIFOLDEM-19
< SERVICE INFORMATION >
C
DE
F
G H
I
J
K L
M A
EM
NP
O
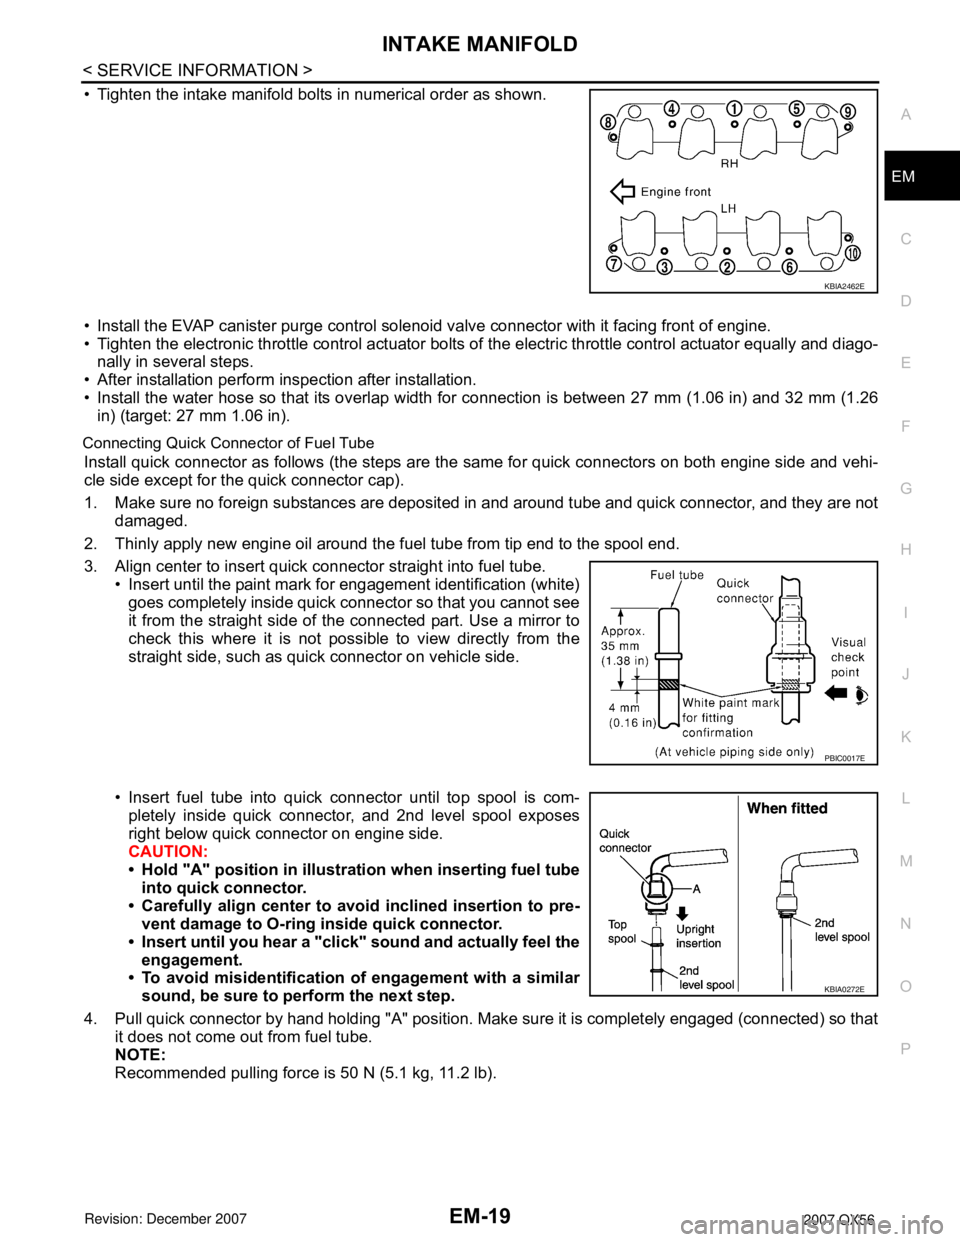
• Tighten the intake manifold bolts in numerical order as shown.
• Install the EVAP canister purge control solenoi
d valve connector with it facing front of engine.
• Tighten the electronic throttle control actuator bolts of the electric throttle control actuator equally and diago-
nally in several steps.
• After installation perform inspection after installation.
• Install the water hose so that its overlap width for connection is between 27 mm (1.06 in) and 32 mm (1.26
in) (target: 27 mm 1.06 in).
Connecting Quick Connector of Fuel Tube
Install quick connector as follows (the steps are the same for quick connectors on both engine side and vehi-
cle side except for the quick connector cap).
1. Make sure no foreign substances are deposited in and around tube and quick connector, and they are not
damaged.
2. Thinly apply new engine oil around the fuel tube from tip end to the spool end.
3. Align center to insert quick connector straight into fuel tube. • Insert until the paint mark for engagement identification (white)
goes completely inside quick connector so that you cannot see
it from the straight side of the connected part. Use a mirror to
check this where it is not possible to view directly from the
straight side, such as quick connector on vehicle side.
• Insert fuel tube into quick connector until top spool is com- pletely inside quick connector, and 2nd level spool exposes
right below quick connector on engine side.
CAUTION:
• Hold "A" position in illustration when inserting fuel tubeinto quick connector.
• Carefully align center to avoid inclined insertion to pre-
vent damage to O-ring inside quick connector.
• Insert until you hear a "click" sound and actually feel the engagement.
• To avoid misidentification of engagement with a similar
sound, be sure to perform the next step.
4. Pull quick connector by hand holding "A" position. Make sure it is completely engaged (connected) so that it does not come out from fuel tube.
NOTE:
Recommended pulling force is 50 N (5.1 kg, 11.2 lb).
KBIA2462E
PBIC0017E
KBIA0272E
Page 1790 of 3061
EM-20
< SERVICE INFORMATION >
INTAKE MANIFOLD
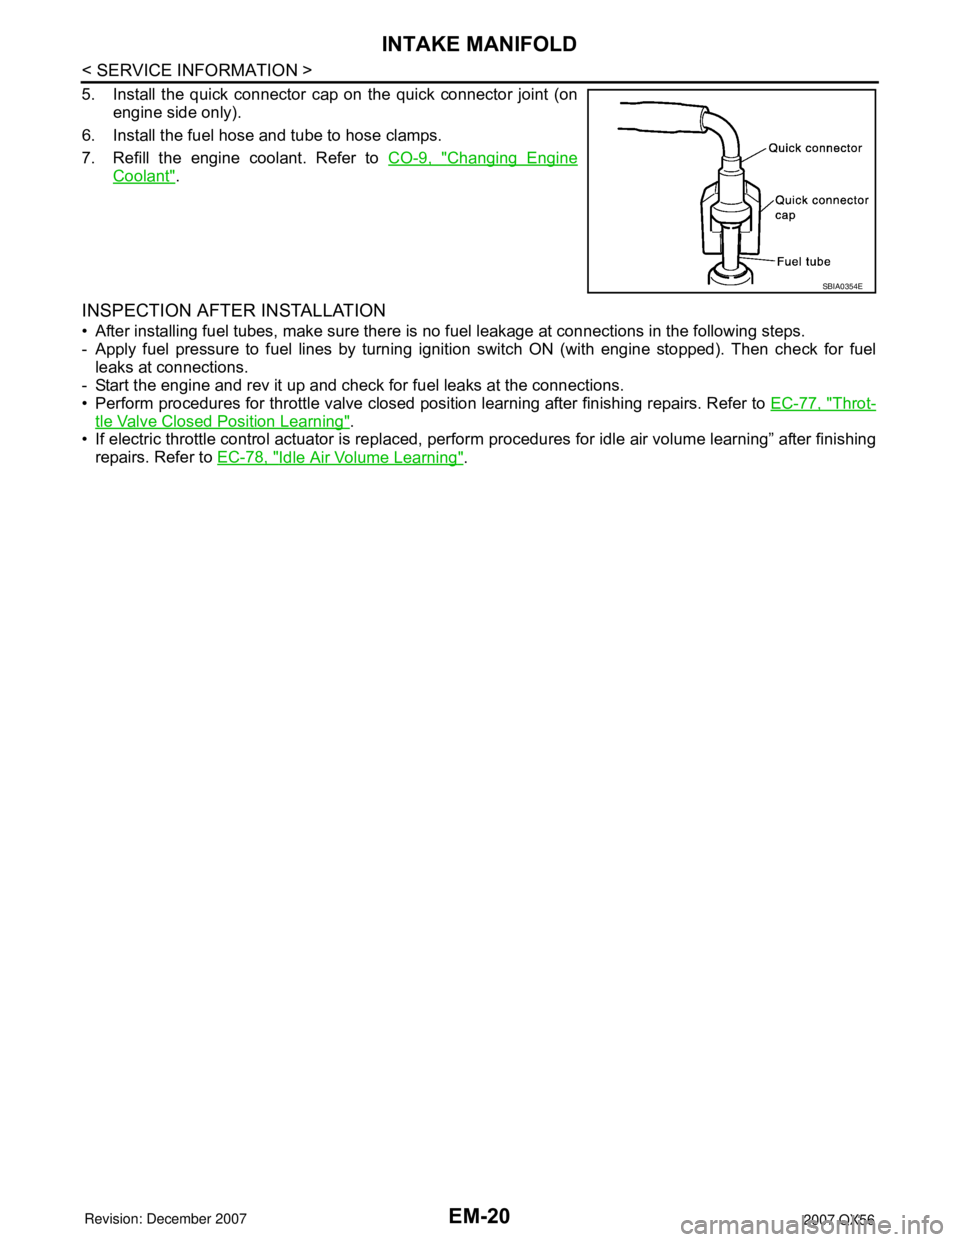
5. Install the quick connector cap on the quick connector joint (onengine side only).
6. Install the fuel hose and tube to hose clamps.
7. Refill the engine coolant. Refer to CO-9, "
Changing Engine
Coolant".
INSPECTION AFTER INSTALLATION
• After installing fuel tubes, make sure there is no fuel leakage at connections in the following steps.
- Apply fuel pressure to fuel lines by turning i gnition switch ON (with engine stopped). Then check for fuel
leaks at connections.
- Start the engine and rev it up and check for fuel leaks at the connections.
• Perform procedures for throttle valve closed position learning after finishing repairs. Refer to EC-77, "
Throt-
tle Valve Closed Position Learning".
• If electric throttle control actuator is replaced, perform procedures for idle air volume learning” after finishing
repairs. Refer to EC-78, "
Idle Air Volume Learning".
SBIA0354E
Page 1801 of 3061
FUEL INJECTOR AND FUEL TUBEEM-31
< SERVICE INFORMATION >
C
DE
F
G H
I
J
K L
M A
EM
NP
O
FUEL INJECTOR AND FUEL TUBE
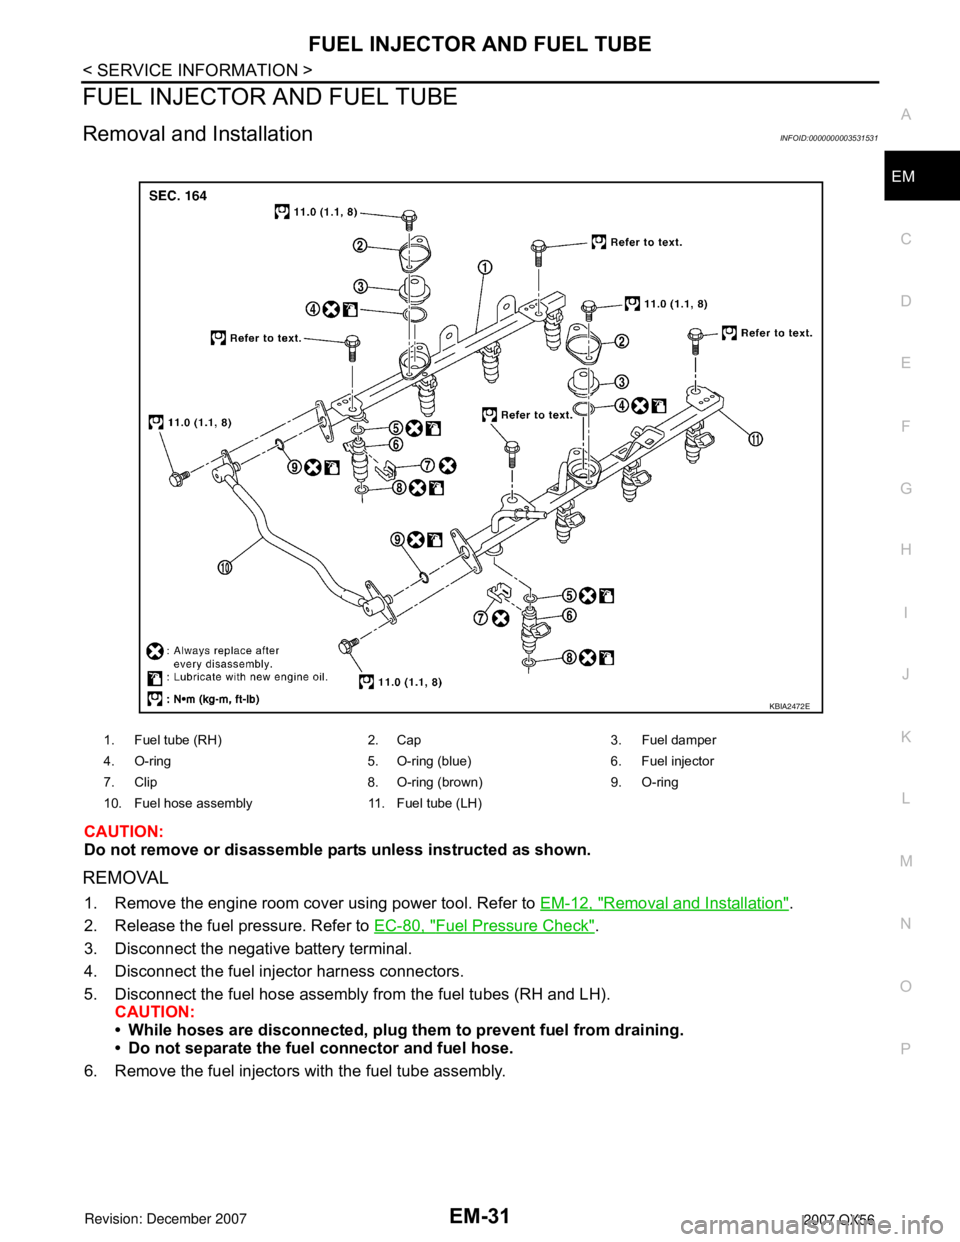
Removal and InstallationINFOID:0000000003531531
CAUTION:
Do not remove or disassemble parts unless instructed as shown.
REMOVAL
1. Remove the engine room cover using power tool. Refer to
EM-12, "Removal and Installation".
2. Release the fuel pressure. Refer to EC-80, "
Fuel Pressure Check".
3. Disconnect the negative battery terminal.
4. Disconnect the fuel injector harness connectors.
5. Disconnect the fuel hose assembly from the fuel tubes (RH and LH).
CAUTION:
• While hoses are disconnected, plug th em to prevent fuel from draining.
• Do not separate the fuel connector and fuel hose.
6. Remove the fuel injectors with the fuel tube assembly.
1. Fuel tube (RH) 2. Cap 3. Fuel damper
4. O-ring 5. O-ring (b lue) 6. Fuel injector
7. Clip 8. O-ring (brown) 9. O-ring
10. Fuel hose assembly 11. Fuel tube (LH)
KBIA2472E