2007 INFINITI QX56 mirror
[x] Cancel search: mirrorPage 2011 of 3061
RECOMMENDED CHEMICAL PRODUCTS AND SEALANTS
GI-45
< SERVICE INFORMATION >
C
D
E
F
G
H
I
J
K
L
MB
GI
N
O
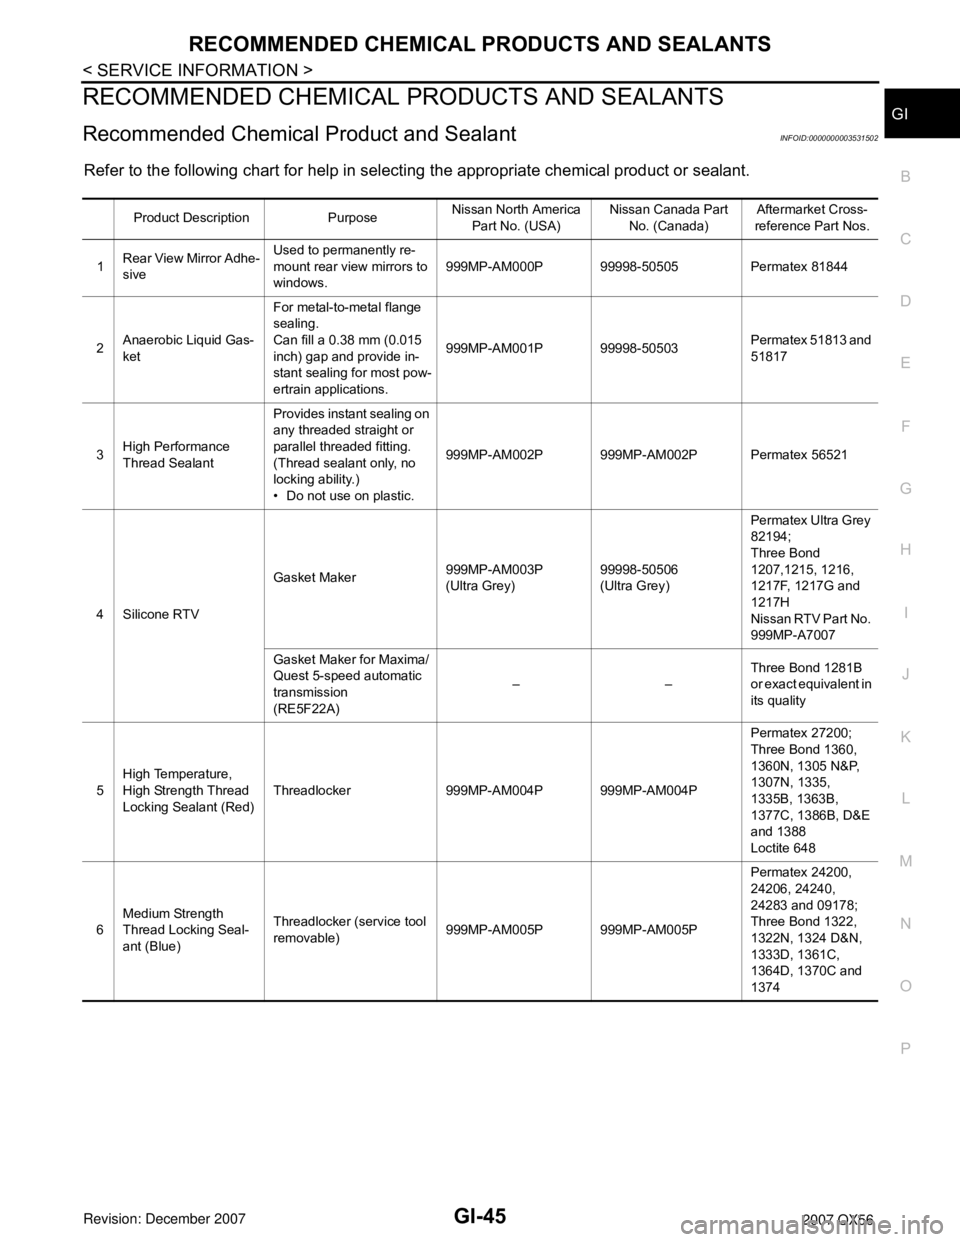
PRECOMMENDED CHEMICAL PRODUCTS AND SEALANTS
Recommended Chemical Product and SealantINFOID:0000000003531502
Refer to the following chart for help in selecting the appropriate chemical product or sealant.
Product Description PurposeNissan North America
Part No. (USA)Nissan Canada Part
No. (Canada)Aftermarket Cross-
reference Part Nos.
1Rear View Mirror Adhe-
siveUsed to permanently re-
mount rear view mirrors to
windows.999MP-AM000P 99998-50505 Permatex 81844
2Anaerobic Liquid Gas-
ketFor metal-to-metal flange
sealing.
Can fill a 0.38 mm (0.015
inch) gap and provide in-
stant sealing for most pow-
ertrain applications.999MP-AM001P 99998-50503Permatex 51813 and
51817
3High Performance
Thread SealantProvides instant sealing on
any threaded straight or
parallel threaded fitting.
(Thread sealant only, no
locking ability.)
• Do not use on plastic.999MP-AM002P 999MP-AM002P Permatex 56521
4 Silicone RTVGasket Maker999MP-AM003P
(Ultra Grey)99998-50506
(Ultra Grey)Permatex Ultra Grey
82194;
Three Bond
1207,1215, 1216,
1217F, 1217G and
1217H
Nissan RTV Part No.
999MP-A7007
Gasket Maker for Maxima/
Quest 5-speed automatic
transmission
(RE5F22A)––Three Bond 1281B
or exact equivalent in
its quality
5High Temperature,
High Strength Thread
Locking Sealant (Red)Threadlocker 999MP-AM004P 999MP-AM004PPermatex 27200;
Three Bond 1360,
1360N, 1305 N&P,
1307N, 1335,
1335B, 1363B,
1377C, 1386B, D&E
and 1388
Loctite 648
6Medium Strength
Thread Locking Seal-
ant (Blue)Threadlocker (service tool
removable)999MP-AM005P 999MP-AM005PPermatex 24200,
24206, 24240,
24283 and 09178;
Three Bond 1322,
1322N, 1324 D&N,
1333D, 1361C,
1364D, 1370C and
1374
Page 2020 of 3061
GW-1
BODY
C
D
E
F
G
H
J
K
L
M
SECTION GW
A
B
GW
N
O
P
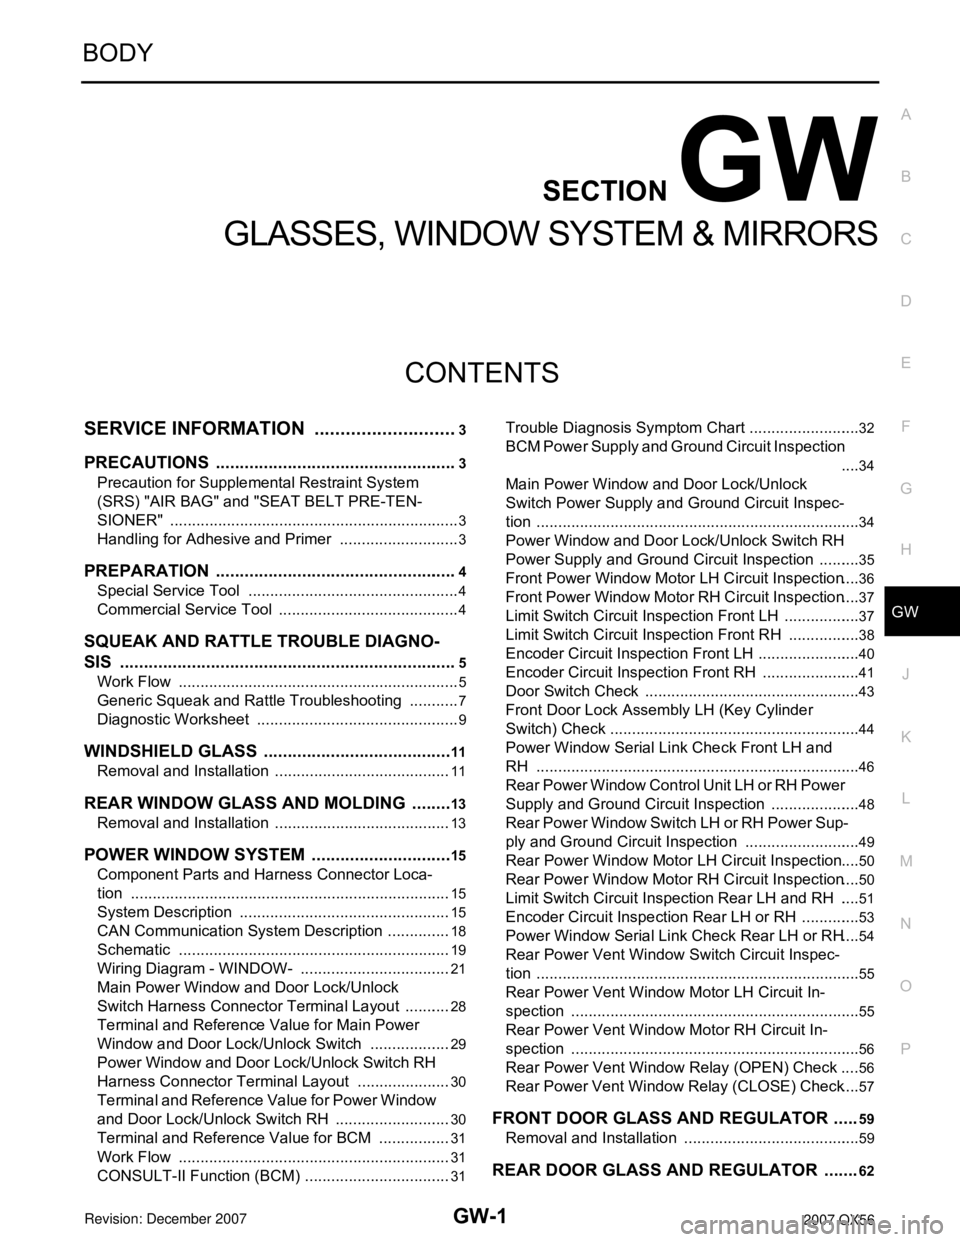
CONTENTS
GLASSES, WINDOW SYSTEM & MIRRORS
SERVICE INFORMATION ............................3
PRECAUTIONS ...................................................3
Precaution for Supplemental Restraint System
(SRS) "AIR BAG" and "SEAT BELT PRE-TEN-
SIONER" ...................................................................
3
Handling for Adhesive and Primer ............................3
PREPARATION ...................................................4
Special Service Tool .................................................4
Commercial Service Tool ..........................................4
SQUEAK AND RATTLE TROUBLE DIAGNO-
SIS .......................................................................
5
Work Flow .................................................................5
Generic Squeak and Rattle Troubleshooting ............7
Diagnostic Worksheet ...............................................9
WINDSHIELD GLASS ........................................11
Removal and Installation .........................................11
REAR WINDOW GLASS AND MOLDING .........13
Removal and Installation .........................................13
POWER WINDOW SYSTEM ..............................15
Component Parts and Harness Connector Loca-
tion ..........................................................................
15
System Description .................................................15
CAN Communication System Description ...............18
Schematic ...............................................................19
Wiring Diagram - WINDOW- ...................................21
Main Power Window and Door Lock/Unlock
Switch Harness Connector Terminal Layout ...........
28
Terminal and Reference Value for Main Power
Window and Door Lock/Unlock Switch ...................
29
Power Window and Door Lock/Unlock Switch RH
Harness Connector Terminal Layout ......................
30
Terminal and Reference Value for Power Window
and Door Lock/Unlock Switch RH ...........................
30
Terminal and Reference Value for BCM .................31
Work Flow ...............................................................31
CONSULT-II Function (BCM) ..................................31
Trouble Diagnosis Symptom Chart ..........................32
BCM Power Supply and Ground Circuit Inspection
....
34
Main Power Window and Door Lock/Unlock
Switch Power Supply and Ground Circuit Inspec-
tion ...........................................................................
34
Power Window and Door Lock/Unlock Switch RH
Power Supply and Ground Circuit Inspection ..........
35
Front Power Window Motor LH Circuit Inspection ....36
Front Power Window Motor RH Circuit Inspection ....37
Limit Switch Circuit Inspection Front LH ..................37
Limit Switch Circuit Inspection Front RH .................38
Encoder Circuit Inspection Front LH ........................40
Encoder Circuit Inspection Front RH .......................41
Door Switch Check ..................................................43
Front Door Lock Assembly LH (Key Cylinder
Switch) Check ..........................................................
44
Power Window Serial Link Check Front LH and
RH ...........................................................................
46
Rear Power Window Control Unit LH or RH Power
Supply and Ground Circuit Inspection .....................
48
Rear Power Window Switch LH or RH Power Sup-
ply and Ground Circuit Inspection ...........................
49
Rear Power Window Motor LH Circuit Inspection ....50
Rear Power Window Motor RH Circuit Inspection ....50
Limit Switch Circuit Inspection Rear LH and RH .....51
Encoder Circuit Inspection Rear LH or RH ..............53
Power Window Serial Link Check Rear LH or RH ....54
Rear Power Vent Window Switch Circuit Inspec-
tion ...........................................................................
55
Rear Power Vent Window Motor LH Circuit In-
spection ...................................................................
55
Rear Power Vent Window Motor RH Circuit In-
spection ...................................................................
56
Rear Power Vent Window Relay (OPEN) Check ....56
Rear Power Vent Window Relay (CLOSE) Check ....57
FRONT DOOR GLASS AND REGULATOR .....59
Removal and Installation .........................................59
REAR DOOR GLASS AND REGULATOR .......62
Page 2021 of 3061
GW-2
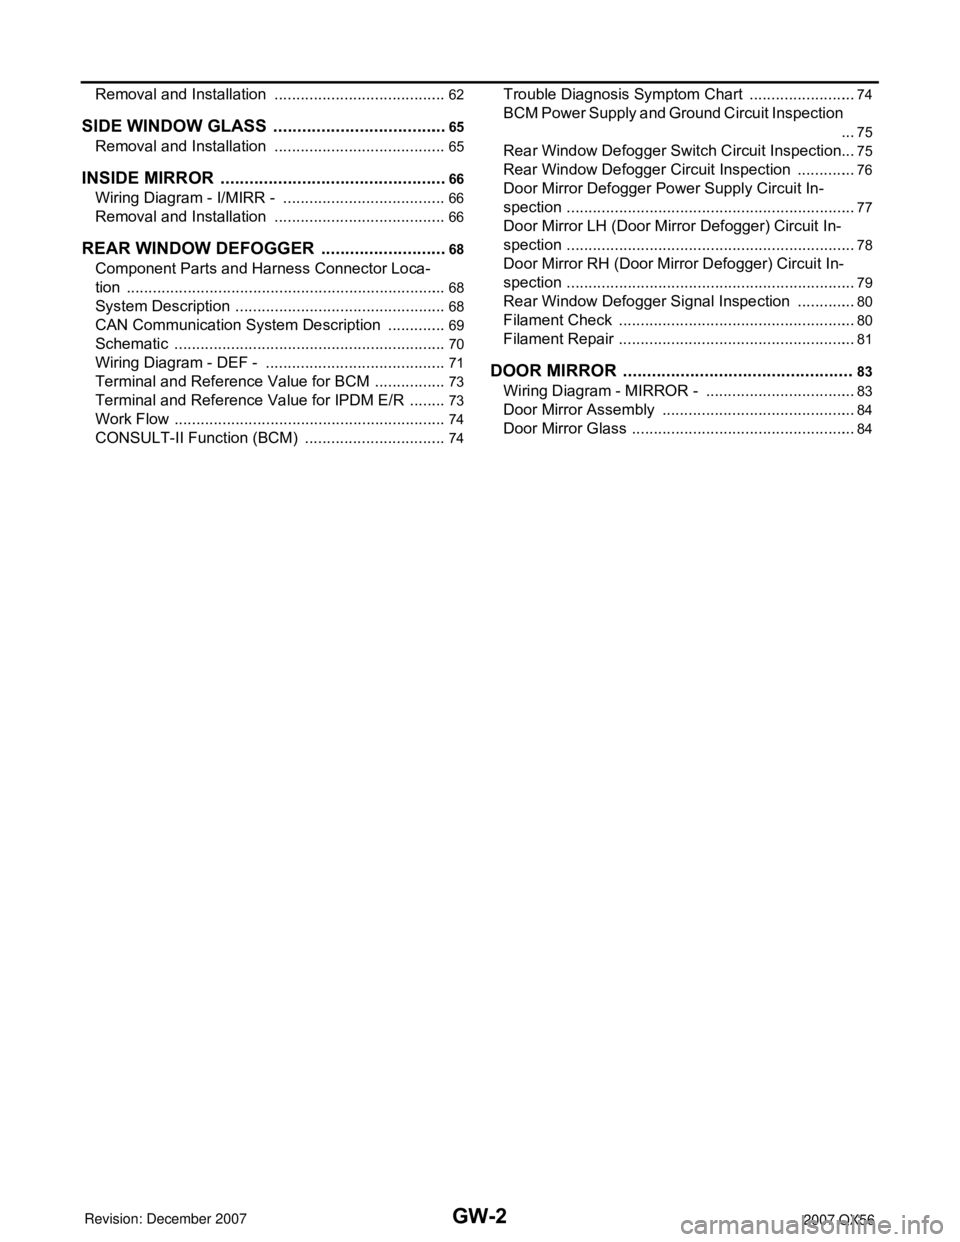
Removal and Installation ........................................62
SIDE WINDOW GLASS .....................................65
Removal and Installation ........................................65
INSIDE MIRROR ................................................66
Wiring Diagram - I/MIRR - ......................................66
Removal and Installation ........................................66
REAR WINDOW DEFOGGER ...........................68
Component Parts and Harness Connector Loca-
tion ..........................................................................
68
System Description .................................................68
CAN Communication System Description ..............69
Schematic ...............................................................70
Wiring Diagram - DEF - ..........................................71
Terminal and Reference Value for BCM .................73
Terminal and Reference Value for IPDM E/R .........73
Work Flow ...............................................................74
CONSULT-II Function (BCM) .................................74
Trouble Diagnosis Symptom Chart .........................74
BCM Power Supply and Ground Circuit Inspection
...
75
Rear Window Defogger Switch Circuit Inspection ...75
Rear Window Defogger Circuit Inspection ..............76
Door Mirror Defogger Power Supply Circuit In-
spection ...................................................................
77
Door Mirror LH (Door Mirror Defogger) Circuit In-
spection ...................................................................
78
Door Mirror RH (Door Mirror Defogger) Circuit In-
spection ...................................................................
79
Rear Window Defogger Signal Inspection ..............80
Filament Check .......................................................80
Filament Repair .......................................................81
DOOR MIRROR .................................................83
Wiring Diagram - MIRROR - ...................................83
Door Mirror Assembly .............................................84
Door Mirror Glass ....................................................84
Page 2030 of 3061
WINDSHIELD GLASS
GW-11
< SERVICE INFORMATION >
C
D
E
F
G
H
J
K
L
MA
B
GW
N
O
P
WINDSHIELD GLASS
Removal and InstallationINFOID:0000000003533022
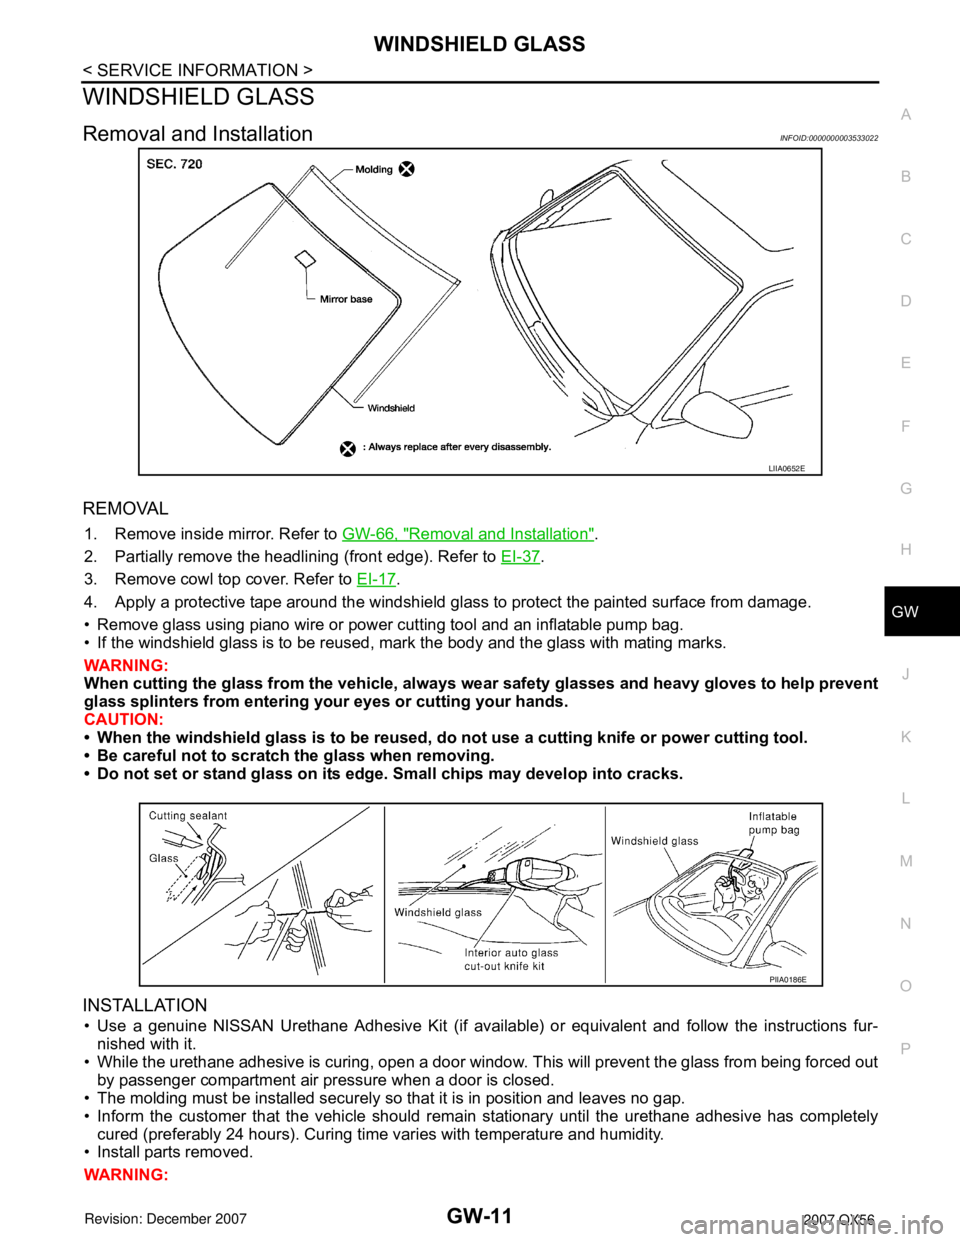
REMOVAL
1. Remove inside mirror. Refer to GW-66, "Removal and Installation".
2. Partially remove the headlining (front edge). Refer to EI-37
.
3. Remove cowl top cover. Refer to EI-17
.
4. Apply a protective tape around the windshield glass to protect the painted surface from damage.
• Remove glass using piano wire or power cutting tool and an inflatable pump bag.
• If the windshield glass is to be reused, mark the body and the glass with mating marks.
WARNING:
When cutting the glass from the vehicle, always wear safety glasses and heavy gloves to help prevent
glass splinters from entering your eyes or cutting your hands.
CAUTION:
• When the windshield glass is to be reused, do not use a cutting knife or power cutting tool.
• Be careful not to scratch the glass when removing.
• Do not set or stand glass on its edge. Small chips may develop into cracks.
INSTALLATION
• Use a genuine NISSAN Urethane Adhesive Kit (if available) or equivalent and follow the instructions fur-
nished with it.
• While the urethane adhesive is curing, open a door window. This will prevent the glass from being forced out
by passenger compartment air pressure when a door is closed.
• The molding must be installed securely so that it is in position and leaves no gap.
• Inform the customer that the vehicle should remain stationary until the urethane adhesive has completely
cured (preferably 24 hours). Curing time varies with temperature and humidity.
• Install parts removed.
WARNING:
LIIA0652E
PIIA0186E
Page 2085 of 3061
GW-66
< SERVICE INFORMATION >
INSIDE MIRROR
INSIDE MIRROR
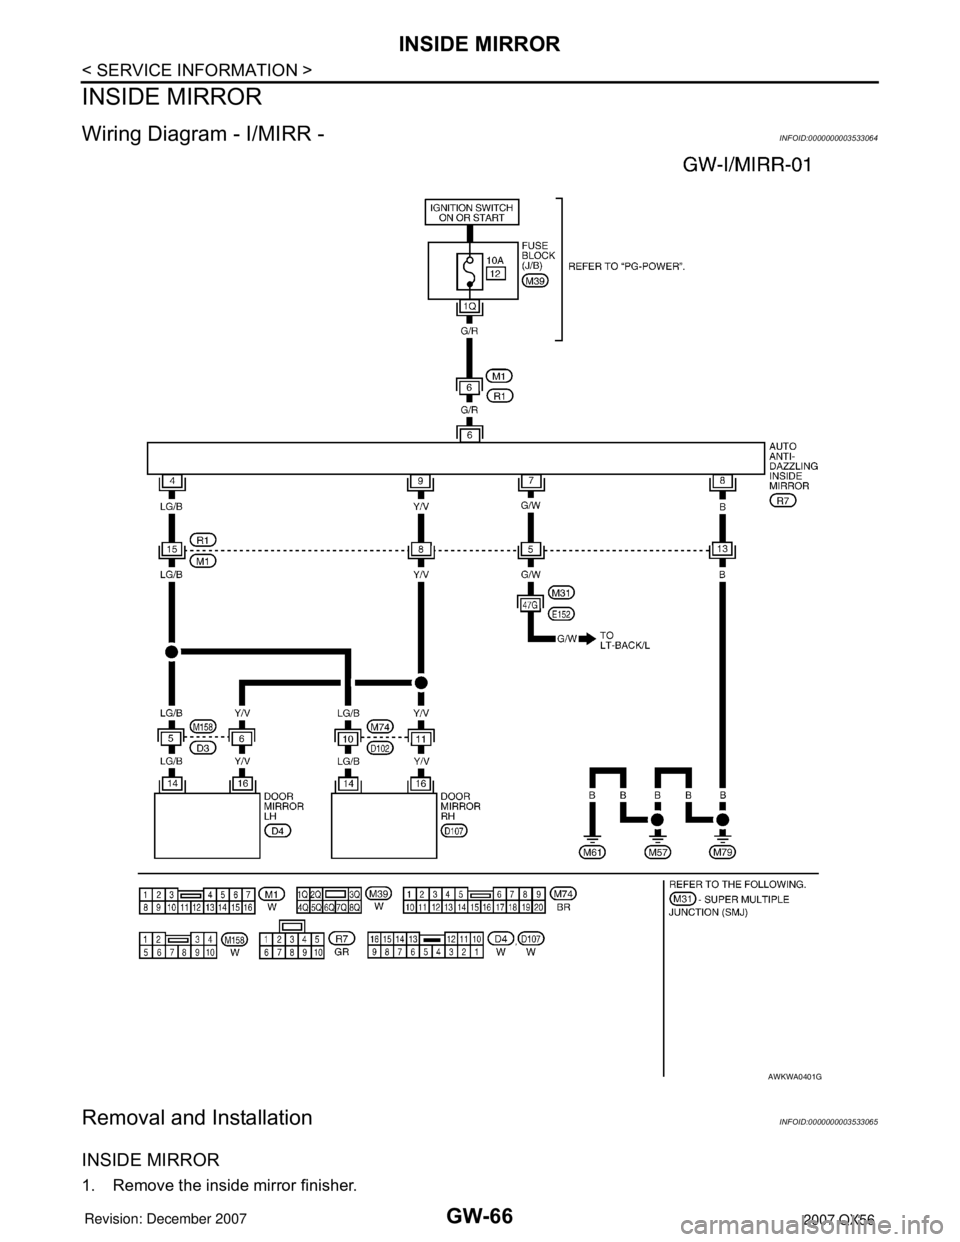
Wiring Diagram - I/MIRR -INFOID:0000000003533064
Removal and InstallationINFOID:0000000003533065
INSIDE MIRROR
1. Remove the inside mirror finisher.
AWKWA0401G
Page 2086 of 3061
INSIDE MIRROR
GW-67
< SERVICE INFORMATION >
C
D
E
F
G
H
J
K
L
MA
B
GW
N
O
P
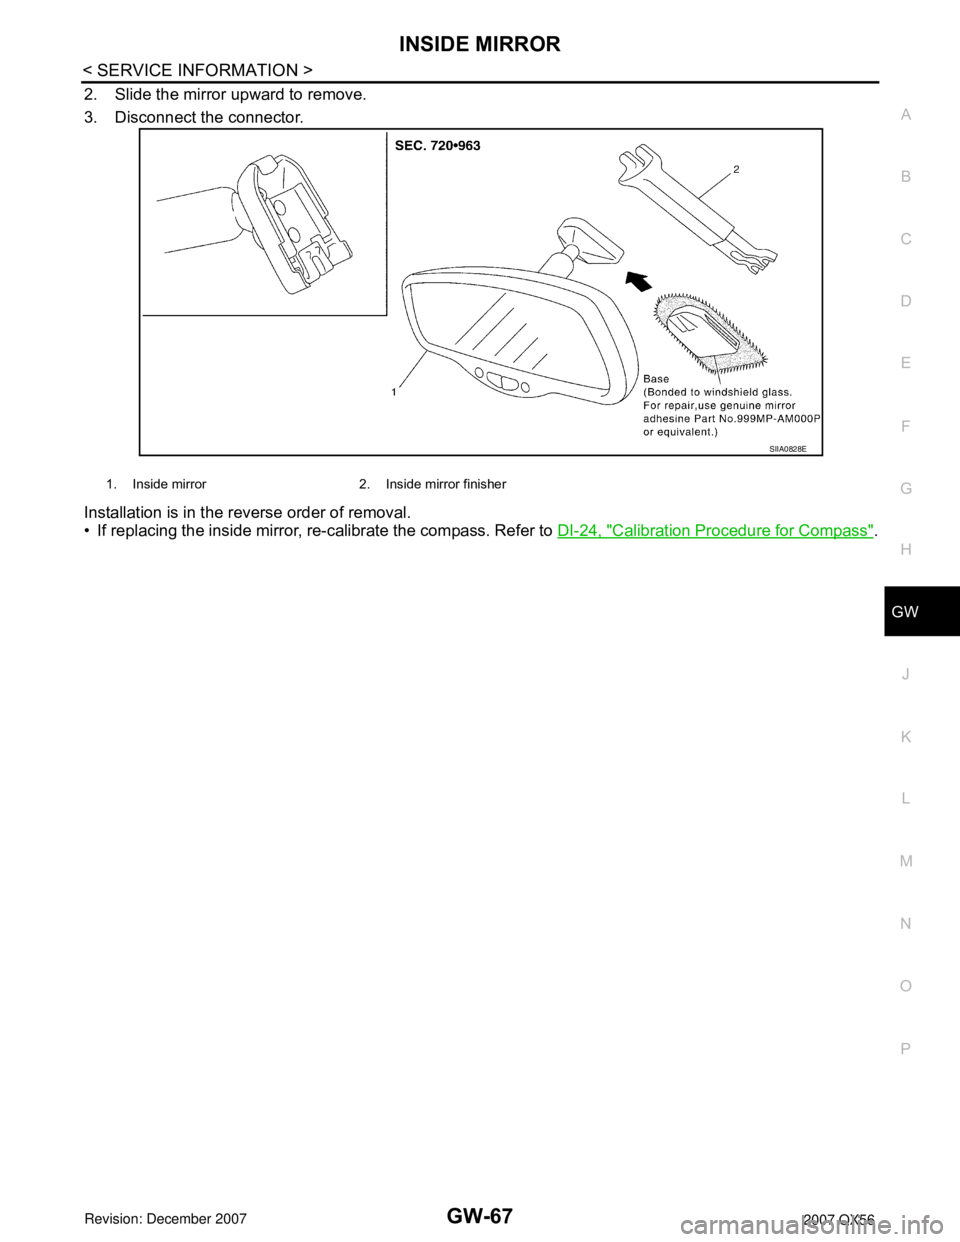
2. Slide the mirror upward to remove.
3. Disconnect the connector.
Installation is in the reverse order of removal.
• If replacing the inside mirror, re-calibrate the compass. Refer to DI-24, "
Calibration Procedure for Compass".
1. Inside mirror 2. Inside mirror finisher
SIIA0828E
Page 2087 of 3061
GW-68
< SERVICE INFORMATION >
REAR WINDOW DEFOGGER
REAR WINDOW DEFOGGER
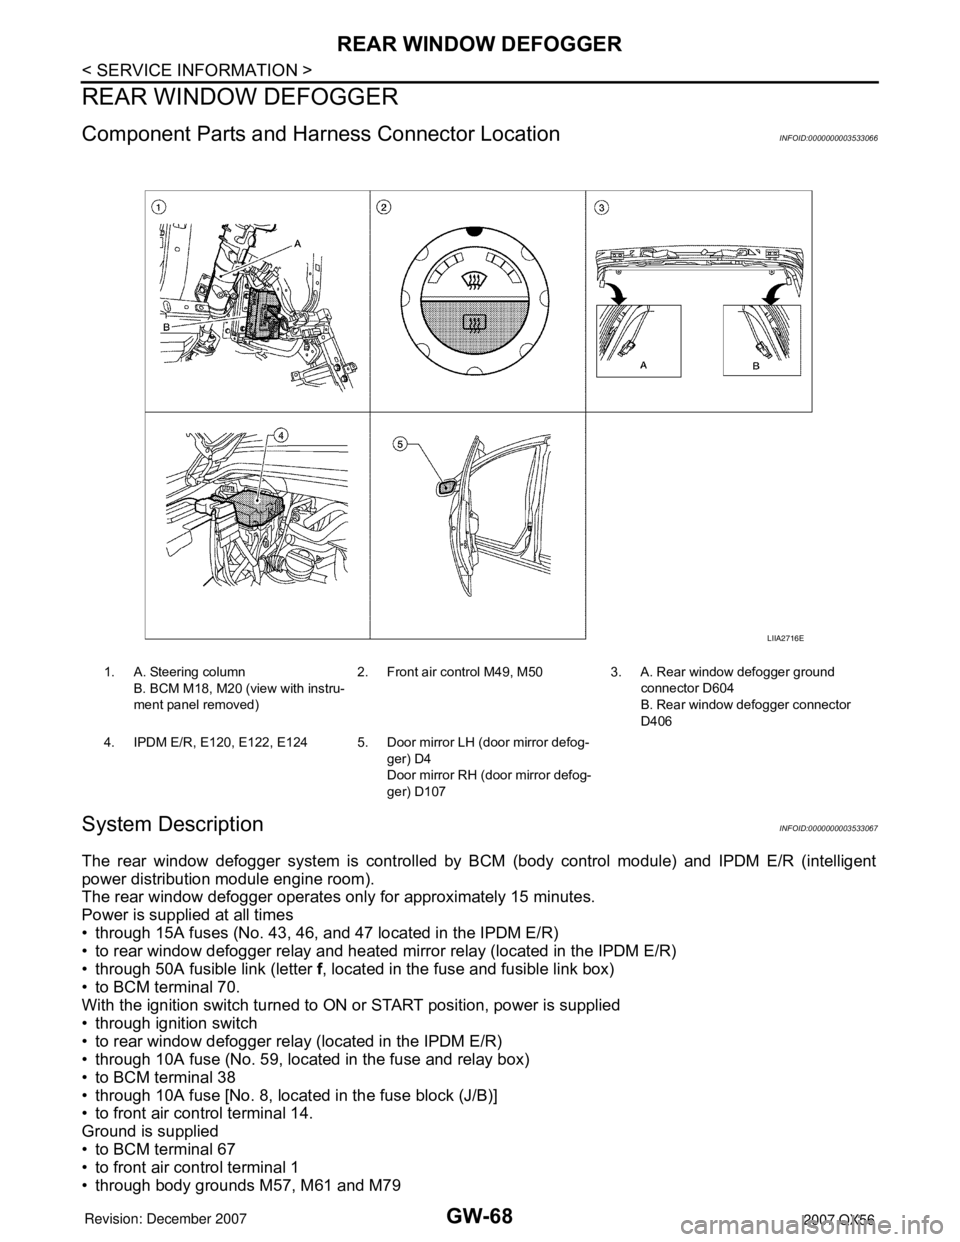
Component Parts and Harness Connector LocationINFOID:0000000003533066
System DescriptionINFOID:0000000003533067
The rear window defogger system is controlled by BCM (body control module) and IPDM E/R (intelligent
power distribution module engine room).
The rear window defogger operates only for approximately 15 minutes.
Power is supplied at all times
• through 15A fuses (No. 43, 46, and 47 located in the IPDM E/R)
• to rear window defogger relay and heated mirror relay (located in the IPDM E/R)
• through 50A fusible link (letter f, located in the fuse and fusible link box)
• to BCM terminal 70.
With the ignition switch turned to ON or START position, power is supplied
• through ignition switch
• to rear window defogger relay (located in the IPDM E/R)
• through 10A fuse (No. 59, located in the fuse and relay box)
• to BCM terminal 38
• through 10A fuse [No. 8, located in the fuse block (J/B)]
• to front air control terminal 14.
Ground is supplied
• to BCM terminal 67
• to front air control terminal 1
• through body grounds M57, M61 and M79
1. A. Steering column
B. BCM M18, M20 (view with instru-
ment panel removed)2. Front air control M49, M50 3. A. Rear window defogger ground
connector D604
B. Rear window defogger connector
D406
4. IPDM E/R, E120, E122, E124 5. Door mirror LH (door mirror defog-
ger) D4
Door mirror RH (door mirror defog-
ger) D107
LIIA2716E
Page 2088 of 3061

REAR WINDOW DEFOGGER
GW-69
< SERVICE INFORMATION >
C
D
E
F
G
H
J
K
L
MA
B
GW
N
O
P
• to IPDM E/R terminals 38 and 59
• through body grounds E9, E15 and E24.
When front air control (rear window defogger switch) is turned to ON, ground is supplied
• to BCM terminal 9
• through front air control terminal 11
• through front air control terminal 1
• through body grounds M57, M61 and M79.
Then rear window defogger switch is illuminated.
Then BCM recognizes that rear window defogger switch is turned to ON.
Then it sends rear window defogger switch signals to IPDM E/R and display control unit via CAN communica-
tion (CAN-H, CAN-L).
When display control unit receives rear window defogger switch signals, and displays on the screen.
When IPDM E/R receives rear window defogger switch signals, ground is supplied
• to rear window defogger relay (located in the IPDM E/R)
• through IPDM E/R terminal 38
• through IPDM E/R terminal 59
• through body grounds E9, E15 and E24
and then rear window defogger relay is energized.
With power and ground supplied, rear window defogger filaments heat and defog the rear window.
When rear window defogger relay is turned to ON, power is supplied
• through heated mirror relay (located in the IPDM E/R)
• through IPDM E/R terminal 23
• to door mirror defogger (LH and RH) terminal 10.
Door mirror defogger (LH and RH) is grounded through body grounds M57, M61 and M79.
With power and ground supplied, rear window defogger filaments heat and defog the rear window and door
mirror defogger filaments heat and defog the mirror.
CAN Communication System DescriptionINFOID:0000000003533068
Refer to LAN-4.