Page 2552 of 3061
RF-20
< SERVICE INFORMATION >
SUNROOF
Fitting Adjustment
INFOID:0000000003533112
GAP ADJUSTMENT
NOTE:
If any gap or height difference between glass lid assembly and roof panel is found, check the fit and adjust as
follows:
1. Open sunshade assembly.
2. Loosen glass lid assembly screws (2 each on left and right sides), then tilt glass lid assembly down.
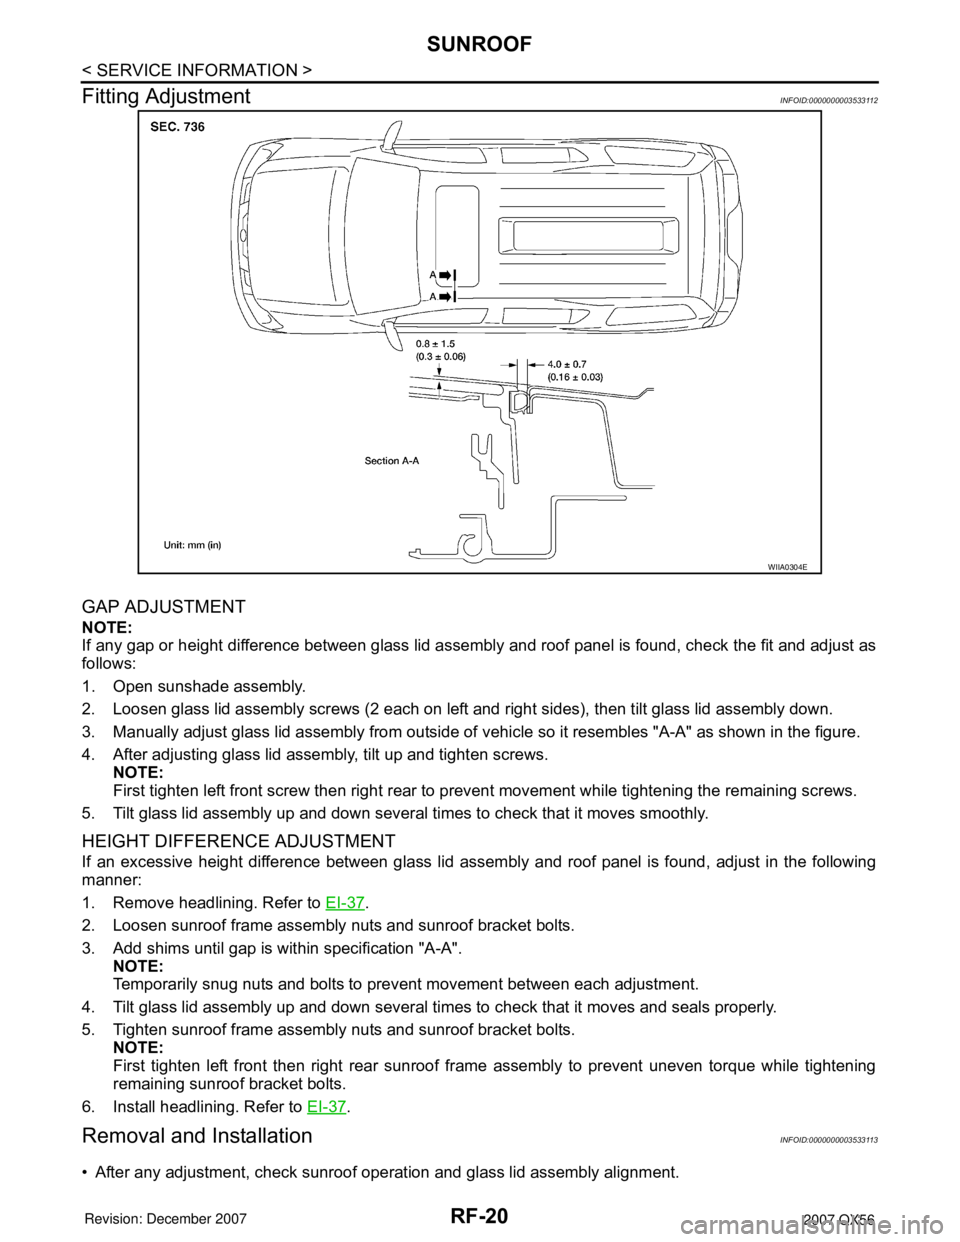
3. Manually adjust glass lid assembly from outside of vehicle so it resembles "A-A" as shown in the figure.
4. After adjusting glass lid assembly, tilt up and tighten screws.
NOTE:
First tighten left front screw then right rear to prevent movement while tightening the remaining screws.
5. Tilt glass lid assembly up and down several times to check that it moves smoothly.
HEIGHT DIFFERENCE ADJUSTMENT
If an excessive height difference between glass lid assembly and roof panel is found, adjust in the following
manner:
1. Remove headlining. Refer to EI-37
.
2. Loosen sunroof frame assembly nuts and sunroof bracket bolts.
3. Add shims until gap is within specification "A-A".
NOTE:
Temporarily snug nuts and bolts to prevent movement between each adjustment.
4. Tilt glass lid assembly up and down several times to check that it moves and seals properly.
5. Tighten sunroof frame assembly nuts and sunroof bracket bolts.
NOTE:
First tighten left front then right rear sunroof frame assembly to prevent uneven torque while tightening
remaining sunroof bracket bolts.
6. Install headlining. Refer to EI-37
.
Removal and InstallationINFOID:0000000003533113
• After any adjustment, check sunroof operation and glass lid assembly alignment.
WIIA0304E
Page 2559 of 3061
RFD-2
< SERVICE INFORMATION >
PRECAUTIONS
SERVICE INFORMATION
PRECAUTIONS
Precaution for Servicing Rear Final DriveINFOID:0000000003532597
• Before starting diagnosis of the vehicle, understand the symptoms well. Perform correct and systematic
operations.
• Check for the correct installation status prior to removal or disassembly. When matching marks are required,
be certain they do not interfere with the function of the parts they are applied to.
• Overhaul should be done in a clean work area, a dust proof area is recommended.
• Before disassembly, completely remove sand and mud from the exterior of the unit, preventing them from
entering into the unit during disassembly or assembly.
• Always use shop paper for cleaning the inside of components.
• Avoid using cotton gloves or a shop cloth to prevent the entering of lint.
• Check appearance of the disassembled parts for damage, deformation, and abnormal wear. Replace them
with new ones if necessary.
• Gaskets, seals and O-rings should be replaced any time the unit is disassembled.
• Clean and flush the parts sufficiently and blow them dry.
• Be careful not to damage sliding surfaces and mating surfaces.
• When applying sealant, remove the old sealant from the mating surface; then remove any moisture, oil, and
foreign materials from the application and mating surfaces.
• In principle, tighten nuts or bolts gradually in several steps working diagonally from inside to outside. If a
tightening sequence is specified, observe it.
• During assembly, observe the specified tightening torque.
• Add new differential gear oil, petroleum jelly, or multi-purpose grease, as specified.
Page 2561 of 3061
RFD-4
< SERVICE INFORMATION >
PREPARATION
KV38107900
(J-39352)
ProtectorInstalling side flange
KV38100800
(J-25604-01)
AttachmentSecuring unit assembly
a: 541 mm (21.30 in) dia.
b: 200 mm (7.87 in) dia.
ST3127S000
(J-25765-A)
Preload gauge
1. GG91030000
(J-25765)
Torque wrench
2. HT62940000
(—)
Socket adapter (1/2 in)
3. HT62900000
(—)
Socket adapter (3/8 in)Measuring drive pinion bearing preload torque
and total preload torque
K V 1 0 1111 0 0
(J-37228)
Seal cutterRemoving carrier cover
ST3306S001
(—)
Differential side bearing puller set
1.ST33051001
(—)
Puller
2.ST33061000
(J-8107-2)
BaseRemoving side bearing inner race
a: 28.5 mm (1.122 in) dia.
b: 38 mm (1.50 in) dia.
ST30021000
(—)
Bearing pullerRemoving drive pinion rear bearing inner race Tool name
Tool number
(Kent-Moore No.)Description
S-NT129
SDIA0267E
NT124
S-NT046
NT072
ZZA0700D
Page 2563 of 3061
RFD-6
< SERVICE INFORMATION >
PREPARATION
Commercial Service Tool
INFOID:0000000003532599
—
(J-8129)
Spring gaugeMeasuring turning torque
KV10112100
(BT-8653-A)
Angle wrenchTightening bolts for drive gear Tool name
Tool number
(Kent-Moore No.)Description
NT127
NT014
Tool nameDescription
Power toolLoosening nuts and bolts
PBIC0190E
Page 2565 of 3061
RFD-8
< SERVICE INFORMATION >
DIFFERENTIAL GEAR OIL
DIFFERENTIAL GEAR OIL
Changing Differential Gear OilINFOID:0000000003532601
DRAINING
1. Stop the engine.
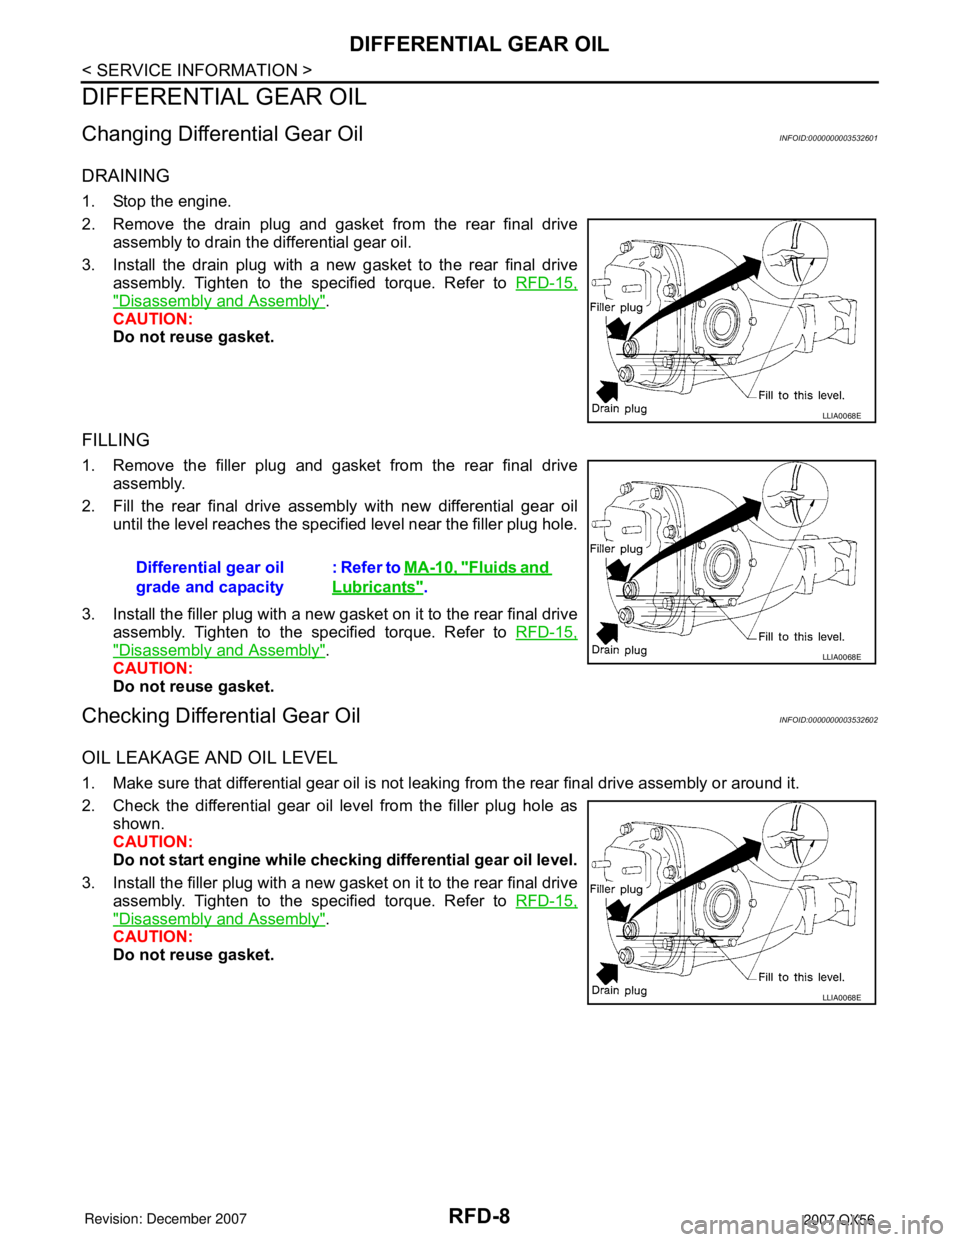
2. Remove the drain plug and gasket from the rear final drive
assembly to drain the differential gear oil.
3. Install the drain plug with a new gasket to the rear final drive
assembly. Tighten to the specified torque. Refer to RFD-15,
"Disassembly and Assembly".
CAUTION:
Do not reuse gasket.
FILLING
1. Remove the filler plug and gasket from the rear final drive
assembly.
2. Fill the rear final drive assembly with new differential gear oil
until the level reaches the specified level near the filler plug hole.
3. Install the filler plug with a new gasket on it to the rear final drive
assembly. Tighten to the specified torque. Refer to RFD-15,
"Disassembly and Assembly".
CAUTION:
Do not reuse gasket.
Checking Differential Gear OilINFOID:0000000003532602
OIL LEAKAGE AND OIL LEVEL
1. Make sure that differential gear oil is not leaking from the rear final drive assembly or around it.
2. Check the differential gear oil level from the filler plug hole as
shown.
CAUTION:
Do not start engine while checking differential gear oil level.
3. Install the filler plug with a new gasket on it to the rear final drive
assembly. Tighten to the specified torque. Refer to RFD-15,
"Disassembly and Assembly".
CAUTION:
Do not reuse gasket.
LLIA0068E
Differential gear oil
grade and capacity: Refer to MA-10, "Fluids and
Lubricants".
LLIA0068E
LLIA0068E
Page 2566 of 3061
FRONT OIL SEAL
RFD-9
< SERVICE INFORMATION >
C
E
F
G
H
I
J
K
L
MA
B
RFD
N
O
P
FRONT OIL SEAL
Removal and InstallationINFOID:0000000003532603
REMOVAL
1. Remove the drive shafts from the rear final drive assembly. Refer to RAX-7, "Removal and Installation".
2. Remove the side flanges and side oil seals. Refer to RFD-11, "
Removal and Installation".
3. Remove the rear propeller shaft. Refer to PR-8, "
Removal and Installation".
4. Measure the total preload torque. Refer to RFD-15, "
Disassembly and Assembly".
NOTE:
Record the total preload torque measurement.
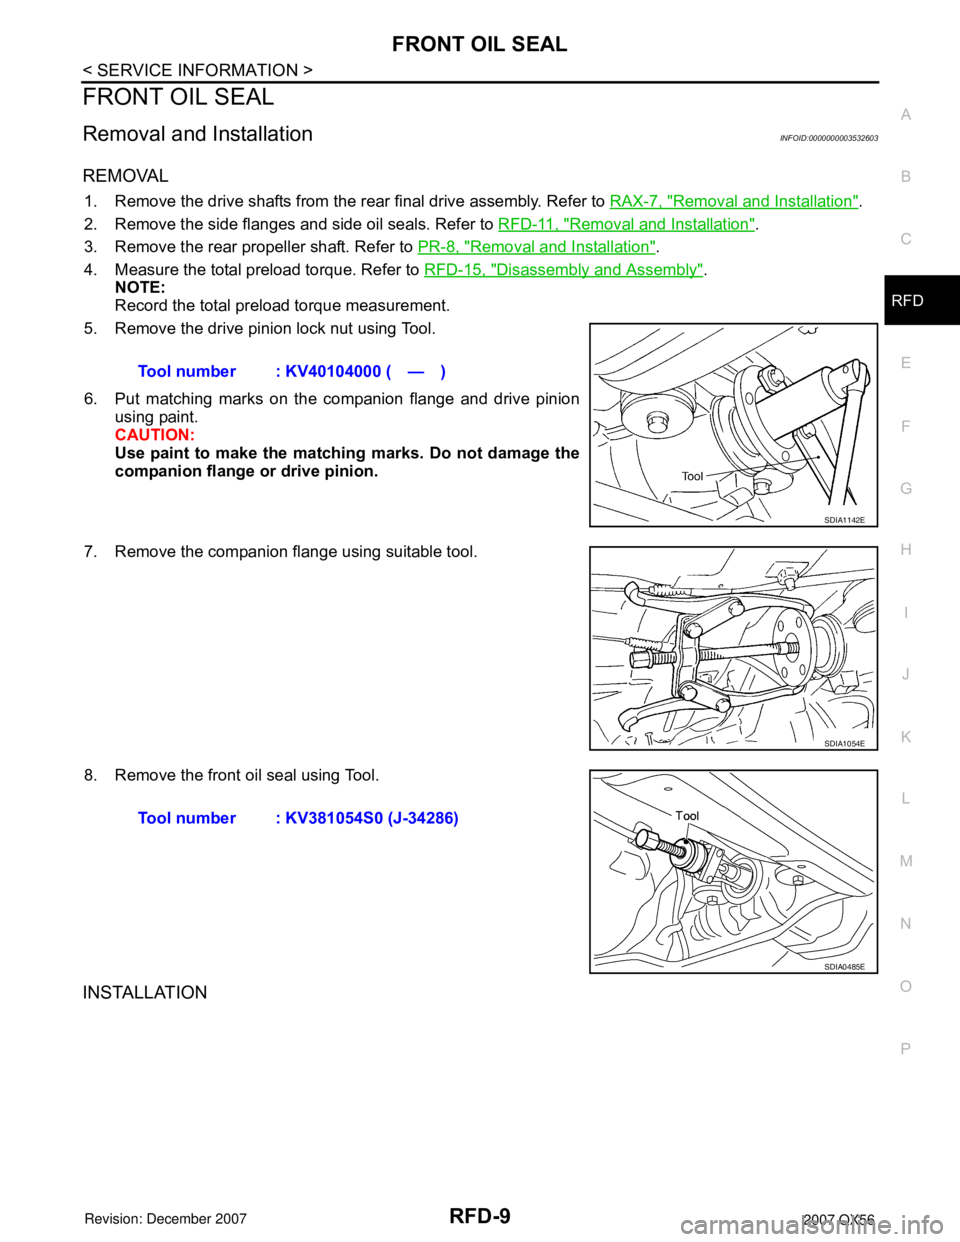
5. Remove the drive pinion lock nut using Tool.
6. Put matching marks on the companion flange and drive pinion
using paint.
CAUTION:
Use paint to make the matching marks. Do not damage the
companion flange or drive pinion.
7. Remove the companion flange using suitable tool.
8. Remove the front oil seal using Tool.
INSTALLATION
Tool number : KV40104000 ( — )
SDIA1142E
SDIA1054E
Tool number : KV381054S0 (J-34286)
SDIA0485E
Page 2567 of 3061
RFD-10
< SERVICE INFORMATION >
FRONT OIL SEAL
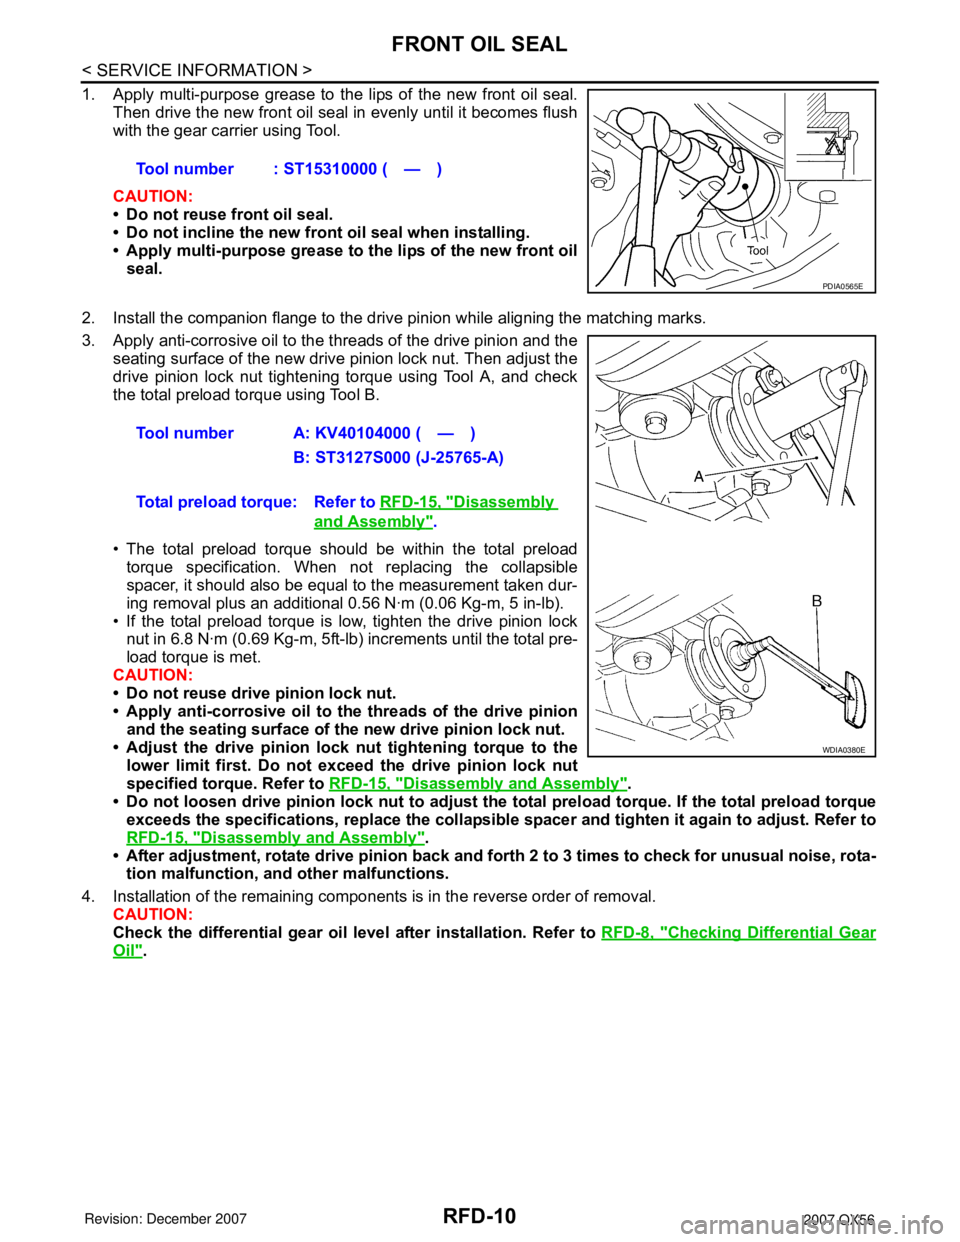
1. Apply multi-purpose grease to the lips of the new front oil seal.
Then drive the new front oil seal in evenly until it becomes flush
with the gear carrier using Tool.
CAUTION:
• Do not reuse front oil seal.
• Do not incline the new front oil seal when installing.
• Apply multi-purpose grease to the lips of the new front oil
seal.
2. Install the companion flange to the drive pinion while aligning the matching marks.
3. Apply anti-corrosive oil to the threads of the drive pinion and the
seating surface of the new drive pinion lock nut. Then adjust the
drive pinion lock nut tightening torque using Tool A, and check
the total preload torque using Tool B.
• The total preload torque should be within the total preload
torque specification. When not replacing the collapsible
spacer, it should also be equal to the measurement taken dur-
ing removal plus an additional 0.56 N·m (0.06 Kg-m, 5 in-lb).
• If the total preload torque is low, tighten the drive pinion lock
nut in 6.8 N·m (0.69 Kg-m, 5ft-lb) increments until the total pre-
load torque is met.
CAUTION:
• Do not reuse drive pinion lock nut.
• Apply anti-corrosive oil to the threads of the drive pinion
and the seating surface of the new drive pinion lock nut.
• Adjust the drive pinion lock nut tightening torque to the
lower limit first. Do not exceed the drive pinion lock nut
specified torque. Refer to RFD-15, "
Disassembly and Assembly".
• Do not loosen drive pinion lock nut to adjust the total preload torque. If the total preload torque
exceeds the specifications, replace the collapsible spacer and tighten it again to adjust. Refer to
RFD-15, "
Disassembly and Assembly".
• After adjustment, rotate drive pinion back and forth 2 to 3 times to check for unusual noise, rota-
tion malfunction, and other malfunctions.
4. Installation of the remaining components is in the reverse order of removal.
CAUTION:
Check the differential gear oil level after installation. Refer to RFD-8, "
Checking Differential Gear
Oil". Tool number : ST15310000 ( — )
PDIA0565E
Tool number A: KV40104000 ( — )
B: ST3127S000 (J-25765-A)
Total preload torque: Refer to RFD-15, "
Disassembly
and Assembly".
WDIA0380E
Page 2570 of 3061
CARRIER COVER
RFD-13
< SERVICE INFORMATION >
C
E
F
G
H
I
J
K
L
MA
B
RFD
N
O
P
CARRIER COVER
Removal and InstallationINFOID:0000000003532605
REMOVAL
1. Remove the rear final drive assembly. Refer to RFD-14, "Removal and Installation".
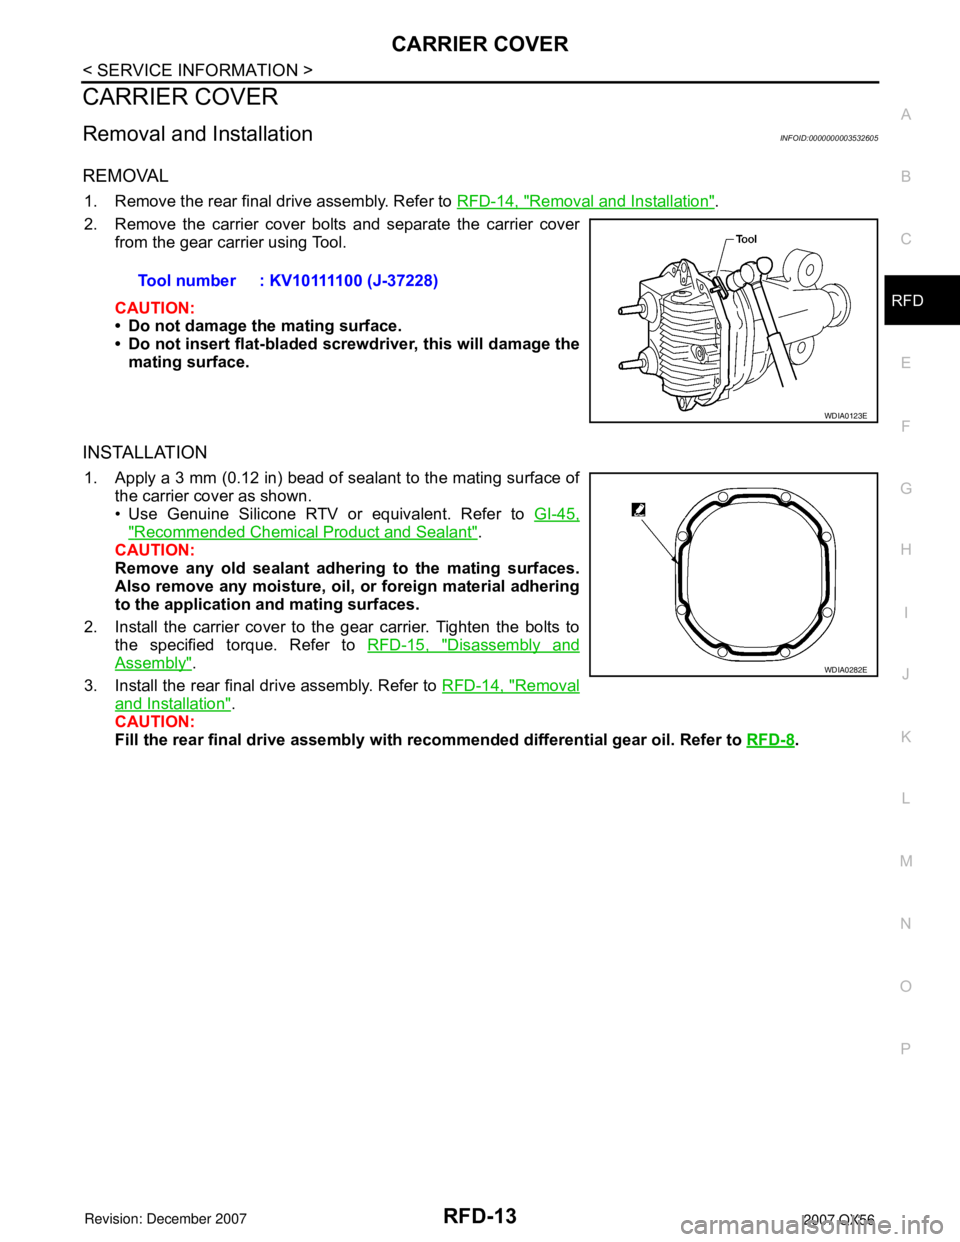
2. Remove the carrier cover bolts and separate the carrier cover
from the gear carrier using Tool.
CAUTION:
• Do not damage the mating surface.
• Do not insert flat-bladed screwdriver, this will damage the
mating surface.
INSTALLATION
1. Apply a 3 mm (0.12 in) bead of sealant to the mating surface of
the carrier cover as shown.
• Use Genuine Silicone RTV or equivalent. Refer to GI-45,
"Recommended Chemical Product and Sealant".
CAUTION:
Remove any old sealant adhering to the mating surfaces.
Also remove any moisture, oil, or foreign material adhering
to the application and mating surfaces.
2. Install the carrier cover to the gear carrier. Tighten the bolts to
the specified torque. Refer to RFD-15, "
Disassembly and
Assembly".
3. Install the rear final drive assembly. Refer to RFD-14, "
Removal
and Installation".
CAUTION:
Fill the rear final drive assembly with recommended differential gear oil. Refer to RFD-8
. Tool number : KV10111100 (J-37228)
WDIA0123E
WDIA0282E