2007 INFINITI QX56 door lock
[x] Cancel search: door lockPage 2321 of 3061

LT-114
< SERVICE INFORMATION >
INTERIOR ROOM LAMP
3. Carry out the Preliminary Check. Refer to LT-114, "Preliminary Check" .
4. Check symptom and repair or replace the component.
5. Does the interior room lamp operate normally? If YES: GO TO 6. If NO: GO TO 4.
6. Inspection End.
Preliminary CheckINFOID:0000000003533461
INSPECTION FOR POWER SUPPLY AND GROUND CIRCUIT FOR BCM
Refer to BCS-15, "BCM Power Supply and Ground Circuit Inspection" .
CONSULT-II Function (BCM)INFOID:0000000003533462
Refer to BCS-16, "CONSULT-II Function (BCM)" .
CONSULT-II START PROCEDURE
Refer to GI-36, "CONSULT-II Start Procedure" .
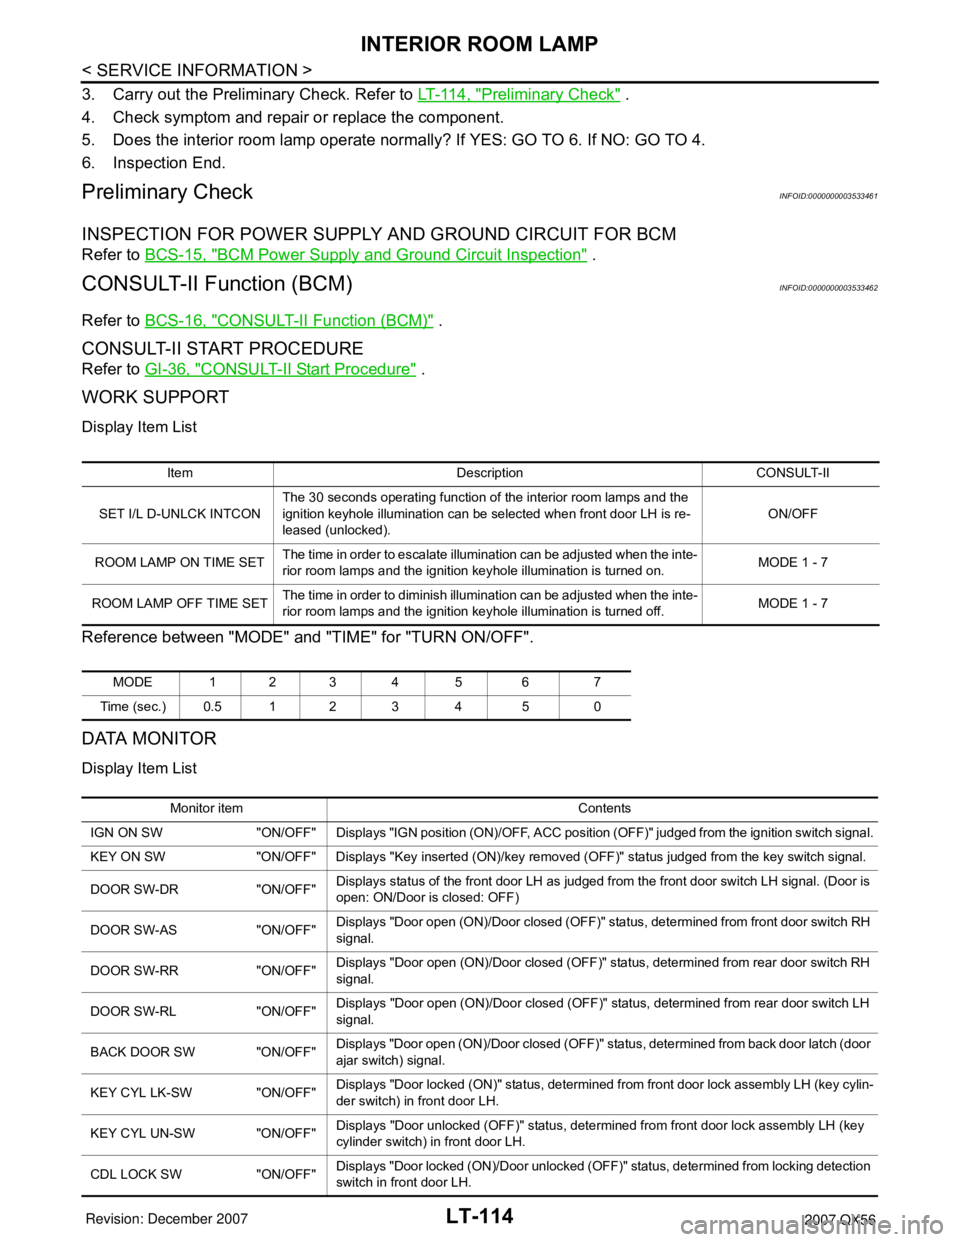
WORK SUPPORT
Display Item List
Reference between "MODE" and "TIME" for "TURN ON/OFF".
DATA MONITOR
Display Item List
Item Description CONSULT-II
SET I/L D-UNLCK INTCONThe 30 seconds operating function of the interior room lamps and the
ignition keyhole illumination can be selected when front door LH is re-
leased (unlocked). ON/OFF
ROOM LAMP ON TIME SETThe time in order to escalate illumination can be adjusted when the inte-
rior room lamps and the ignition keyhole illumination is turned on.MODE 1 - 7
ROOM LAMP OFF TIME SETThe time in order to diminish illumination can be adjusted when the inte-
rior room lamps and the ignition keyhole illumination is turned off.MODE 1 - 7
MODE 123 4 5 6 7
Time (sec.) 0.5 1 2 3 4 5 0
Monitor item Contents
IGN ON SW "ON/OFF" Displays "IGN position (ON)/OFF, ACC position (OFF)" judged from the ignition switch signal.
KEY ON SW "ON/OFF" Displays "Key inserted (ON)/key removed (OFF)" status judged from the key switch signal.
DOOR SW-DR "ON/OFF"Displays status of the front door LH as judged from the front door switch LH signal. (Door is
open: ON/Door is closed: OFF)
DOOR SW-AS "ON/OFF"Displays "Door open (ON)/Door closed (OFF)" status, determined from front door switch RH
signal.
DOOR SW-RR "ON/OFF"Displays "Door open (ON)/Door closed (OFF)" status, determined from rear door switch RH
signal.
DOOR SW-RL "ON/OFF"Displays "Door open (ON)/Door closed (OFF)" status, determined from rear door switch LH
signal.
BACK DOOR SW "ON/OFF"Displays "Door open (ON)/Door closed (OFF)" status, determined from back door latch (door
ajar switch) signal.
KEY CYL LK-SW "ON/OFF"Displays "Door locked (ON)" status, determined from front door lock assembly LH (key cylin-
der switch) in front door LH.
KEY CYL UN-SW "ON/OFF"Displays "Door unlocked (OFF)" status, determined from front door lock assembly LH (key
cylinder switch) in front door LH.
CDL LOCK SW "ON/OFF"Displays "Door locked (ON)/Door unlocked (OFF)" status, determined from locking detection
switch in front door LH.
Page 2322 of 3061

INTERIOR ROOM LAMP
LT-115
< SERVICE INFORMATION >
C
D
E
F
G
H
I
J
L
MA
B
LT
N
O
P
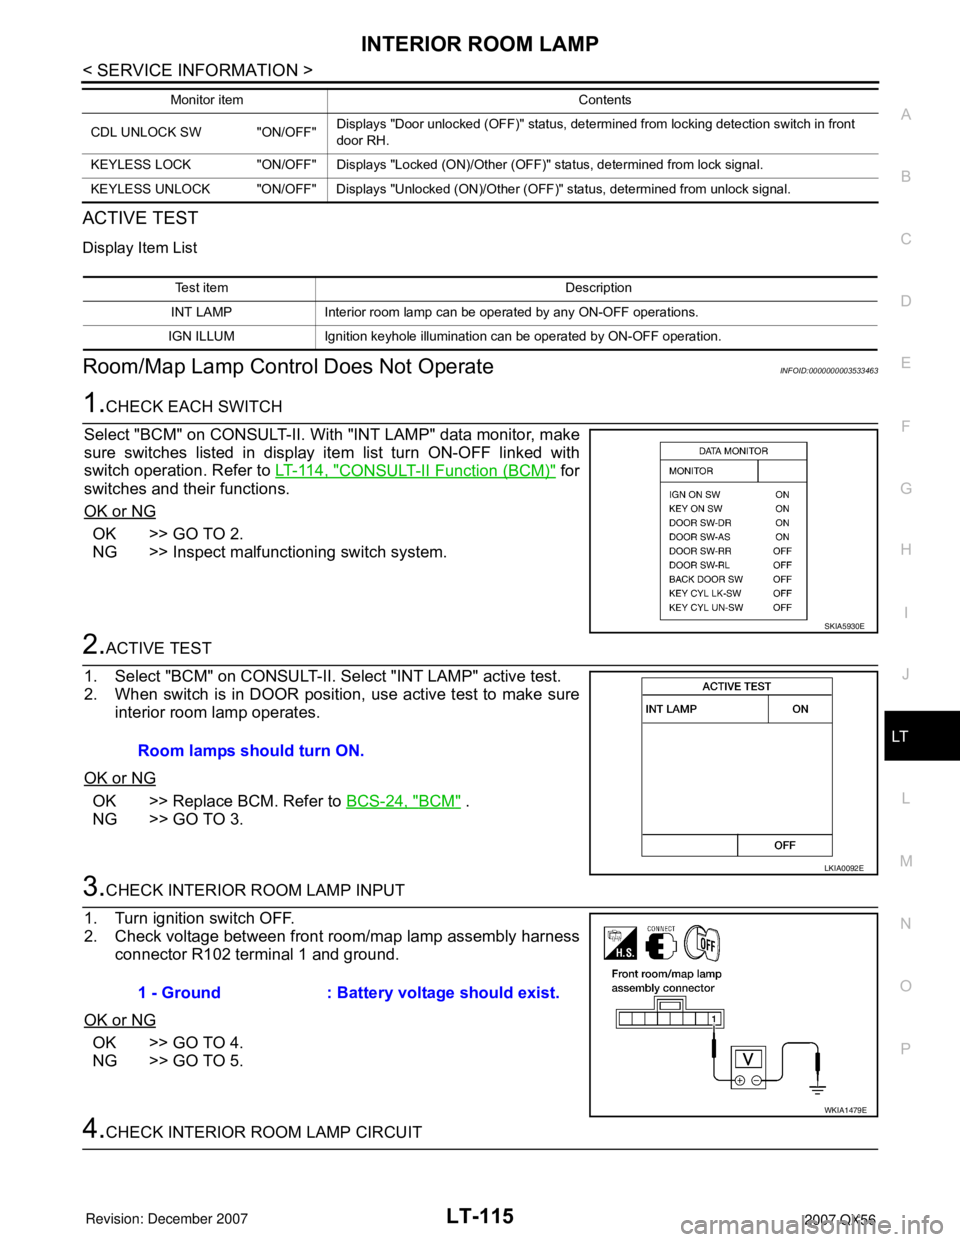
ACTIVE TEST
Display Item List
Room/Map Lamp Control Does Not OperateINFOID:0000000003533463
1.CHECK EACH SWITCH
Select "BCM" on CONSULT-II. With "INT LAMP" data monitor, make
sure switches listed in display item list turn ON-OFF linked with
switch operation. Refer to LT-114, "
CONSULT-II Function (BCM)" for
switches and their functions.
OK or NG
OK >> GO TO 2.
NG >> Inspect malfunctioning switch system.
2.ACTIVE TEST
1. Select "BCM" on CONSULT-II. Select "INT LAMP" active test.
2. When switch is in DOOR position, use active test to make sure
interior room lamp operates.
OK or NG
OK >> Replace BCM. Refer to BCS-24, "BCM" .
NG >> GO TO 3.
3.CHECK INTERIOR ROOM LAMP INPUT
1. Turn ignition switch OFF.
2. Check voltage between front room/map lamp assembly harness
connector R102 terminal 1 and ground.
OK or NG
OK >> GO TO 4.
NG >> GO TO 5.
4.CHECK INTERIOR ROOM LAMP CIRCUIT
CDL UNLOCK SW "ON/OFF"Displays "Door unlocked (OFF)" status, determined from locking detection switch in front
door RH.
KEYLESS LOCK "ON/OFF" Displays "Locked (ON)/Other (OFF)" status, determined from lock signal.
KEYLESS UNLOCK "ON/OFF" Displays "Unlocked (ON)/Other (OFF)" status, determined from unlock signal.Monitor item Contents
Test item Description
INT LAMP Interior room lamp can be operated by any ON-OFF operations.
IGN ILLUM Ignition keyhole illumination can be operated by ON-OFF operation.
SKIA5930E
Room lamps should turn ON.
LKIA0092E
1 - Ground : Battery voltage should exist.
WKIA1479E
Page 2328 of 3061
![INFINITI QX56 2007 Factory Service Manual ILLUMINATION
LT-121
< SERVICE INFORMATION >
C
D
E
F
G
H
I
J
L
MA
B
LT
N
O
P
• to BCM terminal 38, and
• through 10A fuse [No. 14, located in the fuse block (J/B)]
• to combination meter terminal INFINITI QX56 2007 Factory Service Manual ILLUMINATION
LT-121
< SERVICE INFORMATION >
C
D
E
F
G
H
I
J
L
MA
B
LT
N
O
P
• to BCM terminal 38, and
• through 10A fuse [No. 14, located in the fuse block (J/B)]
• to combination meter terminal](/manual-img/42/57029/w960_57029-2327.png)
ILLUMINATION
LT-121
< SERVICE INFORMATION >
C
D
E
F
G
H
I
J
L
MA
B
LT
N
O
P
• to BCM terminal 38, and
• through 10A fuse [No. 14, located in the fuse block (J/B)]
• to combination meter terminal 24.
Ground is supplied
• to BCM terminal 67
• to combination meter terminal 17
• through grounds M57, M61 and M79, and
• to IPDM E/R terminals 38 and 59
• through grounds E9, E15 and E24.
ILLUMINATION OPERATION BY LIGHTING SWITCH
With the lighting switch in the 1ST or 2ND position (or if the auto light system is activated), the BCM receives
input signal requesting the illumination lamps to illuminate. This input signal is communicated to the IPDM E/R
across the CAN communication lines. The CPU of the IPDM E/R controls the tail lamp relay coil, which, when
energized, directs power
• through 10A fuse (No. 36, located in the IPDM E/R)
• through IPDM E/R terminal 49
• to illumination control switch terminal 1
• to power liftgate switch terminal 3
• to front room/map lamp assembly (console box illumination) terminal 7
• to hazard switch terminal 3
• to rear sonar system OFF switch terminal 3
• to glove box lamp terminal 1
• to door mirror remote control switch terminal 16
• to display control unit terminal 14
• to power window and door lock/unlock switch RH terminal 5 (early production)
• to main power window and door lock/unlock switch LH terminal 16 (early production)
• to 4WD shift switch terminal 7 (with 4-wheel drive)
• to front air control terminal 23
• to rear power vent window switch terminal 5
• to DVD player terminal 12 (with DVD entertainment system)
• to NAVI control unit terminal 61
• to pedal adjusting switch terminal 5
• to electric brake (pre-wiring) terminal 4 (with trailer tow)
• to front and rear heated seat switch LH and RH terminal 5
• to A/T device terminal 11
• to VDC OFF switch terminal 3
• to tow mode switch terminal 3
• to headlamp aiming switch terminal 3
• to clock terminal 3, and
• through 10A fuse (No. 37, located in the IPDM E/R)
• through IPDM E/R terminal 57
• to AV switch terminal 3
• to audio unit terminal 8
• to rear air control terminal 1 and
• to rear audio remote control unit terminal 6.
The illumination control switch controls illumination intensity by varying the ground to the following
• through illumination control switch terminal 2
• to power liftgate switch terminal 4
• to front room/map lamp assembly (console box illumination) terminal 8
• to AV switch terminal 4
• to hazard switch terminal 4
• to audio unit terminal 7
• to rear sonar system OFF switch terminal 4
• to power window and door lock/unlock switch RH terminal 1 (early production)
• to main power window and door lock/unlock switch LH terminal 12 (early production)
• to 4WD switch terminal 8 (with 4-wheel drive)
• to front air control terminal 24
• to rear power vent window switch terminal 6
• to DVD player terminal 10 (with DVD entertainment system)
• to pedal adjusting switch terminal 6
• to A/T device terminal 12
Page 2329 of 3061

LT-122
< SERVICE INFORMATION >
ILLUMINATION
• to front heated seat switch LH and RH terminal 6
• to VDC OFF switch terminal 4
• to tow mode switch terminal 4
• to headlamp aiming switch terminal 4
• to clock terminal 4 and
• to combination meter terminal 18.
Ground is supplied
• to illumination control switch terminal 3
• to glove box lamp terminal 2
• to door mirror remote control switch terminal 15
• to display control unit terminal 3
• to rear heated seat switches terminal 6
• to electric brake (pre-wiring) terminal 1 (with trailer tow)
• to combination meter terminal 17
• through grounds M57, M61 and M79, and
• to NAVI control unit terminal 1
• to rear air control terminal 3
• to rear audio remote control unit terminal 15
• through grounds B117 and B132.
With power and ground supplied, illumination lamps illuminate.
EXTERIOR LAMP BATTERY SAVER CONTROL
When the combination switch (lighting switch) is in the 1ST or 2ND position (or if auto light system is acti-
vated), and the ignition switch is turned from ON or ACC to OFF, the battery saver control function is activated.
Under this condition, the illumination lamps remain illuminated for 5 minutes, then the illumination lamps are
turned off.
When the lighting switch is turned from OFF to 1ST or 2ND position (or if auto light system is activated) after
illumination lamps are turned off by the battery saver control, the illumination lamps illuminate again.
Exterior lamp battery saver control mode can be changed by the function setting of CONSULT-II.
CAN Communication System DescriptionINFOID:0000000003533470
Refer to LAN-4, "CAN Communication System" .
Page 2366 of 3061

MA-4
< SERVICE INFORMATION >
GENERAL MAINTENANCE
GENERAL MAINTENANCE
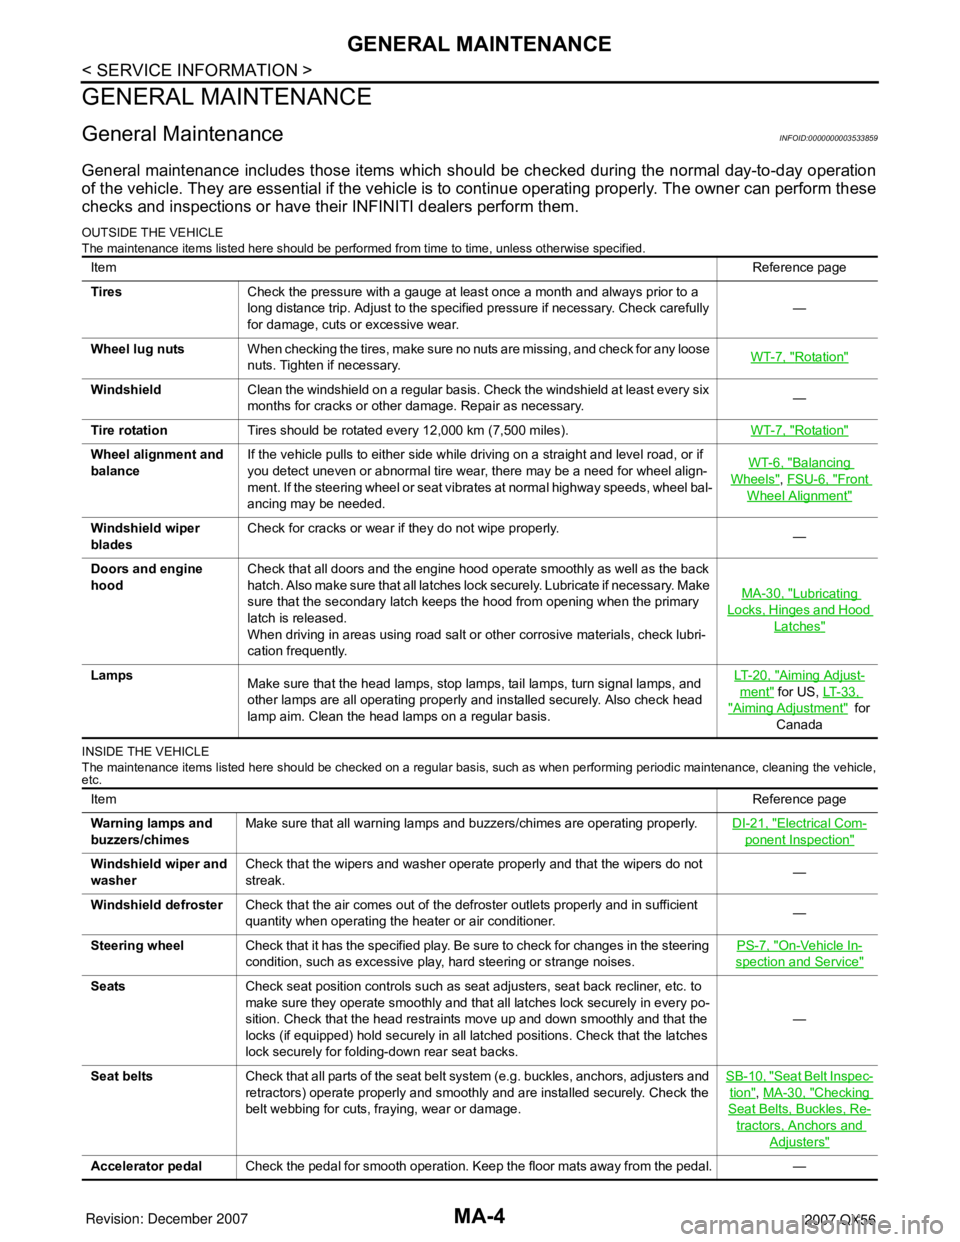
General MaintenanceINFOID:0000000003533859
General maintenance includes those items which should be checked during the normal day-to-day operation
of the vehicle. They are essential if the vehicle is to continue operating properly. The owner can perform these
checks and inspections or have their INFINITI dealers perform them.
OUTSIDE THE VEHICLE
The maintenance items listed here should be performed from time to time, unless otherwise specified.
INSIDE THE VEHICLE
The maintenance items listed here should be checked on a regular basis, such as when performing periodic maintenance, cleaning the vehicle,
etc.
ItemReference page
TiresCheck the pressure with a gauge at least once a month and always prior to a
long distance trip. Adjust to the specified pressure if necessary. Check carefully
for damage, cuts or excessive wear.—
Wheel lug nutsWhen checking the tires, make sure no nuts are missing, and check for any loose
nuts. Tighten if necessary.WT-7, "
Rotation"
WindshieldClean the windshield on a regular basis. Check the windshield at least every six
months for cracks or other damage. Repair as necessary.—
Tire rotationTires should be rotated every 12,000 km (7,500 miles).WT-7, "
Rotation"
Wheel alignment and
balanceIf the vehicle pulls to either side while driving on a straight and level road, or if
you detect uneven or abnormal tire wear, there may be a need for wheel align-
ment. If the steering wheel or seat vibrates at normal highway speeds, wheel bal-
ancing may be needed.WT-6, "Balancing
Wheels", FSU-6, "Front
Wheel Alignment"
Windshield wiper
bladesCheck for cracks or wear if they do not wipe properly.
—
Doors and engine
hoodCheck that all doors and the engine hood operate smoothly as well as the back
hatch. Also make sure that all latches lock securely. Lubricate if necessary. Make
sure that the secondary latch keeps the hood from opening when the primary
latch is released.
When driving in areas using road salt or other corrosive materials, check lubri-
cation frequently.MA-30, "
Lubricating
Locks, Hinges and Hood
Latches"
Lamps
Make sure that the head lamps, stop lamps, tail lamps, turn signal lamps, and
other lamps are all operating properly and installed securely. Also check head
lamp aim. Clean the head lamps on a regular basis.LT- 2 0 , "Aiming Adjust-
ment" for US, LT- 3 3 ,
"Aiming Adjustment" for
Canada
ItemReference page
Warning lamps and
buzzers/chimesMake sure that all warning lamps and buzzers/chimes are operating properly.DI-21, "
Electrical Com-
ponent Inspection"
Windshield wiper and
washerCheck that the wipers and washer operate properly and that the wipers do not
streak.—
Windshield defrosterCheck that the air comes out of the defroster outlets properly and in sufficient
quantity when operating the heater or air conditioner.—
Steering wheelCheck that it has the specified play. Be sure to check for changes in the steering
condition, such as excessive play, hard steering or strange noises.PS-7, "
On-Vehicle In-
spection and Service"
SeatsCheck seat position controls such as seat adjusters, seat back recliner, etc. to
make sure they operate smoothly and that all latches lock securely in every po-
sition. Check that the head restraints move up and down smoothly and that the
locks (if equipped) hold securely in all latched positions. Check that the latches
lock securely for folding-down rear seat backs.—
Seat beltsCheck that all parts of the seat belt system (e.g. buckles, anchors, adjusters and
retractors) operate properly and smoothly and are installed securely. Check the
belt webbing for cuts, fraying, wear or damage.SB-10, "
Seat Belt Inspec-
tion", MA-30, "Checking
Seat Belts, Buckles, Re-
tractors, Anchors and
Adjusters"
Accelerator pedalCheck the pedal for smooth operation. Keep the floor mats away from the pedal. —
Page 2418 of 3061

PG-16
< SERVICE INFORMATION >
POWER SUPPLY ROUTING CIRCUIT
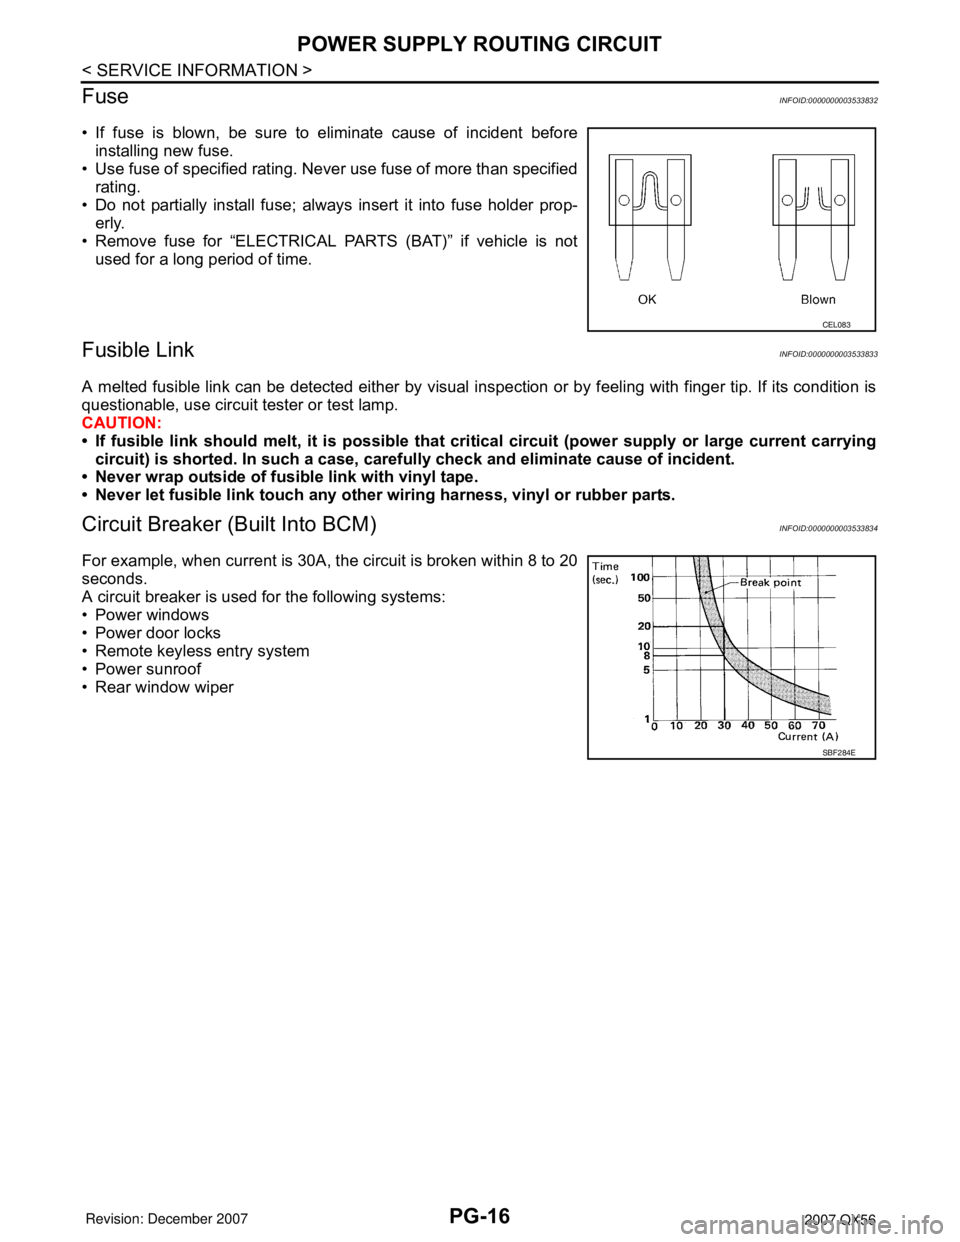
Fuse
INFOID:0000000003533832
• If fuse is blown, be sure to eliminate cause of incident before
installing new fuse.
• Use fuse of specified rating. Never use fuse of more than specified
rating.
• Do not partially install fuse; always insert it into fuse holder prop-
erly.
• Remove fuse for “ELECTRICAL PARTS (BAT)” if vehicle is not
used for a long period of time.
Fusible LinkINFOID:0000000003533833
A melted fusible link can be detected either by visual inspection or by feeling with finger tip. If its condition is
questionable, use circuit tester or test lamp.
CAUTION:
• If fusible link should melt, it is possible that critical circuit (power supply or large current carrying
circuit) is shorted. In such a case, carefully check and eliminate cause of incident.
• Never wrap outside of fusible link with vinyl tape.
• Never let fusible link touch any other wiring harness, vinyl or rubber parts.
Circuit Breaker (Built Into BCM)INFOID:0000000003533834
For example, when current is 30A, the circuit is broken within 8 to 20
seconds.
A circuit breaker is used for the following systems:
• Power windows
• Power door locks
• Remote keyless entry system
• Power sunroof
• Rear window wiper
CEL083
SBF284E
Page 2426 of 3061

PG-24
< SERVICE INFORMATION >
IPDM E/R (INTELLIGENT POWER DISTRIBUTION MODULE ENGINE ROOM)
43 L/Y Wiper auto stop signal InputON or
STARTWiper switch OFF, LO, INT Battery voltage
44 BRDaytime light relay
controlInput ONDaytime light system active 0V
Daytime light system inactive Battery voltage
45 G/W Horn relay control Input ONWhen door locks are operated
using key fob (OFF → ON)*1Battery voltage → 0V
46 GRFuel pump relay con-
trolInput —Ignition switch ON or START 0V
Ignition switch OFF or ACC Battery voltage
47 OThrottle control motor
relay controlInput —Ignition switch ON or START 0V
Ignition switch OFF or ACC Battery voltage
48 B/RStarter relay (inhibit
switch)InputON or
STARTSelector lever in "P" or "N" 0V
Selector lever any other posi-
tionBattery voltage
49 R/L Trailer tow relay Output ONLighting
switch must
be in the 1st
positionOFF 0V
ON Battery voltage
50 W/R Front fog lamp (LH) OutputON or
STARTLighting
switch must
be in the 2nd
position
(LOW beam
is ON) and
the front fog
lamp switchOFF 0V
ON Battery voltage
51 W/R Front fog lamp (RH) OutputON or
STARTLighting
switch must
be in the 2nd
position
(LOW beam
is ON) and
the front fog
lamp switchOFF 0V
ON Battery voltage
52 LLH low beam head-
lampOutput — Lighting switch in 2nd position Battery voltage
54 R/YRH low beam head-
lampOutput — Lighting switch in 2nd position Battery voltage
55 GLH high beam head-
lampOutput —Lighting switch in 2nd position
and placed in HIGH or PASS
positionBattery voltage
56L/W*2
Y*3LH high beam head-
lampOutput —Lighting switch in 2nd position
and placed in HIGH or PASS
positionBattery voltage
57 R/LParking, license, and
tail lampOutput ONLighting
switch 1st po-
sitionOFF 0V
ON Battery voltage
59 B Ground Input — — 0V
60 B/WRear window defog-
ger relayOutputON or
STARTRear defogger switch ON Battery voltage
Rear defogger switch OFF 0V Te r m i n a lWire
colorSignal nameSignal
input/
outputMeasuring condition
Reference value
(Approx.) Igni-
tion
switchOperation or condition
Page 2462 of 3061

PG-60
< SERVICE INFORMATION >
HARNESS
Code Section Wiring Diagram Name
A/C,A ATC Auto Air Conditioner
A/SUSP RSU Rear Air Suspension
AF1B1 EC Air Fuel Ratio (A/F) Sensor 1 (Bank 1)
AF1B2 EC Air Fuel Ratio (A/F) Sensor 1 (Bank 2)
AF1HB1 EC Air Fuel Ratio (A/F) Sensor 1 (Bank 1)
AF1HB2 EC Air Fuel Ratio (A/F) Sensor 1 (Bank 2)
APPS1 EC Accelerator Pedal Position Sensor
APPS2 EC Accelerator Pedal Position Sensor
APPS3 EC Accelerator Pedal Position Sensor
ASC/BS EC ASCD Brake Switch
ASC/SW EC ASCD Steering Switch
ASCBOF EC ASCD Brake Switch
ASCIND EC ASCD Indicator
A/T AT A/T Assembly
AT/IND DI A/T Indicator Lamp
AUDIO AV Audio
AUT/DP SE Automatic Drive Positioner
AUTO/L LT Auto Light Control
B/CLOS BL Back Door Auto Closure System
BACK/L LT Back-up Lamp
BRK/SW EC Brake Switch
CAN EC CAN Communication Line
CAN LAN CAN System
CHARGE SC Charging System
CHIME DI Warning Chime
CLOCK DI Clock
COOL/F EC Cooling Fan Control
COMBSW LT Combination Switch
COMM AV Audio Visual Communication System
COMPAS DI Compass and Thermometer
D/LOCK BL Power Door Lock
DEF GW Rear Window Defogger
DTRL LT Headlamp - With Daytime Light System
DVD AV DVD Entertainment System
ECM/PW EC ECM Power Supply for Back-Up
ECTS EC Engine Coolant Temperature Sensor
ETC1 EC Electric Throttle Control Function
ETC2 EC Throttle Control Motor Relay
ETC3 EC Throttle Control Motor
F/FOG LT Front Fog Lamp
F/PUMP EC Fuel Pump
FTTS EC Fuel Tank Temperature Sensor
FUELB1 EC Fuel Injection System Bank 1
FUELB2 EC Fuel Injection System Bank 2
H/AIM LT Headlamp Aiming Control
H/PHON AV Hands Free Telephone
H/LAMP LT Headlamp
HORN WW Horn
HSEAT SE Heated Seat
ICC ACS Intelligent Cruise Control
ICCBOF EC ICC Brake Switch