Page 3975 of 4647
PR-8
REAR PROPELLER SHAFT
Revision: 2007 April2007 M35/M45
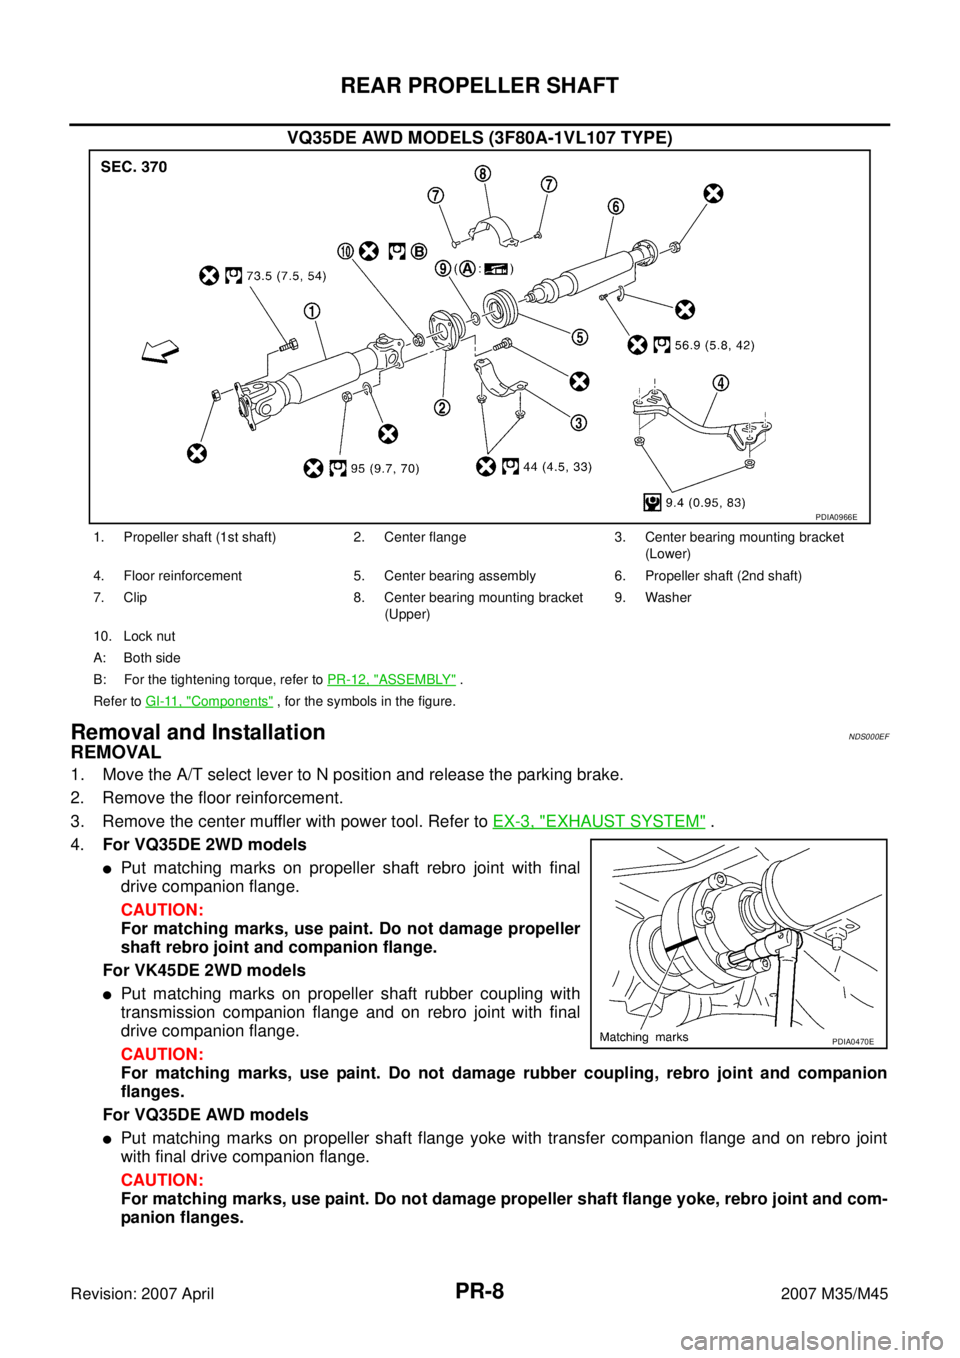
VQ35DE AWD MODELS (3F80A-1VL107 TYPE)
Removal and InstallationNDS000EF
REMOVAL
1. Move the A/T select lever to N position and release the parking brake.
2. Remove the floor reinforcement.
3. Remove the center muffler with power tool. Refer to EX-3, "
EXHAUST SYSTEM" .
4.For VQ35DE 2WD models
�Put matching marks on propeller shaft rebro joint with final
drive companion flange.
CAUTION:
For matching marks, use paint. Do not damage propeller
shaft rebro joint and companion flange.
For VK45DE 2WD models
�Put matching marks on propeller shaft rubber coupling with
transmission companion flange and on rebro joint with final
drive companion flange.
CAUTION:
For matching marks, use paint. Do not damage rubber coupling, rebro joint and companion
flanges.
For VQ35DE AWD models
�Put matching marks on propeller shaft flange yoke with transfer companion flange and on rebro joint
with final drive companion flange.
CAUTION:
For matching marks, use paint. Do not damage propeller shaft flange yoke, rebro joint and com-
panion flanges.
PDIA0966E
1. Propeller shaft (1st shaft) 2. Center flange 3. Center bearing mounting bracket
(Lower)
4. Floor reinforcement 5. Center bearing assembly 6. Propeller shaft (2nd shaft)
7. Clip 8. Center bearing mounting bracket
(Upper)9. Washer
10. Lock nut
A: Both side
B: For the tightening torque, refer to PR-12, "
ASSEMBLY" .
Refer to GI-11, "
Components" , for the symbols in the figure.
PDIA0470E
Page 3976 of 4647
REAR PROPELLER SHAFT
PR-9
C
E
F
G
H
I
J
K
L
MA
B
PR
Revision: 2007 April2007 M35/M45
5. Loosen mounting nuts of center bearing mounting brackets.
CAUTION:
Tighten mounting nuts temporarily.
6. Remove propeller shaft fixing bolts and nuts.
7. Remove center bearing mounting bracket fixing nuts.
8. Remove propeller shaft.
CAUTION:
If constant velocity joint was bent during propeller shaft
assembly removal, installation, or transportation, its boot
may be damaged. Wrap boot interference area to metal part
with shop cloth or rubber to protect boot from breakage.
INSPECTION
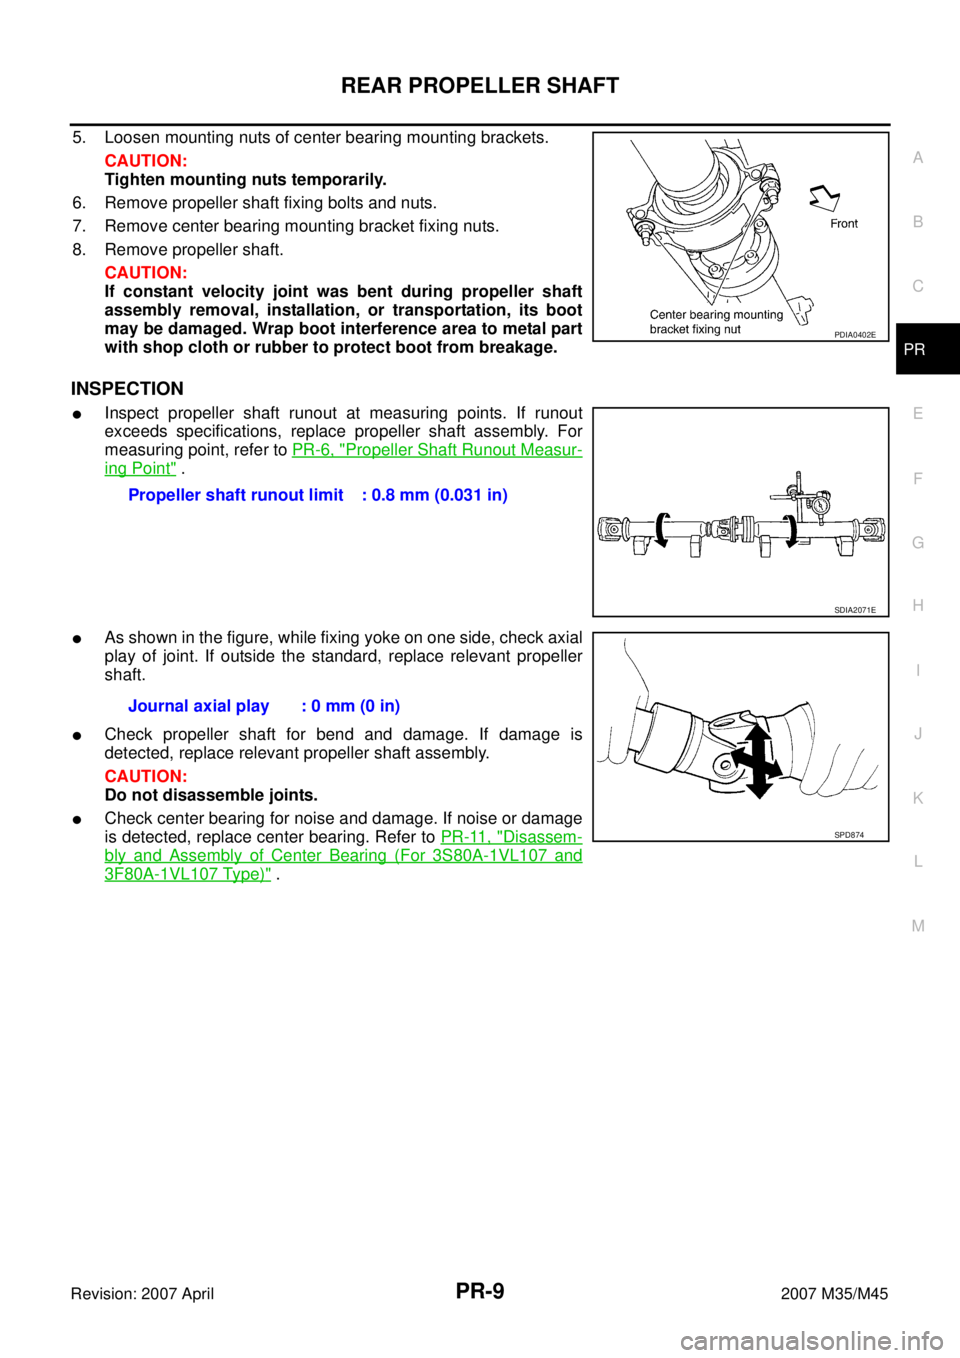
�Inspect propeller shaft runout at measuring points. If runout
exceeds specifications, replace propeller shaft assembly. For
measuring point, refer to PR-6, "
Propeller Shaft Runout Measur-
ing Point" .
�As shown in the figure, while fixing yoke on one side, check axial
play of joint. If outside the standard, replace relevant propeller
shaft.
�Check propeller shaft for bend and damage. If damage is
detected, replace relevant propeller shaft assembly.
CAUTION:
Do not disassemble joints.
�Check center bearing for noise and damage. If noise or damage
is detected, replace center bearing. Refer to PR-11, "
Disassem-
bly and Assembly of Center Bearing (For 3S80A-1VL107 and
3F80A-1VL107 Type)" .
PDIA0402E
Propeller shaft runout limit : 0.8 mm (0.031 in)
SDIA2071E
Journal axial play : 0 mm (0 in)
SPD874
Page 3977 of 4647
PR-10
REAR PROPELLER SHAFT
Revision: 2007 April2007 M35/M45
INSTALLATION
Note the following, and install in the reverse order of removal.
CAUTION:
Avoid damaging the rebro joint boot, protect it with a shop towel or equivalent.
�Align matching marks to install propeller shaft to final drive and transfer (AWD models only) companion
flanges, and then tighten to specified torque. Refer to PR-7, "
Components" .
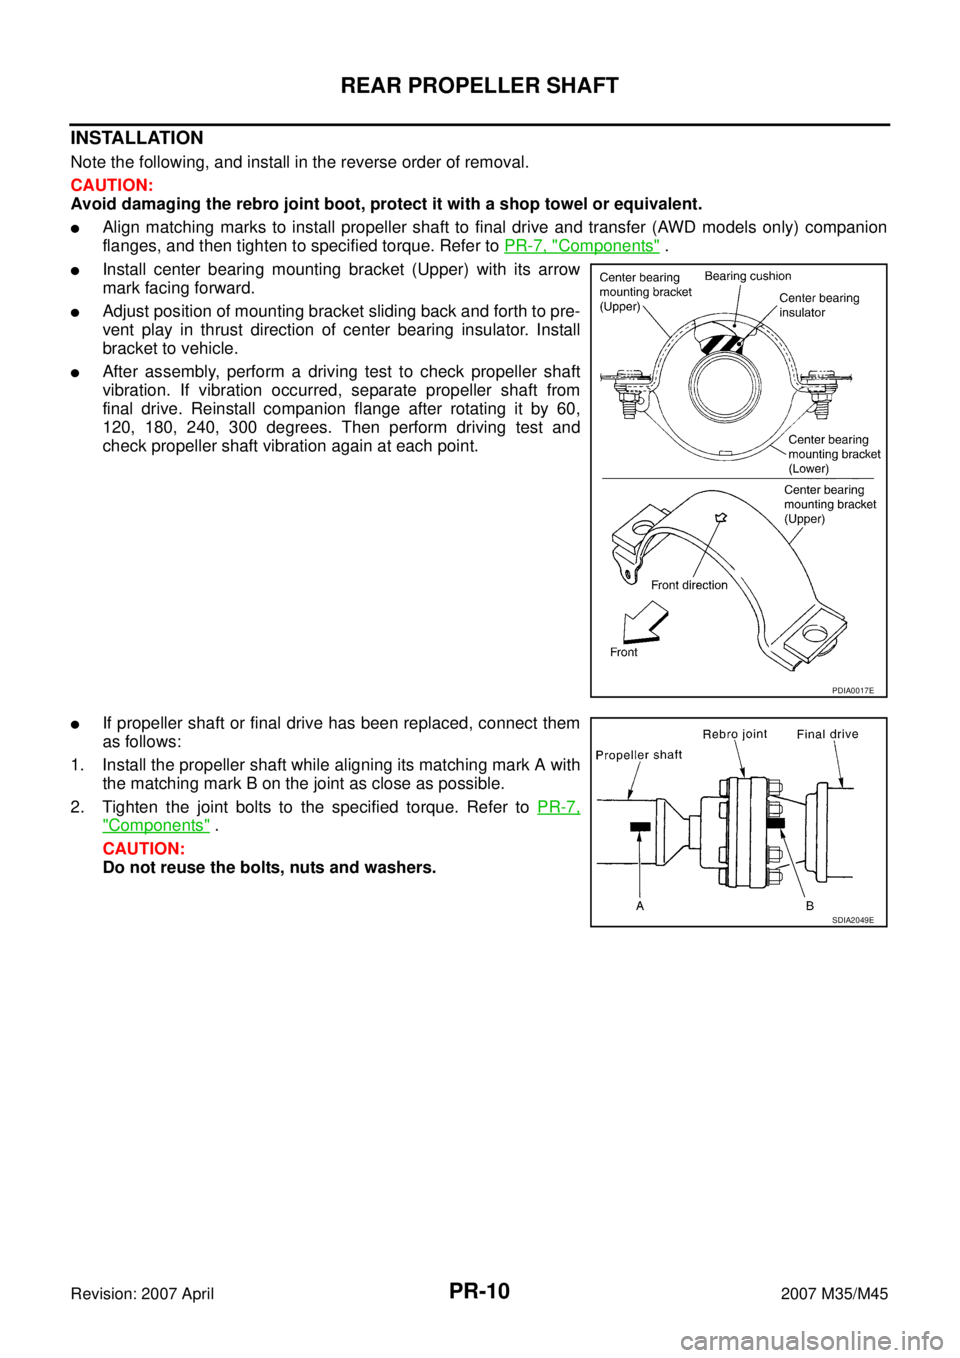
�Install center bearing mounting bracket (Upper) with its arrow
mark facing forward.
�Adjust position of mounting bracket sliding back and forth to pre-
vent play in thrust direction of center bearing insulator. Install
bracket to vehicle.
�After assembly, perform a driving test to check propeller shaft
vibration. If vibration occurred, separate propeller shaft from
final drive. Reinstall companion flange after rotating it by 60,
120, 180, 240, 300 degrees. Then perform driving test and
check propeller shaft vibration again at each point.
�If propeller shaft or final drive has been replaced, connect them
as follows:
1. Install the propeller shaft while aligning its matching mark A with
the matching mark B on the joint as close as possible.
2. Tighten the joint bolts to the specified torque. Refer to PR-7,
"Components" .
CAUTION:
Do not reuse the bolts, nuts and washers.
PDIA0017E
SDIA2049E
Page 3978 of 4647
REAR PROPELLER SHAFT
PR-11
C
E
F
G
H
I
J
K
L
MA
B
PR
Revision: 2007 April2007 M35/M45
Disassembly and Assembly of Center Bearing (For 3S80A-1VL107 and 3F80A-
1VL107 Type)
NDS000EG
DISASSEMBLY
1. Put matching marks on propeller shaft and center flange, then
disassemble the 1st and 2nd propeller shaft.
CAUTION:
For matching marks, use paint. Do not damage the propel-
ler shaft flange and center flange.
2. Put matching marks onto the center flange and propeller shaft
end as shown.
CAUTION:
For matching marks, use paint. Do not damage propeller
shaft end and center flange.
3. Hold the center flange using the flange wrench, and remove the
lock nut.
4. Remove the center flange using a commercial available bearing
puller then remove washer.
5. Press out the center bearing using the puller and hydraulic
press.
SDIA1538E
SDIA1539E
Tool number : KV40104000 ( — )
SDIA1540E
Tool number : ST30031000 (J-22912-01)
SDIA1541E
Page 3979 of 4647
PR-12
REAR PROPELLER SHAFT
Revision: 2007 April2007 M35/M45
ASSEMBLY
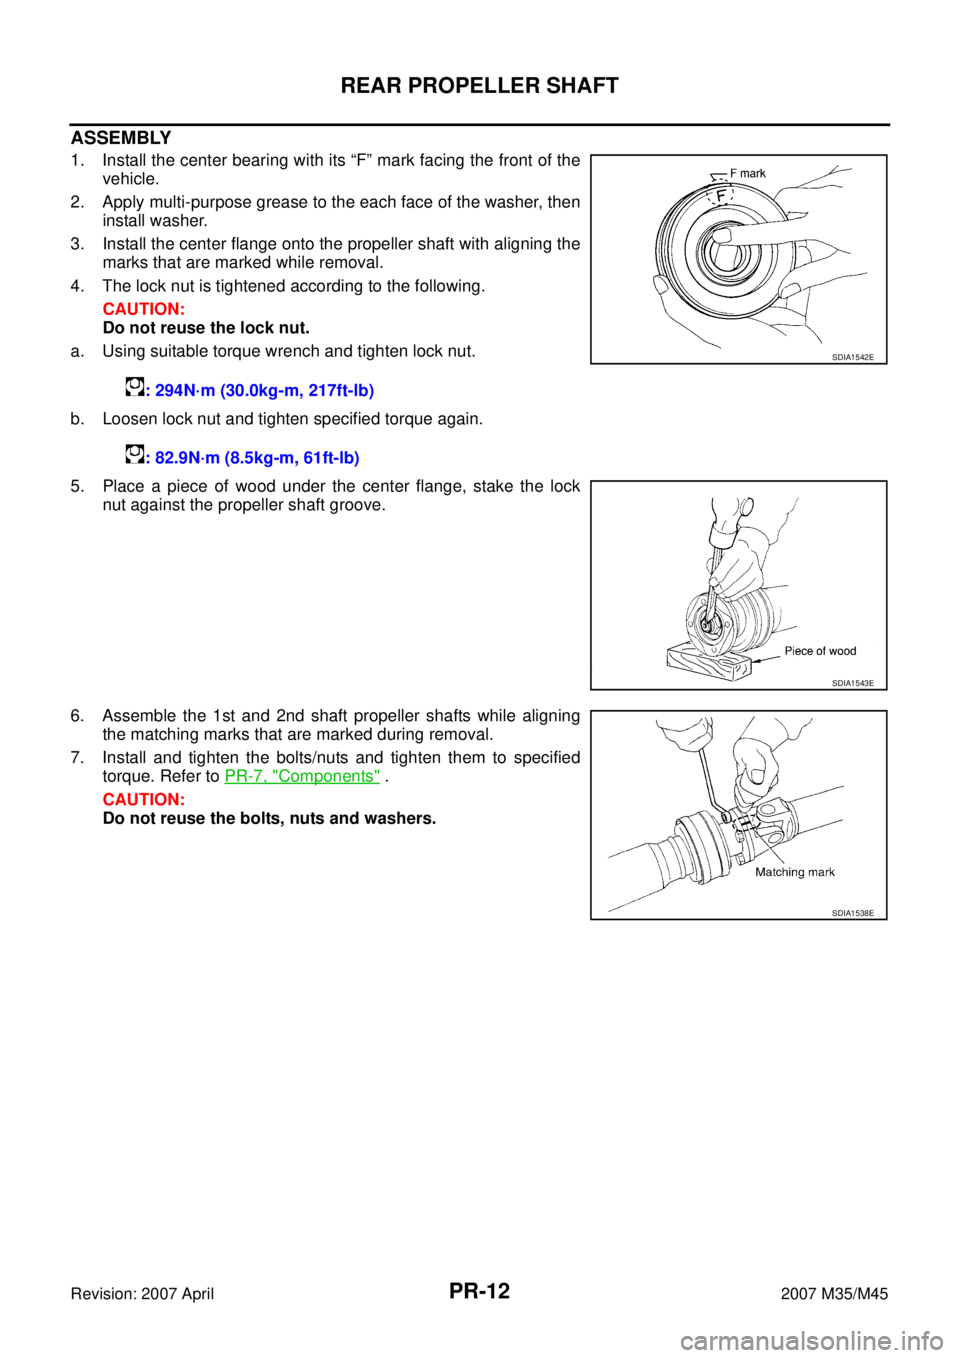
1. Install the center bearing with its “F” mark facing the front of the
vehicle.
2. Apply multi-purpose grease to the each face of the washer, then
install washer.
3. Install the center flange onto the propeller shaft with aligning the
marks that are marked while removal.
4. The lock nut is tightened according to the following.
CAUTION:
Do not reuse the lock nut.
a. Using suitable torque wrench and tighten lock nut.
b. Loosen lock nut and tighten specified torque again.
5. Place a piece of wood under the center flange, stake the lock
nut against the propeller shaft groove.
6. Assemble the 1st and 2nd shaft propeller shafts while aligning
the matching marks that are marked during removal.
7. Install and tighten the bolts/nuts and tighten them to specified
torque. Refer to PR-7, "
Components" .
CAUTION:
Do not reuse the bolts, nuts and washers.: 294N·m (30.0kg-m, 217ft-lb)
: 82.9N·m (8.5kg-m, 61ft-lb)
SDIA1542E
SDIA1543E
SDIA1538E
Page 3980 of 4647
SERVICE DATA AND SPECIFICATIONS (SDS)
PR-13
C
E
F
G
H
I
J
K
L
MA
B
PR
Revision: 2007 April2007 M35/M45
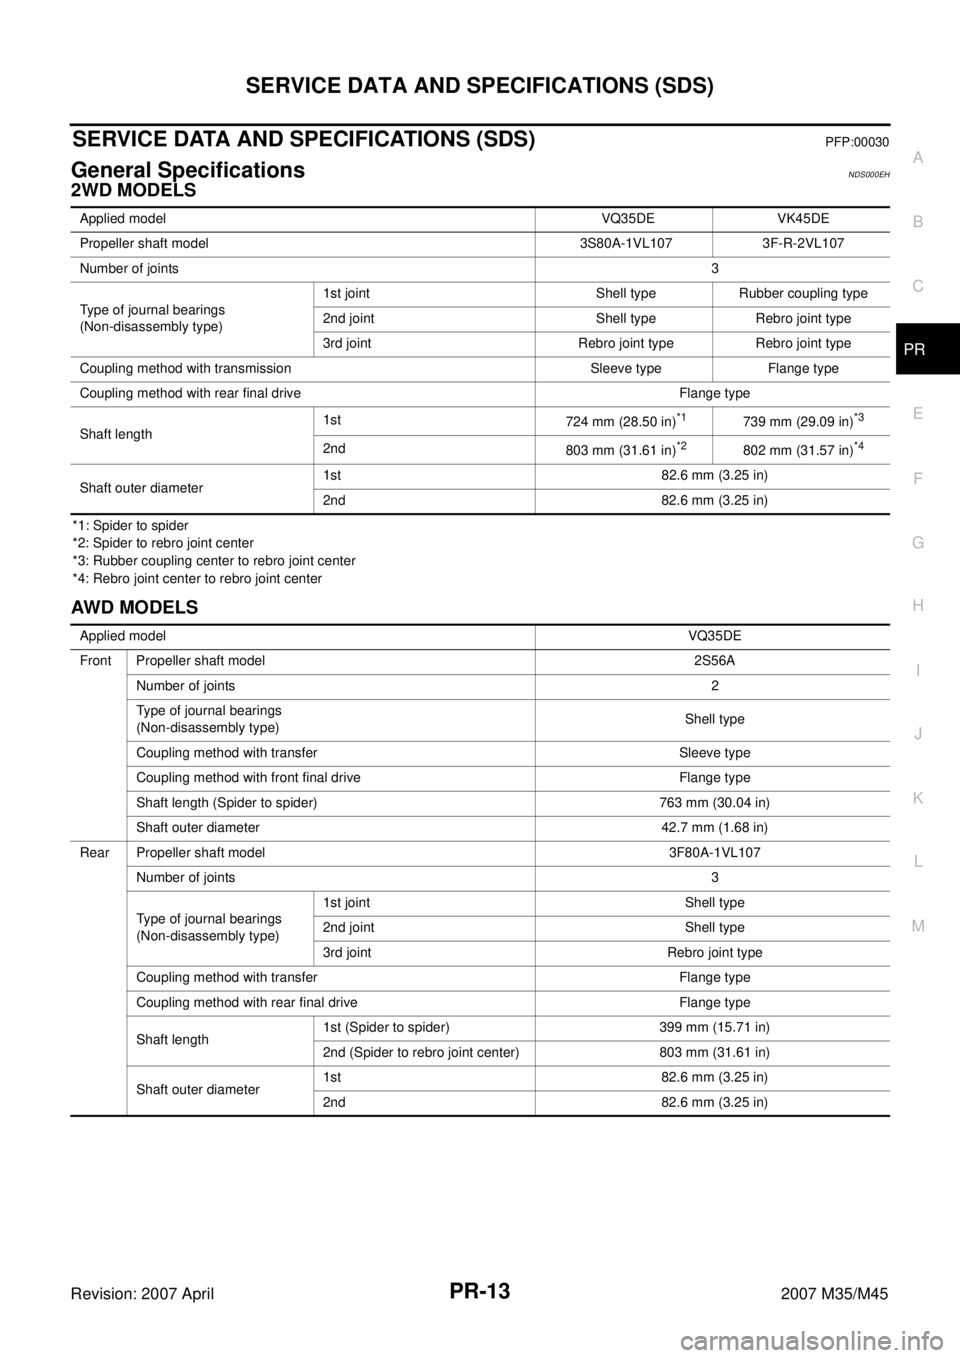
SERVICE DATA AND SPECIFICATIONS (SDS)PFP:00030
General SpecificationsNDS000EH
2WD MODELS
*1: Spider to spider
*2: Spider to rebro joint center
*3: Rubber coupling center to rebro joint center
*4: Rebro joint center to rebro joint center
AWD MODELS
Applied model VQ35DE VK45DE
Propeller shaft model 3S80A-1VL107 3F-R-2VL107
Number of joints3
Type of journal bearings
(Non-disassembly type)1st joint Shell type Rubber coupling type
2nd joint Shell type Rebro joint type
3rd joint Rebro joint type Rebro joint type
Coupling method with transmission Sleeve type Flange type
Coupling method with rear final drive Flange type
Shaft length1st
724 mm (28.50 in)
*1739 mm (29.09 in)*3
2nd
803 mm (31.61 in)*2802 mm (31.57 in)*4
Shaft outer diameter1st 82.6 mm (3.25 in)
2nd 82.6 mm (3.25 in)
Applied modelVQ35DE
Front Propeller shaft model 2S56A
Number of joints2
Type of journal bearings
(Non-disassembly type)Shell type
Coupling method with transfer Sleeve type
Coupling method with front final drive Flange type
Shaft length (Spider to spider) 763 mm (30.04 in)
Shaft outer diameter 42.7 mm (1.68 in)
Rear Propeller shaft model 3F80A-1VL107
Number of joints3
Type of journal bearings
(Non-disassembly type)1st joint Shell type
2nd joint Shell type
3rd joint Rebro joint type
Coupling method with transfer Flange type
Coupling method with rear final drive Flange type
Shaft length1st (Spider to spider) 399 mm (15.71 in)
2nd (Spider to rebro joint center) 803 mm (31.61 in)
Shaft outer diameter1st 82.6 mm (3.25 in)
2nd 82.6 mm (3.25 in)
Page 3981 of 4647
PR-14
SERVICE DATA AND SPECIFICATIONS (SDS)
Revision: 2007 April2007 M35/M45
Journal Axial PlayNDS000EI
Propeller Shaft RunoutNDS000EJ
ModelFront propeller shaft Rear propeller shaft
2S56A 3S80A-1VL107 3F80A-1VL107 3F-R-2VL107
Journal axial play 0 mm (0 in) —
ModelFront propeller shaft Rear propeller shaft
2S56A 3S80A-1VL107 3F80A-1VL107 3F-R-2VL107
Propeller shaft runout limit 0.8 mm (0.031 in)
Page 3988 of 4647
NOISE, VIBRATION AND HARSHNESS (NVH) TROUBLESHOOTING
PS-7
C
D
E
F
H
I
J
K
L
MA
B
PS
Revision: 2007 April2007 M35/M45
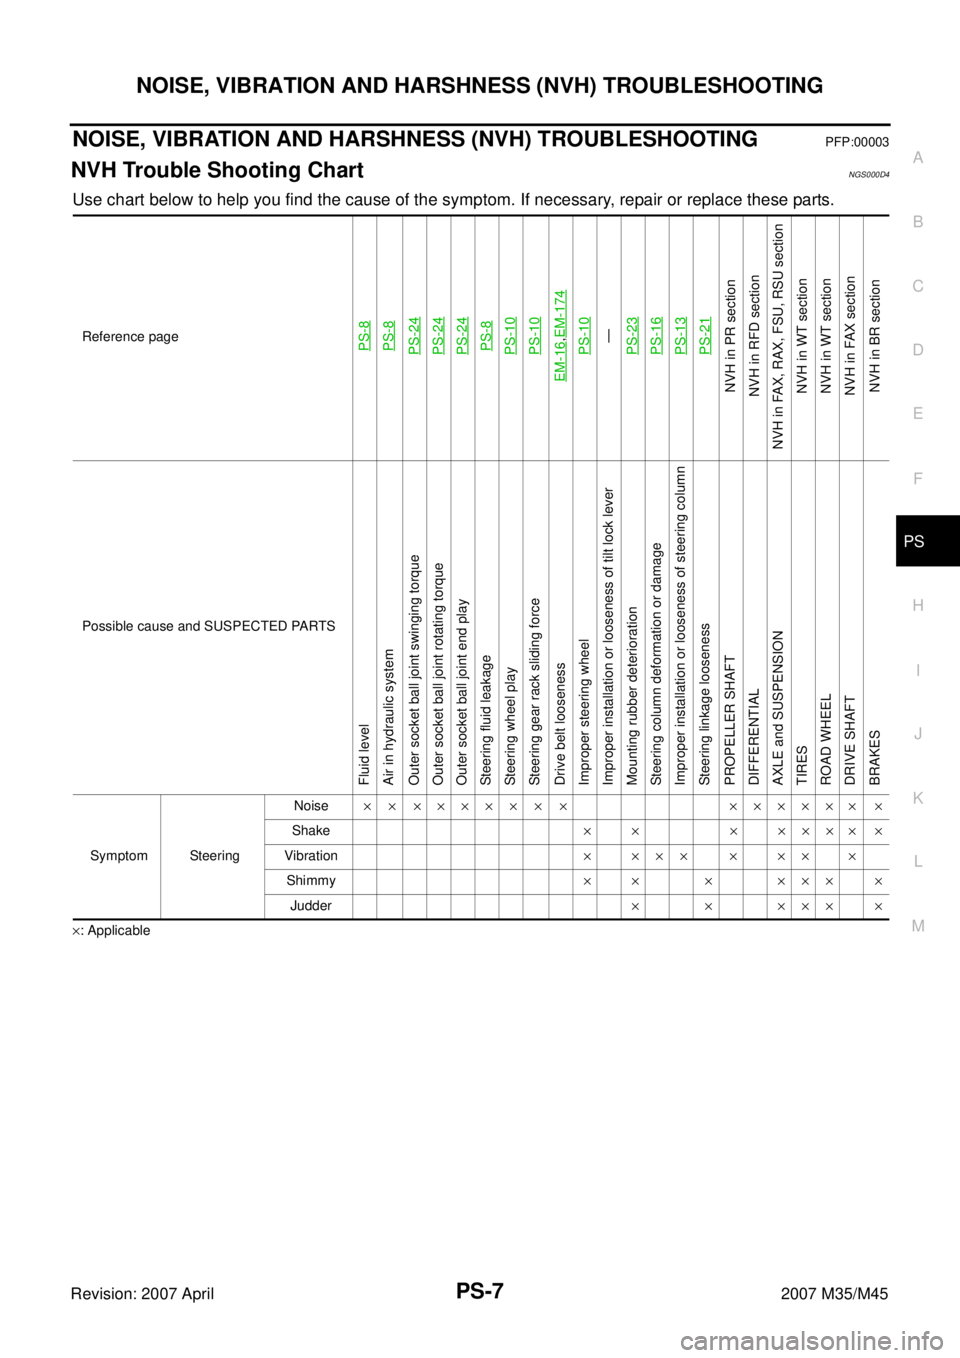
NOISE, VIBRATION AND HARSHNESS (NVH) TROUBLESHOOTINGPFP:00003
NVH Trouble Shooting ChartNGS000D4
Use chart below to help you find the cause of the symptom. If necessary, repair or replace these parts.
×: ApplicableReference page
PS-8PS-8PS-24PS-24PS-24PS-8PS-10PS-10
EM-16
,EM-174PS-10—
PS-23PS-16PS-13PS-21
NVH in PR section
NVH in RFD section
NVH in FAX, RAX, FSU, RSU section
NVH in WT section
NVH in WT section
NVH in FAX section
NVH in BR section
Possible cause and SUSPECTED PARTS
Fluid level
Air in hydraulic system
Outer socket ball joint swinging torque
Outer socket ball joint rotating torque
Outer socket ball joint end play
Steering fluid leakage
Steering wheel play
Steering gear rack sliding force
Drive belt looseness
Improper steering wheel
Improper installation or looseness of tilt lock lever
Mounting rubber deterioration
Steering column deformation or damage
Improper installation or looseness of steering column
Steering linkage looseness
PROPELLER SHAFT
DIFFERENTIAL
AXLE and SUSPENSION
TIRES
ROAD WHEEL
DRIVE SHAFT
BRAKES
Symptom SteeringNoise× × ××××× × × ×××××× ×
Shake×× ××××××
Vibration×××× ××××
Shimmy× × × ××× ×
Judder× × ××× ×