Page 2993 of 4647
EI-22
CENTER MUD GUARD
Revision: 2007 April2007 M35/M45
CENTER MUD GUARDPFP:76850
Removal and InstallationNIS0024L
REMOVAL
1. Remove screw and nuts of wind deflector and remove wind
deflector.
2. Remove screws of mudguard front/rear side.
3. Remove screws of mudguard lower side.
4. Fully open front door and rear door.
5. Remove clips from back of mudguard using clip clamp remover.
6. Remove center mudguard from body side.
INSTALLATION
Install in the reverse order of removal.
CAUTION:
When installing center mud guard, make sure that clips are securely fitted in panel holes on body, and
then press them in.
1. Center mud guard
PIIB2941J
PIIB3973J
Page 2996 of 4647
ROOF SIDE MOLDING
EI-25
C
D
E
F
G
H
J
K
L
MA
B
EI
Revision: 2007 April2007 M35/M45
ROOF SIDE MOLDINGPFP:73854
Removal and InstallationNIS0024O
REMOVAL
1. Apply protective tape around roof side molding.
2. Disengage clips while pinching molding from rear end of rear
window to front end of front window, and then remove roof side
molding.
CAUTION:
Front and rear ends of roof side molding are placed under
the body side. Pull them out after disengaging plastic clip
joints.
NOTE:
�Molding fasteners of front windshield glass and rear window glass are secured with rivet. Remove and
install front windshield glass and rear window glass when replacing the molding fasteners.
�Heat adhesive tape interface using a dryer, and then peel roof side molding clips (body side) using long-
nose pliers.
1. Roof side molding 2. Roof outer panel 3. Windshield glass
4. Clip (body side) 5. Molding fastener 6. Rivet
7. Clip (molding side) 8. Body side outer clip
PIIB2753J
PIIB2749J
Page 2998 of 4647
DOOR SASH MOLDING
EI-27
C
D
E
F
G
H
J
K
L
MA
B
EI
Revision: 2007 April2007 M35/M45
DOOR SASH MOLDINGPFP:80282
Removal and InstallationNIS0024P
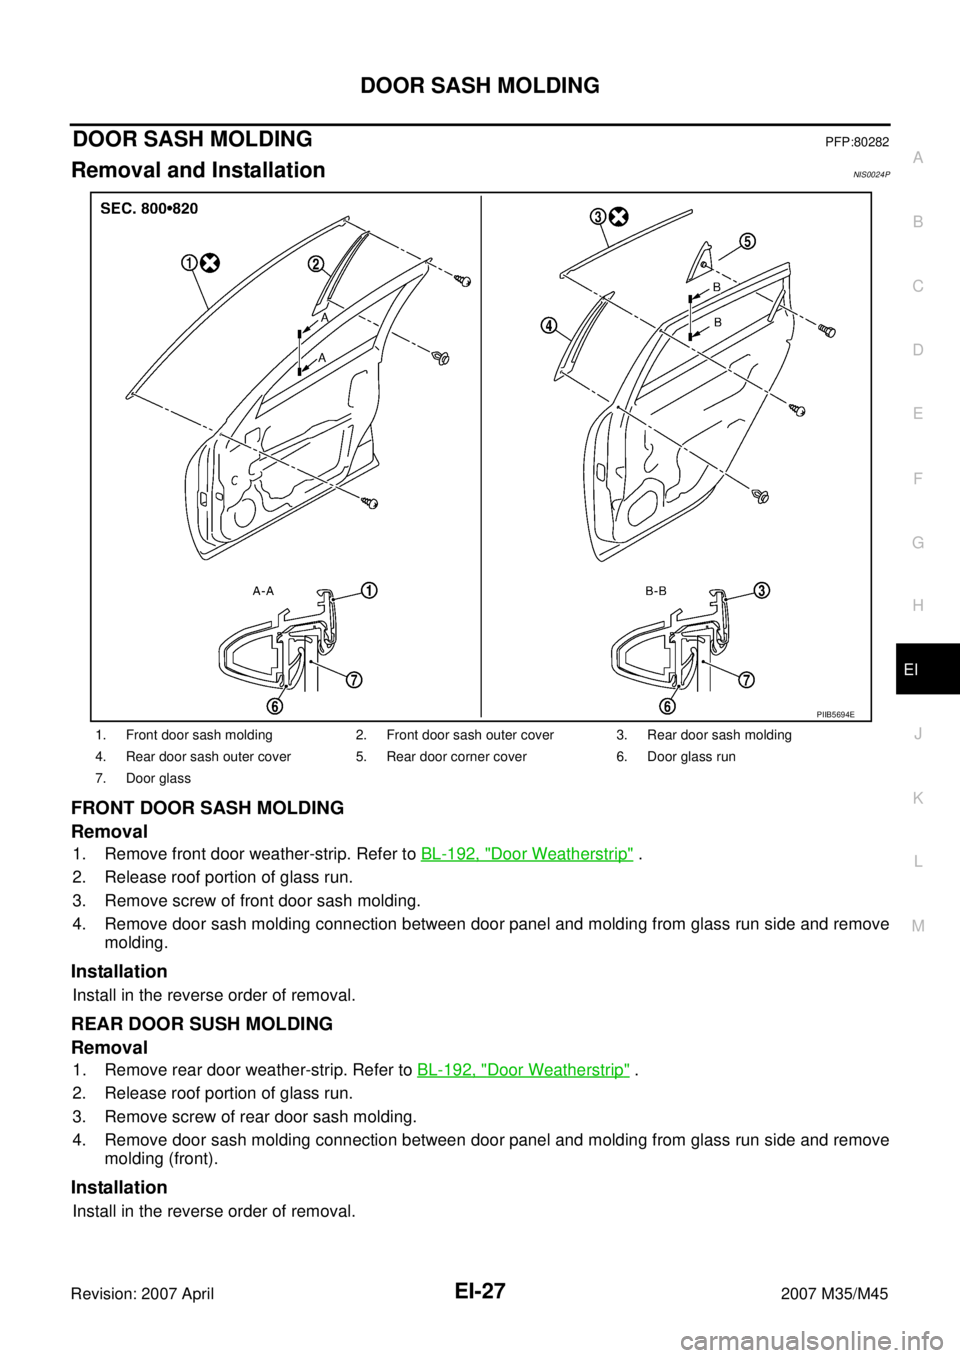
FRONT DOOR SASH MOLDING
Removal
1. Remove front door weather-strip. Refer to BL-192, "Door Weatherstrip" .
2. Release roof portion of glass run.
3. Remove screw of front door sash molding.
4. Remove door sash molding connection between door panel and molding from glass run side and remove
molding.
Installation
Install in the reverse order of removal.
REAR DOOR SUSH MOLDING
Removal
1. Remove rear door weather-strip. Refer to BL-192, "Door Weatherstrip" .
2. Release roof portion of glass run.
3. Remove screw of rear door sash molding.
4. Remove door sash molding connection between door panel and molding from glass run side and remove
molding (front).
Installation
Install in the reverse order of removal.
1. Front door sash molding 2. Front door sash outer cover 3. Rear door sash molding
4. Rear door sash outer cover 5. Rear door corner cover 6. Door glass run
7. Door glass
PIIB5694E
Page 3003 of 4647
EI-32
DOOR PARTING SEAL
Revision: 2007 April2007 M35/M45
DOOR PARTING SEALPFP:80838
Removal and InstallationNIS0024S
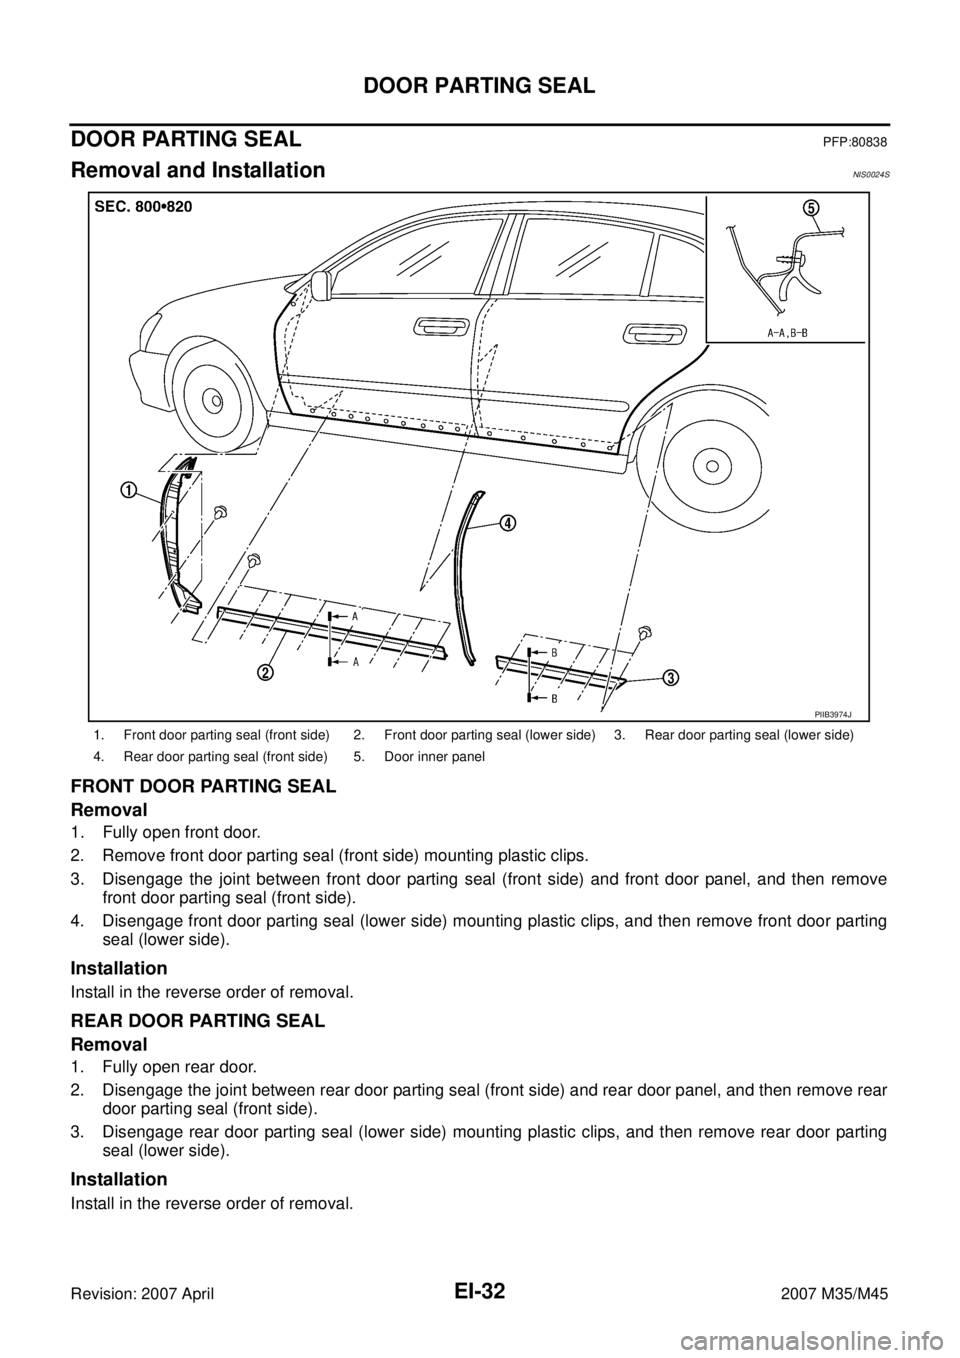
FRONT DOOR PARTING SEAL
Removal
1. Fully open front door.
2. Remove front door parting seal (front side) mounting plastic clips.
3. Disengage the joint between front door parting seal (front side) and front door panel, and then remove
front door parting seal (front side).
4. Disengage front door parting seal (lower side) mounting plastic clips, and then remove front door parting
seal (lower side).
Installation
Install in the reverse order of removal.
REAR DOOR PARTING SEAL
Removal
1. Fully open rear door.
2. Disengage the joint between rear door parting seal (front side) and rear door panel, and then remove rear
door parting seal (front side).
3. Disengage rear door parting seal (lower side) mounting plastic clips, and then remove rear door parting
seal (lower side).
Installation
Install in the reverse order of removal.
1. Front door parting seal (front side) 2. Front door parting seal (lower side) 3. Rear door parting seal (lower side)
4. Rear door parting seal (front side) 5. Door inner panel
PIIB3974J
Page 3006 of 4647
DOOR FINISHER
EI-35
C
D
E
F
G
H
J
K
L
MA
B
EI
Revision: 2007 April2007 M35/M45
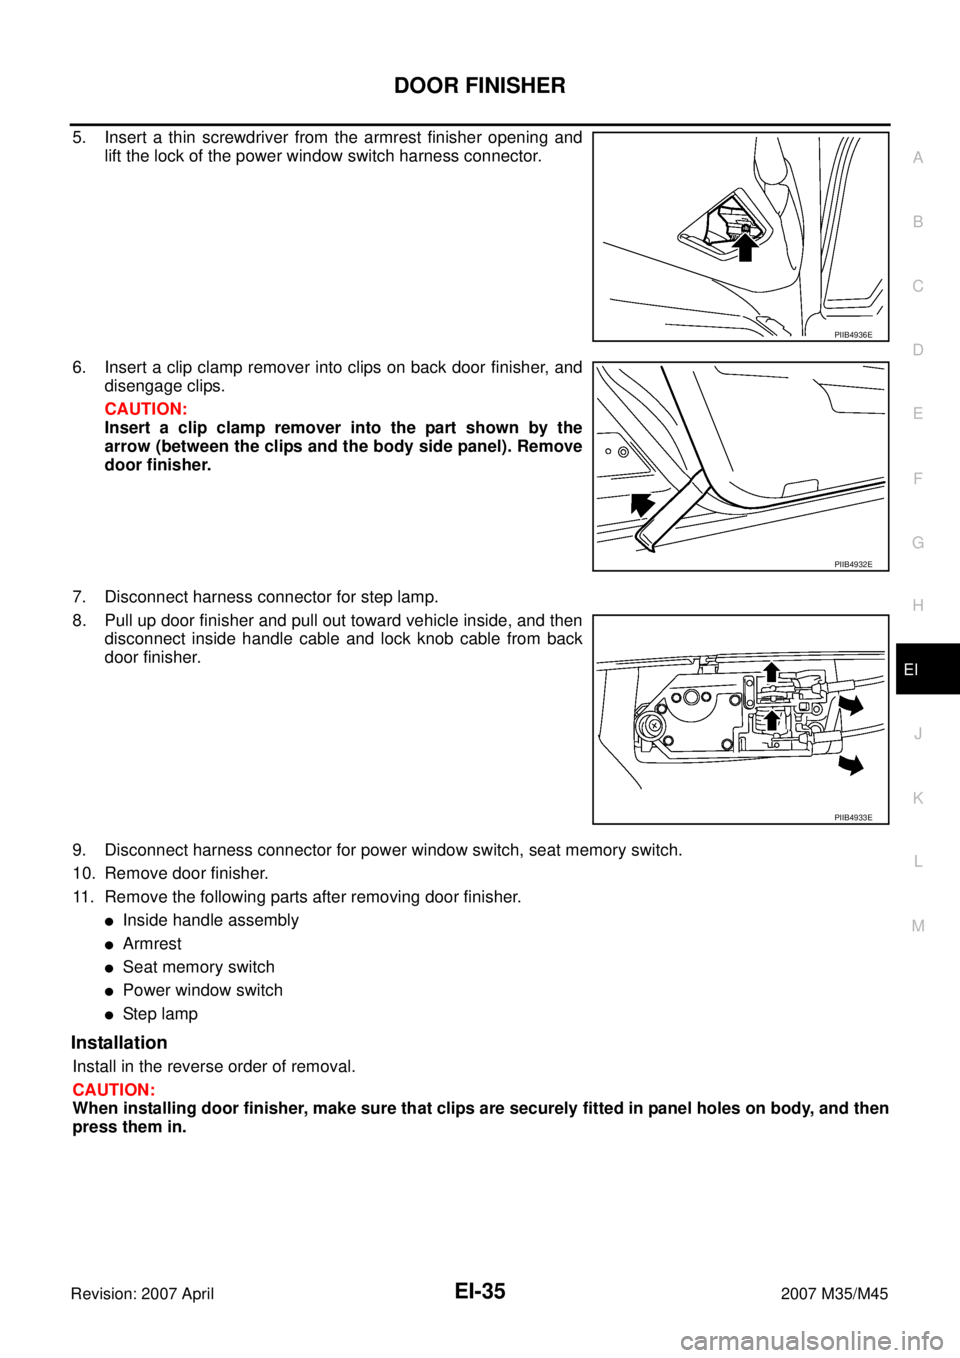
5. Insert a thin screwdriver from the armrest finisher opening and
lift the lock of the power window switch harness connector.
6. Insert a clip clamp remover into clips on back door finisher, and
disengage clips.
CAUTION:
Insert a clip clamp remover into the part shown by the
arrow (between the clips and the body side panel). Remove
door finisher.
7. Disconnect harness connector for step lamp.
8. Pull up door finisher and pull out toward vehicle inside, and then
disconnect inside handle cable and lock knob cable from back
door finisher.
9. Disconnect harness connector for power window switch, seat memory switch.
10. Remove door finisher.
11. Remove the following parts after removing door finisher.
�Inside handle assembly
�Armrest
�Seat memory switch
�Power window switch
�Ste p l am p
Installation
Install in the reverse order of removal.
CAUTION:
When installing door finisher, make sure that clips are securely fitted in panel holes on body, and then
press them in.
PIIB4936E
PIIB4932E
PIIB4933E
Page 3012 of 4647
BODY SIDE TRIM
EI-41
C
D
E
F
G
H
J
K
L
MA
B
EI
Revision: 2007 April2007 M35/M45
REAR WHEEL HOUSE GARNISH
Removal
1. Remove rear seat cushion and rear seatback. Refer to SE-177, "Removal and Installation" .
2. Remove rear body side welt.
3. Remove clip of rear wheel house garnish.
4. Remove rear wheel house garnish.
Installation
Install in the reverse order of removal.
NOTE:
To install, check if all clips are matched over holes of panel on vehicle, then push on.
REAR PILLAR FINISHER
Removal
1. Remove rear seat cushion and rear seatback. Refer to SE-177, "Removal and Installation" .
2. Remove rear seat belt floor anchor bolt. Refer to SB-31, "
Removal and Installation of Rear Seat Belt" .
3. Remove rear kicking plate inner.
4. Remove rear wheel house garnish.
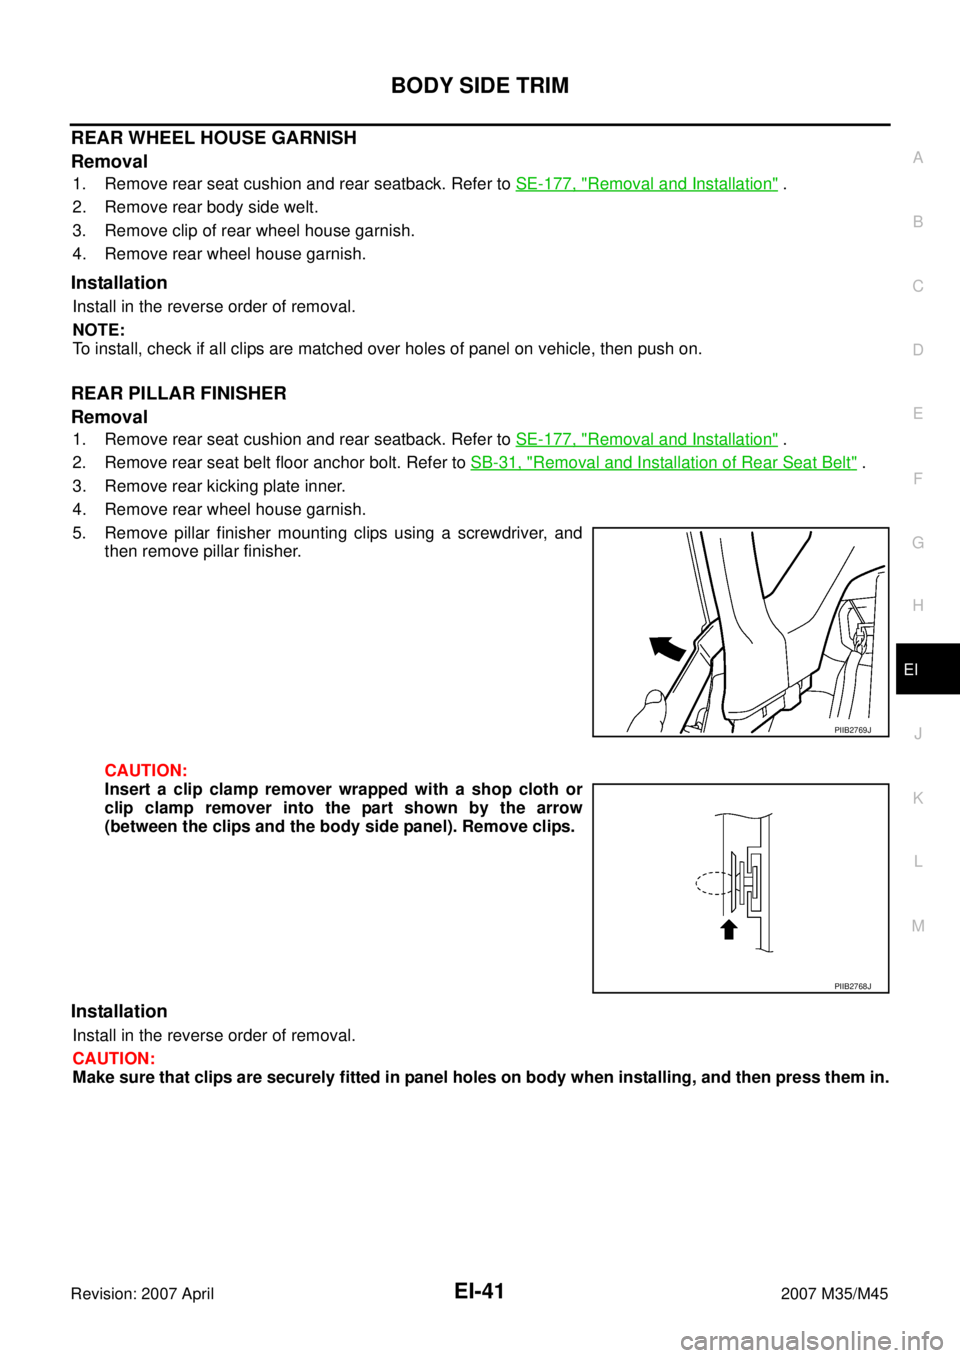
5. Remove pillar finisher mounting clips using a screwdriver, and
then remove pillar finisher.
CAUTION:
Insert a clip clamp remover wrapped with a shop cloth or
clip clamp remover into the part shown by the arrow
(between the clips and the body side panel). Remove clips.
Installation
Install in the reverse order of removal.
CAUTION:
Make sure that clips are securely fitted in panel holes on body when installing, and then press them in.
PIIB2769J
PIIB2768J
Page 3014 of 4647
REAR PARCEL SHELF FINISHER
EI-43
C
D
E
F
G
H
J
K
L
MA
B
EI
Revision: 2007 April2007 M35/M45
4. Remove rear kicking plate inner, rear wheelhouse garnish, rear pillar finisher. Refer to EI-37, "BODY SIDE
TRIM" .
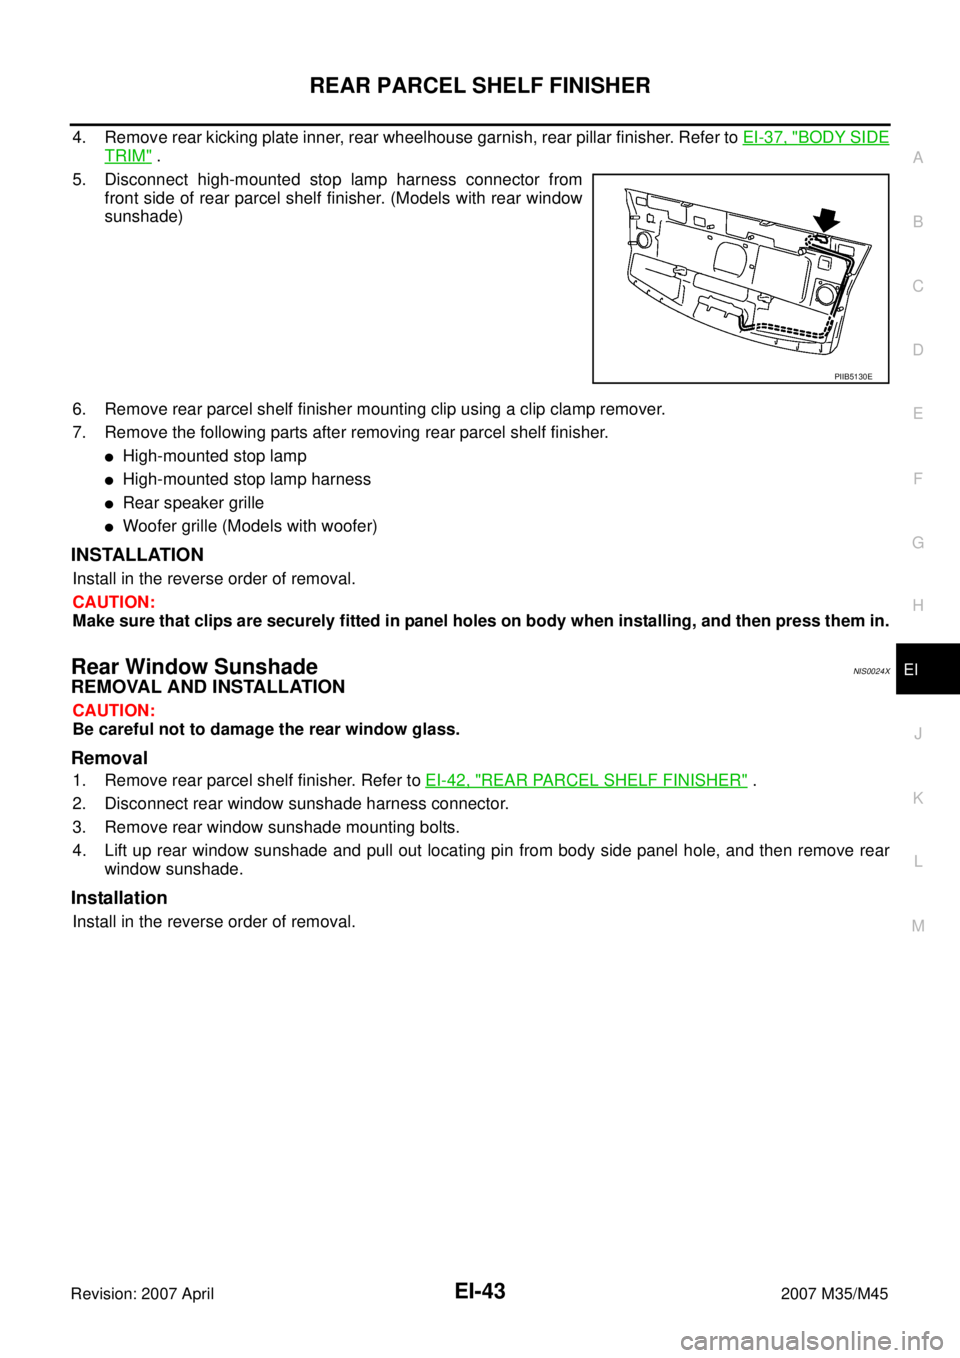
5. Disconnect high-mounted stop lamp harness connector from
front side of rear parcel shelf finisher. (Models with rear window
sunshade)
6. Remove rear parcel shelf finisher mounting clip using a clip clamp remover.
7. Remove the following parts after removing rear parcel shelf finisher.
�High-mounted stop lamp
�High-mounted stop lamp harness
�Rear speaker grille
�Woofer grille (Models with woofer)
INSTALLATION
Install in the reverse order of removal.
CAUTION:
Make sure that clips are securely fitted in panel holes on body when installing, and then press them in.
Rear Window SunshadeNIS0024X
REMOVAL AND INSTALLATION
CAUTION:
Be careful not to damage the rear window glass.
Removal
1. Remove rear parcel shelf finisher. Refer to EI-42, "REAR PARCEL SHELF FINISHER" .
2. Disconnect rear window sunshade harness connector.
3. Remove rear window sunshade mounting bolts.
4. Lift up rear window sunshade and pull out locating pin from body side panel hole, and then remove rear
window sunshade.
Installation
Install in the reverse order of removal.
PIIB5130E
Page 3021 of 4647
EI-50
FLOOR TRIM
Revision: 2007 April2007 M35/M45
FLOOR TRIMPFP:74902
Removal and InstallationNIS00252
REMOVAL
1. Remove front seat (LH/RH) and rear seat cushion. Refer to SE-168, "Removal and Installation" and SE-
177, "Removal and Installation" .
2. Remove accelerator pedal pad. Refer to ACC-3, "
ACCELERATOR CONTROL SYSTEM" .
3. Remove rear floor grille and foot grille. Refer to ATC-143, "
DUCTS AND GRILLES" .
4. Remove front seat belt floor anchor bolt (LH/RH). Refer to SB-29, "
Removal and Installation of Front Seat
Belt" .
5. Remove center console. Refer to IP-10, "
INSTRUMENT PANEL ASSEMBLY" .
6. Remove instrument driver lower panel and instrument passenger lower cover. Refer to IP-10, "
INSTRU-
MENT PANEL ASSEMBLY" .
7. Remove floor hook.
8. Remove dash side finisher, front kicking plate inner, center pillar lower garnish, and rear kicking plate
inner, front body side welt (LH/RH), rear body side welt (LH/RH), rear wheel house garnish. Refer to EI-
37, "BODY SIDE TRIM" .
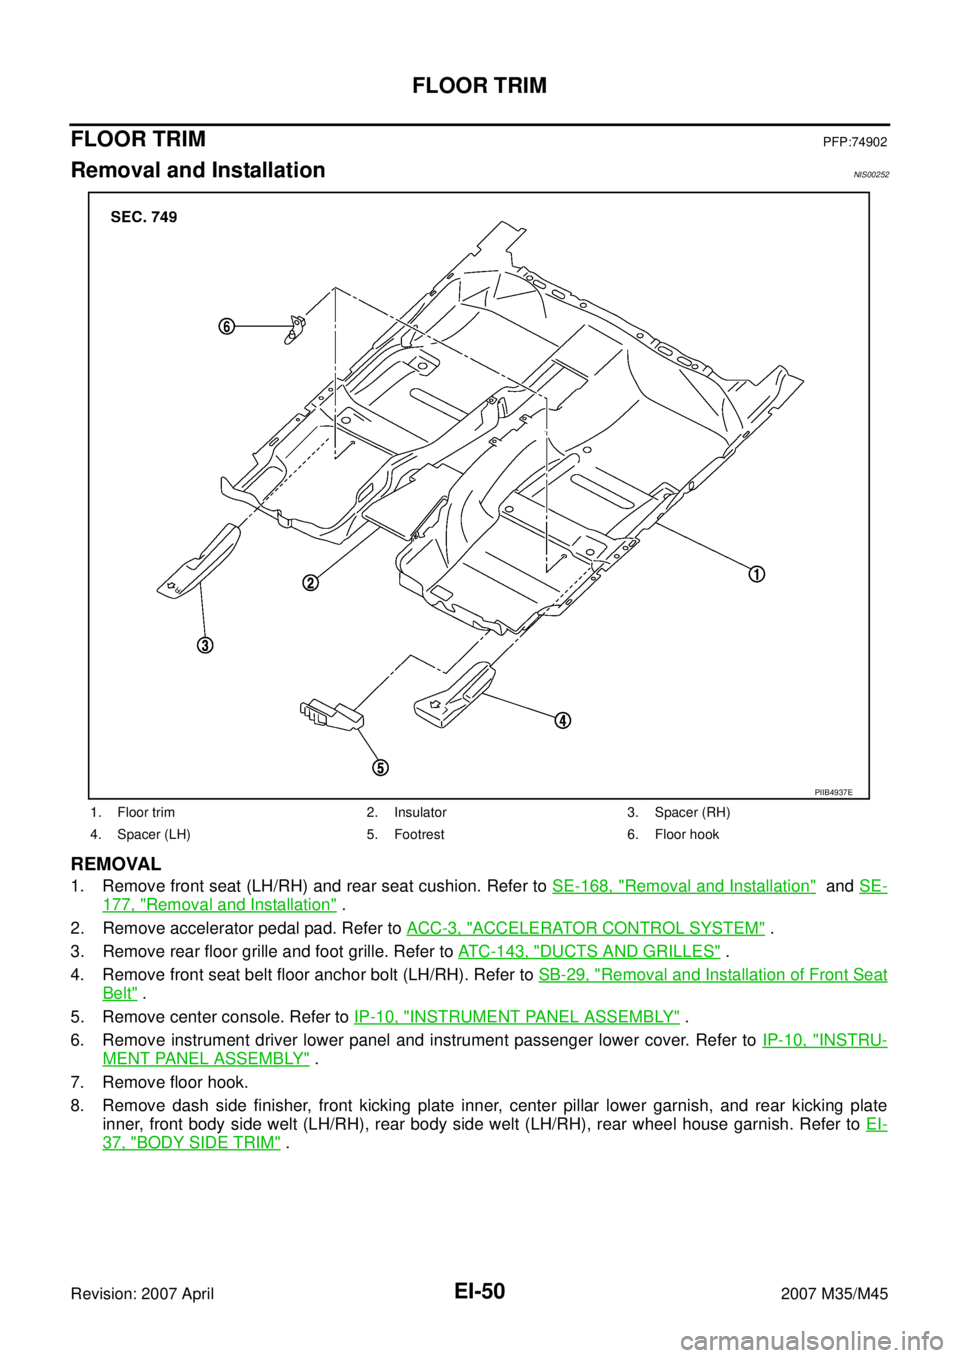
1. Floor trim 2. Insulator 3. Spacer (RH)
4. Spacer (LH) 5. Footrest 6. Floor hook
PIIB4937E