Page 4012 of 4366

SC-14
STARTING SYSTEM
Revision: 2006 July 2007 FX35/FX45
Trouble Diagnosis with Battery/Starting/Charging System Tester (Starting)NKS002US
NOTE:
To ensure a complete and thorough diagnosis, the battery, starter and alternator test segments must be done
as a set from start to finish.
1. Turn off all loads on the vehicle electrical system.
2. Perform battery test with Battery/Starting/Charging system tester. Refer to SC-8, "
Trouble Diagnosis with Battery/Starting/
Charging System Tester (Battery)" .
3. Press “ENTER” to begin the starting system test.
4. Start the engine.
5. Diagnostic result is displayed on the tester. Refer to SC-14,
"DIAGNOSTIC RESULT ITEM CHART" .
NOTE:
�If the starter performs normally but the engine does not start,
perform engine diagnosis.
�For intermittent “NO CRANK” or “NO STARTER OPERA-
TION” incidents, refer to SC-17, "
DIAGNOSTIC PROCE-
DURE 2" .
DIAGNOSTIC RESULT ITEM CHART
SEL408X
SEL409X
SEL410X
Diagnostic item Service procedure
CRANKING VOLTAGE NORMAL Go to SC-15, "
WORK FLOW" .
CRANKING VOLTAGE LOW
CHARGE BATTERY Perform the slow battery charging procedure. (Initial rate of charge is 10A for 12 hours.) Per-
form battery test again with Battery/Starting/Charging system tester. Refer to SC-8, "
Trouble
Diagnosis with Battery/Starting/Charging System Tester (Battery)" .
REPLACE BATTERY Before replacing battery, clean the battery cable clamps and battery posts. Perform battery
test again with Battery/Starting/Charging system tester. Refer to SC-8, "
Trouble Diagnosis
with Battery/Starting/Charging System Tester (Battery)" . If second test result is “REPLACE
BATTERY”, then do so. Perform battery test again to confirm repair.
Page 4013 of 4366
STARTING SYSTEM SC-15
C
D E
F
G H
I
J
L
M A
B
SC
Revision: 2006 July 2007 FX35/FX45
WORK FLOW
*1SC-8, "Trouble Diagnosis with Bat-
tery/Starting/Charging System Tester
(Battery)"
*2SC-17, "MINIMUM SPECIFICATION
OF CRANKING VOLTAGE REFER-
ENCING COOLANT TEMPERA-
TURE"
*3 SC-16, "Check “B” Terminal Circuit"
*4SC-17, "Check “S” Connector Cir-
cuit"
SKIB1369E
Page 4014 of 4366

SC-16
STARTING SYSTEM
Revision: 2006 July 2007 FX35/FX45
DIAGNOSTIC PROCEDURE 1
Check “B” Terminal Circuit
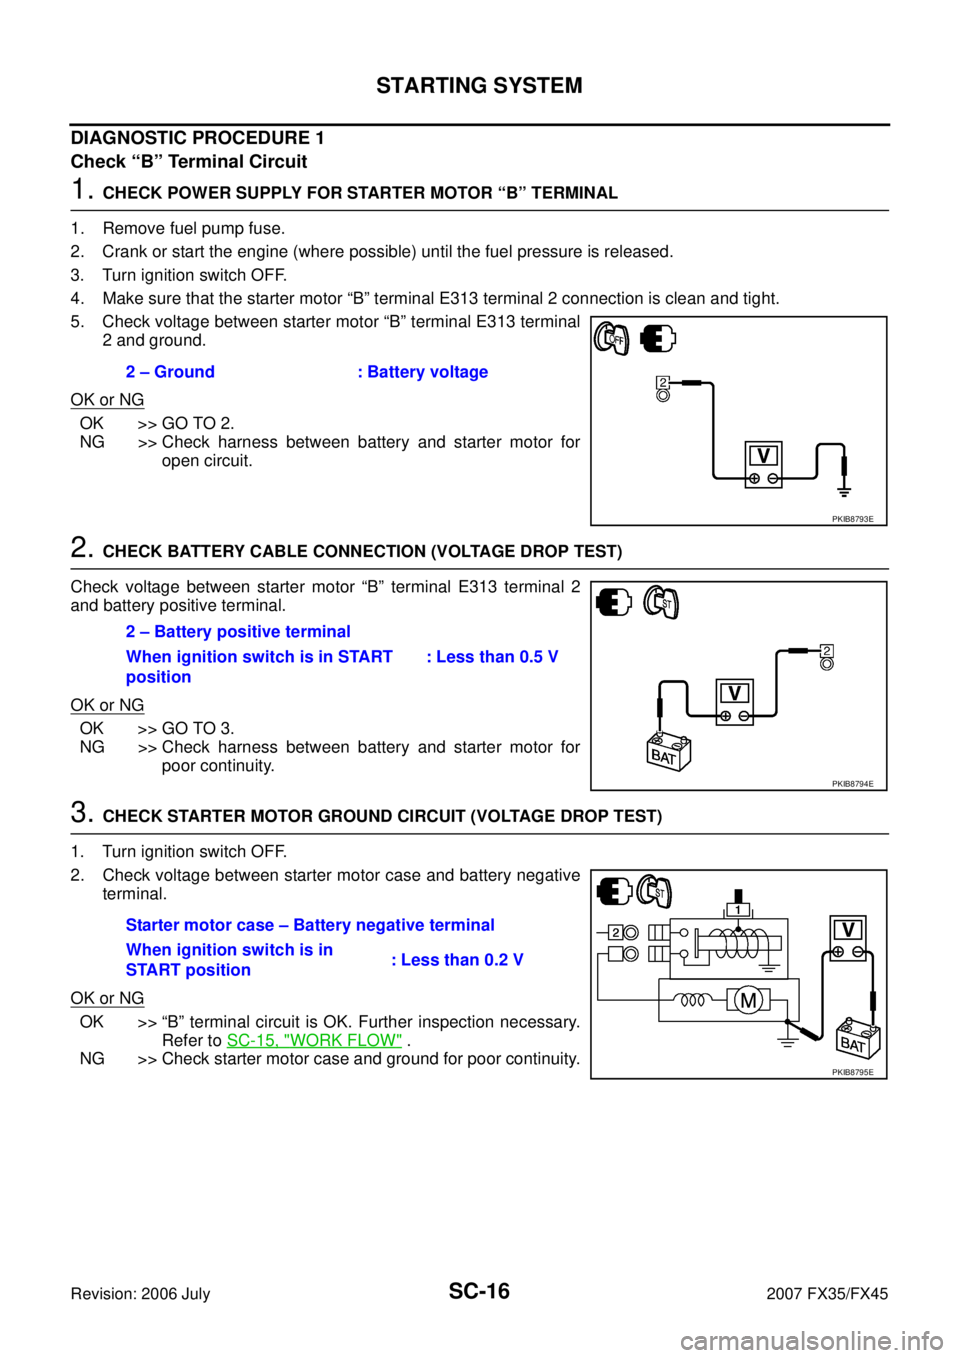
1. CHECK POWER SUPPLY FOR STARTER MOTOR “B” TERMINAL
1. Remove fuel pump fuse.
2. Crank or start the engine (where possible) until the fuel pressure is released.
3. Turn ignition switch OFF.
4. Make sure that the starter motor “B” terminal E313 terminal 2 connection is clean and tight.
5. Check voltage between starter motor “B” terminal E313 terminal 2 and ground.
OK or NG
OK >> GO TO 2.
NG >> Check harness between battery and starter motor for open circuit.
2. CHECK BATTERY CABLE CONNECTION (VOLTAGE DROP TEST)
Check voltage between starter motor “B” terminal E313 terminal 2
and battery positive terminal.
OK or NG
OK >> GO TO 3.
NG >> Check harness between battery and starter motor for poor continuity.
3. CHECK STARTER MOTOR GROUND CIRCUIT (VOLTAGE DROP TEST)
1. Turn ignition switch OFF.
2. Check voltage between starter motor case and battery negative terminal.
OK or NG
OK >> “B” terminal circuit is OK. Further inspection necessary. Refer to SC-15, "
WORK FLOW" .
NG >> Check starter motor case and ground for poor continuity. 2 – Ground : Battery voltage
PKIB8793E
2 – Battery positive terminal
When ignition switch is in START
position : Less than 0.5 V
PKIB8794E
Starter motor case – Battery negative terminal
When ignition switch is in
START position : Less than 0.2 V
PKIB8795E
Page 4015 of 4366

STARTING SYSTEM SC-17
C
D E
F
G H
I
J
L
M A
B
SC
Revision: 2006 July 2007 FX35/FX45
DIAGNOSTIC PROCEDURE 2
Check “S” Connector Circuit
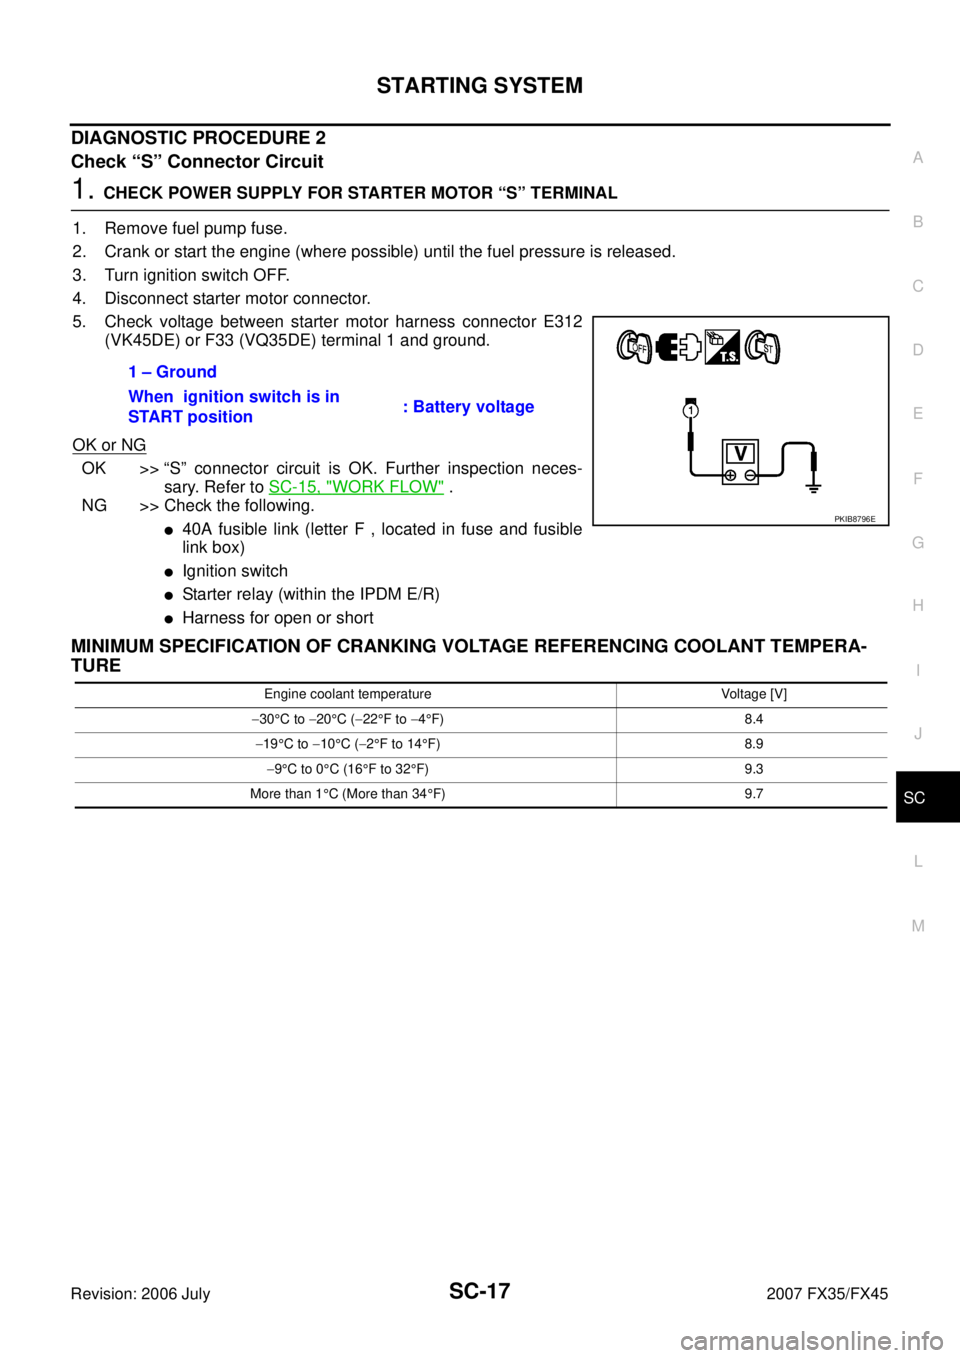
1. CHECK POWER SUPPLY FOR STARTER MOTOR “S” TERMINAL
1. Remove fuel pump fuse.
2. Crank or start the engine (where possible) until the fuel pressure is released.
3. Turn ignition switch OFF.
4. Disconnect starter motor connector.
5. Check voltage between starter motor harness connector E312 (VK45DE) or F33 (VQ35DE) terminal 1 and ground.
OK or NG
OK >> “S” connector circuit is OK. Further inspection neces- sary. Refer to SC-15, "
WORK FLOW" .
NG >> Check the following.
�40A fusible link (letter F , located in fuse and fusible
link box)
�Ignition switch
�Starter relay (within the IPDM E/R)
�Harness for open or short
MINIMUM SPECIFICATION OF CRANKING VOLTAGE REFERENCING COOLANT TEMPERA-
TURE
1 – Ground
When ignition switch is in
START position : Battery voltage
PKIB8796E
Engine coolant temperature Voltage [V]
− 30 °C to −20 °C ( −22 °F to −4°F) 8.4
− 19 °C to −10 °C ( −2°F to 14 °F) 8.9
− 9°C to 0 °C (16 °F to 32 °F) 9.3
More than 1 °C (More than 34 °F) 9.7
Page 4016 of 4366
SC-18
STARTING SYSTEM
Revision: 2006 July 2007 FX35/FX45
Removal and Installation (VK45DE Engine Models)NKS002UT
REMOVAL
1. Disconnect the battery cable from the negative terminal.
2. Remove engine front and rear undercover, using power tools.
3. Disconnect “S” connector.
4. Remove “B” terminal nut.
5. Remove starter motor mounting bolts.
6. Loosen A/T fluid cooler tube clip bolts. Refer to AT- 2 6 6 ,
"TRANSMISSION ASSEMBLY" .
7. Remove starter motor downward from the vehicle.
INSTALLATION
Installation is the reverse order of removal.
CAUTION:
Be sure to tighten “B” terminal nut carefully.
1. Starter motor 2. Starter motor mounting bolt 3. B terminal harness
4. B terminal nut 5. S connector 6. Cylinder block : N·m (kg-m, ft-lb) : Engine front
SKIB7206E
PKIA2810E
Page 4017 of 4366
STARTING SYSTEM SC-19
C
D E
F
G H
I
J
L
M A
B
SC
Revision: 2006 July 2007 FX35/FX45
Removal and Installation [VQ35DE Engine Models (2WD)]NKS004OR
REMOVAL
1. Disconnect the battery cable from the negative terminal.
2. Remove engine rear undercover, using power tools.
3. Disconnect “S” connector.
4. Remove “B” terminal nut.
5. Remove starter motor mounting bolts and harness clip bracket, using power tools.
6. Remove starter motor downward from the vehicle.
INSTALLATION
Installation is the reverse order of removal.
CAUTION:
Be sure to tighten “B” terminal nut carefully.
1. Starter motor mounting bolt 2. Harness clip bracket 3. S connector
4. B terminal nut 5. B terminal harness 6. Starter motor
7. Oil pan : N·m (kg-m, ft-lb) : N·m (kg-m, in-lb) : Engine front
PKIB8799E
PKIA2812E
Page 4018 of 4366
SC-20
STARTING SYSTEM
Revision: 2006 July 2007 FX35/FX45
Removal and Installation [VQ35DE Engine Models (AWD)]NKS004OS
REMOVAL
1. Disconnect the battery cable from the negative terminal.
2. Remove engine front and rear undercover, using power tools.
3. Disconnect “S” connector.
4. Remove “B” terminal nut.
5. Remove starter motor mounting bolts.
6. Remove starter motor downward from the vehicle.
INSTALLATION
Installation is the reverse order of removal.
CAUTION:
Be sure to tighten “B” terminal nut carefully.
1. Starter motor mounting bolt 2. Oil pan 3. Starter motor
4. B terminal harness 5. B terminal nut 6. S connector : N·m (kg-m, ft-lb) : Engine front
SKIB7207E
PKIA2844E
Page 4022 of 4366

SC-24
CHARGING SYSTEM
Revision: 2006 July 2007 FX35/FX45
CHARGING SYSTEMPFP:23100
System DescriptionNKS002UV
The alternator provides DC voltage to operate the vehicle's electrical system and to keep the battery charged.
The voltage output is controlled by the IC regulator.
Power is supplied at all times
�through 10A fuse (No. 33, located in the fuse and fusible link block)
�to alternator terminal 4 (“S” terminal).
“B” Terminal supplies power to charge the battery and operate the vehicle's electrical system. Output voltage
is controlled by the IC regulator at terminal 4 (“S” terminal) detecting the input voltage.
The charging circuit is protected by the 120A fusible link (VK45DE and VQ35DE AWD).
The alternator is grounded to the engine block.
With the ignition switch in the ON or START position, power is supplied
�through 10A fuse [No. 14, located in the fuse block (J/B)]
�to combination meter terminal 7 for the charge warning lamp.
Ground is supplied
�to combination meter terminal 2
�through alternator terminal 3 (“L” terminal)
�to alternator terminal 2 (“E” terminal) (VK45DE) or through case ground (VQ35DE)
�through ground E304 (VK45DE).
With power and ground supplied, the charge warning lamp will illuminate. When the alternator is providing suf-
ficient voltage with the engine running, the ground is opened and the charge warning lamp will go off.
If the charge warning lamp illuminates with the engine running, a malfunction is indicated.
MALFUNCTION INDICATOR
The IC regulator warning function activates to illuminate charge warning lamp, if any of the following symp-
toms occur while alternator is operating:
�Excessive voltage is produced.
�No voltage is produced.