Page 3939 of 4366

DIFFERENTIAL GEAR OIL RFD-9
C E F
G H
I
J
K L
M A
B
RFD
Revision: 2006 July 2007 FX35/FX45
DIFFERENTIAL GEAR OILPFP:KLD30
Changing Differential Gear OilNDS000CT
DRAINING
1. Stop engine.
2. Remove drain plug (1) and drain gear oil.
3. Set a gasket on drain plug (1) and install it to final drive assem- bly and tighten to the specified torque. Refer to RFD-18, "
COM-
PONENTS" .
CAUTION:
Do not reuse gasket.
FILLING
1. Remove filler plug (1). Fill with new gear oil until oil level reaches
the specified level near filler plug mounting hole.
2. After refilling oil, check oil level. Set a gasket to filler plug (1), then install it to final drive assembly. Refer to RFD-18, "
COMPO-
NENTS" .
CAUTION:
Do not reuse gasket.
Checking Differential Gear OilNDS000CU
OIL LEAKAGE AND OIL LEVEL
�Make sure that oil is not leaking from final drive assembly or around it.
�Remove filler plug (1) and check oil level from filler plug mount-
ing hole as shown in the figure.
CAUTION:
Do not start engine while checking oil level.
�Set a gasket on filler plug (1) and install it on final drive assem-
bly. Refer to RFD-18, "
COMPONENTS" .
CAUTION:
Do not reuse gasket.
PDIA0748J
Oil grade and Viscosity:
Refer to MA-12, "
Fluids and Lubricants" .
Oil capacity:
Approx. 1.4 (3 US pt, 2-1/2 Imp pt)
PDIA0749J
PDIA0749J
Page 3948 of 4366

RFD-18
REAR FINAL DRIVE ASSEMBLY
Revision: 2006 July 2007 FX35/FX45
Disassembly and AssemblyNDS000CX
COMPONENTS
1. Drive pinion lock nut 2. Companion flange 3. Front oil seal
4. Pinion front bearing 5. Gear carrier 6. Side oil seal
7. Side flange 8. Collapsible spacer 9. Pinion rear bearing
10. Pinion height adjusting washer 11. Drive pinion 12. Side bearing adjusting washer
13. Side bearing 14. Side gear thrust washer 15. Circular clip
16. Side gear 17. Lock pin 18. Pinion mate gear
19. Pinion mate thrust washer 20. Pinion mate shaft 21. Drive gear
22. Differential case 23. Bearing cap 24. Filler plug
25. Gasket 26. Rear cover 27. Drain plug
A: Oil seal lip
B: Screw hole
C: After tightening the bolts to the specified torque, tighten the bolts additionally by turning the bolts 31 to 36 degrees.
Refer to GI-11, "
Components" and the followings for the symbols in the figure.
: Apply multi-purpose grease.
: Apply gear oil.
: Apply anti-corrosion oil.
: Apply Genuine Silicone RTV or equivalent. Refer to
GI-48, "
Recommended Chemical Products and Sealants" .
: Apply Genuine High Strength Thread Locking Sealant or equivalent. Refer to
GI-48, "
Recommended Chemical Prod-
ucts and Sealants" .
PDIA0986E
Page 4208 of 4366

TF-4
PRECAUTIONS
Revision: 2006 July 2007 FX35/FX45
Service Notice or PrecautionsNDS0009O
�Do not reuse transfer fluid, once it has been drained.
�Check the fluid level or replace the fluid only with the vehicle parked on level ground.
�During removal or installation, keep inside of transfer clear of dust or dirt.
�Replace all tires at the same time. Always use tires of the proper size and the same brand and pattern.
Fitting improper size and unusual wear tires applies excessive force to vehicle mechanism and can cause
longitudinal vibration.
�Disassembly should be done in a clean work area, it is preferable to work in dustproof area.
�Before proceeding with disassembly, thoroughly clean the transfer. It is important to prevent the internal
parts from becoming contaminated by dirt or other foreign matter.
�All parts should be carefully cleaned with a general purpose, non-flammable solvent before inspection or
reassembly.
�Check for the correct installation status prior to removal or disassembly. If matching marks are required,
be certain they do not interfere with the function of the parts when applied.
�Check appearance of the disassembled parts for damage, deformation, and unusual wear. Replace them
with a new ones if necessary.
�Gaskets, seals and O-rings should be replaced any time when the transfer is disassembled.
�In principle, tighten bolts or nuts gradually in several steps working diagonally from inside to outside. If
tightening sequence is specified, use it.
�Observe the specified torque when assembling.
�Clean and flush the parts sufficiently and blow-dry them.
�Be careful not to damage sliding surfaces and mating surfaces.
�Clean innerparts with lint-free cloth or towels. Do not use cotton work gloves and rags to prevent adhering
fibers.
Page 4212 of 4366
TF-8
NOISE, VIBRATION AND HARSHNESS (NVH) TROUBLESHOOTING
Revision: 2006 July 2007 FX35/FX45
NOISE, VIBRATION AND HARSHNESS (NVH) TROUBLESHOOTINGPFP:00003
NVH Troubleshooting ChartNDS0009R
Use the chart below to help you find the cause of the symptom. The numbers indicate the order of the inspec-
tion. If necessary, repair or replace these parts.
Reference pageTF-9TF-45TF-45TF-51TF-51TF-51
SUSPECTED PARTS
(Possible cause)
TRANSFER FLUID (Level low)
TRANSFER FLUID (Wrong)
TRANSFER FLUID (Level too high)
LIQUID GASKET (Damaged)
OIL SEAL (Worn or damaged)
GEAR (Worn or damaged)
BEARING (Worn or damaged)
TRANSFER CASE (Damaged)
Symptom Noise 1 2 3 3 3
Transfer fluid leakage 4 1 2 2 3
Page 4213 of 4366

TRANSFER FLUID TF-9
C E F
G H
I
J
K L
M A
B
TF
Revision: 2006 July 2007 FX35/FX45
TRANSFER FLUIDPFP:31001
ReplacementNDS0009S
DRAINING
1. Run the vehicle to warm up the transfer unit sufficiently.
2. Stop the engine, and remove the drain plug to drain the transfer fluid.
3. Apply sealant to drain plug. Install drain plug on transfer and tighten to the specified torque. Refer to TF-45, "
COMPO-
NENTS" .
�Use Genuine Silicone RTV or equivalent. Refer to GI-48,
"Recommended Chemical Products and Sealants" .
FILLING
1. Remove filler plug and add transfer fluid until fluid level reaches
the specified limit near filler plug mounting hole.
CAUTION:
Carefully fill the fluid. (Fill up for approx. 3 minutes.)
2. Leave the vehicle for 3 minutes, and check the fluid level again.
3. Set a new gasket onto filler plug and install it on transfer and tighten to the specified torque. Refer to TF-45, "
COMPO-
NENTS" .
CAUTION:
Do not reuse gasket.
InspectionNDS0009T
FLUID LEAKAGE AND FLUID LEVEL
1. Check fluid level from filler plug mounting hole as shown in the figure.
2. Before installing filler plug, set a new gasket. Install filler plug on transfer and tighten to the specified torque. Refer to TF-45,
"COMPONENTS" .
CAUTION:
Do not reuse gasket.
SDIA2087E
Fluid capacity
: Approx. 1.25 (2-5/8 US pt, 2-1/4 lmp pt)
SDIA2028E
SDIA2028E
Page 4249 of 4366
TRANSFER ASSEMBLY TF-45
C E F
G H
I
J
K L
M A
B
TF
Revision: 2006 July 2007 FX35/FX45
Disassembly and AssemblyNDS000AO
COMPONENTS
1. Drive chain 2. Front drive shaft rear bearing 3. Front drive shaft
4. Front drive shaft front bearing 5. Sprocket 6. Mainshaft
7. Needle bearing 8. Snap ring 9. Mainshaft bearing
10. Front case 11. Front oil seal 12. Mainshaft oil seal
13. Oil cover 14. Temperature sensor 15. Electric controlled coupling
16. Spacer 17. Snap ring 18. O-ring
19. Oil gutter 20. Drain plug 21. Baffle plate
22. Rear bearing 23. Snap ring 24. Spacer
25. Rear oil seal 26. Companion flange 27. Self-lock nut
28. Breather tube 29. Rear case 30. Harness bracket
31. Retainer 32. Filler plug 33. Gasket
PDIA0244E
Page 4260 of 4366
TF-56
TRANSFER ASSEMBLY
Revision: 2006 July 2007 FX35/FX45
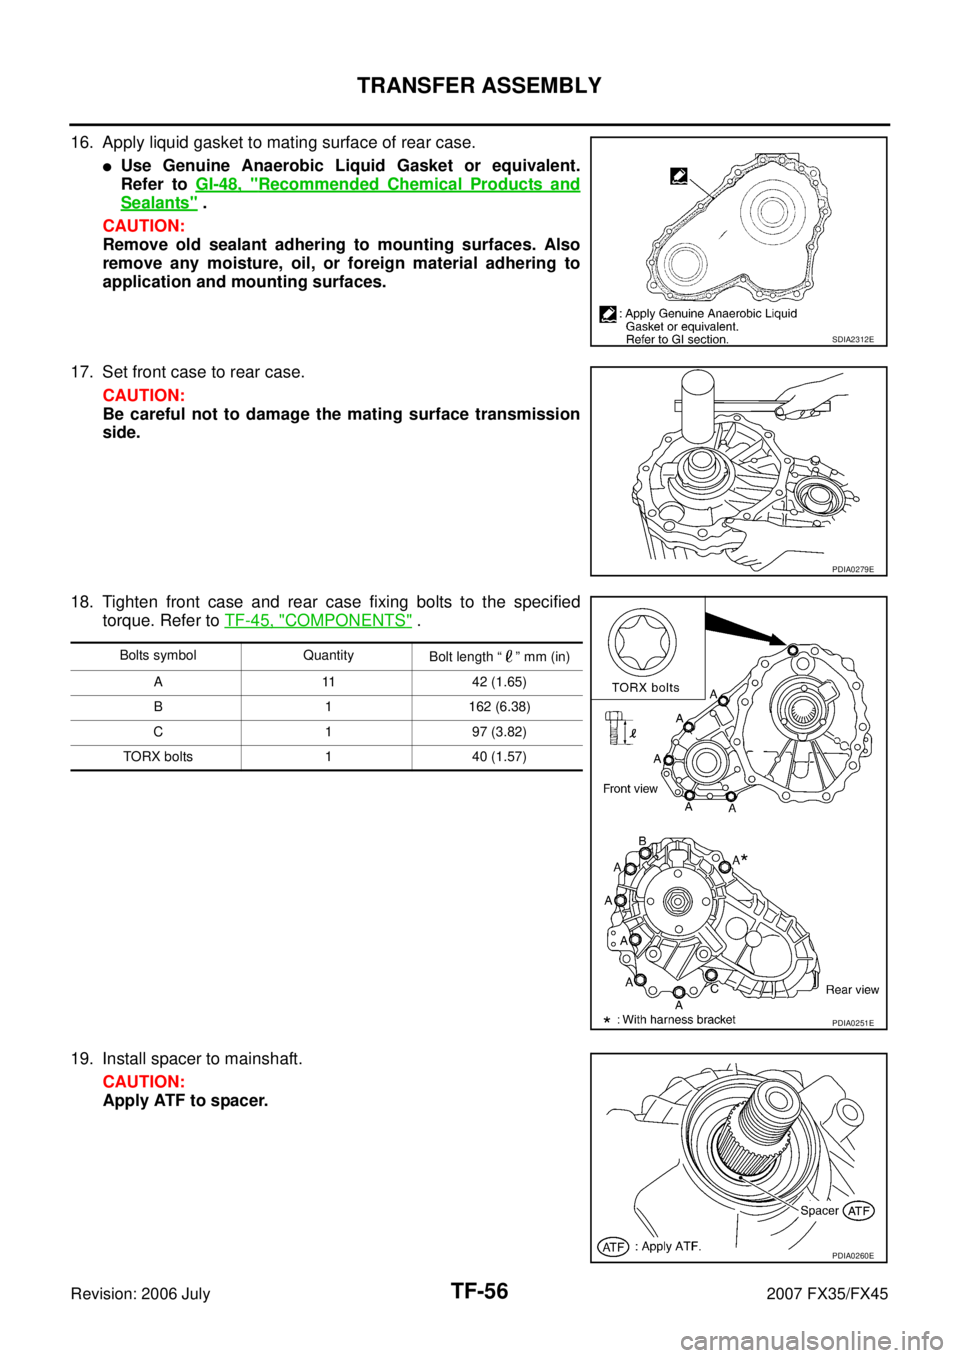
16. Apply liquid gasket to mating surface of rear case.
�Use Genuine Anaerobic Liquid Gasket or equivalent.
Refer to GI-48, "
Recommended Chemical Products and
Sealants" .
CAUTION:
Remove old sealant adhering to mounting surfaces. Also
remove any moisture, oil, or foreign material adhering to
application and mounting surfaces.
17. Set front case to rear case. CAUTION:
Be careful not to damage the mating surface transmission
side.
18. Tighten front case and rear case fixing bolts to the specified torque. Refer to TF-45, "
COMPONENTS" .
19. Install spacer to mainshaft. CAUTION:
Apply ATF to spacer.
SDIA2312E
PDIA0279E
Bolts symbol Quantity Bolt length “ ” mm (in)
A 11 42 (1.65)
B 1 162 (6.38)
C 1 97 (3.82)
TORX bolts 1 40 (1.57)
PDIA0251E
PDIA0260E
Page 4262 of 4366
TF-58
TRANSFER ASSEMBLY
Revision: 2006 July 2007 FX35/FX45
�Use Genuine Silicone RTV or equivalent. Refer to GI-48, "Recommended Chemical Products and
Sealants" .
CAUTION:
Remove old sealant and oil adhering to threads.
26. Set gasket to filler plug. Install it to rear case and tighten to the specified torque. Refer to TF-45, "
COM-
PONENTS" .
CAUTION:
Do not reuse gasket.
 TROUBLESHOOTING
Revision: 2006 July 2007 FX35/FX45
NOISE, VIBRATION AND HARSHNESS (NVH) TROUBLESHOOTINGPFP:00003
NVH Troubleshooting ChartNDS0009R
Use the cha")