Page 369 of 4366
OVERHAUL AT-285
D E
F
G H
I
J
K L
M A
B
AT
Revision: 2006 July 2007 FX35/FX45
7. Pawl shaft 8. Self-sealing bolt 9. Seal ring
10. Needle bearing 11. Gasket 12. Revolution sensor
13. Parking gear 14. Output shaft 15. Bearing race
16. Needle bearing 17. Manual plate 18. Parking rod
19. Manual shaft oil seal 20. Manual shaft 21. O-ring
22. Band servo anchor end pin 23. Detent spring 24. Spacer
25. Seal ring 26. Snap ring 27. Return spring
28. O-ring 29. Servo assembly 30. Snap ring
31. Sub-harness 32. Control valve with TCM 33. Bracket
34. A/T fluid temperature sensor 2 35. Clip 36. Oil pan mounting bolt
37. Oil pan 38. Magnet 39. Drain plug
40. Drain plug gasket 41. Oil pan gasket 42. Terminal cord assembly
43. O-ring 44. Retaining pin 45. Transmission case
Refer to GI section to make sure icons (symbol marks) in the figure. Refer to GI-11, "
Components" .
Page 371 of 4366
OVERHAUL AT-287
D E
F
G H
I
J
K L
M A
B
AT
Revision: 2006 July 2007 FX35/FX45
7. Return spring 8. Pawl shaft 9. Seal ring
10. Needle bearing 11. Gasket 12. Revolution sensor
13. Parking gear 14. Output shaft 15. Bearing race
16. Needle bearing 17. Manual plate 18. Parking rod
19. Manual shaft oil seal 20. Manual shaft 21. O-ring
22. Band servo anchor end pin 23. Detent spring 24. Spacer
25. Seal ring 26. Snap ring 27. Return spring
28. O-ring 29. Servo assembly 30. Snap ring
31. Sub-harness 32. Control valve with TCM 33. Bracket
34. A/T fluid temperature sensor 2 35. Clip 36. Bracket
37. Bracket 38. Oil pan mounting bolt 39. Oil pan
40. Magnet 41. Drain plug 42. Drain plug gasket
43. Oil pan gasket 44. Terminal cord assembly 45. O-ring
46. Retaining pin 47. Transmission case
Refer to GI section to make sure icons (symbol marks) in the figure. Refer to GI-11, "
Components" .
Page 378 of 4366

AT-294
DISASSEMBLY
Revision: 2006 July 2007 FX35/FX45
DISASSEMBLYPFP:31020
DisassemblyNCS001IP
CAUTION:
Do not disassemble parts behind drum support. Refer to AT- 1 8 , "
Cross-sectional View (2WD Models)"
, AT- 1 9 , "Cross-sectional View (VQ35DE Models for AWD)" or AT- 2 0 , "Cross-sectional View (VK45DE
Models for AWD)" .
1. Drain ATF through drain plug.
2. Remove torque converter by holding it firmly and turing while pulling straight out.
3. Check torque converter one-way clutch using check tool as shown in the figure.
a. Insert check tool into the groove of bearing support built into one-way clutch outer race.
b. When fixing bearing support with check tool, rotate one-way clutch spline using screwdriver.
c. Make sure that inner race rotates clockwise only. If not, replace torque converter assembly.
4. Remove tightening bolts (1) for converter housing and transmis- sion case.
� : Bolt (8)
�Self-sealing bolts (2)
5. Remove converter housing from transmission case. CAUTION:
Be careful not to scratch converter housing.
SCIA5010E
SCIA3171E
SCIA7985E
Page 384 of 4366

AT-300
DISASSEMBLY
Revision: 2006 July 2007 FX35/FX45
29. Remove bracket (1) (VK45DE), clips (2), oil pan (3) and oil pan
gasket.
�: Vehicle front
�: Bolt (22)
�Drain plug (4)
30. Check foreign materials in oil pan to help determine causes of malfunction. If the ATF is very dark, smells burned, or contains
foreign particles, the frictional material (clutches, band) may
need replacement. A tacky film that will not wipe clean indicates
varnish build up. Varnish can cause valves, servo, and clutches
to stick and can inhibit pump pressure.
�If frictional material is detected, perform A/T fluid cooler
cleaning. Refer to AT- 1 5 , "
A/T Fluid Cooler Cleaning" .
31. Remove magnets from oil pan.
32. Disconnect A/T fluid temperature sensor 2 connector (1). CAUTION:
Be careful not to damage connector.
33. Straighten terminal clips ( ) to free terminal cord assembly and A/T fluid temperature sensor 2 harness.
34. Disconnect revolution sensor connector. CAUTION:
Be careful not to damage connector.
SCIA8128E
SCIA5199E
SCIA5200E
SCIA8069E
SCIA7524E
Page 441 of 4366

ASSEMBLY AT-357
D E
F
G H
I
J
K L
M A
B
AT
Revision: 2006 July 2007 FX35/FX45
16. Install magnets in oil pan.
17. Install oil pan to transmission case.
a. Install oil pan gasket to transmission case. CAUTION:
�Do not reuse oil pan gasket.
�Install it in the direction to align hole positions.
�Complete remove all moisture, oil and old gasket, etc. from oil pan gasket mounting surface.
b. Install oil pan (3) (with oil pan gasket), clips (2) and brackets (1) (VK45DE) to transmission case.
�: Vehicle front
�: Bolt (22)
CAUTION:
�Install it so that drain plug (4) comes to the position as
shown in the figure.
�Be careful not to pinch harnesses.
�Completely remove all moisture, oil and old gasket, etc.
from oil pan gasket mounting surface.
c. Tighten oil pan mounting bolts to the specified torque in numeri- cal order shown in the figure after temporarily tightening them.
Refer to AT- 2 7 4 , "
Components" .
CAUTION:
Do not reuse oil pan mounting bolts.
18. Install drain plug to oil pan, and then tighten drain plug mounting bolts to the specified torque. Refer to AT- 2 7 4 , "
Components" .
CAUTION:
Do not reuse drain plug gasket.
19. Install torque converter.
a. Pour ATF into torque converter.
�Approximately 2 liter (2-1/8 US qt, 1-3/4 Imp qt) of ATF is
required for a new torque converter.
�When reusing old torque converter, add the same amount
of ATF as was drained.
SCIA5200E
SCIA8128E
SCIA4113E
SAT428DA
Page 571 of 4366

HEATER & COOLING UNIT ASSEMBLY ATC-125
C
D E
F
G H
I
K L
M A
B
AT C
Revision: 2006 July 2007 FX35/FX45
HEATER & COOLING UNIT ASSEMBLYPFP:27110
Removal and InstallationNJS000EU
REMOVAL
1. Use a refrigerant collecting equipment (for HFC-134a) to discharge the refrigerant.
2. Drain coolant from cooling system. Refer to CO-11, "
Changing Engine Coolant" (VQ35DE) or CO-38,
"Changing Engine Coolant" (VK45DE).
3. Remove cowl top cover. Refer to EI-23, "
COWL TOP" .
4. Remove high-pressure pipe 2 mounting clip.
5. Remove low-pressure flexible hose bracket mounting bolt. Refer to ATC-146, "
Removal and Installation of
Low-pressure Flexible Hose" .
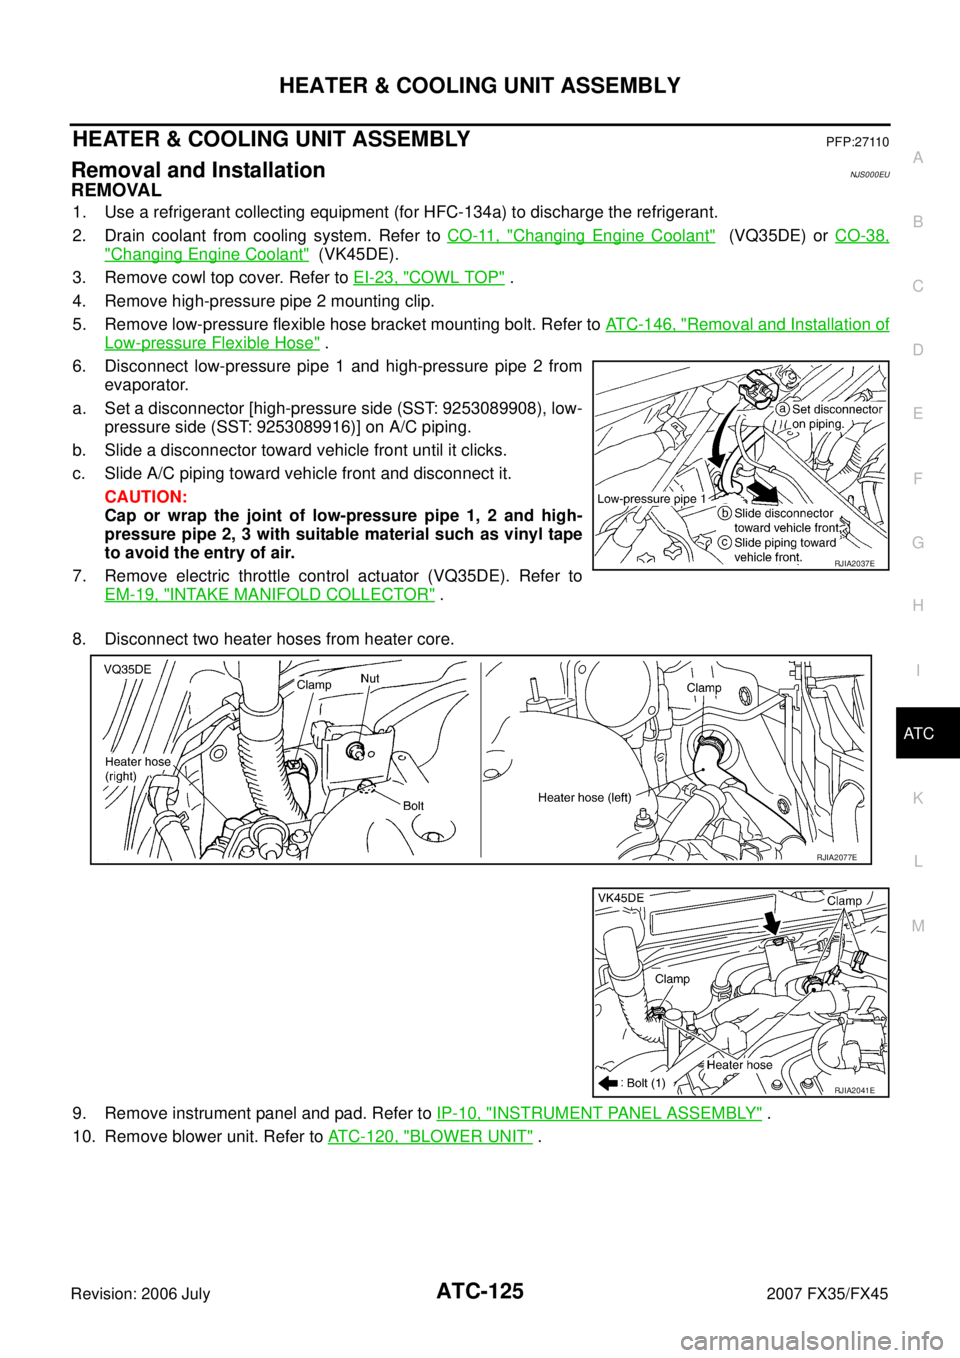
6. Disconnect low-pressure pipe 1 and high-pressure pipe 2 from evaporator.
a. Set a disconnector [high-pressure side (SST: 9253089908), low- pressure side (SST: 9253089916)] on A/C piping.
b. Slide a disconnector toward vehicle front until it clicks.
c. Slide A/C piping toward vehicle front and disconnect it.
CAUTION:
Cap or wrap the joint of low-pressure pipe 1, 2 and high-
pressure pipe 2, 3 with suitable material such as vinyl tape
to avoid the entry of air.
7. Remove electric throttle control actuator (VQ35DE). Refer to EM-19, "
INTAKE MANIFOLD COLLECTOR" .
8. Disconnect two heater hoses from heater core.
9. Remove instrument panel and pad. Refer to IP-10, "
INSTRUMENT PANEL ASSEMBLY" .
10. Remove blower unit. Refer to ATC-120, "
BLOWER UNIT" .
RJIA2037E
RJIA2077E
RJIA2041E
Page 572 of 4366
ATC-126
HEATER & COOLING UNIT ASSEMBLY
Revision: 2006 July 2007 FX35/FX45
11. Remove mounting nuts and bolts, and then remove instrument stays (left and right side).
12. Remove mounting bolts from heater & cooling unit assembly.
13. Disconnect drain hose.
14. Remove center and side ventilator ducts, defroster nozzle and side defroster ducts. Refer to ATC-134,
"Removal of Defroster Nozzle, Ducts and Ventilator Ducts" .
15. Remove steering column mounting bolts and nut.
16. Remove steering member mounting bolts, nut and harness clips.
17. Remove steering member, and then remove heater & cooling unit assembly.
INSTALLATION
Installation is basically the reverse order of removal.
CAUTION:
�Replace O-rings of low-pressure pipe 1 and high-pressure pipe 2 with new ones, and then apply
compressor oil to it when installing it.
�Female-side piping connection is thin and easy to deform. Slowly insert the male-side piping
straight in axial direction.
RJIA2042E
SJIA1223E
SJIA1656E
Page 1105 of 4366

BRAKE TUBE AND HOSE BR-11
C
D E
G H
I
J
K L
M A
B
BR
Revision: 2006 July 2007 FX35/FX45
BRAKE TUBE AND HOSEPFP:46210
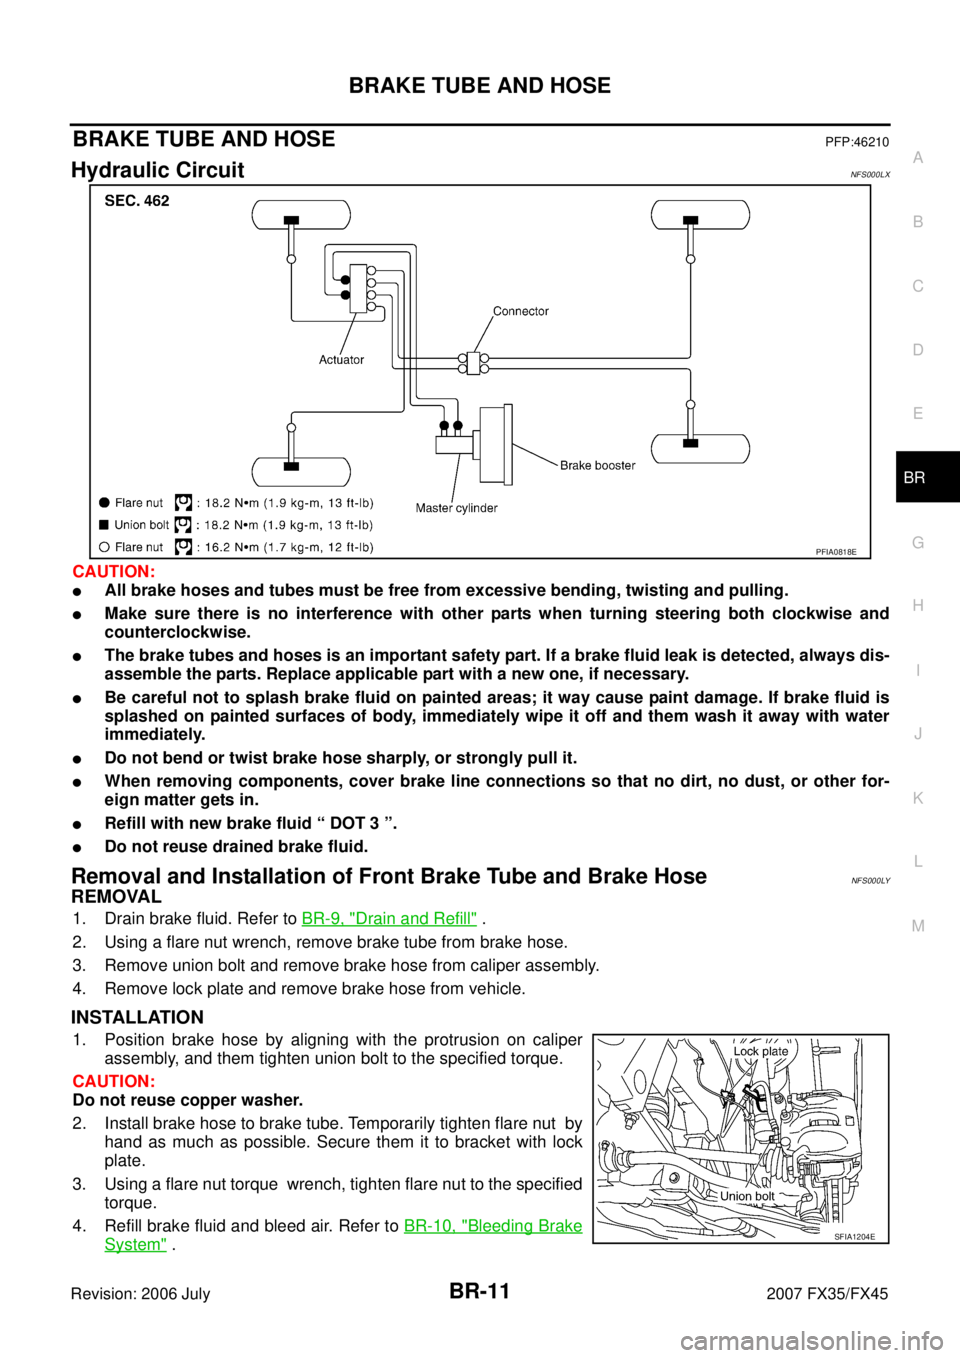
Hydraulic CircuitNFS000LX
CAUTION:
�All brake hoses and tubes must be free from excessive bending, twisting and pulling.
�Make sure there is no interference with other parts when turning steering both clockwise and
counterclockwise.
�The brake tubes and hoses is an important safety part. If a brake fluid leak is detected, always dis-
assemble the parts. Replace applicable part with a new one, if necessary.
�Be careful not to splash brake fluid on painted areas; it way cause paint damage. If brake fluid is
splashed on painted surfaces of body, immediately wipe it off and them wash it away with water
immediately.
�Do not bend or twist brake hose sharply, or strongly pull it.
�When removing components, cover brake line connections so that no dirt, no dust, or other for-
eign matter gets in.
�Refill with new brake fluid “ DOT 3 ”.
�Do not reuse drained brake fluid.
Removal and Installation of Front Brake Tube and Brake Hose NFS000LY
REMOVAL
1. Drain brake fluid. Refer to BR-9, "Drain and Refill" .
2. Using a flare nut wrench, remove brake tube from brake hose.
3. Remove union bolt and remove brake hose from caliper assembly.
4. Remove lock plate and remove brake hose from vehicle.
INSTALLATION
1. Position brake hose by aligning with the protrusion on caliper assembly, and them tighten union bolt to the specified torque.
CAUTION:
Do not reuse copper washer.
2. Install brake hose to brake tube. Temporarily tighten flare nut by hand as much as possible. Secure them it to bracket with lock
plate.
3. Using a flare nut torque wrench, tighten flare nut to the specified torque.
4. Refill brake fluid and bleed air. Refer to BR-10, "
Bleeding Brake
System" .
PFIA0818E
SFIA1204E