2007 HYUNDAI TUCSON ECU
[x] Cancel search: ECUPage 233 of 306
5
VEHICLE MAINTENANCE REQUIREMENTS8
F070D01A-AATo Manual Transaxle OilInspect the manual transaxle oil according to
the maintenance schedule.NOTE:If the oil level is low, check for possible leaks
before adding oil. Do not overfill.F070F01A-AATo Brake Hoses and LinesVisually check for proper installation, chafing,
cracks, deterioration and any leakage. Replace
any deteriorated or damaged parts immedi-
ately.
F070C01A-AATo CoolantThe coolant should be changed at the intervals
specified in the maintenance schedule.F060E01A-AATo Timing BeltInspect all parts related to the timing belt for
damage and deformation. Replace any dam-
aged parts immediately.F060J01A-AATo Spark PlugsMake sure to install new spark plugs of the
correct heat range.F060H01A-AATo Air Cleaner FilterA Genuine Hyundai air cleaner filter is recom-
mended when the filter is replaced.
F060G01A-AATo Vapor Hose and Fuel Filler CapThe vapor hose and fuel filler cap should be
inspected at those intervals specified in the
maintenance schedule. Make sure that a new
vapor hose or fuel filler cap is correctly re-
placed.F065F01O-AATo Crankcase Ventilation HoseInspect the surface of hose for evidence of heat
and/or mechanical damage. Hard and brittle
rubber, cracking, tears, cuts, abrasions, and
excessive swelling indicate deterioration. Par-
ticular attention should be paid to examine that
hose surface nearest to high heat sources,
such as the exhaust manifold.
Inspect the hose routing to assure that the hose
does not come in contact with any heat source,
sharp edges or moving component which might
cause heat damage or mechanical wear. In-
spect all hose connections, such as clamps and
couplings, to make sure they are secure, and
that no leaks are present. Hose should be
replaced immediately if there is any evidence of
deterioration or damage.
F070E06A-AATo Automatic Transaxle FluidThe fluid level should be in the “HOT” range of
the dipstick, after the engine and transaxle are
at normal operating temperature. Check the
automatic transaxle fluid level with the engine
running and the transaxle in neutral, with the
parking brake properly applied. Use HYUNDAI
GENUINE ATF SP III, DIAMOND ATF SP III, SK
ATF SP III or other brands meeting the SP III
specification approved by Hyundai Motor Co.
when adding or changing fluid. Using the wrong
ATF may result in damage to the ATM.
Page 244 of 306
6
DO-IT-YOURSELF MAINTENANCE
9
!
!
WARNING:
The cooling fan is controlled by engine
coolant temperature and may sometimes
operate even when the engine is not run-
ning. Use extreme caution when working
near the blades of the coolant fan so that
you are not injured by a rotating fan blade.
As the engine coolant temperature de-
creases, the fan will automatically shut off.
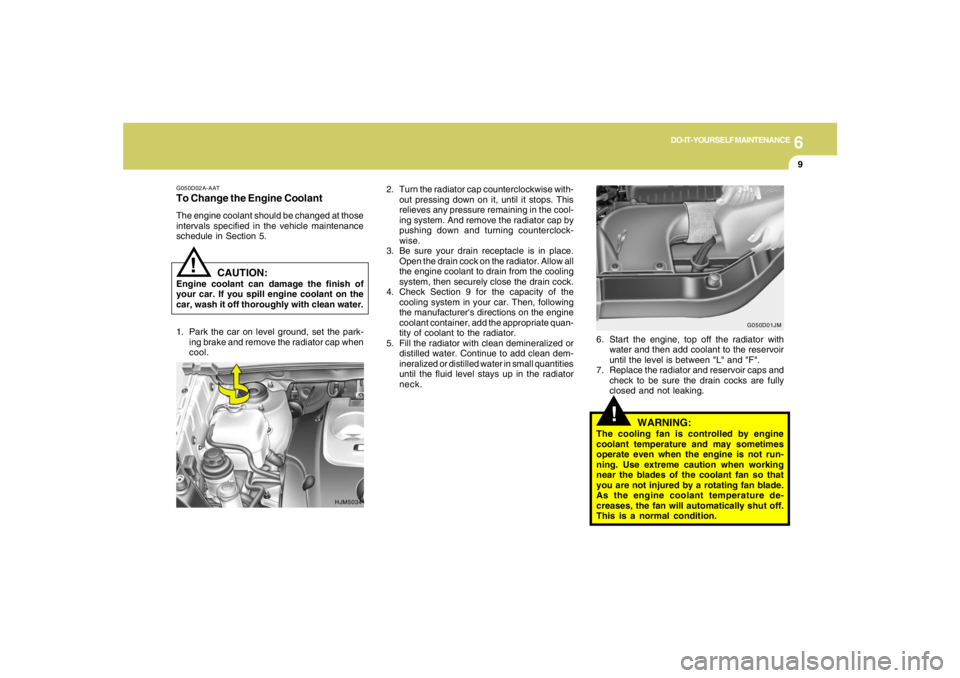
This is a normal condition. 2. Turn the radiator cap counterclockwise with-
out pressing down on it, until it stops. This
relieves any pressure remaining in the cool-
ing system. And remove the radiator cap by
pushing down and turning counterclock-
wise.
3. Be sure your drain receptacle is in place.
Open the drain cock on the radiator. Allow all
the engine coolant to drain from the cooling
system, then securely close the drain cock.
4. Check Section 9 for the capacity of the
cooling system in your car. Then, following
the manufacturer's directions on the engine
coolant container, add the appropriate quan-
tity of coolant to the radiator.
5. Fill the radiator with clean demineralized or
distilled water. Continue to add clean dem-
ineralized or distilled water in small quantities
until the fluid level stays up in the radiator
neck.6. Start the engine, top off the radiator with
water and then add coolant to the reservoir
until the level is between "L" and "F".
7. Replace the radiator and reservoir caps and
check to be sure the drain cocks are fully
closed and not leaking.
G050D02A-AATTo Change the Engine CoolantThe engine coolant should be changed at those
intervals specified in the vehicle maintenance
schedule in Section 5.
HJM5034G050D01JM
CAUTION:
Engine coolant can damage the finish of
your car. If you spill engine coolant on the
car, wash it off thoroughly with clean water.
1. Park the car on level ground, set the park-
ing brake and remove the radiator cap when
cool.
Page 247 of 306
6
DO-IT-YOURSELF MAINTENANCE
12
CHECKING THE TRANSAXLE
FLUID (AUTOMATIC)G110A01E-AATTransaxle fluid in the automatic transaxle should
be checked at those intervals specified in the
vehicle maintenance schedule in Section 5.NOTE:Automatic transaxle fluid is basically red
color. As driving distance increases, the
fluid color turns darkish red gradually. It is
a normal condition and you should not
judge the need to replace based upon the
changing color.
You must replace the automatic transaxle
fluid in accordance with intervals specified
in the vehicle maintenance schedule in
section 5.
G100B01L
!
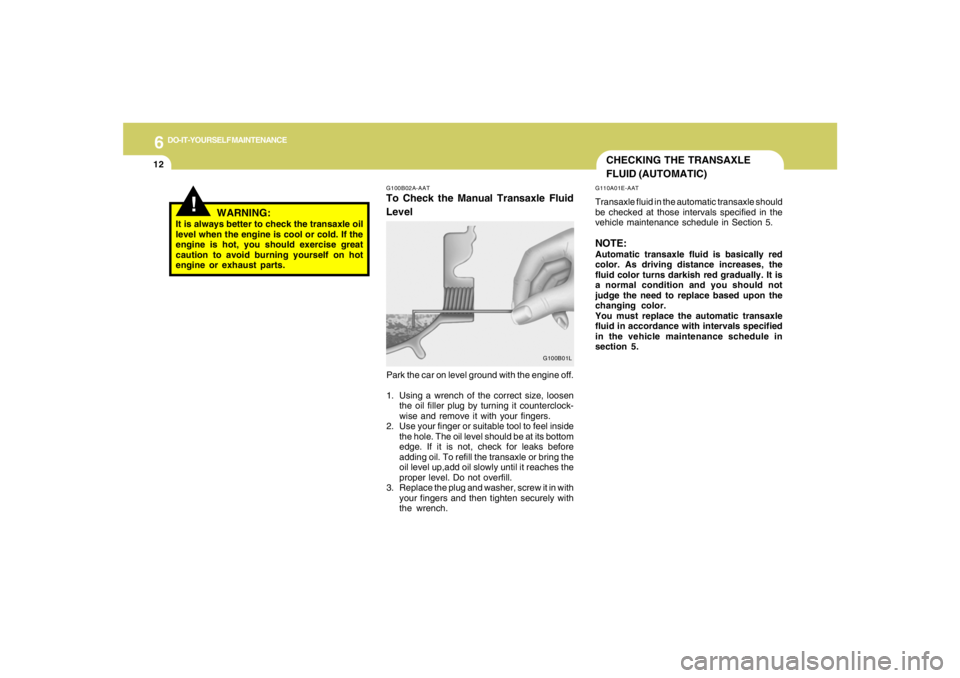
G100B02A-AATTo Check the Manual Transaxle Fluid
Level
WARNING:
It is always better to check the transaxle oil
level when the engine is cool or cold. If the
engine is hot, you should exercise great
caution to avoid burning yourself on hot
engine or exhaust parts.
Park the car on level ground with the engine off.
1. Using a wrench of the correct size, loosen
the oil filler plug by turning it counterclock-
wise and remove it with your fingers.
2. Use your finger or suitable tool to feel inside
the hole. The oil level should be at its bottom
edge. If it is not, check for leaks before
adding oil. To refill the transaxle or bring the
oil level up,add oil slowly until it reaches the
proper level. Do not overfill.
3. Replace the plug and washer, screw it in with
your fingers and then tighten securely with
the wrench.
Page 270 of 306
6
DO-IT-YOURSELF MAINTENANCE
35
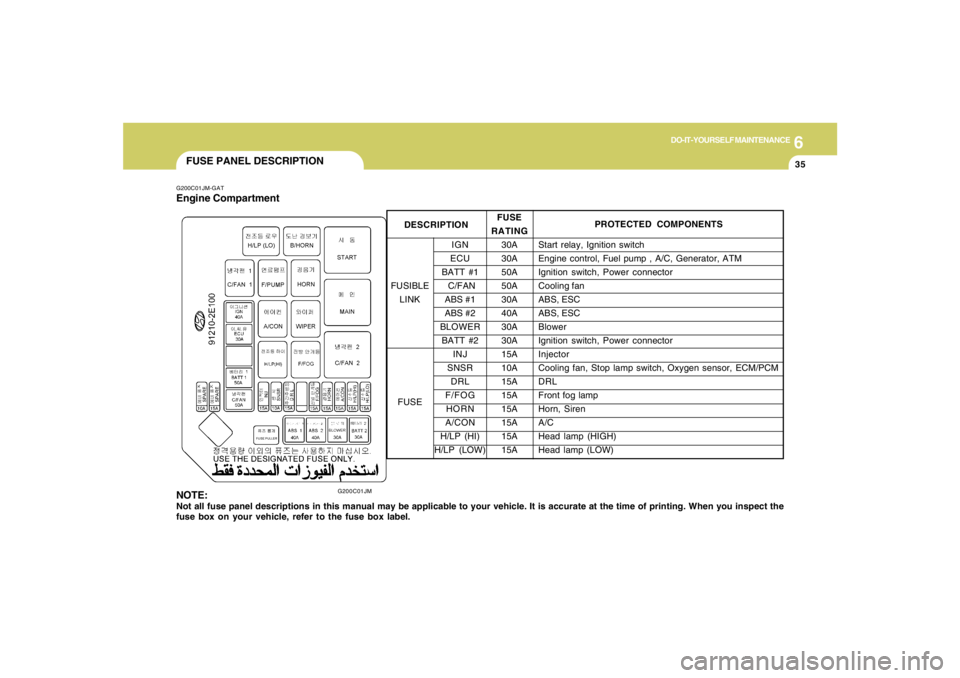
FUSE PANEL DESCRIPTIONG200C01JM-GATEngine Compartment
G200C01JM
NOTE:Not all fuse panel descriptions in this manual may be applicable to your vehicle. It is accurate at the time of printing. When you inspect the
fuse box on your vehicle, refer to the fuse box label.FUSE
RATING
30A
30A
50A
50A
30A
40A
30A
30A
15A
10A
15A
15A
15A
15A
15A
15APROTECTED COMPONENTS
Start relay, Ignition switch
Engine control, Fuel pump , A/C, Generator, ATM
Ignition switch, Power connector
Cooling fan
ABS, ESC
ABS, ESC
Blower
Ignition switch, Power connector
Injector
Cooling fan, Stop lamp switch, Oxygen sensor, ECM/PCM
DRL
Front fog lamp
Horn, Siren
A/C
Head lamp (HIGH)
Head lamp (LOW)
IGN
ECU
BATT #1
C/FAN
ABS #1
ABS #2
BLOWER
BATT #2
INJ
SNSR
DRL
F/FOG
HORN
A/CON
H/LP (HI)
H/LP (LOW) FUSIBLE
LINK
FUSE
DESCRIPTION
Page 273 of 306
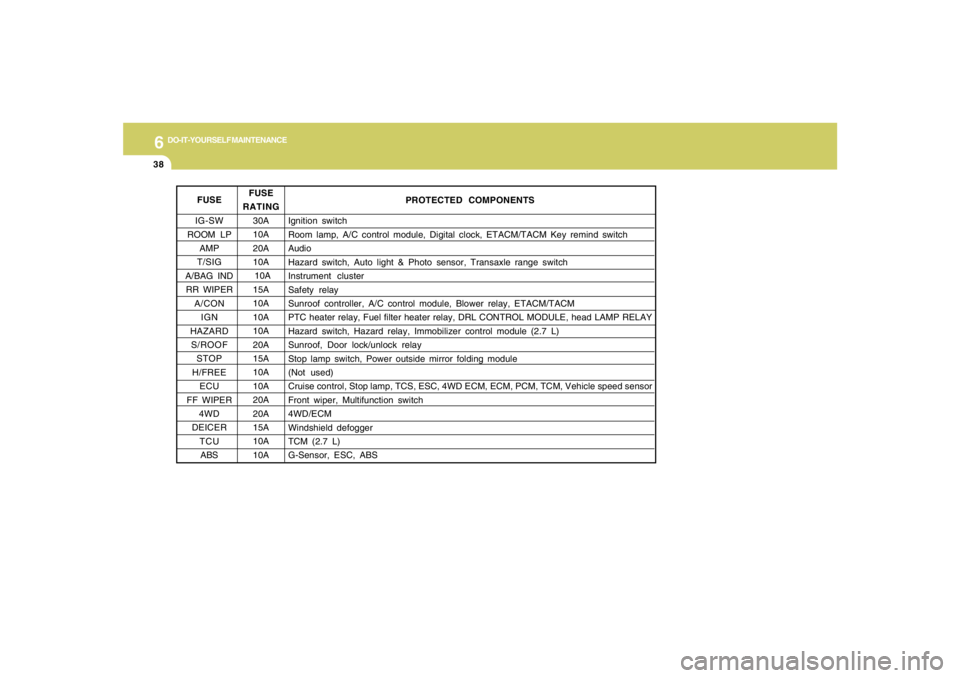
6
DO-IT-YOURSELF MAINTENANCE
38
FUSE
IG-SW
ROOM LP
AMP
T/SIG
A/BAG IND
RR WIPER
A/CON
IGN
HAZARD
S/ROOF
STOP
H/FREE
ECU
FF WIPER
4WD
DEICER
TCU
ABS
PROTECTED COMPONENTS
Ignition switch
Room lamp, A/C control module, Digital clock, ETACM/TACM Key remind switch
Audio
Hazard switch, Auto light & Photo sensor, Transaxle range switch
Instrument cluster
Safety relay
Sunroof controller, A/C control module, Blower relay, ETACM/TACM
PTC heater relay, Fuel filter heater relay, DRL CONTROL MODULE, head LAMP RELAY
Hazard switch, Hazard relay, Immobilizer control module (2.7 L)
Sunroof, Door lock/unlock relay
Stop lamp switch, Power outside mirror folding module
(Not used)
Cruise control, Stop lamp, TCS, ESC, 4WD ECM, ECM, PCM, TCM, Vehicle speed sensor
Front wiper, Multifunction switch
4WD/ECM
Windshield defogger
TCM (2.7 L)
G-Sensor, ESC, ABS FUSE
RATING
30A
10A
20A
10A
10A
15A
10A
10A
10A
20A
15A
10A
10A
20A
20A
15A
10A
10A
Page 300 of 306

10
INDEX
2
A
Air bag ...............................................................................................1-33
Air Cleaner Filter ...............................................................................6-10
Air Conditioning
Care..............................................................................................6-16
Operation............................................................................ 1-95, 6-16
Switch...........................................................................................1-95
Antenna..........................................................................................1-154
Ashtray..............................................................................................1-65
Audio System
Cassette Tape player operation (J290)...................................1-139
Cassete tape player operation (M280) .........................1-116, 1-130
Compact disc player operation (K260)....................................1-110
Compact disc player operation (M280) .........................1-119, 1-133
CD changer operation (M280) ..................................................1-123
Compact disc player / CD Auto changer operation (J290) .....1-141
Compact disc player / CD Auto changer operation (J295) .....1-149
Stereo radio operation (J290) ...................................................1-136
Stereo radio operation (J295) ...................................................1-146
Stereo radio operation (K260)..................................................1-107
Stereo radio operation (M280)....................................... 1-113, 1-127
B
Battery...............................................................................................6-23
Binding Arbitration (U.S.A Only) .......................................................8-17
Brake
Anti-lock brake system ................................................................2-13
Traction control system (TCS) ...................................................2-13
Checking the brakes ....................................................................6-14Electronic Stability Control (ESC) .....................................................2-15
Fluid ..............................................................................................6-11
Pedal clearance...........................................................................6-20
Pedal free-play.............................................................................6-19
Practices......................................................................................2-19
Breaking-In your New Hyundai .......................................................... 1-3
Bulb Replacement.............................................................................6-27
C
California Perchlorate Notice ............................................................5-10
Care of Cassette Tapes ................................................................1-152
Care of Disc ...................................................................................
1-152
Catalytic Converter............................................................................. 7-3
Child-Protector Rear Door Lock ......................................................... 1-7
Child Restraint System.....................................................................1-25
Installing a Child Restraint Seat with the
"Tether Anchorage" System .....................................................1-26
Securing the Child Restraint Seat with the "ISOFIX" System ....1-28
Cigarette Lighter................................................................................1-64
Clock.................................................................................................1-64
Clutch
Checking fluid...............................................................................6-16
Pedal free-play.............................................................................6-19
Combination Light
Auto light.......................................................................................1-60
Headlight flasher..........................................................................1-59
Headlight switch...........................................................................1-59
High-beam switch........................................................................1-59
Lane change signal ......................................................................1-58
Parking light auto off .....................................................................1-59
Turn signal operation...................................................................1-58