2007 Hyundai Terracan lights
[x] Cancel search: lightsPage 109 of 291
1
FEATURES OF YOUR HYUNDAI
95
!
CAUTION:
o The cross bars should be posi- tioned before carrying a load on the roof rack.
o In case the sunroof is equipped, do not position roof rack loadsthat could interfere with opening of the sunroof.
o The following specification is rec- ommended when loading cargoor luggage.
o Loading cargo or luggage above 34 kg (75 lb) on the roof rack maydamage your vehicle. When you carry large objects, never let them hang over the rearor the sides of your vehicle.
o To prevent damage or loss of
cargo as you are driving, checkfrequently to make sure the lug- gage carrier and cargo are still securely fastened.ROOF RACK
34 kg (75 lb)
EVENLY DIS-
TRIBUTED
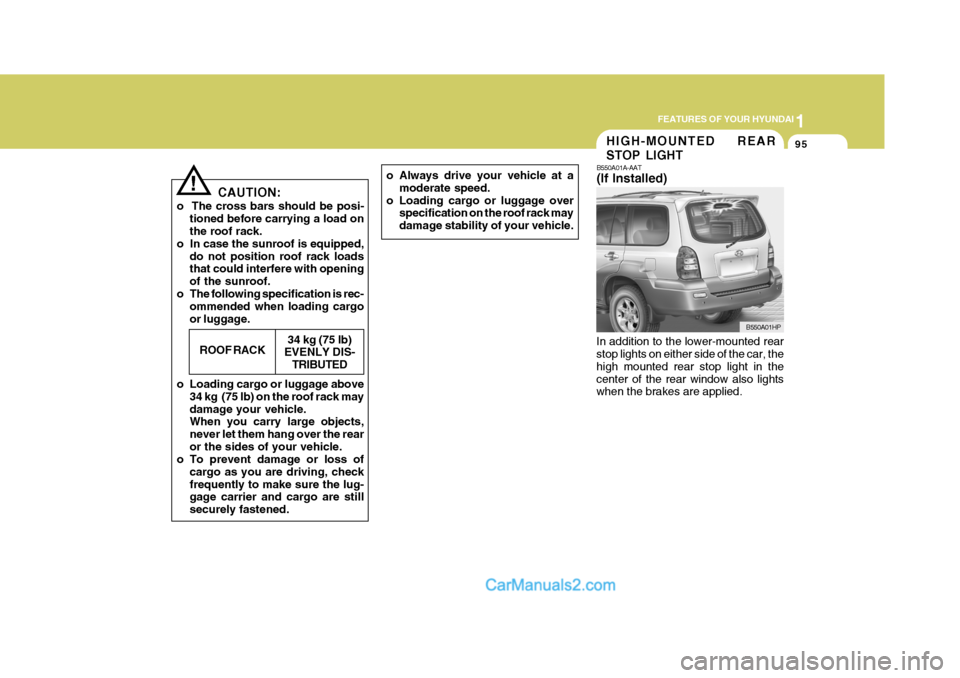
HIGH-MOUNTED REAR STOP LIGHT
o Always drive your vehicle at a moderate speed.
o Loading cargo or luggage over specification on the roof rack may damage stability of your vehicle.
B550A01A-AAT (If Installed)
In addition to the lower-mounted rear stop lights on either side of the car, the high mounted rear stop light in thecenter of the rear window also lights when the brakes are applied. B550A01HP
Page 114 of 291
1FEATURES OF YOUR HYUNDAI
100
LOADING CONDITION Driver only Driver + Front PassengerFull Passengers Full passengers + Maximum Permissible LoadingDriver + Maximum Permissible LoadingSwitch
position 0 01 2 3
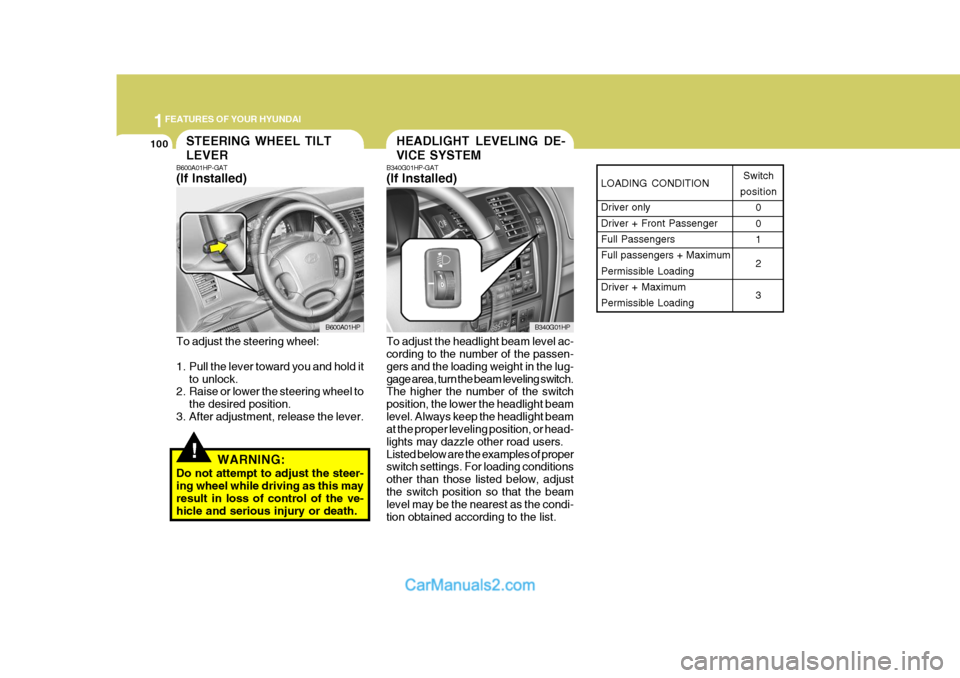
HEADLIGHT LEVELING DE- VICE SYSTEMSTEERING WHEEL TILT LEVER
!
B600A01HP-GAT (If Installed) To adjust the steering wheel:
1. Pull the lever toward you and hold itto unlock.
2. Raise or lower the steering wheel to
the desired position.
3. After adjustment, release the lever.
WARNING:
Do not attempt to adjust the steer- ing wheel while driving as this may result in loss of control of the ve- hicle and serious injury or death. B340G01HP-GAT (If Installed) To adjust the headlight beam level ac- cording to the number of the passen- gers and the loading weight in the lug-gage area, turn the beam leveling switch. The higher the number of the switch position, the lower the headlight beamlevel. Always keep the headlight beam at the proper leveling position, or head- lights may dazzle other road users.Listed below are the examples of proper switch settings. For loading conditions other than those listed below, adjustthe switch position so that the beam level may be the nearest as the condi- tion obtained according to the list.
B600A01HP
B340G01HP
Page 159 of 291
2
DRIVING YOUR HYUNDAI
3
!
BEFORE STARTING THE ENGINE
C020A02A-AAT Before you start the engine, you should always:
1. Look around the vehicle to be sure
there are no flat tires, puddles of oil, water or other indications of possible trouble.
2. After entering the car, check to be sure the parking brake is engaged.
3. Check that all windows, and lights are clean.
4. Check that the interior and exterior
mirrors are clean and in position.
5. Check your seat, seatback and headrest to be sure they are in theirproper positions.
6. Lock all the doors.
7. Fasten your seat belt and be sure
that all other occupants have fas- tened theirs.
8. Turn off all lights and accessories
that are not needed.
9. When you turn the ignition switch to "ON", check that all appropriatewarning lights are operating andthat you have sufficient fuel.
10. Check the operation of warning
lights and all bulbs when key is inthe "ON" position.
WARNING:
Your vehicle is equipped with tires designed to provide for safe ride and handling capability.Do not use a size and type of tire and wheel that is different from the one that was originally installed onyour vehicle. It can affect the safety and performance of your vehicle, which could lead to handling fail-ure or rollover and serious injury. When replacing the tires, be sure to equip all four tires with the tire andwheel of the same size, type, tread, brand and load-carrying capacity. If you nevertheless decide to equipyour vehicle with any tire/wheel combination not recommended by Hyundai for off-road driving, youshould not use these tires for high- way driving.
!WARNING:
Always wear appropriate shoes when operating your vehicle.Unsuitable shoes (high heels, ski boots, etc.) may interfere with your ability to use the brake and accelera-tor pedal, and the clutch (if installed).
Page 165 of 291
2
DRIVING YOUR HYUNDAI
9AUTOMATIC TRANSMIS- SION
!
o Exercise extreme caution when driv-
ing on a slippery surface. Be espe- cially careful when braking, acceler- ating or shifting gears. On a slippery surface, an abrupt change in ve-hicle speed can cause the drive wheels to lose traction and the ve- hicle to go out of control. o In the event your vehicle leaves
the roadway, do not steer sharply.Instead, slow down before pull- ing back into the travel lanes.
o Never exceed posted speed lim- its.
WARNING:
o Avoid high cornering speeds.
o Do not make quick steering wheel movements, such as sharp lanechanges or fast, sharp turns.
o Always wear your seat belts. In a collision crash, an unbeltedperson is significantly more likelyto die than a person wearing a seatbelt.
o The risk of rollover is greatly in-
creased if you lose control ofyour vehicle at highway speeds.
o Loss of control often occurs if
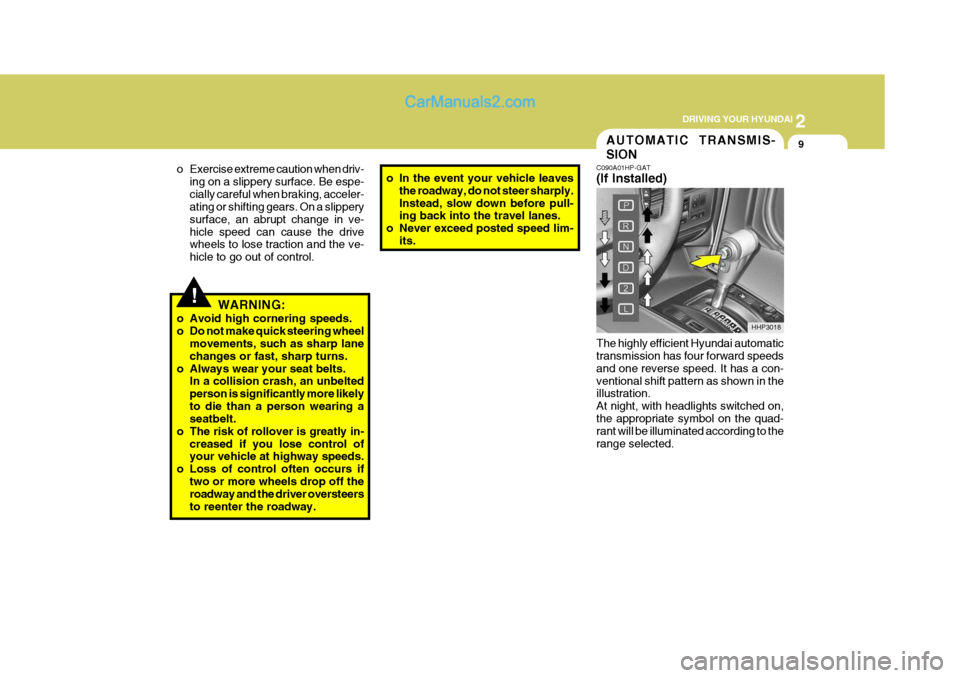
two or more wheels drop off theroadway and the driver oversteers to reenter the roadway. C090A01HP-GAT (If Installed) The highly efficient Hyundai automatic transmission has four forward speeds and one reverse speed. It has a con-ventional shift pattern as shown in the illustration. At night, with headlights switched on,the appropriate symbol on the quad- rant will be illuminated according to the range selected.
HHP3018
Page 179 of 291
2
DRIVING YOUR HYUNDAI
23
o Don't coast down hills with the car out of gear. This is extremely haz- ardous. Keep the car in gear at all times, use the brakes to slow down, then shift to a lower gear so thatengine braking will help you main- tain a safe speed.
o Don't "ride" the brake pedal. Rest- ing your foot on the brake pedalwhile driving can be dangerous be- cause it can result in the brakesoverheating and losing their effec- tiveness. It also increases the wear of thebrake components.
o If a tire goes flat while you are
driving, apply the brakes gently andkeep the car pointed straight ahead while you slow down. When you are moving slowly enough for it to besafe to do so, pull off the road and stop in a safe place.
o If your car is equipped with an auto- matic transmission, don't let yourcar creep forward. To avoid creep- ing forward, keep your foot firmly onthe brake pedal when the car is stopped.
o Use caution when parking on a hill. Engage the parking brake and place the gear selector lever in "P" (auto- matic transmission) or in first orreverse gear (manual transmission). If your car is facing downhill, turn the front wheels into the curb to helpkeep the car from rolling. If your car is facing uphill, turn the front wheels away from the curb to help keep thecar from rolling. If there is no curb or if it is required by other conditions to keep the car from rolling, block thewheels.
o Under some conditions your park-
ing brake can freeze in the engagedposition. This is most likely to hap- pen when there is an accumulation of snow or ice around or near therear brakes or if the brakes are wet. If there is a risk that the parking brake may freeze, apply it only tem-porarily while you put the gear se- lector lever in "P" (automatic) or in first or reverse gear (manual trans-mission) and block the rear wheels so the car cannot roll. Then release the parking brake.
o Do not hold the vehicle on the up- grade with the accelerator pedal.This can cause the transmission tooverheat. Always use the brake pedal or parking brake.DRIVING FOR ECONOMY
C140A02A-AAT You can save fuel and get more miles from your car if you follow these sug- gestions:
o Drive smoothly. Accelerate at a moderate rate. Don't make "jack- rabbit" starts or full-throttle shiftsand maintain a steady cruising speed. Don't race between stop- lights. Try to adjust your speed tothat of the other traffic so you don't have to change speeds unneces- sarily. Avoid heavy traffic wheneverpossible. Always maintain a safe distance from other vehicles so you can avoid unnecessary braking. Thisalso reduces brake wear.
o Drive at a moderate speed. The
faster you drive, the more fuel yourcar uses. Driving at a moderate speed, especially on the highway, is one of the most effective ways toreduce fuel consumption.
Page 184 of 291
2 DRIVING YOUR HYUNDAI
28
C190B01S-AAT Trailer Hitches Select the proper hitch and ball combi- nation, making sure that it's location is compatible with that of the trailer or vehicle being towed.Use a quality non-equalizing hitch which distributes the tongue load uniformly throughout the chassis. The hitch should be bolted securely to the car and installed by a qualifiedtechnician. DO NOT USE A HITCH DESIGNED FOR TEMPORARY IN- STALLATION AND NEVER USE ONETHAT ATTACHES ONLY TO THE BUMPER.TRAILER OR VEHICLE TOWING
!
C190A01HP-GAT If you are considering towing with your car, you should first check with your Province Department of Motor Vehicles to determine their legal requirements.Since laws vary from province to prov- ince the requirements for towing trail- ers, cars, or other types of vehicles orapparatus may differ. Ask your Hyundai dealer for further details before towing.
CAUTION:
Do not do any towing with your carduring its first 2,000 km (1,200 miles) in order to allow the engine to prop-erly break in. Failure to heed this caution may result in serious en- gine or transmission damage.
USE OF LIGHTS
C180A01A-AAT Check your lights regularly for correct operation and always keep them clean. When driving during the day in condi- tions of poor visibility, it is helpful todrive with headlights on low beam. This enables you to be seen, as well as to see.
Page 187 of 291
2
DRIVING YOUR HYUNDAI
31
C190F01HP-GAT Trailer or Vehicle Towing Tips
1. Before towing, check hitch and safety chain connections as well as proper operation of the trailer running lights, brake lights, and turn signals.
2. Always drive your vehicle at a mod- erate speed (Less than 100 km/h).
3. Trailer towing requires more fuel than normal conditions.
4. To maintain engine braking effi-
ciency, do not tow a trailer with thetransmission in fifth gear (manual transmission) or an overdrive gear (automatic transmission).
5. Always secure items in the trailer to prevent load shift while driving.
6. Check the condition and air pres- sure of all tires on the trailer and your car. Low tire pressure can seriously affect the handling. Alsocheck the spare tire.
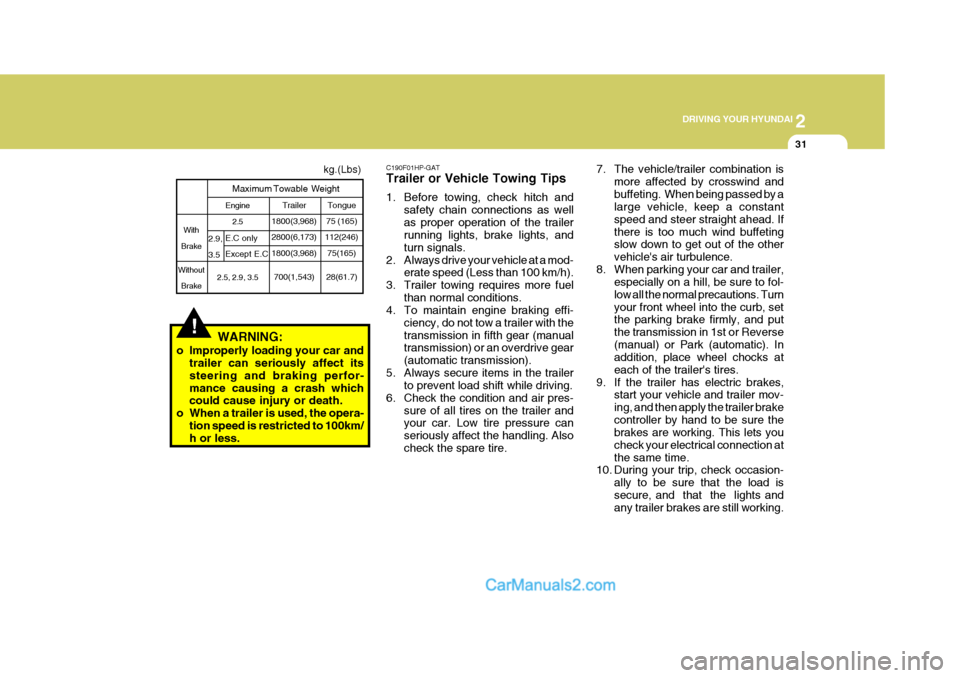
Tongue
75 (165)
112(246)
75(165)
28(61.7)
Engine
2.5
2.5, 2.9, 3.5
!WARNING:
o Improperly loading your car and trailer can seriously affect its steering and braking perfor-mance causing a crash which could cause injury or death.
o When a trailer is used, the opera- tion speed is restricted to 100km/h or less.
With
Brake
Without BrakeE.C only Except E.C
2.9,3.5
Maximum Towable Weight
Trailer
1800(3,968) 2800(6,173) 1800(3,968)
700(1,543)
7. The vehicle/trailer combination is more affected by crosswind and buffeting. When being passed by a large vehicle, keep a constant speed and steer straight ahead. Ifthere is too much wind buffeting slow down to get out of the other vehicle's air turbulence.
8. When parking your car and trailer, especially on a hill, be sure to fol-low all the normal precautions. Turnyour front wheel into the curb, set the parking brake firmly, and put the transmission in 1st or Reverse(manual) or Park (automatic). In addition, place wheel chocks at each of the trailer's tires.
9. If the trailer has electric brakes, start your vehicle and trailer mov-ing, and then apply the trailer brakecontroller by hand to be sure the brakes are working. This lets you check your electrical connection atthe same time.
10. During your trip, check occasion-
ally to be sure that the load issecure, and that the lights and any trailer brakes are still working.
kg.(Lbs)
Page 191 of 291
3
WHAT TO DO IN AN EMERGENCY
3JUMP STARTING
!
D020A02A-AAT
WARNING:
The gas produced by the battery during the jump-start operation is highly explosive. If these instruc- tions are not followed exactly, seri-ous personal injury and damage to the vehicle may occur! If you are not sure how to follow this proce-dure, seek qualified assistance. Automobile batteries contain sul- furic acid. This is poisonous andhighly corrosive. When jump start- ing, wear protective glasses and be careful not to get acid on yourself,your clothing or on the car. o If you should accidentally get acid
on your skin or in your eyes,immediately remove any contami- nated clothing and flush the area with clear water for at least 15 min-utes. Then promptly obtain medical attention. If you must be transported to an emergency facility, continue toapply water to the affected area with a sponge or cloth.
o The gas produced by the battery
during the jump-start operation ishighly explosive. Do not smoke or allow a spark or an open flame inthe vicinity.
o The battery being used to provide
the jump start must be 12-volt. If youcannot determine that it is a 12-volt battery, do not attempt to use it for the jump start.
o To jump start a car with a discharged battery, follow this procedure ex-actly:
1. If the booster battery is installed in another vehicle, be sure the twovehicles are not touching. 2. Turn off all unnecessary lights and
acces-sories in both vehicles.
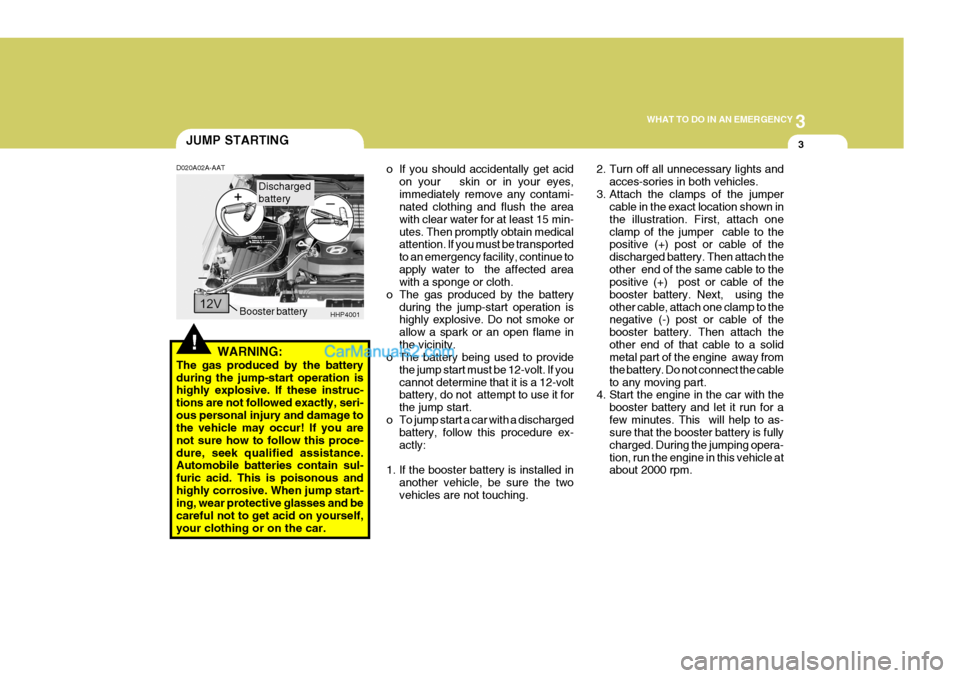
3. Attach the clamps of the jumper cable in the exact location shown inthe illustration. First, attach oneclamp of the jumper cable to the positive (+) post or cable of the discharged battery. Then attach theother end of the same cable to the positive (+) post or cable of the booster battery. Next, using theother cable, attach one clamp to the negative (-) post or cable of the booster battery. Then attach theother end of that cable to a solid metal part of the engine away from the battery. Do not connect the cableto any moving part.
4. Start the engine in the car with the
booster battery and let it run for afew minutes. This will help to as- sure that the booster battery is fully charged. During the jumping opera-tion, run the engine in this vehicle at about 2000 rpm.
HHP4001
Booster battery
Discharged battery