2007 Hyundai H-1 (Grand Starex) child lock
[x] Cancel search: child lockPage 13 of 284

Fuel Recommendations ................................................ 1-2
Before Driving Your Vehicle Safety Checks ................. 1-3
Running-in Recommendations ..................................... 1-4
Vehicle Identification Number (VIN) .............................. 1-5
Keys ............................................................................. 1-7
Immobilizer System ...................................................... 1-7
Illuminated Ignition Switc h ............................................ 1-12
Door ............................................................................. 1-13
Hold Open Lock System ............................................. 1-14
Central Door Locks ..................................................... 1-15
Theft-alarm System ..................................................... 1-16
Tail Gate/Rear Gate/Side Gate ................................... 1-21
Hood R elease .............................................................. 1-25
Remote Fuel-filler Lid Release ..................................... 1-26
Window ........................................................................ 1-28
Seats ........................................................................... 1-30
Seat Belts .................................................................... 1-42
Child Restraint System ................................................ 1-46
Steering Wheel Tilt Lever ............................................. 1-50
Supplemental Restraint (Airbag) System.................... 1-51
BEFORE DRIVING YOUR VEHICLE
1
1
Page 25 of 284
1
BEFORE DRIVING YOUR VEHICLE
13DOOR
!
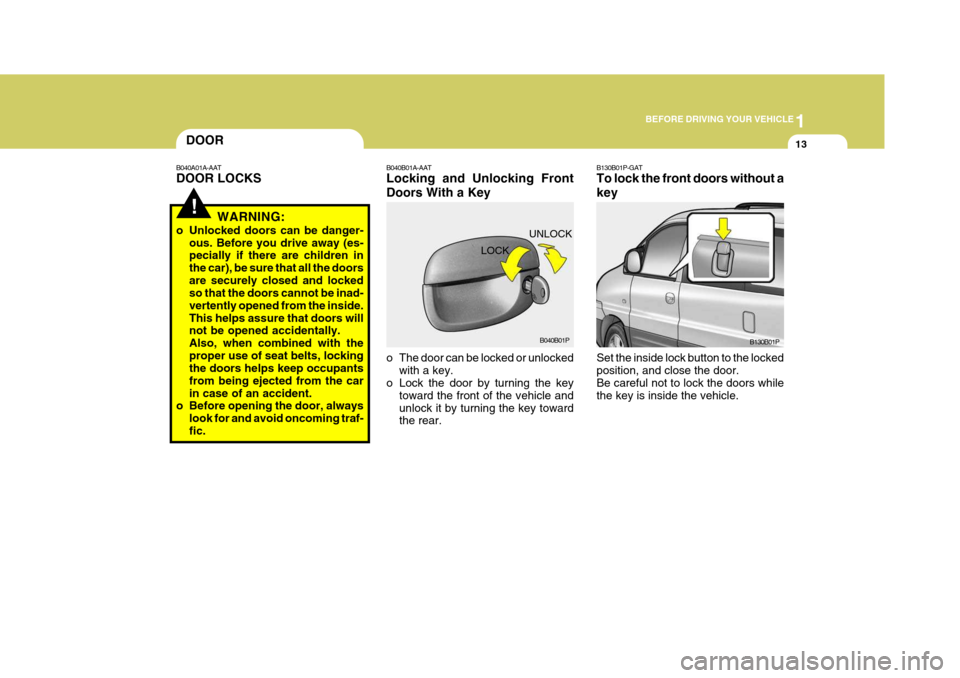
B040A01A-AAT DOOR LOCKS
WARNING:
o Unlocked doors can be danger- ous. Before you drive away (es- pecially if there are children in the car), be sure that all the doorsare securely closed and locked so that the doors cannot be inad- vertently opened from the inside.This helps assure that doors will not be opened accidentally. Also, when combined with theproper use of seat belts, locking the doors helps keep occupants from being ejected from the carin case of an accident.
o Before opening the door, always
look for and avoid oncoming traf-fic. B040B01A-AAT Locking and Unlocking Front Doors With a Key
o The door can be locked or unlocked
with a key.
o Lock the door by turning the key
toward the front of the vehicle and unlock it by turning the key toward the rear. LOCK
B130B01P-GAT To lock the front doors without a key Set the inside lock button to the locked position, and close the door. Be careful not to lock the doors while the key is inside the vehicle.
B040B01P
B130B01P
UNLOCK
Page 28 of 284
1BEFORE DRIVING YOUR VEHICLE
16
B160B01P-GAT CARRYING CHILDREN
o If a child is left in the vehicle alone,
always be sure to turn off the igni- tion and remove the key.
o If a child is seated alone in the
second seat, use the child-protec-tion system.
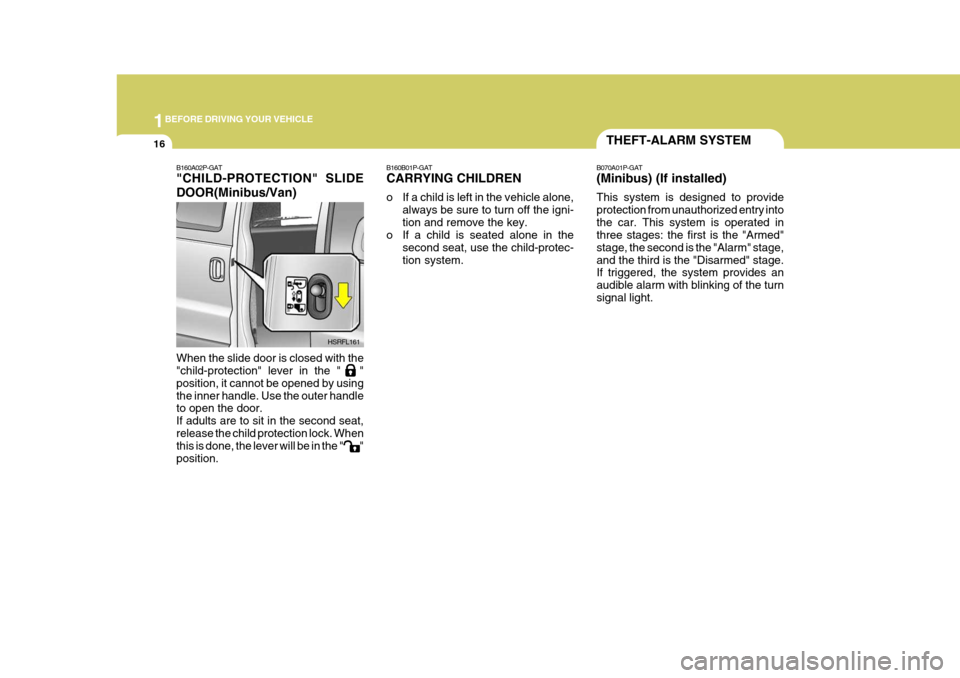
B160A02P-GAT "CHILD-PROTECTION" SLIDE DOOR(Minibus/Van) When the slide door is closed with the "child-protection" lever in the " " position, it cannot be opened by usingthe inner handle. Use the outer handle to open the door. If adults are to sit in the second seat,release the child protection lock. When this is done, the lever will be in the " " position.
HSRFL161
THEFT-ALARM SYSTEM
B070A01P-GAT (Minibus) (If installed) This system is designed to provide protection from unauthorized entry intothe car. This system is operated in three stages: the first is the "Armed" stage, the second is the "Alarm" stage,and the third is the "Disarmed" stage. If triggered, the system provides an audible alarm with blinking of the turnsignal light.
Page 41 of 284
1
BEFORE DRIVING YOUR VEHICLE
29
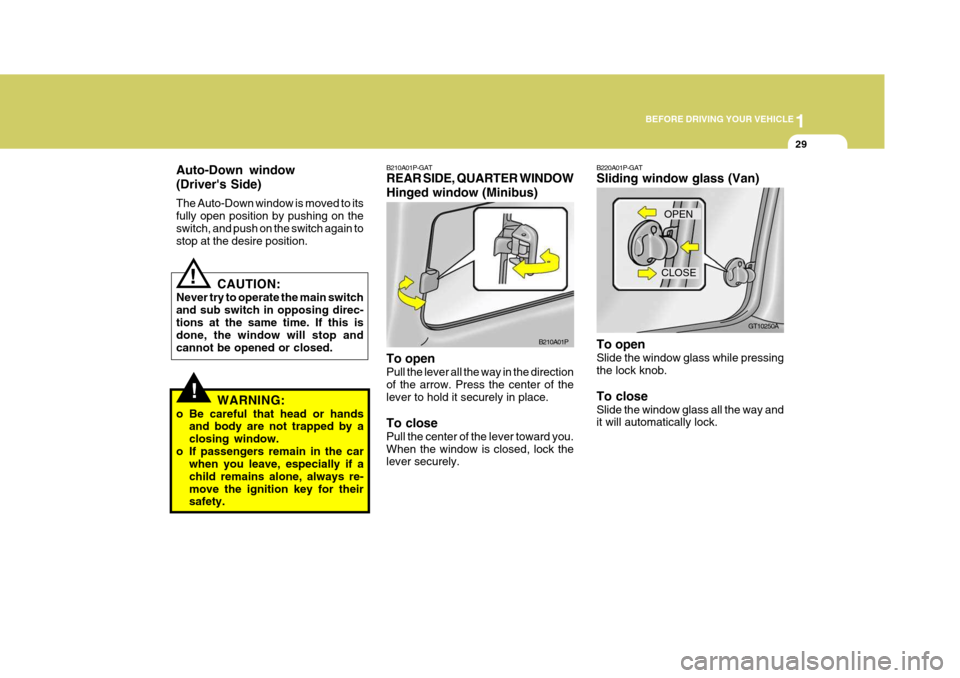
B210A01P-GAT REAR SIDE, QUARTER WINDOW Hinged window (Minibus) To open Pull the lever all the way in the direction of the arrow. Press the center of the lever to hold it securely in place. To close Pull the center of the lever toward you. When the window is closed, lock the lever securely. B210A01P
!
Auto-Down window (Driver's Side) The Auto-Down window is moved to its fully open position by pushing on theswitch, and push on the switch again to stop at the desire position.
CAUTION:
Never try to operate the main switch and sub switch in opposing direc-tions at the same time. If this is done, the window will stop and cannot be opened or closed.
WARNING:
o Be careful that head or hands and body are not trapped by aclosing window.
o If passengers remain in the car when you leave, especially if achild remains alone, always re-move the ignition key for their safety.
!
B220A01P-GAT Sliding window glass (Van) To open Slide the window glass while pressing the lock knob. To close Slide the window glass all the way and it will automatically lock. CLOSE
GT10250A
OPEN
Page 51 of 284
1
BEFORE DRIVING YOUR VEHICLE
39
HSRFL088
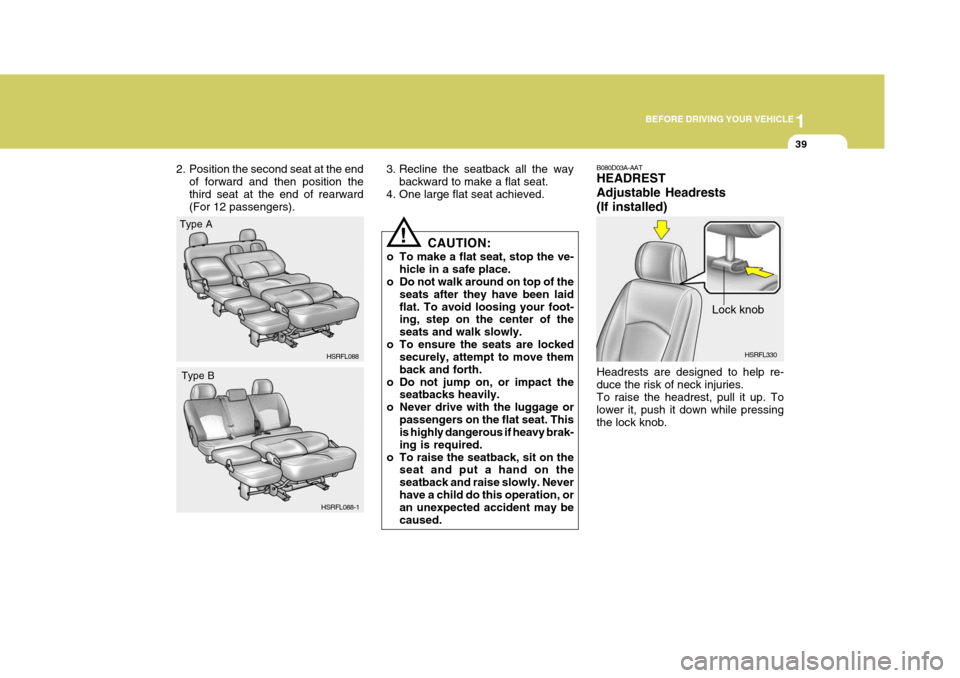
2. Position the second seat at the end
of forward and then position the third seat at the end of rearward (For 12 passengers). 3. Recline the seatback all the way
backward to make a flat seat.
4. One large flat seat achieved.
CAUTION:
o To make a flat seat, stop the ve- hicle in a safe place.
o Do not walk around on top of the
seats after they have been laid flat. To avoid loosing your foot- ing, step on the center of the seats and walk slowly.
o To ensure the seats are locked securely, attempt to move themback and forth.
o Do not jump on, or impact the seatbacks heavily.
o Never drive with the luggage or
passengers on the flat seat. This is highly dangerous if heavy brak- ing is required.
o To raise the seatback, sit on the seat and put a hand on theseatback and raise slowly. Neverhave a child do this operation, or an unexpected accident may be caused.
!
HSRFL088-1
Type A
Type B
B080D03A-AAT HEADREST Adjustable Headrests(If installed) Headrests are designed to help re- duce the risk of neck injuries. To raise the headrest, pull it up. To lower it, push it down while pressingthe lock knob. Lock knob
HSRFL330
Page 58 of 284
1BEFORE DRIVING YOUR VEHICLE
46CHILD RESTRAINT SYSTEM
B230A03A-GAT (Minibus/Van) (If installed) Children riding in the car should sit in the rear seat and must always berestrained to minimize the risk of injury in an accident, sudden stop or sudden maneuver. According to accident sta-tistics, children are safer when prop- erly restrained in the rear seats than in the front seat. Larger children shoulduse one of the seat belts provided. You are required by law to use safety restraints for children. If small childrenride in your vehicle you must put them in a child restraint system (safety seat). Children could be injured in a crash iftheir restraints are not properly se- cured. For small children and babies, a child seat or infant seat must be used.Before buying a particular child re- straint system, make sure it fits your car seat and seat belts, and fits yourchild. Follow all the instructions pro- vided by the manufacturer when in- stalling the child restraint system.
!
NOTE:
o When the pre-tensioner seat belt is activated, there may be an ex- plosion noise. This noise is nor-mal and is not hazardous.
o Pre-tensioner seat belt is de-
signed to operate only when asufficiently severe impact occurs and it will be only operated once.
WARNING:
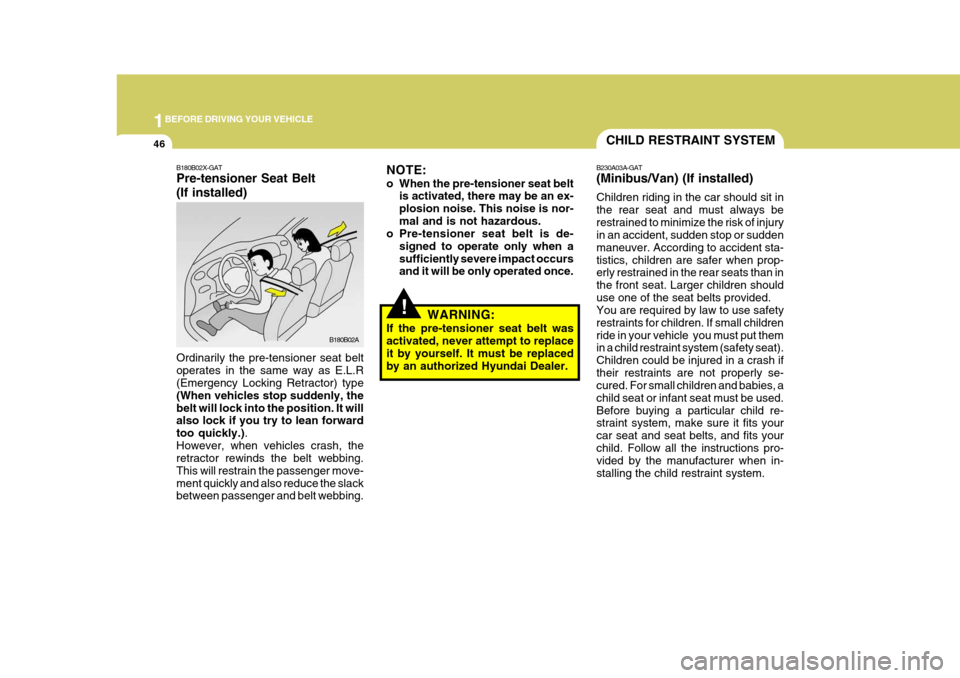
If the pre-tensioner seat belt was activated, never attempt to replace it by yourself. It must be replaced by an authorized Hyundai Dealer.B180B02X-GAT Pre-tensioner Seat Belt (If installed) Ordinarily the pre-tensioner seat belt operates in the same way as E.L.R (Emergency Locking Retractor) type (When vehicles stop suddenly, thebelt will lock into the position. It will also lock if you try to lean forward too quickly.) .
However, when vehicles crash, the retractor rewinds the belt webbing. This will restrain the passenger move-ment quickly and also reduce the slack between passenger and belt webbing. B180B02A
Page 60 of 284
1BEFORE DRIVING YOUR VEHICLE
48
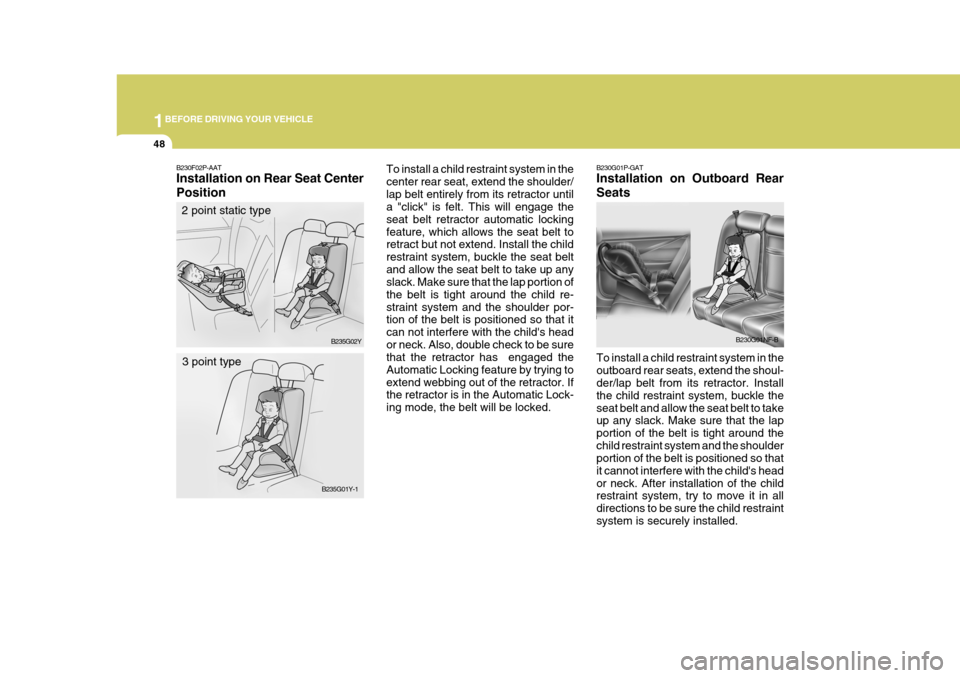
B230G01P-GAT Installation on Outboard Rear Seats To install a child restraint system in the outboard rear seats, extend the shoul- der/lap belt from its retractor. Install the child restraint system, buckle theseat belt and allow the seat belt to take up any slack. Make sure that the lap portion of the belt is tight around thechild restraint system and the shoulder portion of the belt is positioned so that it cannot interfere with the child's heador neck. After installation of the child restraint system, try to move it in all directions to be sure the child restraintsystem is securely installed. B230G01NF-B
To install a child restraint system in thecenter rear seat, extend the shoulder/lap belt entirely from its retractor until a "click" is felt. This will engage the seat belt retractor automatic lockingfeature, which allows the seat belt to retract but not extend. Install the child restraint system, buckle the seat beltand allow the seat belt to take up any slack. Make sure that the lap portion of the belt is tight around the child re-straint system and the shoulder por- tion of the belt is positioned so that it can not interfere with the child's heador neck. Also, double check to be sure that the retractor has engaged the Automatic Locking feature by trying toextend webbing out of the retractor. If the retractor is in the Automatic Lock- ing mode, the belt will be locked.B230F02P-AAT Installation on Rear Seat Center Position
2 point static type
B235G02Y
B235G01Y-1
3 point type
Page 61 of 284
1
BEFORE DRIVING YOUR VEHICLE
49
!
If you need to tighten the belt, pull more webbing toward the retractor. When youunbuckle the seat belt and allow it to retract, the retractor will automatically revert back to its normal seated pas-senger emergency locking usage con- dition. NOTE:
o Before installing the child re-
straint system, read the instruc- tions supplied by the child re- straint system manufacturer.
o If the seat belt does not operate as described, have the systemchecked immediately by yourauthorized Hyundai dealer.
WARNING:
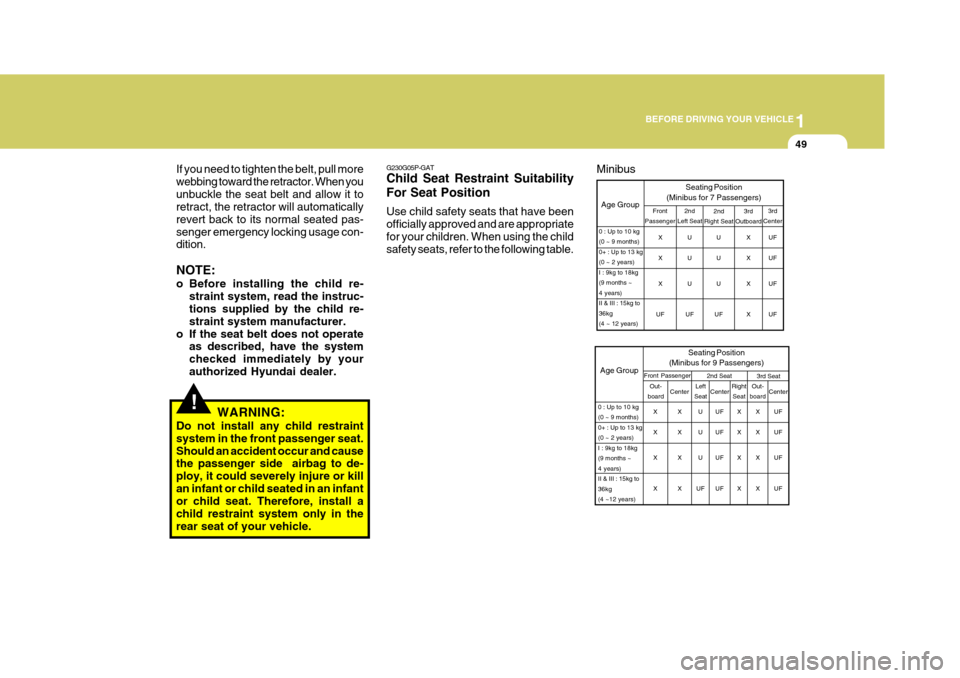
Do not install any child restraintsystem in the front passenger seat.Should an accident occur and cause the passenger side airbag to de- ploy, it could severely injure or killan infant or child seated in an infant or child seat. Therefore, install a child restraint system only in therear seat of your vehicle. G230G05P-GAT Child Seat Restraint Suitability For Seat Position Use child safety seats that have been officially approved and are appropriatefor your children. When using the child safety seats, refer to the following table.
UF UF UF UF
0 : Up to 10 kg (0 ~ 9 months)0+ : Up to 13 kg(0 ~ 2 years)I : 9kg to 18kg(9 months ~4 years)II & III : 15kg to36kg(4 ~ 12 years) 3rd
Center
3rd
Outboard
Age Group Seating Position
(Minibus for 7 Passengers)2nd
Left Seat2nd
Right Seat
U U U
UF U U U
UF X X X X
Front
Passenger
X X X
UF
3rd SeatAge Group Seating Position
(Minibus for 9 Passengers)Front Passenger 2nd Seat
0 : Up to 10 kg (0 ~ 9 months)0+ : Up to 13 kg(0 ~ 2 years)I : 9kg to 18kg(9 months ~4 years)II & III : 15kg to36kg(4 ~12 years)Out-
board Center Left
Seat Right
Seat
Center Out-
board Center
X X X X X X X XU U U
UF UF UF UF UF X X X XX X X XUF UF UF UF
Minibus