2007 Hyundai H-1 (Grand Starex) change time
[x] Cancel search: change timePage 1 of 284

F1
OWNER'S MANUAL A030A01P-GAT Operation Maintenance Specifications All information in the Owner's Manual is current at the time of publication. Hyundai reserves the right to make changes at any time as part of our policy of continual product improvement may be carried out. This manual applies to current Hyundai
models and explanations of optional as well as standard equipment are
included. As a result, you may find material in this manual that does not apply to your specific vehicle. HA1FL002
Page 86 of 284

2
INSTRUMENTS AND CONTROLS
19MUTI-FUNITION LIGHT SWITCH
B340C03P-AAT Headlight Switch
To operate the headlights, turn the bar- rel on the end of the multi-function switch. The first position turns on theposition, licence-plate, tail lights and instrument panel lights. The second position turns on the headlights. NOTE: The ignition must be in the "ON" position to turn on the headlights.
B340B01A-AAT Lane Change Signal To indicate a lane change, move the lever up or down to a point where it begins flashing.The lever will automatically return to the center position when released.
HSRFL2113
HSRFL2114
C150A01P-GAT Turn signal switch Pulling down on the lever causes the turn signals on the left side of the car toblink. Pushing upward on the lever causes the turn signals on the right side of the car to blink. As the turn iscompleted, the lever will automatically return to the center position and turn off the turn signals at the same time. Ifeither turn signal indicator light blinks more rapidly than usual, goes on but does not blink, or does not go on at all,there is a malfunction in the system. Check for a burned-out fuse or bulb or see your Hyundai dealer.
Page 104 of 284

2
INSTRUMENTS AND CONTROLS
37
C420A02P-GAT Rear ashtray (If installed)
Pull out the rear ashtray downward to open. To remove the ashtray, pull it out while pressing the stubber. GS2025A
Type A
DIGITAL CLOCK
B400A01A-AAT (If Installed) There are three control buttons for the digital clock. Their functions are: HOUR - Push "H" to advance the hour
indicated.
MIN - Push "M" to advance the
minute indicated.
RESET - Push "R" to reset minutes to
":00" to facilitate resetting the clock to the correct time. When this is done:
Pressing "R" between 10 : 30 and 11 :29 changes the readout to 11 : 00. Pressing "R" between 11 : 30 and 12 : 29 changes the readout to 12 : 00. C440A01PHORN
C280A01P-GAT Press the pad on the steering wheel to sound the horn. B240A01P-1
C430A01P
Type B
To use the ashtray, open up the lid. To remove the ashtray, open the lidand lift upward holding the lid.
Page 144 of 284

3 STARTING AND OPERATING
2
C010A02O-AAT
WARNING: ENGINE EXHAUST CAN BE DANGEROUS!
Engine exhaust fumes can be extremely dangerous. If, at any time, you smell exhaust fumes inside the vehicle, open the windows immediately.
o Do not inhale exhaust fumes. Exhaust fumes contain carbon monoxide, a colorless, odorless gas that can cause unconsciousness and death by asphyxiation.
o Be sure the exhaust system does not leak. The exhaust system should be checked whenever the vehicle is raised to change the oil or for any other purpose. If you hear a change in the sound of the exhaust or if you drive over something that strikes the underneath sideof the car, have the exhaust system checked as soon as possible by your Hyundai dealer.
o Do not run the engine in an enclosed area. Letting the engine idle in your garage, even with the garage door open, is a hazardous practice. Never run the engine in your garage any longer than it takes to start the engine and back the car out.
o Avoid idling the engine for prolonged periods with people inside the car. If it is necessary to idle the engine for a prolonged period with people inside the car, be sure to do so only in an open area with the air intake set at "Fresh" and fan operating at one of the higher speeds so fresh air is drawn intothe interior. If you must drive with the tailgate open because you are carrying objects that make this necessary:
1. Close all windows.
2. Open side vents.
3. Set the air intake control at "Fresh", the air flow control at "Floor" or "Face" and the fan at one of the higher speeds.
To assure proper operation of the ventilation system, be sure the ventilation air intakes located just in front of the windshield are kept clear of snow, ice, leaves or other obstructions.
!
Page 145 of 284

3
STARTING AND OPERATING
3PRECAUTION FOR EX- HAUST FUMES WHILESTARTING AND DRIVING
D010A01P-GAT
1. Do not breathe exhaust fumes con- taining carbons monoxide when starting or driving. Carbon monox- ide is a colorless, odorless gas and can cause unconsciousness ordeath by asphyxiation.
2. Open all the windows fully and get
the back door closed if you smellexhaust fumes inside the vehicle. Have the cause immediately located and corrected.
3. Check the exhaust system, from time to time, for holes or loose con-nections if you hear a change in theexhaust sound, or if something has hit the exhaust system.
4. Do not race the engine in a garage
or enclosed area any longer than ittakes to start the engine and drive the vehicle in or out. The sealedexhaust fume may make a particu- larly dangerous situation.
!
BEFORE STARTING THE ENGINE
C020A02O-GAT Before you start the engine, you should always:
1. Look around the vehicle to be sure
there are no flat tires, puddles of oil, water or other indications of pos- sible trouble.
2. After entering the car, check to be sure the parking brake is engaged.
3. Check that all windows, and lights are clean.
4. Check that the interior and exterior
mirrors are clean and in position.
5. Check your seat, seatback and headrest to be sure they are in theirproper positions.
6. Lock all the doors.
7. Fasten your seat belt and be sure
that all other occupants have fas- tened theirs.
8. Turn off all lights and accessories
that are not needed. WARNING (DIESEL ENGINE):
To ensure that sufficient vacuum exists within the brake system dur- ing cold weather start-up condi-tions, it is necessary to run the engine at idle for several seconds after starting the engine.
9. When you turn the ignition switch to
"ON", check that all appropriatewarning lights are operating andthat you have sufficient fuel.
10.Check the operation of warning
lights and all bulbs when key is inthe "ON" position.
!WARNING:
Always wear appropriate shoes when operating your vehicle. Unsuitable shoes (high heels, ski boots, etc.) may interfere with yourability to use the brake and accelera- tor pedal, and the clutch (if installed).
Page 184 of 284

44IN CASE OF EMERGENCY
8
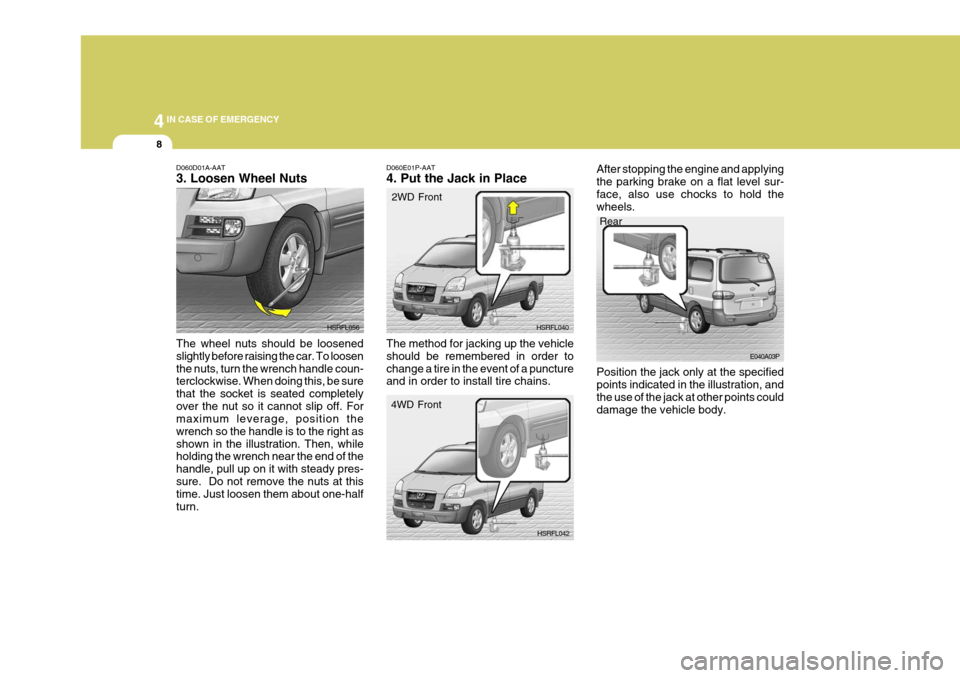
D060D01A-AAT 3. Loosen Wheel Nuts The wheel nuts should be loosened slightly before raising the car. To loosenthe nuts, turn the wrench handle coun- terclockwise. When doing this, be sure that the socket is seated completelyover the nut so it cannot slip off. For maximum leverage, position the wrench so the handle is to the right asshown in the illustration. Then, while holding the wrench near the end of the handle, pull up on it with steady pres-sure. Do not remove the nuts at this time. Just loosen them about one-half turn. HSRFL056
D060E01P-AAT 4. Put the Jack in Place
Rear
E040A03P
HSRFL040
HSRFL042
2WD Front
4WD Front
The method for jacking up the vehicle should be remembered in order tochange a tire in the event of a puncture and in order to install tire chains. After stopping the engine and applying the parking brake on a flat level sur-face, also use chocks to hold the wheels. Position the jack only at the specified points indicated in the illustration, and the use of the jack at other points coulddamage the vehicle body.
Page 196 of 284

44IN CASE OF EMERGENCY
20
!WARNING:
o Improperly loading your car and trailer can serious affect its steer- ing and braking performance causing a crash in which youmay be seriously injured.
o For automatic transmission ve-
hicles, the trailer should be towedwith the towing vehicle unloaded, with the exception of the driver. Otherwise, the automatic trans-mission oil temperature may rise to a temperature that may result in serious damage of the auto- matic transmission. C190F02A-GAT Trailer or Vehicle Towing Tips
1. Before towing, check hitch and
safety chain connections as well as proper operation of the trailer run- ning lights, brake lights, and turn signals.
2. Always drive your vehicle at a mod- erate speed (Less than 100 km/h).
3. Trailer towing requires more fuel than normal conditions.
4. To maintain engine braking effi-
ciency and electrical charging per-formance, do not use fifth gear (manual transmission) or overdrive (automatic transmission).
5. Always secure items in the trailer to prevent load shift while driving.
6. Check the condition and air pres- sure of all tires on the trailer and your car. Low tire pressure can se- riously affect the handling. Alsocheck the spare tire.
7. The vehicle/trailer combination is
more affected by crosswind andbuffeting. When being passed by a large vehicle, keep a constant speed and steer straight ahead. If there is too much wind buffeting,slow down to get out of the othervehicle’s air turbulence.
8. When parking your car and trailer,
especially on a hill, be sure to followall the normal precautions. Turn your front wheel into the curb, set the parking brake firmly, and put thetransmission in 1st or "R" (manual transmission) or "P" (automatic transmission). In addition, placewheel chocks at each of the trailer’s tires.
9. If the trailer has electric brakes, start your vehicle and trailer mov-ing, and then apply the trailer brake controller by hand to be sure thebrakes are working. This lets you check your electrical connection at the same time.
10.During your trip, check occasion- ally to be sure that the load issecure, and that the lights and anytrailer brakes are still working.
11.Avoid jerky starts, sudden accel-
eration or sudden stops.
12.Avoid sharp turns and rapid lane changes.
Page 256 of 284

8DO-IT YOURSELF MAINTENANCE
12
!
4. Turn the radiator cap counterclock-
wise without pressing down on it, until it stops. This relieves any pres- sure remaining in the cooling sys- tem. And remove the radiator capby pushing down and turning coun- terclockwise. Now fill the radiator with clean dem- ineralized or distilled water. Con- tinue to add clean demineralized or distilled water in small quantitiesuntil the fluid level stays up in the radiator neck.
5. Start the engine, top off the radia- tor with water and then add engine coolant to the reservoir until thelevel is between "L" and "F".
6. Replace the radiator and reservoir caps and check to be sure thedrain cocks are fully closed and not leaking. WARNING:
The cooling fan is controlled by
engine coolant temperature andmay sometimes operate even when the engine is not running. Useextreme caution when working near the blades of the cooling fan so that you are not injured by a rotat-ing fan blade. As the engine cool- ant temperature decreases, the fan will automatically shut off. This isa normal condition.
G050D02P-AAT To Change the Coolant The coolant should be changed at those intervals specified in the ve- hicle maintenance schedule in Sec- tion 6.
!
CAUTION:
Engine coolant can damage the finish of your car. If you spill en-gine coolant on the car, wash it off thoroughly with clean water.
1. Park the car on level ground, set the parking brake and remove the radia- tor cap when cool.
2. Be sure your drain receptacle is in
place. Open the drain cock on theradiator. Allow all the engine cool- ant to drain from the cooling sys- tem, then securely close the draincock.
3. Check Section 9 for the capacity of the cooling system in your car.Then, following the manufacturer's directions on the engine coolant container, add the appropriatequantity of coolant to the radiator.