2007 Hyundai H-1 (Grand Starex) warning light
[x] Cancel search: warning lightPage 186 of 284
44IN CASE OF EMERGENCY
10
!
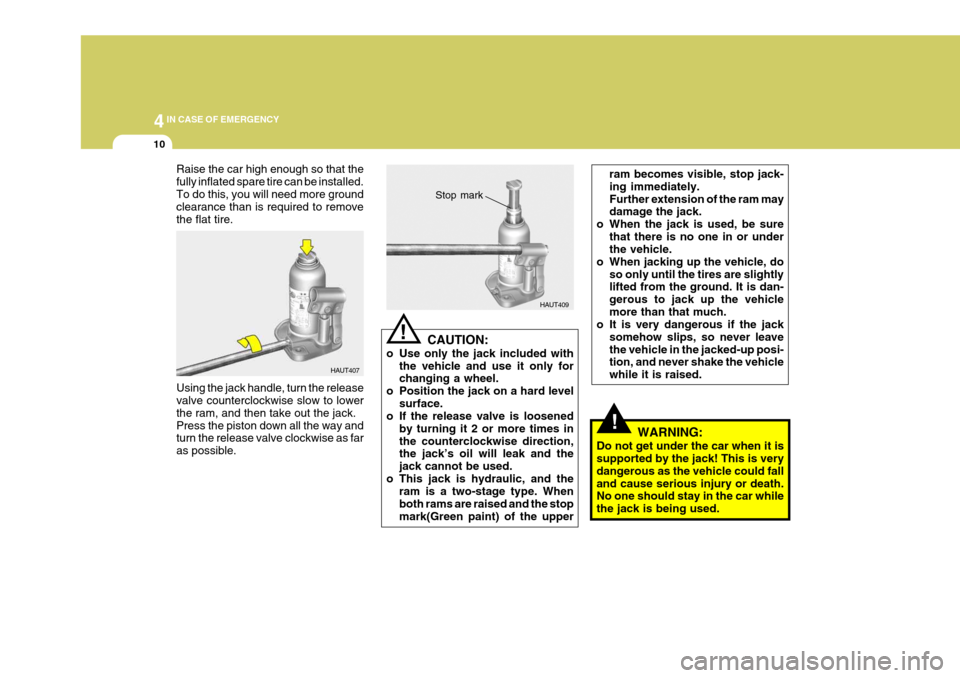
Raise the car high enough so that the fully inflated spare tire can be installed.To do this, you will need more ground clearance than is required to remove the flat tire. Using the jack handle, turn the release valve counterclockwise slow to lower the ram, and then take out the jack.Press the piston down all the way and turn the release valve clockwise as far as possible. HAUT407
HAUT409
CAUTION:
o Use only the jack included with the vehicle and use it only for changing a wheel.
o Position the jack on a hard level
surface.
o If the release valve is loosened
by turning it 2 or more times in the counterclockwise direction, the jack’s oil will leak and the jack cannot be used.
o This jack is hydraulic, and the ram is a two-stage type. Whenboth rams are raised and the stopmark(Green paint) of the upper
! Stop mark
ram becomes visible, stop jack- ing immediately.Further extension of the ram may damage the jack.
o When the jack is used, be sure
that there is no one in or underthe vehicle.
o When jacking up the vehicle, do so only until the tires are slightlylifted from the ground. It is dan- gerous to jack up the vehiclemore than that much.
o It is very dangerous if the jack
somehow slips, so never leavethe vehicle in the jacked-up posi- tion, and never shake the vehicle while it is raised.
WARNING:
Do not get under the car when it is supported by the jack! This is very dangerous as the vehicle could falland cause serious injury or death. No one should stay in the car while the jack is being used.
Page 187 of 284
4
CORROSION PREVENTION AND APPEARANCE CARE
11
4
IN CASE OF EMERGENCY
11
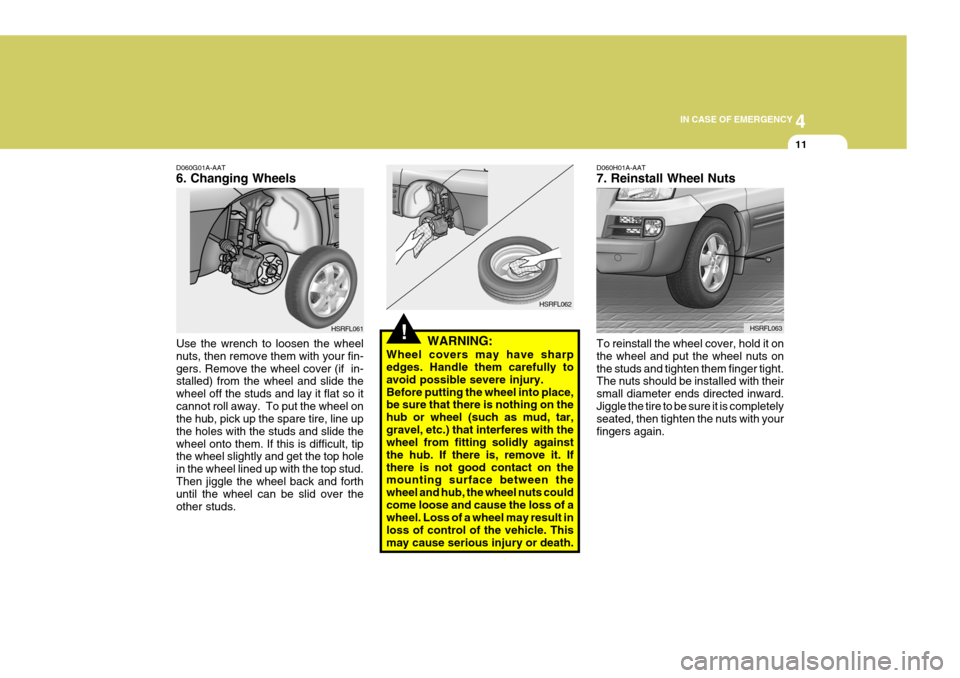
D060G01A-AAT 6. Changing Wheels Use the wrench to loosen the wheel nuts, then remove them with your fin-gers. Remove the wheel cover (if in- stalled) from the wheel and slide the wheel off the studs and lay it flat so itcannot roll away. To put the wheel on the hub, pick up the spare tire, line up the holes with the studs and slide thewheel onto them. If this is difficult, tip the wheel slightly and get the top hole in the wheel lined up with the top stud.Then jiggle the wheel back and forth until the wheel can be slid over the other studs. HSRFL061
!
HSRFL062
WARNING:
Wheel covers may have sharp edges. Handle them carefully to avoid possible severe injury.Before putting the wheel into place, be sure that there is nothing on the hub or wheel (such as mud, tar,gravel, etc.) that interferes with the wheel from fitting solidly against the hub. If there is, remove it. Ifthere is not good contact on the mounting surface between the wheel and hub, the wheel nuts couldcome loose and cause the loss of a wheel. Loss of a wheel may result in loss of control of the vehicle. Thismay cause serious injury or death. D060H01A-AAT 7. Reinstall Wheel Nuts To reinstall the wheel cover, hold it on the wheel and put the wheel nuts onthe studs and tighten them finger tight. The nuts should be installed with their small diameter ends directed inward.Jiggle the tire to be sure it is completely seated, then tighten the nuts with your fingers again.
HSRFL063
Page 196 of 284
44IN CASE OF EMERGENCY
20
!WARNING:
o Improperly loading your car and trailer can serious affect its steer- ing and braking performance causing a crash in which youmay be seriously injured.
o For automatic transmission ve-
hicles, the trailer should be towedwith the towing vehicle unloaded, with the exception of the driver. Otherwise, the automatic trans-mission oil temperature may rise to a temperature that may result in serious damage of the auto- matic transmission. C190F02A-GAT Trailer or Vehicle Towing Tips
1. Before towing, check hitch and
safety chain connections as well as proper operation of the trailer run- ning lights, brake lights, and turn signals.
2. Always drive your vehicle at a mod- erate speed (Less than 100 km/h).
3. Trailer towing requires more fuel than normal conditions.
4. To maintain engine braking effi-
ciency and electrical charging per-formance, do not use fifth gear (manual transmission) or overdrive (automatic transmission).
5. Always secure items in the trailer to prevent load shift while driving.
6. Check the condition and air pres- sure of all tires on the trailer and your car. Low tire pressure can se- riously affect the handling. Alsocheck the spare tire.
7. The vehicle/trailer combination is
more affected by crosswind andbuffeting. When being passed by a large vehicle, keep a constant speed and steer straight ahead. If there is too much wind buffeting,slow down to get out of the othervehicle’s air turbulence.
8. When parking your car and trailer,
especially on a hill, be sure to followall the normal precautions. Turn your front wheel into the curb, set the parking brake firmly, and put thetransmission in 1st or "R" (manual transmission) or "P" (automatic transmission). In addition, placewheel chocks at each of the trailer’s tires.
9. If the trailer has electric brakes, start your vehicle and trailer mov-ing, and then apply the trailer brake controller by hand to be sure thebrakes are working. This lets you check your electrical connection at the same time.
10.During your trip, check occasion- ally to be sure that the load issecure, and that the lights and anytrailer brakes are still working.
11.Avoid jerky starts, sudden accel-
eration or sudden stops.
12.Avoid sharp turns and rapid lane changes.
Page 200 of 284

44IN CASE OF EMERGENCY
24
D010B01A-AAT If Engine Doesn't Turn Over or Turns Over Slowly
1. If your car has an automatic
transaxle, be sure the gear selector lever is in "N" or "P" and the emer-gency brake is set.
2. Check the battery connections to be
sure they are clean and tight.
3. Turn on the interior light. If the light dims or goes out when you operatethe starter, the battery is discharged.
4. Check the starter connections to be sure they are securely tightened.
5. Do not push or pull the vehicle to start it. See instructions for "Jump Starting". D010B02P
D010D01A-AAT If the Engine Stalls While Driving
1. Reduce your speed gradually, keep-ing a straight line. Move cautiously off the road to a safe place.
2. Turn on your emergency flashers.
3. Try to start the engine again. If your
vehicle will not start, contact a Hyundai dealer or seek other quali- fied assistance.
JUMP STARTING
!
HA1FL4001
WARNING:
The gas produced by the battery during the jump-start operation is highly explosive. If these instruc-tions are not followed exactly, seri- ous personal injury and damage to the vehicle may occur! If you arenot sure how to follow this proce- dure, seek qualified assistance. Automobile batteries contain sul-furic acid. This is poisonous and highly corrosive. When jump start- ing, wear protective glasses and becareful not to get acid on yourself, your clothing or on the car. E110A02P-GAT
Discharged battery
Booster battery
D010C02A-AAT If Engine Turns Over Normally but Does Not Start 1. Check fuel level. 2. With the key in the "OFF" position,check all connectors at ignition coils and spark plugs(For Gasoline En- gine) or check all connectors atglow plug and glow plug relay(For Diesel Engine). Reconnect any that may be disconnected or loose.
3. Check fuel line in the engine room. 4. If engine still refuses to start, call a
Hyundai dealer or seek other quali- fied assistance.
Page 208 of 284
44IN CASE OF EMERGENCY
32
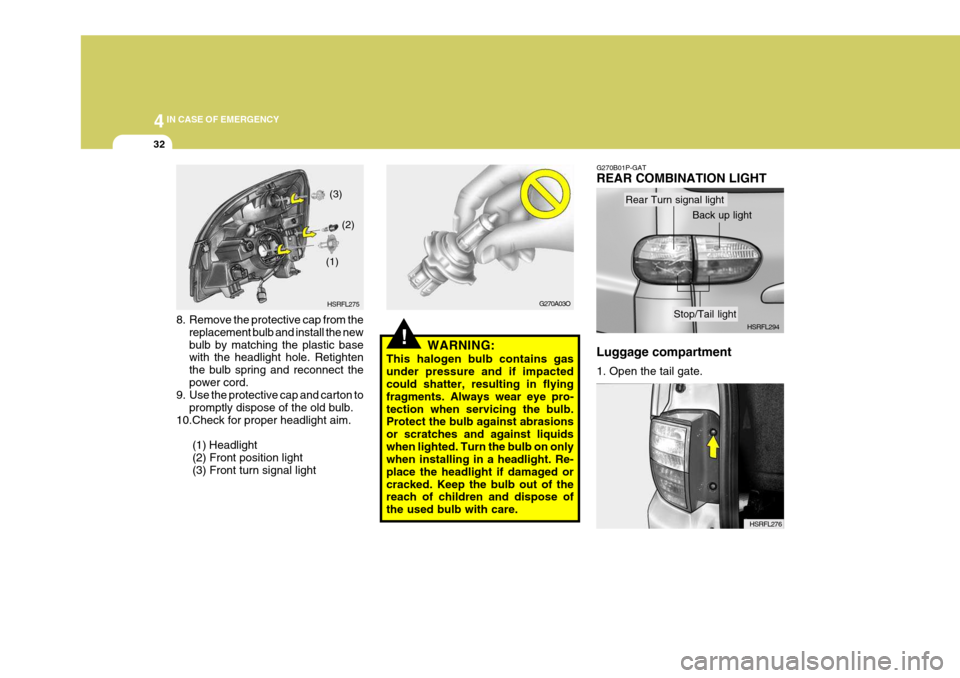
8. Remove the protective cap from the
replacement bulb and install the new bulb by matching the plastic base with the headlight hole. Retighten the bulb spring and reconnect thepower cord.
9. Use the protective cap and carton to
promptly dispose of the old bulb.
10.Check for proper headlight aim.
(1) Headlight(2) Front position light (3) Front turn signal light HSRFL275
(1)
(2)
(3)
!
G270A03O
WARNING:
This halogen bulb contains gas under pressure and if impacted could shatter, resulting in flying fragments. Always wear eye pro-tection when servicing the bulb. Protect the bulb against abrasions or scratches and against liquidswhen lighted. Turn the bulb on only when installing in a headlight. Re- place the headlight if damaged orcracked. Keep the bulb out of the reach of children and dispose of the used bulb with care.
HSRFL276
G270B01P-GAT REAR COMBINATION LIGHT Luggage compartment 1. Open the tail gate.
HSRFL294
Rear Turn signal light
Back up light
Stop/Tail light
Page 214 of 284
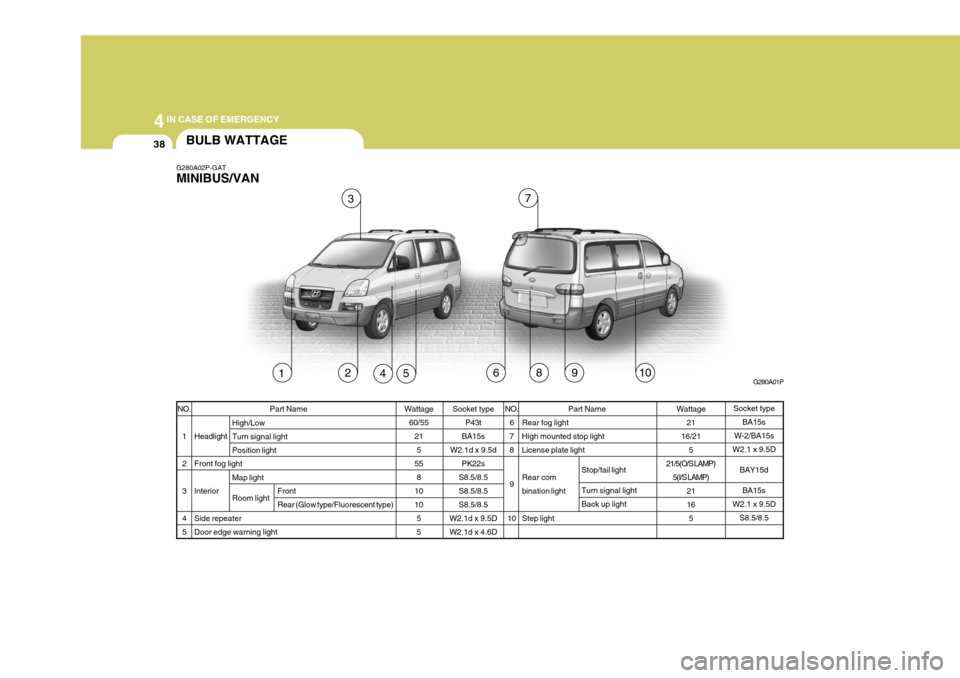
44IN CASE OF EMERGENCY
38
7
96
BULB WATTAGE
G280A02P-GAT MINIBUS/VAN
G280A01P
123
45810
Socket typeBA15s
W-2/BA15s
W2.1 x 9.5D
BAY15dBA15s
W2.1 x 9.5D S8.5/8.5
Socket type
P43t
BA15s
W2.1d x 9.5d PK22s
S8.5/8.5 S8.5/8.5S8.5/8.5
W2.1d x 9.5DW2.1d x 4.6D Part Name
Rear fog lightHigh mounted stop lightLicense plate light Rear com bination light Step light Stop/tail light Turn signal light Back up light
Part Name
Headlight Front fog lightInteriorSide repeater Door edge warning light High/LowTurn signal lightPosition light Map light Room light
Wattage
21
16/21 5
21/5(O/S LAMP) 5(I/S LAMP) 21 165
NO.
678 9
10NO. 1 234 5 Wattage
60/55 215
55 8
1010 55
Front Rear (Glow type/Fluorescent type)
Page 221 of 284

4
CORROSION PREVENTION AND APPEARANCE CARE
45
4
IN CASE OF EMERGENCY
45
G200F01P-GAT Passenger Compartment
G200F01P CIRCUIT PROTECTED
Power outside mirror switch, Cigarette lighter, Digital clock
Audio
DRL, ABS control module, condenser fan relay
Wiper motor, Washer motor
Blower relay, Head lamp relay, Power window relay, Defogger relay, Mode actuator,
Rear fog relay, Head lamp leveling switch, Heater control panel, Left (Right) head
lamp leveling actuator
ECM, Neutral switch, Injection pump, Engine control relay, Intercooler fan relay, EGR
solenoid valve, SRS control module SRS control module
Back-up lamp switch, Vehicle speed sensor, ABS relay, Instrument cluster,
Pre-excitation resistor
Hazard switch
TA C M
Instrument cluster
A/C switch
Stop lamp switch
Hazard switch Not used. Not used.Not used.
Defogger relay
Rear fog lamp relay
Left power door lock actuator Not used.
ECM, Star t relay
Digital clock, Tachograph, Power antenna, Audio
Instrument cluster, Front (Rear) room lamp, TACM, Door warning switch & Key ill.
AMPERAGES 15A 10A10A 20A 10A 10A 15A10A10A 10A10A 10A 10A10A---
10A10A15A -
10A10A 10A
FUSE
123 4 5 6 7 8 9
10 1112 13 14 1516 17 1819 20 2122 23 24
Page 255 of 284
8
DO-IT YOURSELF MAINTENANCE
11
A translucent coolant reservoir tank is
in the engine compartment.
The coolant level in this tank should
be kept between the "L" and "F" marks when measured while the engine iswarm and idling.
The cooling system is a closed sys-
tem and normally the loss of coolant should be very slight. A noticeable drop in the coolant level could indi-cate leakage. If this occurs, have the system
checked at an authorized HYUNDAIdealer as soon as possible. If the level should drop below the "L"
level on the reservoir tank, add cool- ant.
Also, if the reservoir tank is com-
pletely empty, remove the radiatorcap and add coolant until the level reaches the filler neck.
!WARNING:
Do not open the reservoir tank lid
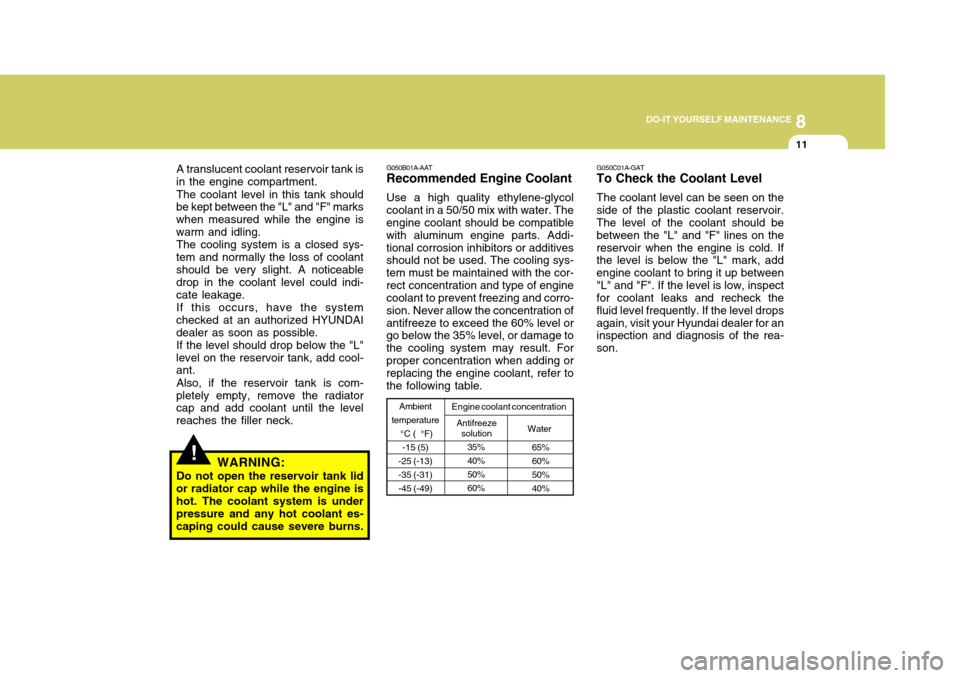
or radiator cap while the engine is hot. The coolant system is under pressure and any hot coolant es-caping could cause severe burns. G050B01A-AAT Recommended Engine Coolant Use a high quality ethylene-glycol coolant in a 50/50 mix with water. The engine coolant should be compatible with aluminum engine parts. Addi-tional corrosion inhibitors or additives should not be used. The cooling sys- tem must be maintained with the cor-rect concentration and type of engine coolant to prevent freezing and corro- sion. Never allow the concentration ofantifreeze to exceed the 60% level or go below the 35% level, or damage to the cooling system may result. Forproper concentration when adding or replacing the engine coolant, refer to the following table.
Water
65% 60%50%40%
35%40%50%60%
Ambient
temperature °C ( °F)-15 (5)
-25 (-13) -35 (-31)-45 (-49) Engine coolant concentration
Antifreezesolution G050C01A-GAT To Check the Coolant Level The coolant level can be seen on the side of the plastic coolant reservoir. The level of the coolant should be between the "L" and "F" lines on thereservoir when the engine is cold. If the level is below the "L" mark, add engine coolant to bring it up between"L" and "F". If the level is low, inspect for coolant leaks and recheck the fluid level frequently. If the level dropsagain, visit your Hyundai dealer for an inspection and diagnosis of the rea- son.