2007 Hyundai H-1 (Grand Starex) clock
[x] Cancel search: clockPage 186 of 284

44IN CASE OF EMERGENCY
10
!
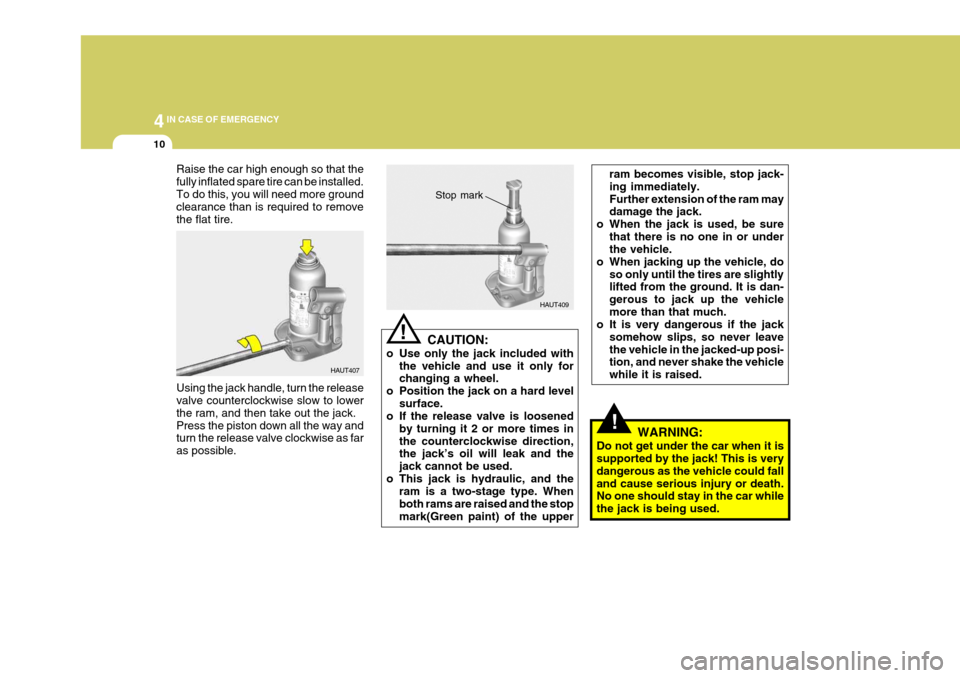
Raise the car high enough so that the fully inflated spare tire can be installed.To do this, you will need more ground clearance than is required to remove the flat tire. Using the jack handle, turn the release valve counterclockwise slow to lower the ram, and then take out the jack.Press the piston down all the way and turn the release valve clockwise as far as possible. HAUT407
HAUT409
CAUTION:
o Use only the jack included with the vehicle and use it only for changing a wheel.
o Position the jack on a hard level
surface.
o If the release valve is loosened
by turning it 2 or more times in the counterclockwise direction, the jack’s oil will leak and the jack cannot be used.
o This jack is hydraulic, and the ram is a two-stage type. Whenboth rams are raised and the stopmark(Green paint) of the upper
! Stop mark
ram becomes visible, stop jack- ing immediately.Further extension of the ram may damage the jack.
o When the jack is used, be sure
that there is no one in or underthe vehicle.
o When jacking up the vehicle, do so only until the tires are slightlylifted from the ground. It is dan- gerous to jack up the vehiclemore than that much.
o It is very dangerous if the jack
somehow slips, so never leavethe vehicle in the jacked-up posi- tion, and never shake the vehicle while it is raised.
WARNING:
Do not get under the car when it is supported by the jack! This is very dangerous as the vehicle could falland cause serious injury or death. No one should stay in the car while the jack is being used.
Page 207 of 284

4
CORROSION PREVENTION AND APPEARANCE CARE
31
4
IN CASE OF EMERGENCY
31
CAUTION:
Keep the lamps out of contact with petroleum products, such as oil,gasoline, etc.
!
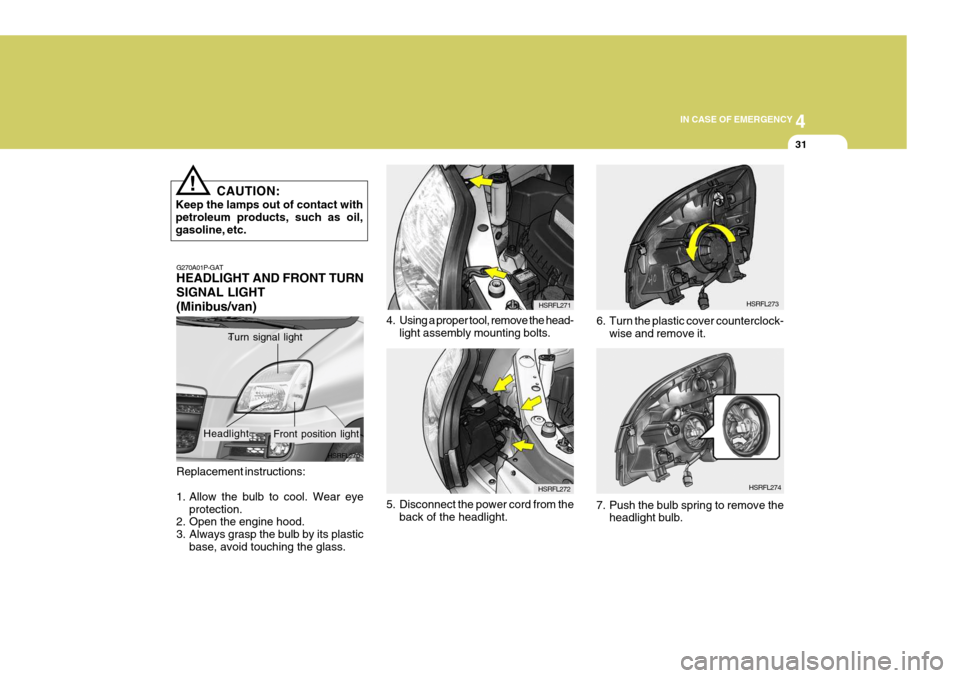
4. Using a proper tool, remove the head- light assembly mounting bolts.
Replacement instructions:
1. Allow the bulb to cool. Wear eye protection.
2. Open the engine hood.
3. Always grasp the bulb by its plastic
base, avoid touching the glass. HSRFL270
G270A01P-GAT HEADLIGHT AND FRONT TURN SIGNAL LIGHT(Minibus/van)
Turn signal light
HSRFL271
Front position light
Headlight
HSRFL274
7. Push the bulb spring to remove the headlight bulb. HSRFL273
6. Turn the plastic cover counterclock- wise and remove it.
HSRFL272
5. Disconnect the power cord from the back of the headlight.
Page 213 of 284

4
CORROSION PREVENTION AND APPEARANCE CARE
37
4
IN CASE OF EMERGENCY
37
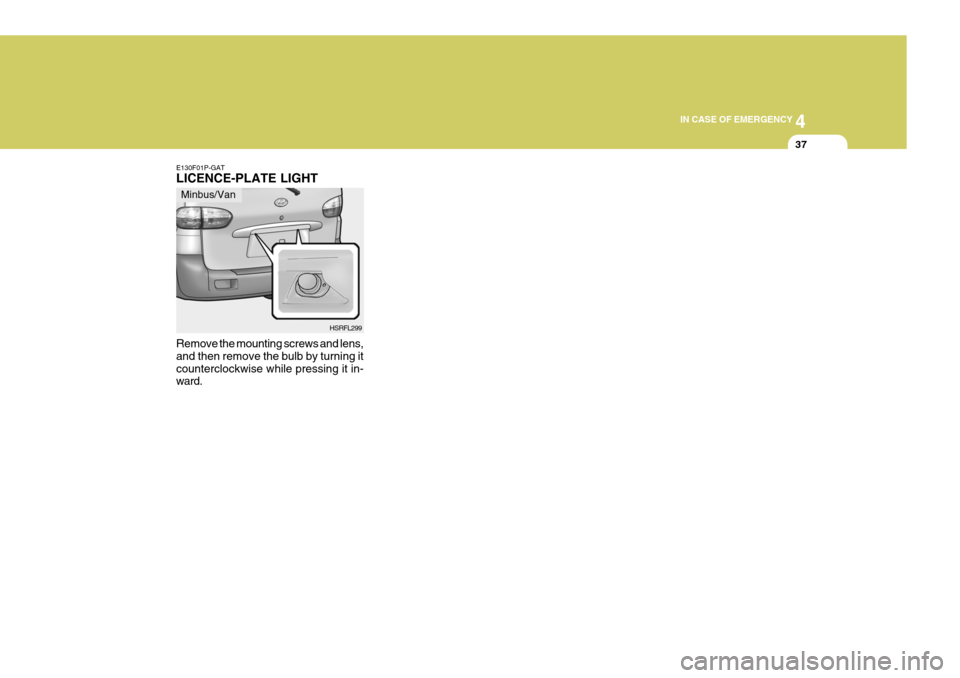
E130F01P-GAT LICENCE-PLATE LIGHT
HSRFL299
Remove the mounting screws and lens, and then remove the bulb by turning itcounterclockwise while pressing it in- ward. Minbus/Van
Page 218 of 284

44IN CASE OF EMERGENCY
42
G200D01P-GAT Inner Panel
G200D01PFUSE
1 23 4 56 7 8 9
10 11 12 13 14 15161718 19 20 CIRCUIT PROTECTED
Power outside mirror switch
Audio, Digital clock, Cigarette lighter, Multi-meter, A/T shift & key lock control module
Power outlet
Heater control module, Mode actuator
Front wiper & Washer
Rear wiper & Washer
Left front/rear sunroof relay, PTC heater relay, Fuel filter heater relay, Thermo sensor,
Hear lamp relay, Condenser fan main relay, HLLD switch, Inter cooler fan relay
ETACM, Power & hold switch, Front wiper relay, Seat belt tension reducer, Blower relay,
Overhead blower relay, Outside mirror defogger relay, Rear window defogger relay,
Rear blower relay, Rear blower main switch, Rear blower sub switch
Rear fog lamp relay
Seat warmer switchInstrument clusterSRS control module
ABS control module, Neutral switch, Back-up lamp switch, Vehicle speed sensor, Fuel
water sensor, Fuel filter switch, Fuel filter heater, Transaxle range switch, Instrument
cluster, TCM, Stop lamp switch, A/T shift & Key lock control module, G-Sensor, Overdrive
switch, A/T shift lever
Hazard switch
ETACM, ECM (D4BH), ECM (D4CB), Immobilizer control module, Idle-up control module
Rear window defogger relay
Left front sunroof relay
Left rear sunroof relay
Data link connector, Heater control module, Outside mirror defogger relay
Stop lamp switchAMPERAGES 10A 15A15A10A20A15A 10A 10A 10A 10A10A10A 10A10A 10A25A20A20A10A15A
Page 219 of 284

4
CORROSION PREVENTION AND APPEARANCE CARE
43
4
IN CASE OF EMERGENCY
43
FUSE 21 22 23 24 2526 27 28- CIRCUIT PROTECTED
Digital clock, Hazard switch, A/T key solenoid, A/T shift lever TCCM
Hazard relay, Multipurpose check connector, Front door lamp, ETACM, Step lamp,
Instrument cluster, Room lamp switch, TCM, Room lamp, Ignition key ILL & Door warning
switch
Back warning buzzer, Immobilizer control module, Audio, Power antenna
Door lock relay, Door unlock relay
Overhead blower relay
Condenser fan relay (D4CB), Inter cooler fan relay (D4CB), Glow relay (D4CB),
Stop lamp switch, Throttle flap solenoid, EGR solenoid valve
ECM (D4CB), Immobilizer control module (D4CB)
SPARE
AMPERAGES 10A 20A 10A15A 20A10A 15A10A
20A/15A/10A
Page 221 of 284

4
CORROSION PREVENTION AND APPEARANCE CARE
45
4
IN CASE OF EMERGENCY
45
G200F01P-GAT Passenger Compartment
G200F01P CIRCUIT PROTECTED
Power outside mirror switch, Cigarette lighter, Digital clock
Audio
DRL, ABS control module, condenser fan relay
Wiper motor, Washer motor
Blower relay, Head lamp relay, Power window relay, Defogger relay, Mode actuator,
Rear fog relay, Head lamp leveling switch, Heater control panel, Left (Right) head
lamp leveling actuator
ECM, Neutral switch, Injection pump, Engine control relay, Intercooler fan relay, EGR
solenoid valve, SRS control module SRS control module
Back-up lamp switch, Vehicle speed sensor, ABS relay, Instrument cluster,
Pre-excitation resistor
Hazard switch
TA C M
Instrument cluster
A/C switch
Stop lamp switch
Hazard switch Not used. Not used.Not used.
Defogger relay
Rear fog lamp relay
Left power door lock actuator Not used.
ECM, Star t relay
Digital clock, Tachograph, Power antenna, Audio
Instrument cluster, Front (Rear) room lamp, TACM, Door warning switch & Key ill.
AMPERAGES 15A 10A10A 20A 10A 10A 15A10A10A 10A10A 10A 10A10A---
10A10A15A -
10A10A 10A
FUSE
123 4 5 6 7 8 9
10 1112 13 14 1516 17 1819 20 2122 23 24
Page 256 of 284

8DO-IT YOURSELF MAINTENANCE
12
!
4. Turn the radiator cap counterclock-
wise without pressing down on it, until it stops. This relieves any pres- sure remaining in the cooling sys- tem. And remove the radiator capby pushing down and turning coun- terclockwise. Now fill the radiator with clean dem- ineralized or distilled water. Con- tinue to add clean demineralized or distilled water in small quantitiesuntil the fluid level stays up in the radiator neck.
5. Start the engine, top off the radia- tor with water and then add engine coolant to the reservoir until thelevel is between "L" and "F".
6. Replace the radiator and reservoir caps and check to be sure thedrain cocks are fully closed and not leaking. WARNING:
The cooling fan is controlled by
engine coolant temperature andmay sometimes operate even when the engine is not running. Useextreme caution when working near the blades of the cooling fan so that you are not injured by a rotat-ing fan blade. As the engine cool- ant temperature decreases, the fan will automatically shut off. This isa normal condition.
G050D02P-AAT To Change the Coolant The coolant should be changed at those intervals specified in the ve- hicle maintenance schedule in Sec- tion 6.
!
CAUTION:
Engine coolant can damage the finish of your car. If you spill en-gine coolant on the car, wash it off thoroughly with clean water.
1. Park the car on level ground, set the parking brake and remove the radia- tor cap when cool.
2. Be sure your drain receptacle is in
place. Open the drain cock on theradiator. Allow all the engine cool- ant to drain from the cooling sys- tem, then securely close the draincock.
3. Check Section 9 for the capacity of the cooling system in your car.Then, following the manufacturer's directions on the engine coolant container, add the appropriatequantity of coolant to the radiator.
Page 279 of 284

10
INDEX
3
D DAY/NIGHT INSIDE REARVIEW MIRROR ................2-34
DEFROSTING/DEFOGGING ......................................2-43
DIGITAL CLOCK ........................................................ 2-37
DOOR LOCKS ............................................................ 1-13
DRINK HOLDER ......................................................... 2-35
DRIVING FOR ECONOMY .........................................3-26
DRIVING WITH ELECTRONIC DUAL-RANGE AUTOMATIC TRANSMISSION ...............................3-14
EEMISSION CONTROL SYSTEM ................................. 7-2
ENGINE ....................................................................... 9-3
ENGINE COMPARTMENT . ......................................... 8-2
ENGINE COOLANT .................................................... 8-10
ENGINE COOLANT TEMPERATURE GAUGE ..........2-12
ENGINE EXHAUST CAN BE DANGEROUS! ............. 3-2
ENGINE NUMBER ...................................................... 1-6
ENGINE OIL ................................................................ 8-7ENGINE RPM ADJUSTMENT KNOB ........................2-24
EXPLANATION OF SCHEDULED
MAINTENANCE ITEMS .............. ...........................6-12
FFOUR-WHEEL DRIVE (4WD) .....................................3-16
FRONT DOOR EDGE WARNING LIGHT ................... 2-25
FRONT DOOR WINDOW GLASS ..............................1-28FRONT FOG LI
GHT SWITCH .................................... 2-25
FRONT/REAR WINDOW DEFROSTER SWITCH ......2-26
FUEL GAUGE ............................................................ 2-12
FUEL RECOMMENDATIONS ...................................... 1-2
FUEL TANK CAPACITY .............................................. 9-2
FUSE PANEL DESC RIPTION .................................... 4-40
GGENERAL CHECKS .................................................... 8-6
GOOD BRAKING PRAC TICE .................................... 3-23
HHAZARD WARNING SYSTEM ................................... 2-26
HEADLIGHT AIMING ADJUSTMENT ........................ 4-29
HEADLIGHT LEVELING DEVICE SYSTEM ..............2-23
HEADREST ................................................................ 1-39
HEATING AND COOLING CONTROL ........................2-38
HEATING CONTROLS ............................................... 2-42
HEIGHT ADJUSTABLE FRONT SEAT SHOULDER BELT ....................................................................... 1-43
HIGH-MOUNTED REAR STOP LIGHT .......................2-25
HOLD OPEN LOCK SYSTEM .................................... 1-14
HOOD RELEASE ....................................................... 1-25
HORN ......................................................................... 2-37