Page 84 of 282

1FEATURES OF YOUR HYUNDAI
72
B340A01A-AAT Combination Turn Signal, Head- light And High-beam SwitchTurn Signal Operation Pulling down on the lever causes the turn signals on the left side of the car to blink. Pushing upwards on the levercauses the turn signals on the right side of the car to blink. As the turn is com- pleted, the lever will automatically re-turn to the center position and turn off the turn signals at the same time. If either turn signal indicator light blinksmore rapidly than usual, goes on but does not blink, or does not go on at all, there is a malfunction in the system.Check for a burned-out fuse or bulb or see your Hyundai dealer. B340B01A-AAT Lane Change Signal To indicate a lane change, move the lever up or down to a point where it begins flashing.The lever will automatically return to the center position when released.
B340B01MC
B340C04FC-GAT Headlight Switch
To operate the headlights, turn the bar- rel on the end of the multi-function switch. The first position turns on theparking lights, sidelights, tail lights and instrument panel lights. The second position turns on the headlights. NOTE: The ignition must be in the "ON" position to turn on the headlights. Parking Light Auto Cut
o The purpose of this feature is to prevent the battery from being dis- charged.B340C02MC
MULTI-FUNCTION LIGHT SWITCH
Page 224 of 282

Engine Compartment .................................................... 6-2
General Checks ........................................................... 6-5
Maintenance Precautions ............................................. 6-6
Checking the Engine Oil ............................................... 6-6
Checking and Changing the Engine Coolant ...............6-10
Changing the Air Cleaner Filte r ....................................6-12
Checking the Transaxle Oil (Manual ) ..........................6-14
Checking the Transaxle Fluid (Automatic)..................6-15
Checking the B rakes ................................................... 6-17
Checking the Clutch Fluid ............................................ 6-18
Air Conditioning Care ................................................... 6-18
Changing the Climate Control Air Filter........................ 6-19
Checking and Replacing Fuses .................................. 6-20
Checking the Battery ................................................... 6-22
Power Steering Fluid Level .......................................... 6-24
Removal of Water from the Fuel Filter .........................6-25
Headlight Aiming Adjustment ....................................... 6-26
Replacement of Light Bulbs ......................................... 6-27
Bulb Wattage ............................................................... 6-34
Fuse Panel Description ............................................... 6-35
DO-IT-YOURSELF MAINTENANCE
6
6
Page 250 of 282

6
DO-IT-YOURSELF MAINTENANCE
27REPLACEMENT OF LIGHT BULBS
SPECIFICATIONS: "H" Horizontal center line of headlights from ground.: 665 mm (26.18 in.) "W" Distance between each headlight center. : 1,170 mm (46.06 in.) "L" Distance between the headlightsand the wall that the lights are tested against. : 3,000 mm (118.11 in.). G260A01MC-AAT Before attempting to replace a light bulb, be sure the switch is turned to the "OFF" position.The next paragraph shows how to reach the light bulbs so they may be changed. Be sure to replace the burned-out bulbwith one of the same number and watt- age rating. See page 6-34 for the wattage descrip-tions.
CAUTION:
o Keep the lamps out of contact with petroleum products, such as oil,gasoline, etc.
o If you don't have necessary tools,
the correct bulbs and the exper-tise, consult your authorized Hyundai dealer.
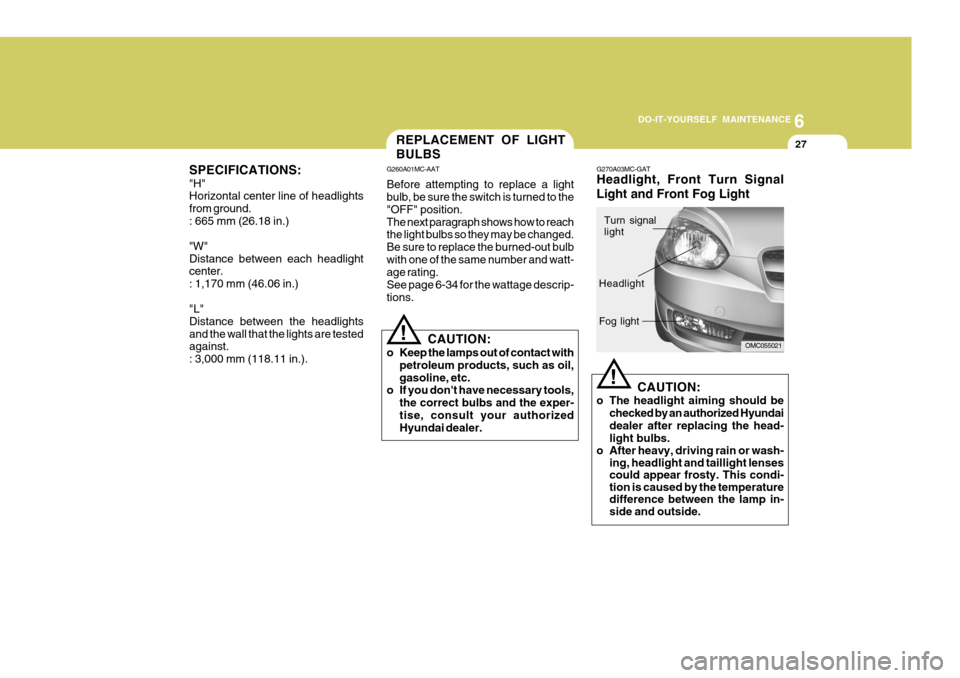
! G270A03MC-GAT Headlight, Front Turn Signal Light and Front Fog Light
CAUTION:
o The headlight aiming should be checked by an authorized Hyundai dealer after replacing the head- light bulbs.
o After heavy, driving rain or wash- ing, headlight and taillight lenses could appear frosty. This condi-tion is caused by the temperaturedifference between the lamp in-side and outside.
!
OMC055021
Turn signal light
Headlight Fog light
Page 251 of 282

6 DO-IT-YOURSELF MAINTENANCE
28
5. Remove the socket cover.
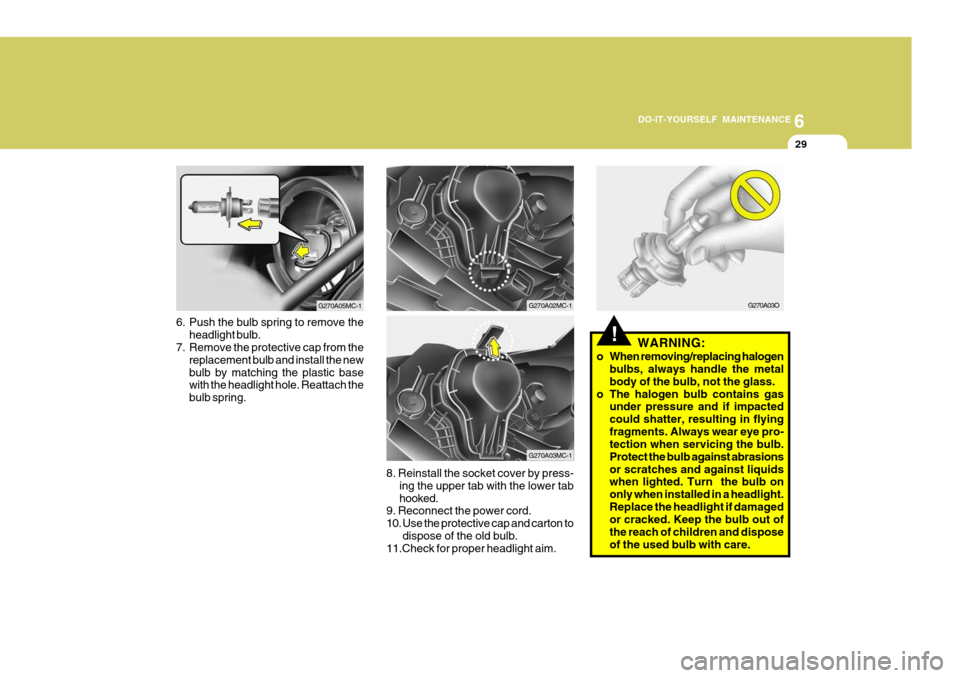
6. Push the bulb spring to remove theheadlight bulb.
7. Remove the protective cap from the replacement bulb and install the new bulb by matching the plastic basewith the headlight hole. Reattach the bulb spring and install the socket cover. Reconnect the power cord.
8. Use the protective cap and carton to dispose of the old bulb.
9.Check for proper headlight aim.
Headlight (Type A)
1. Allow the bulb to cool. Wear eye protection.
2. Open the engine hood and discon- nect the negative (-) post of the battery.
3. Always grasp the bulb by its plastic base, avoid touching the glass.
4. Disconnect the power cord from the
back of the headlight.
This is similar to the condensa- tion on your windows inside yourvehicle during the rain and doesn’tindicate a problem with your ve-hicle. If the water leaks into thelamp bulb circuitry, have the ve- hicle checked by an authorizedHyundai dealer.
OMC055022Headlight (Type B)
1. Allow the bulb to cool. Wear eye protection.
2. Open the engine hood and discon- nect the negative (-) post of the battery.
3. Always grasp the bulb by its plastic base, avoid touching the glass.
4. Disconnect the power cord from the
back of the headlight.
5. Remove the socket cover by press-ing the tab and pulling up.
G270A04MC-1
Page 252 of 282

6
DO-IT-YOURSELF MAINTENANCE
29
G270A03O
!WARNING:
o When removing/replacing halogen bulbs, always handle the metal body of the bulb, not the glass.
o The halogen bulb contains gas under pressure and if impactedcould shatter, resulting in flyingfragments. Always wear eye pro- tection when servicing the bulb. Protect the bulb against abrasionsor scratches and against liquids when lighted. Turn the bulb on only when installed in a headlight.Replace the headlight if damaged or cracked. Keep the bulb out of the reach of children and disposeof the used bulb with care.
6. Push the bulb spring to remove the
headlight bulb.
7. Remove the protective cap from the
replacement bulb and install the newbulb by matching the plastic base with the headlight hole. Reattach the bulb spring.
8. Reinstall the socket cover by press-ing the upper tab with the lower tab hooked.
9. Reconnect the power cord.
10. Use the protective cap and carton to
dispose of the old bulb.
11.Check for proper headlight aim.
G270A05MC-1G270A02MC-1
G270A03MC-1
Page 257 of 282
6 DO-IT-YOURSELF MAINTENANCE
34BULB WATTAGES
G280A01MC-GAT
G280A01MC-A
Socket Type P43t-38
BAU15s
W2.1X9.5d W2.1X9.5d
S8.5/8.5PG13
W2.1X9.5d
BAY15d Part Name
High Mounted Rear Stop Light(If Installed) Luggage Compartment Light
Rear Turn Signal LightRear Fog Light (If Installed) Back-up Light
License Plate Light
Part Name
Headlight (High/Low)Front Turn Signal LightFront Position Light Map Light Interior LightFront Fog Light (If Installed) Side Repeater Light (If Installed) Stop/Tail Light
No.
12 3 4 5 67 No.
8 9
10 11 12 13
Wattage
55/60
215
1010 27 5
21/5
Wattage
165
21 5
16
5 Socket Type
W2.1X9.5d S8.5/8.5BA15s
W2.1X9.5d W2.1X9.5d S8.5/8.5
4 Door 3 Door