2007 Hyundai Accent fog light
[x] Cancel search: fog lightPage 9 of 282

1. Hood Release Lever ............................................ 1-90
2. Front/Rear Fog Light Switch (If Installed) ............ 1-77
3. Headlight Leveling Switch (If Installed) ................ 1-76
4. Instrument Cluster.............................................. 1-66
5. Multi-Function Light Switch................................. 1-72
6. Horn and Driver's Front Airbag (If Installed) 1-98, 1-44
7. Windshield W iper/Washer Switch ........................1-74
8. Hazard Warning Light Switch.............................. 1-76
9. Digital Clock ........................................................ 1-78
10. Rear Window De froster Switch ............................ 1-77
11. Audio System (If Installed) ................................ 1-118
12. Passenger's Front Airbag (If Installed) ................1-44
13. Glov e Box ........................................................... 1-86
CAUTION:
When installing a container of liquid air freshener inside the vehicle, do not place it near the instrument cluster nor on the instrument panel pad surface. If there is any leakage from the air freshener onto these areas (Instrument cluster, instrument panel pad or air ventilator), itmay damage these parts. If the liquid from air freshener does leak onto these areas, wash them with water immediately.
! 14. Heating/Air Conditioning Control Panel
(If Installed) ....................................................... 1-100
15. Multi Box ............................................................ 1-86
16. Cigarette Lighter .................................................. 1-78
17. Seat Warmer Switch (If Installed) ........................ 1-18
18. Electronic Stability Program (ESP) Switch
(If Installed) ......................................................... 2-14
19. Power Outlet ....................................................... 1-79
20. Ashtray ............................................................... 1-80
21. Shift Lever ........................................................... 2-9
22. Parking Brake Lever ........................................... 1-89
23. Front Drink Holder ............................................... 1-80
24. Trunk Lid Release Lever .....................................1-94
25. Fuel Filler Lid Release Lever ...............................1-92
Page 11 of 282

CAUTION:
When installing a container of liquid air freshener inside the vehicle, do not place it near the instrument cluster nor on the instrument panel pad surface. If there is any leakage from the air freshener onto these areas (Instrument cluster, instrument panel pad or air ventilator), it may damage these parts. If the liquid from air freshener does leak onto these areas, wash themwith water immediately.!
1. Hood
Release Lever ............................................ 1-90
2. Front/Rear Fog Light Switch (If Installed) ............ 1-77
3. Headlight Leveling Switch (If Installed) ................ 1-76
4. Instrument Cluster.............................................. 1-66
5. Multi-Function Light Switch................................. 1-72
6. Horn and Driver's Front Airbag (If Installed) . 1-98,1-44
7. Windshield W iper/Washer Switch ........................1-74
8. Hazard Warning Light Switch.............................. 1-76
9. Digital Clock ........................................................ 1-78
10. Rear Window De froster Switch ............................ 1-77
11. Audio System (If Installed) ................................ 1-118
12. Passenger's Front Airbag (If Installed) ................1-44
13. Glov e Box ........................................................... 1-8614. Heating/Air Conditioning Control Panel
(If Installed) ....................................................... 1-100
15. Multi Box ............................................................ 1-86
16. Cigarette Lighter .................................................. 1-78
17. Seat Warmer Switch (If Installed) ........................ 1-18
18. Electronic Stability Program (ESP) Switch (If Installed) ......................................................... 2-14
19. Power Outlet ....................................................... 1-79
20. Ashtray ............................................................... 1-80
21. Shift Lever ........................................................... 2-9
22. Parking Brake Lever ........................................... 1-89
23. Front Drink Holder ............................................... 1-80
24. Trunk Lid Release Lever .....................................1-94
25. Fuel Filler Lid Release Lever ...............................1-92
Page 89 of 282
1
FEATURES OF YOUR HYUNDAI
77FOG LIGHT SWITCH
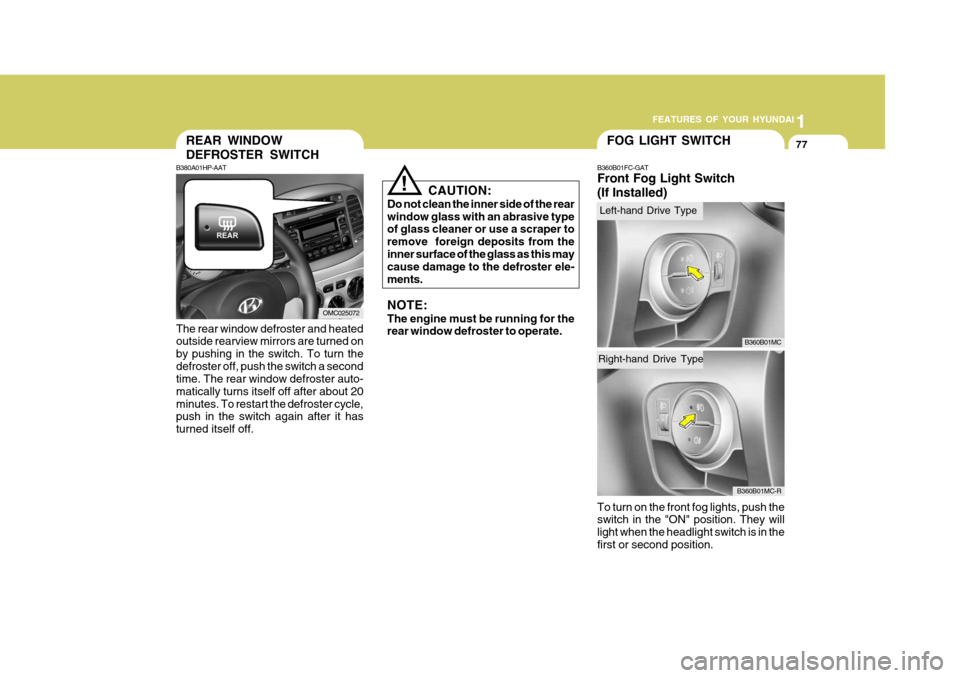
B360B01FC-GAT Front Fog Light Switch (If Installed) To turn on the front fog lights, push the switch in the "ON" position. They will light when the headlight switch is in thefirst or second position.
CAUTION:
Do not clean the inner side of the rearwindow glass with an abrasive type of glass cleaner or use a scraper to remove foreign deposits from theinner surface of the glass as this may cause damage to the defroster ele- ments. NOTE: The engine must be running for the rear window defroster to operate.
!
B360B01MC
REAR WINDOW DEFROSTER SWITCH
B380A01HP-AAT The rear window defroster and heated outside rearview mirrors are turned on by pushing in the switch. To turn thedefroster off, push the switch a second time. The rear window defroster auto- matically turns itself off after about 20minutes. To restart the defroster cycle, push in the switch again after it has turned itself off.
OMC025072
B360B01MC-R
Right-hand Drive Type
Left-hand Drive Type
Page 90 of 282

1FEATURES OF YOUR HYUNDAI
78DIGITAL CLOCK
B400A01A-AAT There are three control buttons for the digital clock. Their functions are: HOUR - Push "H" to advance the hour
indicated. MIN - Push "M" to advance the minute
indicated.RESET - Push "R" to reset minutes to
":00" to facilitate resetting the clock to the correct time. When this is done: Pressing "R" between 10 : 30 and 11 : 29 changes the readout to 11 : 00. Pressing "R" between 11 : 30 and 12 :29 changes the readout to 12 : 00.CIGARETTE LIGHTER
B420A02A-AAT
For the cigarette lighter to work, the key must be in the "ACC" position or the "ON" position. To use the cigarette lighter, push it allthe way into its socket. When the ele- ment has heated, the lighter will pop out to the "ready" position.Do not hold the cigarette lighter pressed in. This can damage the heating ele- ment and create a fire hazard.If it is necessary to replace the ciga- rette lighter, use only a genuine Hyundai replacement or its approved equivalent. HHR2098A
OMC025098
B360A01Y-GAT Rear Fog Light Switch (If Installed)
To turn on the rear fog lights, push the switch. They will light when the head- light switch is in the second position and the key is in the "ON" position.
B360A01MC
B360A01MC-R
Right-hand Drive Type
Left-hand Drive Type
Page 250 of 282
6
DO-IT-YOURSELF MAINTENANCE
27REPLACEMENT OF LIGHT BULBS
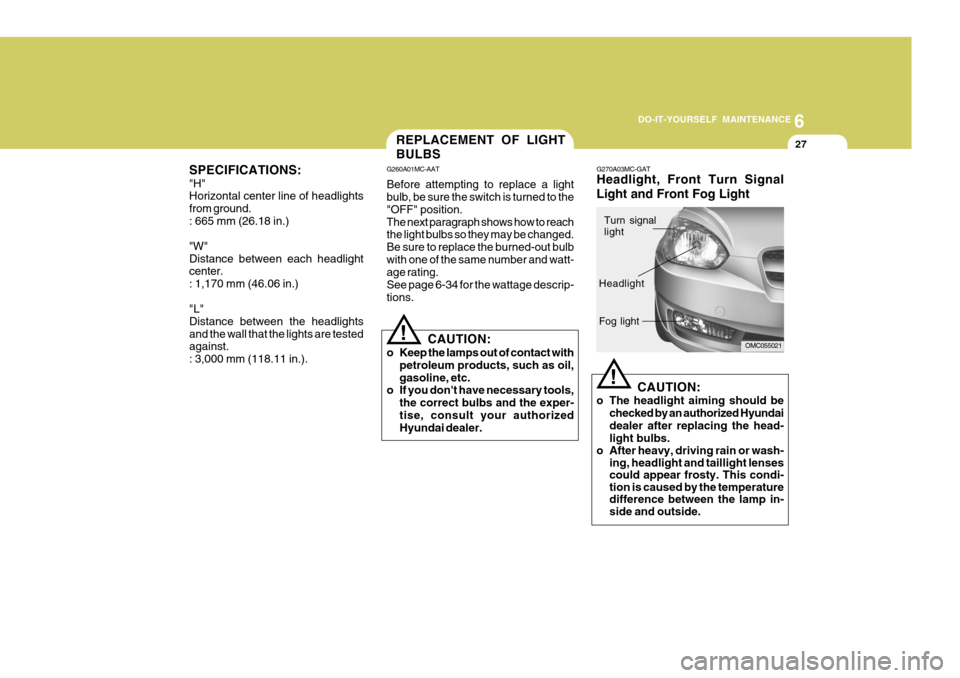
SPECIFICATIONS: "H" Horizontal center line of headlights from ground.: 665 mm (26.18 in.) "W" Distance between each headlight center. : 1,170 mm (46.06 in.) "L" Distance between the headlightsand the wall that the lights are tested against. : 3,000 mm (118.11 in.). G260A01MC-AAT Before attempting to replace a light bulb, be sure the switch is turned to the "OFF" position.The next paragraph shows how to reach the light bulbs so they may be changed. Be sure to replace the burned-out bulbwith one of the same number and watt- age rating. See page 6-34 for the wattage descrip-tions.
CAUTION:
o Keep the lamps out of contact with petroleum products, such as oil,gasoline, etc.
o If you don't have necessary tools,
the correct bulbs and the exper-tise, consult your authorized Hyundai dealer.
! G270A03MC-GAT Headlight, Front Turn Signal Light and Front Fog Light
CAUTION:
o The headlight aiming should be checked by an authorized Hyundai dealer after replacing the head- light bulbs.
o After heavy, driving rain or wash- ing, headlight and taillight lenses could appear frosty. This condi-tion is caused by the temperaturedifference between the lamp in-side and outside.
!
OMC055021
Turn signal light
Headlight Fog light
Page 253 of 282
6 DO-IT-YOURSELF MAINTENANCE
30
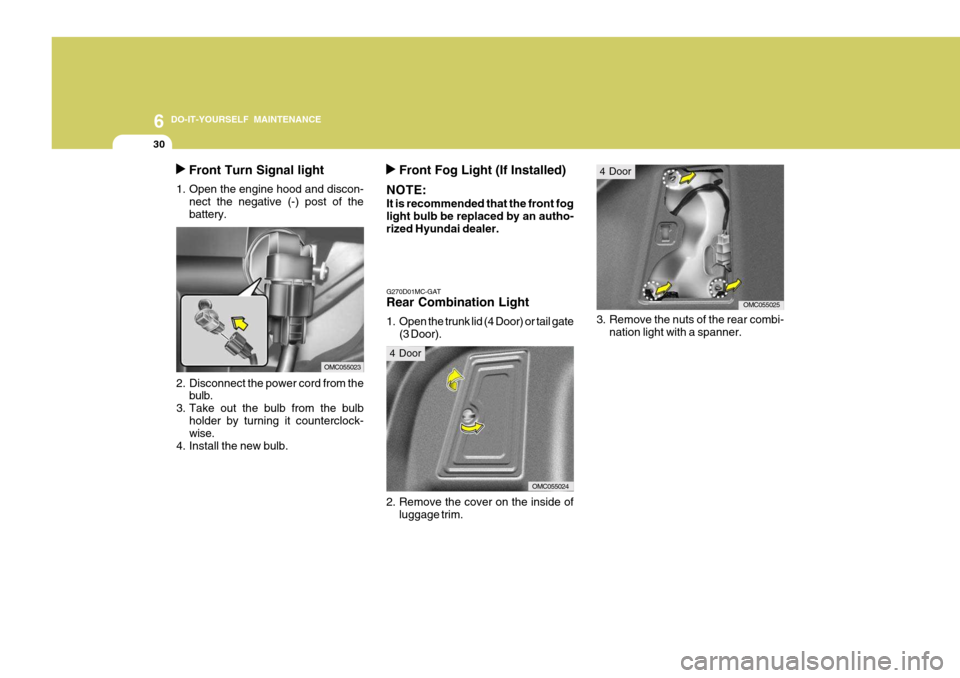
Front Turn Signal light
1. Open the engine hood and discon- nect the negative (-) post of the battery.
2. Disconnect the power cord from the bulb.
3. Take out the bulb from the bulb holder by turning it counterclock- wise.
4. Install the new bulb.
OMC055023
Front Fog Light (If Installed)
NOTE: It is recommended that the front fog light bulb be replaced by an autho- rized Hyundai dealer.
3. Remove the nuts of the rear combi- nation light with a spanner.
G270D01MC-GAT Rear Combination Light
1. Open the trunk lid (4 Door) or tail gate(3 Door).
OMC055024
OMC055025
2. Remove the cover on the inside of luggage trim.
4 Door
4 Door
Page 254 of 282
6
DO-IT-YOURSELF MAINTENANCE
31
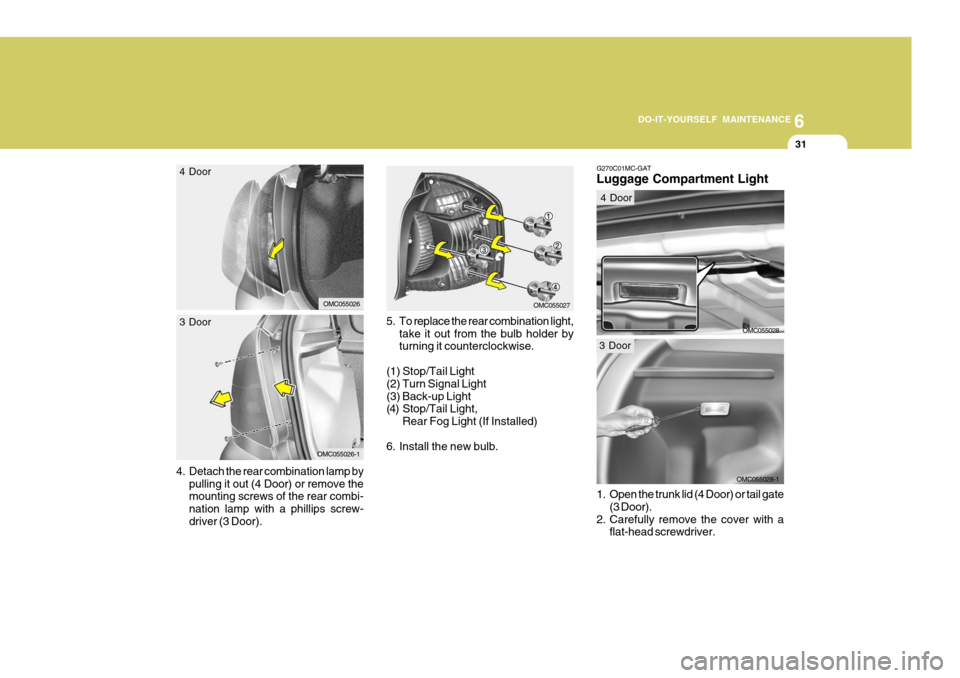
5. To replace the rear combination light, take it out from the bulb holder by turning it counterclockwise.
(1) Stop/Tail Light (2) Turn Signal Light(3) Back-up Light
(4) Stop/Tail Light, Rear Fog Light (If Installed)
6. Install the new bulb.
4.
Detach the rear combination lamp by pulling it out (4 Door) or remove the mounting screws of the rear combi- nation lamp with a phillips screw-driver (3 Door).
OMC055027OMC055026
4 Door
OMC055026-1
3 Door
OMC055028-1
G270C01MC-GAT Luggage Compartment Light
OMC055028
1. Open the trunk lid (4 Door) or tail gate (3 Door).
2. Carefully remove the cover with a flat-head screwdriver.
4 Door
3 Door
Page 257 of 282
6 DO-IT-YOURSELF MAINTENANCE
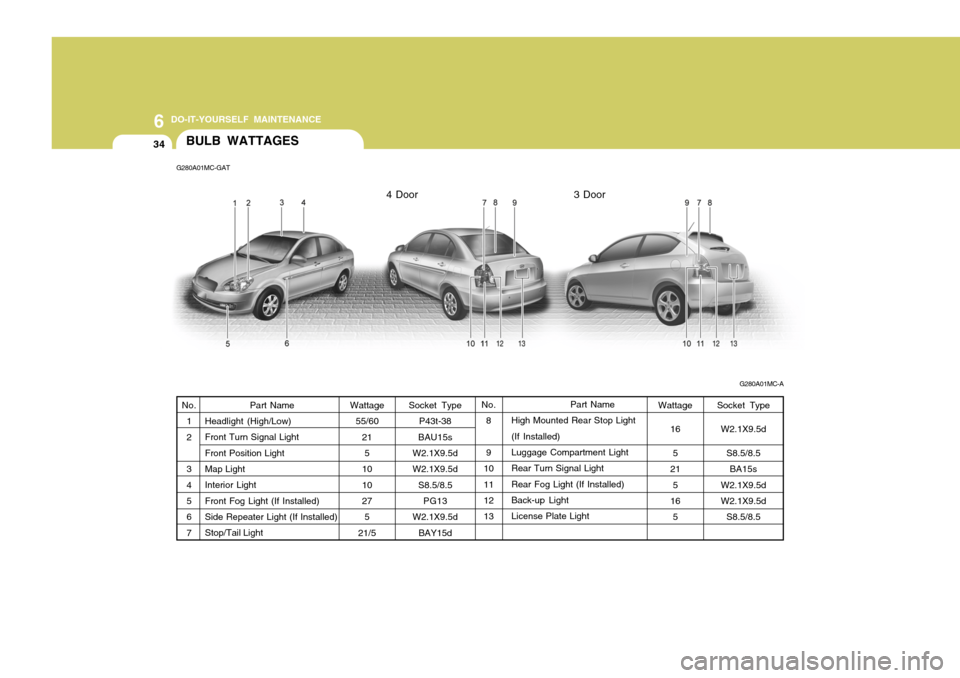
34BULB WATTAGES
G280A01MC-GAT
G280A01MC-A
Socket Type P43t-38
BAU15s
W2.1X9.5d W2.1X9.5d
S8.5/8.5PG13
W2.1X9.5d
BAY15d Part Name
High Mounted Rear Stop Light(If Installed) Luggage Compartment Light
Rear Turn Signal LightRear Fog Light (If Installed) Back-up Light
License Plate Light
Part Name
Headlight (High/Low)Front Turn Signal LightFront Position Light Map Light Interior LightFront Fog Light (If Installed) Side Repeater Light (If Installed) Stop/Tail Light
No.
12 3 4 5 67 No.
8 9
10 11 12 13
Wattage
55/60
215
1010 27 5
21/5
Wattage
165
21 5
16
5 Socket Type
W2.1X9.5d S8.5/8.5BA15s
W2.1X9.5d W2.1X9.5d S8.5/8.5
4 Door 3 Door