2007 Hyundai Accent door panel
[x] Cancel search: door panelPage 12 of 282

YOUR VEHICLE AT A GLANCE
B255A02MC-GAT INDICATOR SYMBOLS ON THE INSTRUMENT PANEL * More detailed explanations of these items will be found begining on page 1-58.Turn Signal Indicator Lights
SRS (Airbag) Service Reminder Indicator (If Installed) O/D OFF Indicator Light (Automatic transaxle only) High Beam Indicator Light
Low Oil Pressure Warning Light
ABS Service Reminder Indicator (If Installed)
Door Ajar Warning Light
Parking Brake/Low Brake Fluid Level Warning Light
Charging System Warning Light Fuel Filter Warning Light (Diesel only)
Low Fuel Level Warning Light Diesel Pre-heat Indicator Light (Diesel only)
Malfunction Indicator Light (If Installed)
Immobilizer Warning Light (If Installed)
Passenger's Front Airbag OFF Indicator Light (If Installed)
Trunk Lid/Tail Gate Open Warning Light
Engine Coolant Temperature Indicator Light (If Installed) Seat Belt Warning Light
Electronic Power Steering (EPS) System Warning Light (If Installed)
Electronic Stability Program Indicator Lights (If Installed)
120
km/hOverspeed Warning Light (If Installed)
Page 48 of 282

1FEATURES OF YOUR HYUNDAI
36
B230E01MC-GAT Securing a Child Restraint Sys- tem with "Tether Anchorage" System (3 Door) Three child restraint hook holders are located on the rear floor panel.
2. Route the child restraint seat strapover the seatback. For vehicles with adjustable head- rests, route the tether strap under theheadrest and between the headrest posts, otherwise route the tether strap over the top of the seatback.
3. Connect the tether strap hook (2) to the child restraint hook holder (1) andtighten to secure the seat. B230C02MC
1. Open the tether anchor cover on therear floor panel.
B230E01MC
B230C03A-GAT Securing a Child Restraint Sys- tem with "Tether Anchorage"System (4 Door) Three child restraint hook holders are located on the rear seat package tray.
1. Open the tether anchor cover on the rear seat package tray.B230C01MC
Page 50 of 282

1FEATURES OF YOUR HYUNDAI
38
WARNING:
o Do not install a child restraint seat at the center of the rear seat using the vehicle's ISOFIX anchors. The ISOFIX anchors are only providedfor the left and right outboard rear seating positions. Do not misuse the ISOFIX anchors by attemptingto attach a child restraint seat in the middle of the rear seat to the ISOFIX anchors. In a crash, thechild restraint seat ISOFIX attach- ments may not be strong enough to secure the child restraint seatproperly in the center of the rear seat and may break, causing seri- ous injury or death.
o When using the vehicle’s "ISOFIX" system to install a child restraintsystem in the rear seat, all unusedvehicle rear seat belt metal latch plates or tabs must be latched securely in their seat belt bucklesand the seat belt webbing must be retracted behind the child restraint to prevent the child from reachingand taking hold of unretracted seat
belts. Unlatched metal latch plates
B230D03MC
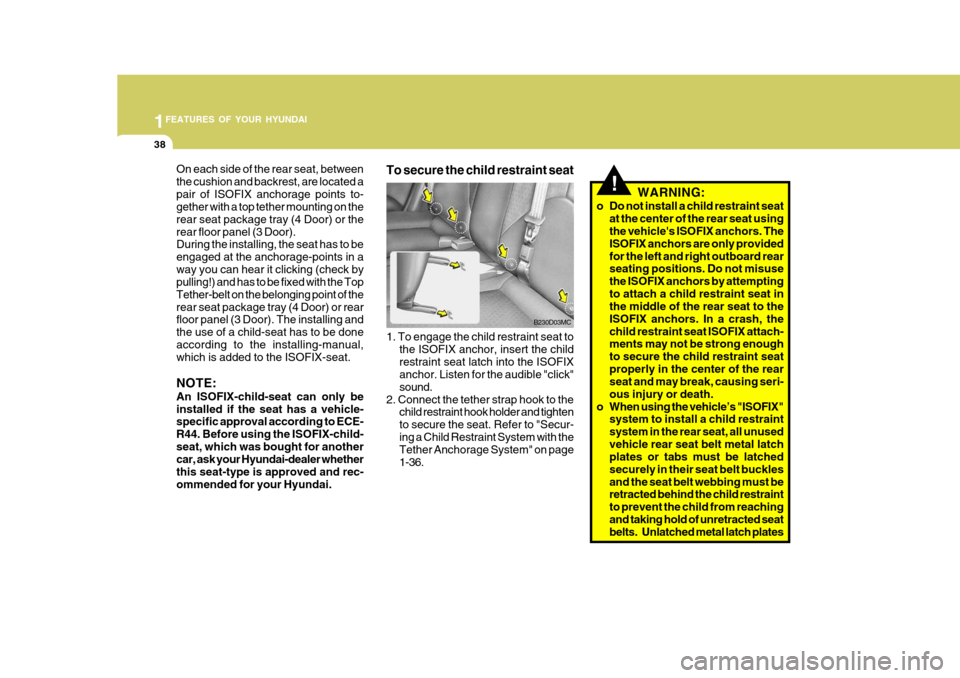
1. To engage the child restraint seat to the ISOFIX anchor, insert the child restraint seat latch into the ISOFIX anchor. Listen for the audible "click" sound.
2. Connect the tether strap hook to the child restraint hook holder and tightento secure the seat. Refer to "Secur-ing a Child Restraint System with the Tether Anchorage System" on page 1-36.
To secure the child restraint seat!
On each side of the rear seat, between the cushion and backrest, are located apair of ISOFIX anchorage points to- gether with a top tether mounting on the rear seat package tray (4 Door) or therear floor panel (3 Door). During the installing, the seat has to be engaged at the anchorage-points in away you can hear it clicking (check by pulling!) and has to be fixed with the Top Tether-belt on the belonging point of therear seat package tray (4 Door) or rear floor panel (3 Door). The installing and the use of a child-seat has to be doneaccording to the installing-manual, which is added to the ISOFIX-seat. NOTE: An ISOFIX-child-seat can only be installed if the seat has a vehicle- specific approval according to ECE- R44. Before using the ISOFIX-child-seat, which was bought for another car, ask your Hyundai-dealer whether this seat-type is approved and rec-ommended for your Hyundai.
Page 208 of 282

4
CORROSION PREVENTION AND APPEARANCE CARE
3
4
CORROSION PREVENTION AND APPEARANCE CARE
3TO HELP PREVENT CORRO- SION
E020C01A-AAT Keep Your Garage Dry Don't park your car in a damp, poorly ventilated garage. This creates a fa- vorable environment for corrosion. Thisis particularly true if you wash your car in the garage or drive it into the garage when it is still wet or covered withsnow, ice or mud. Even a heated ga- rage can contribute to corrosion un- less it is well ventilated so moisture isdispersed. E020D01A-AAT Keep Paint and Trim in Good Condition Scratches or chips in the finish should be covered with "touch-up" paint assoon as possible to reduce the possi- bility of corrosion. If bare metal is show- ing through, the attention of a qualifiedbody and paint shop is recommended. E020E01A-AAT Don't Neglect the Interior Moisture can collect under the floor mats and carpeting to cause corro- sion. Check under the mats periodi- cally to be sure the carpeting is dry.Use particular care if you carry fertiliz- ers, cleaning materials or chemicals in the car.These should be carried only in proper containers and any spills or leaks should be cleaned up, flushed withclear water and thoroughly dried.
E020B01A-AAT Keep Your Car Clean The best way to prevent corrosion is to keep your car clean and free of corro- sive materials. Attention to the under- side of the car is particularly important.
o If you live in a high-corrosion area —
where road salts are used, near the ocean, areas with industrial pollu- tion, acid rain, etc.—, you should take extra care to prevent corro-sion. In winter, hose off the under- side of your car at least once a month and be sure to clean theunderside thoroughly when winter is over.
o When cleaning underneath the car, give particular attention to the com-ponents under the fenders and other areas that are hidden from view. Doa thorough job; just dampening the accumulated mud rather than wash-ing it away will accelerate corrosionrather than prevent it. Water under high pressure and steam are par- ticularly effective in removing accu-mulated mud and corrosive materi- als.
o When cleaning lower door panels,
rocker panels and frame members,be sure that drain holes are kept open so that moisture can escapeand not be trapped inside to ac- celerate corrosion.
E020A01A-AAT You can help prevent corrosion from getting started by observing the follow- ing:
Page 260 of 282

6
DO-IT-YOURSELF MAINTENANCE
37
G200E01MC-GAT Inner Panel FUSE RATING
25A 25A 10A 25A10A 10A15A 25A 10A 10A 20A10A 10A 30A 25A 10A 10A15A 10A 10A CIRCUIT PROTECTED
Driver Power Window Switch, Assist Power Window Switch,Rear Power Window Switch RH Driver Power Window Switch, Rear Power Window Switch LHPower Outside Mirror & Mirror Folding Switch, Digital Clock,Audio Cigarette Lighter, Power Outlet Head Lamp LHECM, Driver Power Outside Mirror & Mirror Folding Motor,Assist Power Outside Mirror & Mirror Folding Motor, PCM, Rear Defogger Switch Multi-function Switch, Rear Wiper MotorMulti-function Switch, Front Wiper Motor Rear Combination Lamp LH, License Lamp LH(3DOOR),Head Lamp LH, DRL Control ModuleHead Lamp Leveling Switch, Head Lamp Leveling Actuator,Fuel Filter Heater Relay(Diesel), Front Fog Relay Driver Seat Warmer Switch, Assist Seat Warmer Switch
Active Interior & Humidity Sensor, A/C Control Module, BCM, Blower Relay, SunroofMotor, PTC Heater Relay #2, #3(Diesel) Rear Combination Lamp RH, License Lamp RH(3DOOR),Head Lamp RH, License Lamp(4DOOR), Shunt ConnectorBCM, Rear Defogger AMP Head Lamp RH, Instrument Cluster, DRL Control Module
Hazard Relay, Hazard Switch SRS Control Module
PAB Cut Off SwitchRear Combination Lamp, Rear Fog Lamp Switch, BCM
P/WDW RH
P/WDW LH AUDIO
C/LIGHTER H/LP (LH)
HTD MIRR
RR WIPER FR WIPER
TAIL LP (LH)
IGN
HTD SEAT BLOWER
TAIL LP (RH) HTD GLASS AMP
H/LP (RH) HAZARD
A/BAG
SNSR
RR FOG LP
FUSE
G200E01MC
Page 267 of 282

8CONSUMER INFORMATION
2VEHICLE IDENTIFICATION NUMBER (VIN)
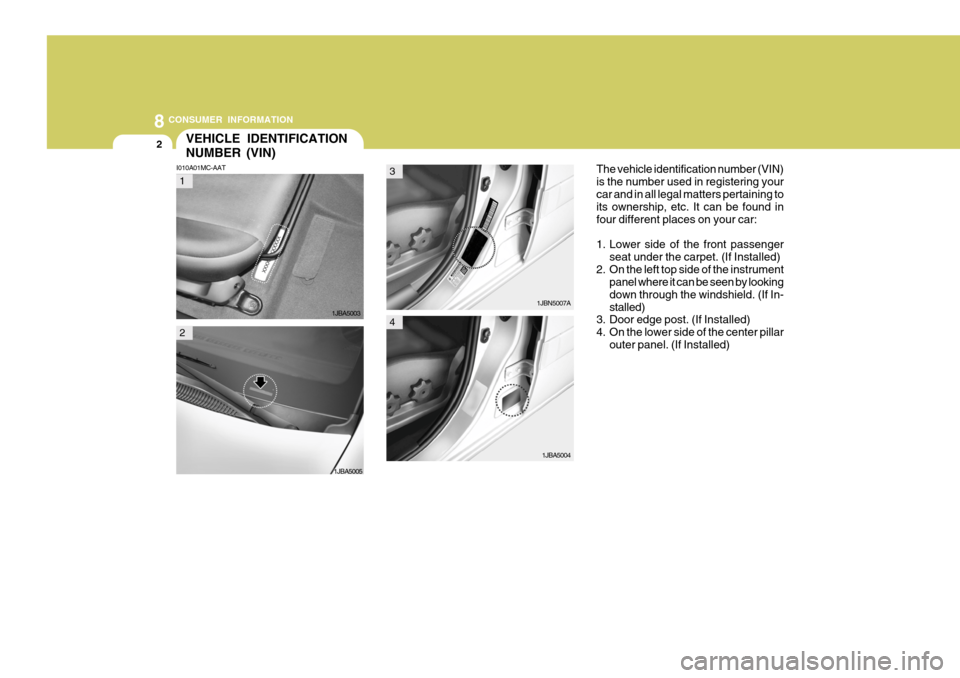
I010A01MC-AAT The vehicle identification number (VIN) is the number used in registering yourcar and in all legal matters pertaining to its ownership, etc. It can be found in four different places on your car:
1. Lower side of the front passenger
seat under the carpet. (If Installed)
2. On the left top side of the instrument panel where it can be seen by looking down through the windshield. (If In-stalled)
3. Door edge post. (If Installed)
4. On the lower side of the center pillar
outer panel. (If Installed)
1JBA5003
1JBA5004
1JBA5005 1JBN5007A
1
2
3
4
Page 279 of 282

10
INDEX
3
D Door Central door locks .................................................... 1-9
Door locks ................................................................ 1-7 Locking, unlocking front doors with a key ................ 1-7
Drink Holder ............................................................... 1-80
Driving
Economical driving ................................................. 2-18
Smooth corneri ng .................................................... 2-20
Winter driving .......................................................... 2-20
EElectronic Stability Program ...................................... 2-14
Emission Contro l System ............................................ 7-2
Engine
Before starting the engine ....................................... 2-3
Compartment ........................................................... 6-2
Coolant ................................................................... 6-10
Coolant temperature gauge .....................................1-66
If the engine overheats ............................................. 3-4
Number ..................................................................... 8-3
Oil ............................................................................. 6-6Starting ..................................................................... 2-5
Emergency Commodity ............................................. 3-11
Engine Exhaust Can Be Dangerous ............................ 2-2 F Fog Light
Front ....................................................................... 1-77
Rear ........................................................................ 1-78
Front Seats
Adjustable front seats ............................................. 1-15
Adjustable headrests .............................................. 1-16
Adjusting seat forward and rearward .......................1-15
Adjusting seatback angle ....................................... 1-15
Seat warmer ........................................................... 1-17
Fuel
Capacity ................................................................... 9-2
Gauge ..................................................................... 1-66
Recommendations .................................................... 1-2
Fuel Filler Lid
Remote release ...................................................... 1-92
Fuses ........................................................................ 6-20
Fuse Panel description .............................................. 6-35
G General Checks ........................................................... 6-5
Glove Box ................................................................. 1-86
H Hazard Warning System ............................................ 1-76
Headlight Aiming Adjustment..................................... 6-26
Headlight Leveling Device S ystem ............................1-76
Heating and Cooling Control ......................................1-99