Page 24 of 282

1FEATURES OF YOUR HYUNDAI
12
!
WINDOW GLASS
B050A01A-AAT
To raise or lower the window, turn the window regulator handle clockwise or counterclockwise. WARNING:
When opening or closing the win- dows, make sure your passenger'sarms, hands and body are safely out of the way.
3FDA2015
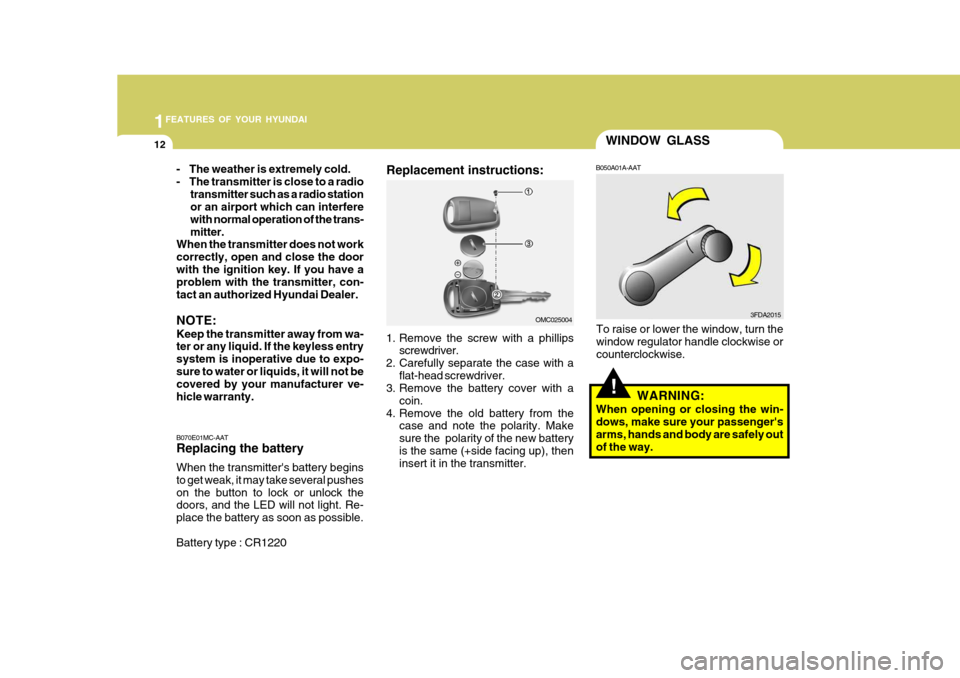
B070E01MC-AAT Replacing the battery When the transmitter's battery begins to get weak, it may take several pusheson the button to lock or unlock the doors, and the LED will not light. Re- place the battery as soon as possible. Battery type : CR1220 1. Remove the screw with a phillips
screwdriver.
2. Carefully separate the case with a flat-head screwdriver.
3. Remove the battery cover with a
coin.
4. Remove the old battery from the case and note the polarity. Make sure the polarity of the new batteryis the same (+side facing up), then insert it in the transmitter. OMC025004
- The weather is extremely cold.
- The transmitter is close to a radio
transmitter such as a radio station or an airport which can interfere with normal operation of the trans-mitter.
When the transmitter does not workcorrectly, open and close the doorwith the ignition key. If you have a problem with the transmitter, con- tact an authorized Hyundai Dealer. NOTE: Keep the transmitter away from wa- ter or any liquid. If the keyless entry system is inoperative due to expo-sure to water or liquids, it will not be covered by your manufacturer ve- hicle warranty. Replacement instructions:
Page 224 of 282

Engine Compartment .................................................... 6-2
General Checks ........................................................... 6-5
Maintenance Precautions ............................................. 6-6
Checking the Engine Oil ............................................... 6-6
Checking and Changing the Engine Coolant ...............6-10
Changing the Air Cleaner Filte r ....................................6-12
Checking the Transaxle Oil (Manual ) ..........................6-14
Checking the Transaxle Fluid (Automatic)..................6-15
Checking the B rakes ................................................... 6-17
Checking the Clutch Fluid ............................................ 6-18
Air Conditioning Care ................................................... 6-18
Changing the Climate Control Air Filter........................ 6-19
Checking and Replacing Fuses .................................. 6-20
Checking the Battery ................................................... 6-22
Power Steering Fluid Level .......................................... 6-24
Removal of Water from the Fuel Filter .........................6-25
Headlight Aiming Adjustment ....................................... 6-26
Replacement of Light Bulbs ......................................... 6-27
Bulb Wattage ............................................................... 6-34
Fuse Panel Description ............................................... 6-35
DO-IT-YOURSELF MAINTENANCE
6
6
Page 245 of 282

6 DO-IT-YOURSELF MAINTENANCE
22
!
CHECKING THE BATTERY
G210A01A-AAT
WARNING:
Batteries can be dangerous! When working with batteries, carefully ob-serve the following precautions to avoid serious injuries. The fluid in the battery contains a strong solution of sulfuric acid, which is poi- sonous and highly corrosive. Be careful not to spill it on yourself or the car. If youdo spill battery fluid on yourself, imme- diately do the following:
OMC055018
G200C01CM-GAT Power Connector
NOTE:
o If the power connector is pulled
up from the fuse panel, the warn- ing chime, audio, clock and inte- rior lamps, etc., will not operate. The following items must be resetafter replacement. - Digital Clock - Trip computer
- Automatic heating and cooling control system
- Audio
o Even though the power connector is pulled up, the battery can stillbe discharged by operation of theheadlights or other electrical de- vices.
Your vehicle is equipped with a power connector to prevent battery discharge if your vehicle is parked without being operated for prolonged periods. Use thefollowing procedures before parking the vehicle for prolonged periods.
1. Turn off the engine.
2. Turn off the headlights and tail lights.
3. Open the driver’s side panel cover
and pull up the power connector.
4. Insert the power connector in the
opposite direction.
G200F01MC
Page 251 of 282

6 DO-IT-YOURSELF MAINTENANCE
28
5. Remove the socket cover.
6. Push the bulb spring to remove theheadlight bulb.
7. Remove the protective cap from the replacement bulb and install the new bulb by matching the plastic basewith the headlight hole. Reattach the bulb spring and install the socket cover. Reconnect the power cord.
8. Use the protective cap and carton to dispose of the old bulb.
9.Check for proper headlight aim.
Headlight (Type A)
1. Allow the bulb to cool. Wear eye protection.
2. Open the engine hood and discon- nect the negative (-) post of the battery.
3. Always grasp the bulb by its plastic base, avoid touching the glass.
4. Disconnect the power cord from the
back of the headlight.
This is similar to the condensa- tion on your windows inside yourvehicle during the rain and doesn’tindicate a problem with your ve-hicle. If the water leaks into thelamp bulb circuitry, have the ve- hicle checked by an authorizedHyundai dealer.
OMC055022Headlight (Type B)
1. Allow the bulb to cool. Wear eye protection.
2. Open the engine hood and discon- nect the negative (-) post of the battery.
3. Always grasp the bulb by its plastic base, avoid touching the glass.
4. Disconnect the power cord from the
back of the headlight.
5. Remove the socket cover by press-ing the tab and pulling up.
G270A04MC-1