2007 Hyundai Accent headlight aiming
[x] Cancel search: headlight aimingPage 224 of 282

Engine Compartment .................................................... 6-2
General Checks ........................................................... 6-5
Maintenance Precautions ............................................. 6-6
Checking the Engine Oil ............................................... 6-6
Checking and Changing the Engine Coolant ...............6-10
Changing the Air Cleaner Filte r ....................................6-12
Checking the Transaxle Oil (Manual ) ..........................6-14
Checking the Transaxle Fluid (Automatic)..................6-15
Checking the B rakes ................................................... 6-17
Checking the Clutch Fluid ............................................ 6-18
Air Conditioning Care ................................................... 6-18
Changing the Climate Control Air Filter........................ 6-19
Checking and Replacing Fuses .................................. 6-20
Checking the Battery ................................................... 6-22
Power Steering Fluid Level .......................................... 6-24
Removal of Water from the Fuel Filter .........................6-25
Headlight Aiming Adjustment ....................................... 6-26
Replacement of Light Bulbs ......................................... 6-27
Bulb Wattage ............................................................... 6-34
Fuse Panel Description ............................................... 6-35
DO-IT-YOURSELF MAINTENANCE
6
6
Page 249 of 282

6 DO-IT-YOURSELF MAINTENANCE
26HEADLIGHT AIMING ADJUSTMENT
5. Open the hood.
6. Draw the vertical line (through the
center of each headlight beam pat-tern) and the horizontal line (throughthe center of each headlight beam pattern) on the aiming screen. And then, draw a horizontal parallel line at 30 mm (1.18 in.) under the horizontal line.
7. Adjust each cut-off line of the low beam to the parallel line with a phillipsscrewdriver - VERTICAL AIMING.
8. Adjust each cut-off line of the low
beam to each vertical line with aphillips screwdriver - HORIZONTAL AIMING. Horizontal aiming
Vertical aiming
If the vehicle has had front body repair and the headlight assembly has beenreplaced, an headlight aiming should be checked using an aiming screen as shown in the illustration. Turn on theheadlight switch. (Low Beam Position)
1. Adjust headlights so that main axisof light is parallel to center line of the body and is aligned with point "P" shown in the illustration.
2. Dotted lines in the illustration show the center of headlights.
G290B01MC-GAT Adjustment After Headlight As- sembly Replacement
G290A03A-GAT Before performing aiming adjustment, make sure of the following.
1. Keep all tires inflated to the correct
pressure.
2. Place the vehicle on level ground
and press the front bumper and rear bumper down several times. Place the vehicle at a distance of 3,000 mm (118 in.) from the test wall.
3. See that the vehicle is unloaded (except for full levels of coolant,engine oil and fuel, and spare tire,jack, and tools). Have the driver or equivalent weight placed in driver's seat.
4. Clean the head lights lenses and turn on the headlight (low beam). G290B01B
LW
H
H Cut-off line
Ground line
"P"
Horizontal line
Vertical line30 mm
G290A03MC
Page 250 of 282

6
DO-IT-YOURSELF MAINTENANCE
27REPLACEMENT OF LIGHT BULBS
SPECIFICATIONS: "H" Horizontal center line of headlights from ground.: 665 mm (26.18 in.) "W" Distance between each headlight center. : 1,170 mm (46.06 in.) "L" Distance between the headlightsand the wall that the lights are tested against. : 3,000 mm (118.11 in.). G260A01MC-AAT Before attempting to replace a light bulb, be sure the switch is turned to the "OFF" position.The next paragraph shows how to reach the light bulbs so they may be changed. Be sure to replace the burned-out bulbwith one of the same number and watt- age rating. See page 6-34 for the wattage descrip-tions.
CAUTION:
o Keep the lamps out of contact with petroleum products, such as oil,gasoline, etc.
o If you don't have necessary tools,
the correct bulbs and the exper-tise, consult your authorized Hyundai dealer.
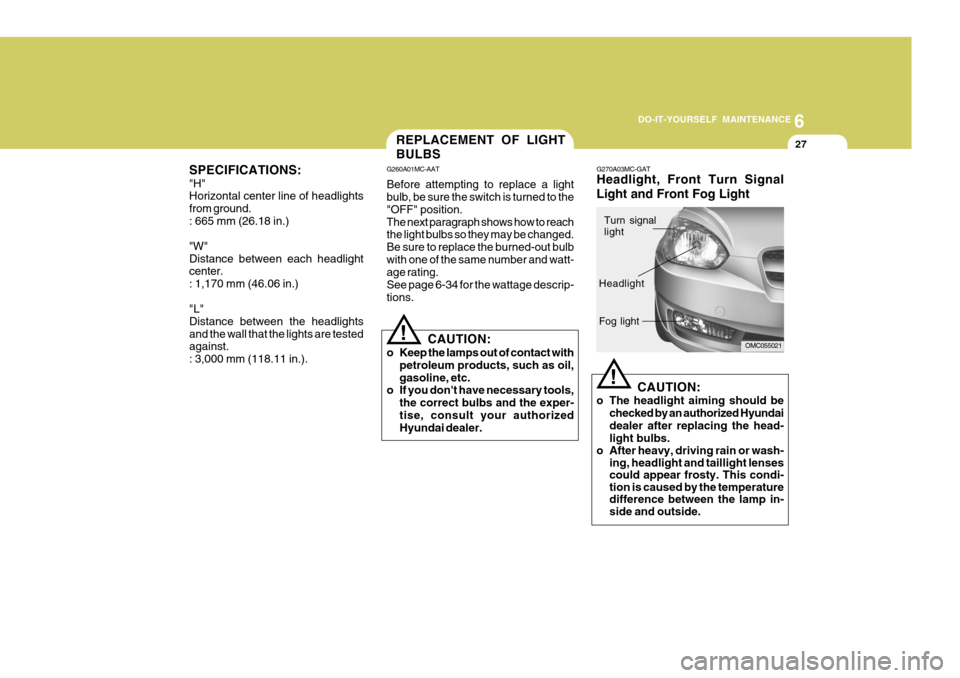
! G270A03MC-GAT Headlight, Front Turn Signal Light and Front Fog Light
CAUTION:
o The headlight aiming should be checked by an authorized Hyundai dealer after replacing the head- light bulbs.
o After heavy, driving rain or wash- ing, headlight and taillight lenses could appear frosty. This condi-tion is caused by the temperaturedifference between the lamp in-side and outside.
!
OMC055021
Turn signal light
Headlight Fog light
Page 279 of 282

10
INDEX
3
D Door Central door locks .................................................... 1-9
Door locks ................................................................ 1-7 Locking, unlocking front doors with a key ................ 1-7
Drink Holder ............................................................... 1-80
Driving
Economical driving ................................................. 2-18
Smooth corneri ng .................................................... 2-20
Winter driving .......................................................... 2-20
EElectronic Stability Program ...................................... 2-14
Emission Contro l System ............................................ 7-2
Engine
Before starting the engine ....................................... 2-3
Compartment ........................................................... 6-2
Coolant ................................................................... 6-10
Coolant temperature gauge .....................................1-66
If the engine overheats ............................................. 3-4
Number ..................................................................... 8-3
Oil ............................................................................. 6-6Starting ..................................................................... 2-5
Emergency Commodity ............................................. 3-11
Engine Exhaust Can Be Dangerous ............................ 2-2 F Fog Light
Front ....................................................................... 1-77
Rear ........................................................................ 1-78
Front Seats
Adjustable front seats ............................................. 1-15
Adjustable headrests .............................................. 1-16
Adjusting seat forward and rearward .......................1-15
Adjusting seatback angle ....................................... 1-15
Seat warmer ........................................................... 1-17
Fuel
Capacity ................................................................... 9-2
Gauge ..................................................................... 1-66
Recommendations .................................................... 1-2
Fuel Filler Lid
Remote release ...................................................... 1-92
Fuses ........................................................................ 6-20
Fuse Panel description .............................................. 6-35
G General Checks ........................................................... 6-5
Glove Box ................................................................. 1-86
H Hazard Warning System ............................................ 1-76
Headlight Aiming Adjustment..................................... 6-26
Headlight Leveling Device S ystem ............................1-76
Heating and Cooling Control ......................................1-99