2007 Hyundai Accent audio
[x] Cancel search: audioPage 148 of 282

1FEATURES OF YOUR HYUNDAI
136
M455F01MC-GAT 1. AUDIO/MP3 CD Select Button
o Insert the CD with the label facingupward.
o Insert the CD to start CD playback, during radio operation or cassette tape playing.
o If you press the CD button while a disc is in the CD deck, the CD playerwill begin playing even if the radio orcassette player is being used.
o The CD player can be used when the
ignition switch is in either the “ON” or“ACC” position.
o Push the CD button to Start CD
playback without pushing Power ON-OFF control knob. (Only when a CD is in the deck.
NOTE :
o Do not stick paper or tape etc., on the label side or the recording side of any discs, as it may causea malfunction. o The unit can play a multi-session
CD-R (recordable CD) and CD-RW(rewritable CD) that consists of more than two sessions. Please refer to the manual of CD-R/CD-RW recoder or CD-R/CD-RW software for more information on finalization process.
o Depending on the recording sta- tus, some CD-Rs/CD-RWs may notbe played on this unit.
o Playback of MP3, AAC, and WMA file formats are supported. Loadto play time for these formats maybe longer due to the compressed nature of these discs.
2. TRACK UP/DOWN Button
o The desired track on the disc cur- rently being played can be selected using the track number.
o Press button once to skip forward to the beginning of the next track.Press within a second after play-back begins to quickly move back- ward through a CD. If you press after more than asecond, it will take you to the begin- ning of the file you are now listening to. 3. FF/REW Button If you want to fast forward or reverse through the compact disc track, pushand hold the FF or REW button. When you release the button, the com- pact disc player will resume playing. 4. REPEAT (RPT) Button
o To repeat the track you are currently
listening to, press the RPT button. To cancel, press it again.
o To repeat the music within selected
folder, press the RPT button for morethan 0.8 seconds. To cancel, press it again. (MP3 CD only)
o If you do not release RPT operation when the track ends, it will automati-cally be replayed.This process will be continued until you push the button again or turn the power OFF then ON.
5. RANDOM (RDM) Button
o Press the RDM button to listen to recorded tracks in random sequence. Press RDM again to cancel or turn the audio unit OFF then ON. The unit defaults to playing tracks in sequen-tial order.
Page 150 of 282

1FEATURES OF YOUR HYUNDAI
138
!
CAUTION:
o Do not insert warped or poor qual- ity discs into the CD player as damage to the unit may occur.
o Do not insert anything like coins into the player slot as damage tothe unit may occur.
o Do not place beverages close to the audio system. The playbackmechanism may be damaged ifyou spill them.
o Do not strike or allow anything to
impact the audio system, damage to the system mechanisms could occur.
o Off-road or rough surface driving
may cause the compact disc toskip. Do not use the compact disc when driving in such conditionsas damage to the compact disc face could occur.
o Do not attempt to grab or pull the
compact disc out while the disc isbeing pulled into the audio unit by the self-loading mechanism. Dam- age to the audio unit and compact disc could occur.
o Avoid using recorded compact discs in your audio unit. Originalcompact discs are recommended.
12. DIRECTORY SEARCH
Button
o You can move through the folder by pushing the DIR button to up ( ) anddown ( ). After moving the desired folder, press the FILE SEARCH knob to playbackthe selected folder. If you do not press the FILE SEARCH knob within five seconds, the searchwill stop.
NOTE :
o To assure proper operation of the unit, keep the vehicle interior tem- perature within a normal range by using the vehicle's air condition- ing or heating system.
o When replacing the fuse, replace it with a fuse having the correctcapacity.
o All stored bookmarks are all erased when the car battery is discon-nected or power to the vehicle islost. If this occurs, the bookmarks will have to be reset. o This equipment is designed to be
used only in a 12 volt DC battery system with negative ground.
o This unit is made of precision
parts. Do not attempt to disas-semble or adjust any parts.
o When driving your vehicle, be sure
to keep the volume of the unit setlow enough to allow you to hear sounds coming from the outside.
o Do not expose this equipment (in-
cluding the speakers and tape) towater or excessive moisture.
Page 153 of 282

1
FEATURES OF YOUR HYUNDAI
141
1
FEATURES OF YOUR HYUNDAI
141
1
FEATURES OF YOUR HYUNDAI
141
1
FEATURES OF YOUR HYUNDAI
141
5. Best Station Memory (BSM) Button
When the BSM button is pressed, the six channels from the highest field in-tensity are selected next and stored in memory. The stations selected are stored in the sequence frequency fromthe first preset key. 6. EQ Button Press the EQ button to select the CLAS- SIC, POPS, ROCK, JAZZ and OFF MODE for the desired tone quality. Each press of the button changes thedisplay as follows;
7. PRESET STATION Select Buttons
Six stations for AM(MW, LW), FM1 and FM2 respectively can be preset in theelectronic memory circuit. HOW TO PRESET STATIONS Six AM(MW, LW) and twelve FM sta- tions may be programmed into thememory of the radio. Then, by simply pressing the AM(MW, LW) / FM select button and/or one of the six stationselect buttons, you may recall any of these stations instantly. To program the stations, follow these steps:
o Press AM(MW, LW)/FM selector to
set the band for AM(MW, LW), FM1 and FM2.
o Select the desired station to be stored
by seek or manual tuning.
o Determine the preset station select button you wish to use to accessthat station.
o Press the station select button for more than two seconds. A selectbutton indicator will show in the dis-play indicating which select button you have depressed. The frequency display will flash after it has beenstored into the memory. You should then release the button, and proceed to program the next desired station.A total of 24 stations can be pro- grammed by selecting one AM(MW, LW) and two FM station per button. o When completed, any preset station
may be recalled by selecting AM(MW, LW), FM1 or FM2 band and the appropriate station button.
! CAUTION:
o Do not place beverages close to the audio system. The audio sys- tem mechanism may be damagedif you spill them.
o Do not strike or allow anything to
impact the audio system, damageto the system mechanisms could occur.
CLASSIC � POPS � ROCK � JAZZ �DEFEAT
Page 155 of 282

1
FEATURES OF YOUR HYUNDAI
143
1
FEATURES OF YOUR HYUNDAI
143
1
FEATURES OF YOUR HYUNDAI
143
1
FEATURES OF YOUR HYUNDAI
143
M465D01MC-GAT 1. TAPE PROGRAM Button This allows you to play the reverse side of the tape by merely pressing theprogram button. The PLAY and an ar- row will appear in the display to show tape direction. 2. TAPE EJECT Button
o When the EJECT button is pressed with a cassette loaded, the cassette will eject.
o When the EJECT button is pressed
during FF/REW mode, the cassettewill eject.
3. AUTO MUSIC Search (AMS) Button
Press the button to find the startingpoint of each song in a prerecorded music tape. The quiet space betweensongs (must have at least a 4 sec. gap) can be identified by the AUTO MUSIC SEARCH button.
o Pressing the will play the begin- ning of the next music segment. o Pressing the will start replay at the
beginning of the music just listened to.
o To stop FF or REW action, press the
button again.
4. DOLBY Button If you get background noise during tape PLAY, you can reduce this consider-ably by merely pressing the DOLBY button. If you want to cancel the DOLBY feature, press the button again. 5. FF/REW Button
o Fast forward tape winding starts when the FF button is pressed during PLAY or REW mode.
o PLAY starts when the FF button is
pressed again during FF mode.
o Tape rewinding starts when the
REW button is pressed during PLAY or FF mode.
o PLAY starts when the REW button
pressed again during REW mode.
6. REPEAT (RPT) Button
o To repeat the track you are currently listening to, press the RPT button. To cancel, press again. o If you do not release RPT operation
when the track ends, it will automati-cally be replayed.
This process will be continued until youpush the button again or turn the powerOFF then ON. 7. EQ Button Press the EQ button to select the CLAS- SIC, POPS, JAZZ, ROCK and OFF MODE for the desired tone quality. Each press of the button changes thedisplay as follows;
CLASSIC � POPS � ROCK � JAZZ �DEFEAT
!
CAUTION:
o Do not insert anything like coins into the player slot as damage to the unit may occur.
o Do not place beverages close to the audio system. The playbackmechanism may be damaged if you spill them.
o Do not strike or allow anything to impact the audio system, damageto the system mechanisms couldoccur.
Page 159 of 282

1
FEATURES OF YOUR HYUNDAI
147
1
FEATURES OF YOUR HYUNDAI
147
1
FEATURES OF YOUR HYUNDAI
147
1
FEATURES OF YOUR HYUNDAI
147
10. REPEAT (RPT) Button
o To repeat the track you are currently listening to, press the RPT button. To cancel, press again.
o To repeat the music within selected
CD, press the RPT button for morethan 0.8 seconds. To cancel, press it again for more than 0.8 seconds.
o If you do not release RPT operation after all the tracks are played back,the unit will play back again from thefirst track.
11. RANDOM (RDM) Button With random, you can listen to the tracks in random, rather than sequen- tial order, on all of the discs or on onedisc. To use random, do the following:
o Press the RDM button to listen to recorded tracks in random sequence.Press RDM again to cancel or turnthe audio unit OFF then ON. The unit defaults to playing tracks in sequen- tial order. NOTE :
o To assure proper operation of the
unit, keep the vehicle interior tem- perature within a normal range byusing the vehicle's air condition- ing or heating system.
o When replacing the fuse, replace it with a fuse having the correctcapacity.
o All stored bookmarks are all erased when the car battery is discon-nected or power to the vehicle is lost. If this occurs, the bookmarkswill have to be reset.
o Do not add any oil to the rotating
parts. Keep magnets, screwdriv-ers and other metallic objects away from the tape mechanism and head.
! CAUTION:
o Do not insert warped or poor qual- ity discs into the CD player as damage to the unit may occur.
o Do not insert anything like coins
into the player slot as damage tothe unit may occur.
o Do not place beverages close to
the audio system. The playbackmechanism may be damaged if you spill them.
o Do not strike or allow anything to impact the audio system, damageto the system mechanisms could occur.
o Off-road or rough surface driving may cause the compact disc toskip. Do not use the compact discwhen driving in such conditions as damage to the compact disc face could occur.
o Do not attempt to grab or pull the compact disc out while the disc isbeing pulled into the audio unit bythe self-loading mechanism. Dam- age to the audio unit and compact disc could occur.
Page 160 of 282

1FEATURES OF YOUR HYUNDAI
148
o This equipment is designed to be
used only in a 12 volt DC battery system with negative ground.
o This unit is made of precision
parts. Do not attempt to disas-semble or adjust any parts.
o When driving your vehicle, be sure
to keep the volume of the unit setlow enough to allow you to hear sounds coming from the outside.
o Do not expose this equipment (in-
cluding the speakers and tape) towater or excessive moisture.
o Avoid using recorded compact
discs in your audio unit. Originalcompact discs are recommended.
o The unit is not sure of playing CD-
RW (Rewritable).
Page 162 of 282

1FEATURES OF YOUR HYUNDAI
150
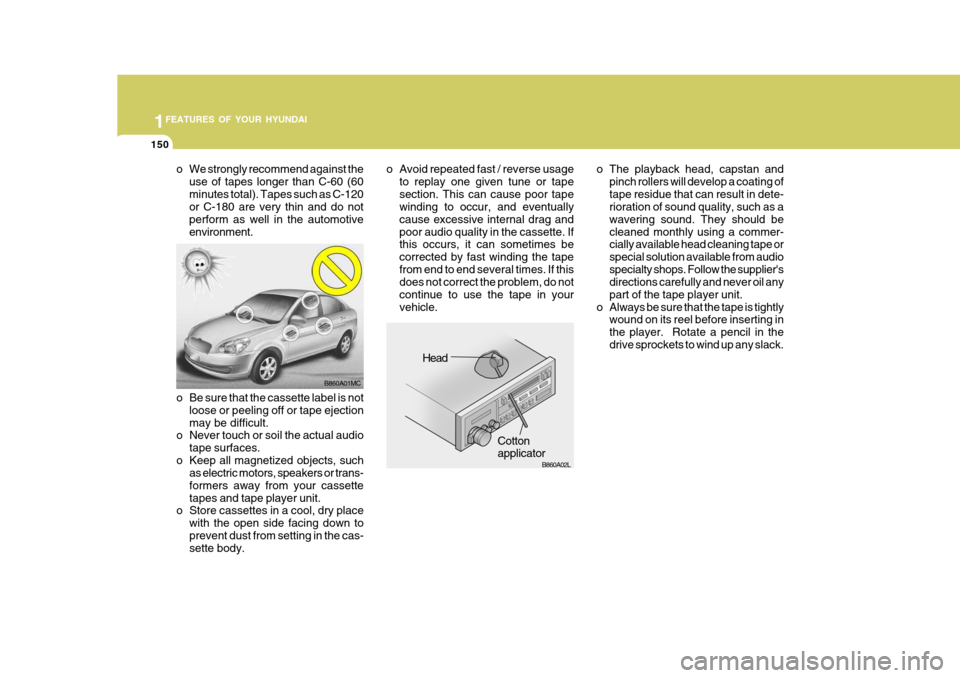
o The playback head, capstan andpinch rollers will develop a coating of tape residue that can result in dete- rioration of sound quality, such as a wavering sound. They should becleaned monthly using a commer- cially available head cleaning tape or special solution available from audiospecialty shops. Follow the supplier's directions carefully and never oil any part of the tape player unit.
o Always be sure that the tape is tightly wound on its reel before inserting inthe player. Rotate a pencil in thedrive sprockets to wind up any slack.
o Be sure that the cassette label is not loose or peeling off or tape ejectionmay be difficult.
o Never touch or soil the actual audio
tape surfaces.
o Keep all magnetized objects, such as electric motors, speakers or trans-formers away from your cassettetapes and tape player unit.
o Store cassettes in a cool, dry place
with the open side facing down toprevent dust from setting in the cas- sette body.
o We strongly recommend against the
use of tapes longer than C-60 (60 minutes total). Tapes such as C-120 or C-180 are very thin and do not perform as well in the automotiveenvironment. o Avoid repeated fast / reverse usage
to replay one given tune or tapesection. This can cause poor tape winding to occur, and eventually cause excessive internal drag andpoor audio quality in the cassette. If this occurs, it can sometimes be corrected by fast winding the tapefrom end to end several times. If this does not correct the problem, do not continue to use the tape in yourvehicle.
HLC216
Head
Cotton applicator
B860A01MC
B860A02L
Page 245 of 282

6 DO-IT-YOURSELF MAINTENANCE
22
!
CHECKING THE BATTERY
G210A01A-AAT
WARNING:
Batteries can be dangerous! When working with batteries, carefully ob-serve the following precautions to avoid serious injuries. The fluid in the battery contains a strong solution of sulfuric acid, which is poi- sonous and highly corrosive. Be careful not to spill it on yourself or the car. If youdo spill battery fluid on yourself, imme- diately do the following:
OMC055018
G200C01CM-GAT Power Connector
NOTE:
o If the power connector is pulled
up from the fuse panel, the warn- ing chime, audio, clock and inte- rior lamps, etc., will not operate. The following items must be resetafter replacement. - Digital Clock - Trip computer
- Automatic heating and cooling control system
- Audio
o Even though the power connector is pulled up, the battery can stillbe discharged by operation of theheadlights or other electrical de- vices.
Your vehicle is equipped with a power connector to prevent battery discharge if your vehicle is parked without being operated for prolonged periods. Use thefollowing procedures before parking the vehicle for prolonged periods.
1. Turn off the engine.
2. Turn off the headlights and tail lights.
3. Open the driver’s side panel cover
and pull up the power connector.
4. Insert the power connector in the
opposite direction.
G200F01MC