Page 227 of 331
�´
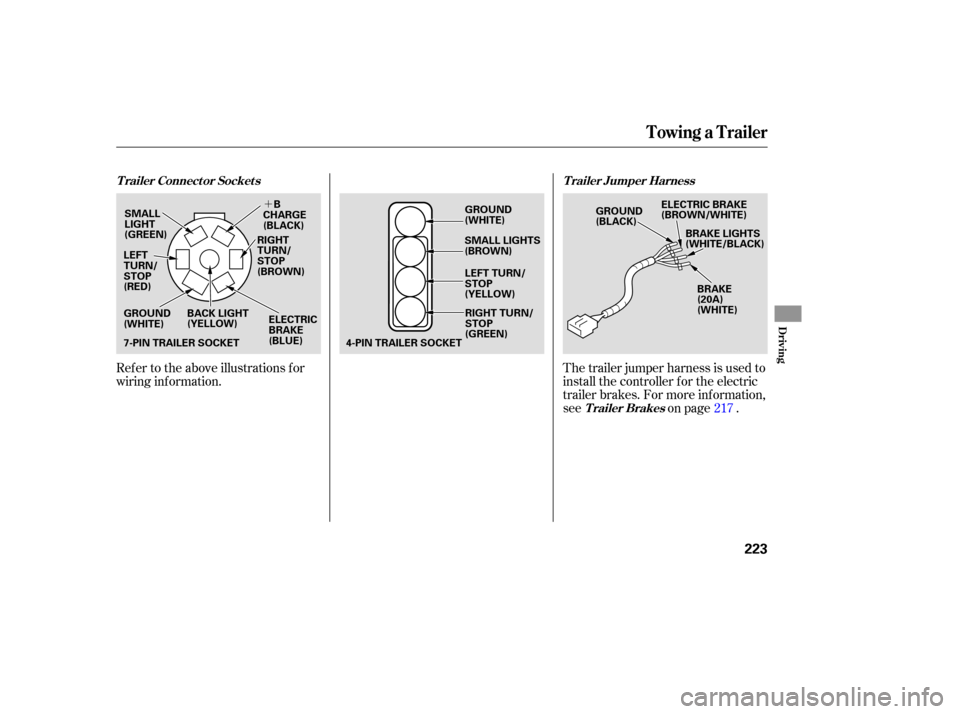
Refer to the above illustrations for
wiring information. The
trailer jumper harness is used to
install the controller for the electric
trailer brakes. For more information,
see on page . 217
Towing a Trailer
T railer Connect or Socket s
Trailer Brakes
T railer Jumper Harness
Driving
223
7-PIN TRAILER SOCKET
ELECTRIC
BRAKE
(BLUE)
SMALL
LIGHT
(GREEN)
B
CHARGE
(BLACK)
BACK LIGHT
(YELLOW)
GROUND
(WHITE)
4-PIN TRAILER SOCKETGROUND
(WHITE)
GROUND
(BLACK)ELECTRIC BRAKE
(BROWN/WHITE)
BRAKE LIGHTS
(WHITE/BLACK)
BRAKE
(20A)
(WHITE)
LEFT TURN/
STOP
(YELLOW)
RIGHT TURN/
STOP
(GREEN)
SMALL LIGHTS
(BROWN)
RIGHT
TURN/
STOP
(BROWN)
LEFT
TURN/
STOP
(RED)
Page 228 of 331

The added weight, length, and
height of a trailer will af f ect your
vehicle’s handling and perf ormance,
so driving with a trailer requires
some special driving skills and
techniques.
Your vehicle tires and spare are in
good condition and properly
inf lated.
The trailer tires and spare are in
good condition and inf lated as
recommended by the trailer
maker.
The vehicle has been properly
serviced, and the tires, brakes,
suspension, cooling system, and
lights are in good operating
condition.
The trailer has been properly
serviced and is in good condition.
All weights and loads are within
limits.
Thehitch,safetychains,andany
other attachments are secure.
Allitemsonandinthetrailerare
properly secured and cannot shif t
while you drive. Towing perf ormance can be
af f ected by high altitude, high
temperature, or when climbing
steep grades. Theref ore, premium
f uel (premium unleaded gasoline
with pump octane number of 91 or
higher) is recommended when
towing more than 3,500 lbs (1,590
kg).
Foryoursafetyandthesafetyof
others,taketimetopracticedriving
maneuvers bef ore heading f or the
open road, and f ollow the guidelines
below.
Avoid towing a trailer during your
vehicle’s f irst 600 miles (1,000 km).
When preparing to tow, and bef ore
driving away, be sure to check the
f ollowing:
Driving Saf ely With a T railer
Pre-T ow Checklist
Towing a Trailer
Break-In Period
224
Page 237 of 331

This section explains why it is
important to keep your vehicle well
maintained and how to follow basic
maintenance safety precautions.
If you have the skills and tools to
perform more complex maintenance
tasks on your vehicle, you may want
to purchase the service manual. See
page f or inf ormation on how to
obtain a copy, or see your dealer. This section also includes
instructions on how to read the
maintenance minder messages on
the information display, a
maintenance record, and instructions
for simple maintenance tasks you
may want to take care of yourself. ......................
Maintenance Saf ety .234
....................
Maintenance Minder .235
....................
Maintenance Record .243
..............................
Fluid Locations .245
........................
Adding Engine Oil .246
Changing the Engine Oil and
...........................................
Filter .247
..............................
Engine Coolant .249
....................
Windshield Washers .250
....
Automatic Transmission Fluid .251
.................
Rear Dif f erential Fluid .252
.............
Transf er Assembly Fluid .253
....................................
Brake Fluid .253
....................
Power Steering Fluid .254
....................................
Timing Belt .254
.............................................
Lights .255
................
Cleaning the Seat Belts .261
.....................................
Floor Mats .261
..................
Dust and Pollen Filter .262
.................................
Wiper Blades .262
...........................................
Wheels .264
...............................................
Tires .265
...................
Checking the Battery .270
.............................
Vehicle Storage .272
315
Maintenance
Maint enance
233
Page 245 of 331
�µ�µ�µ
�µ
�µ �µ
Youshouldcheckthefollowing
items at the specified interval s. If
you are unsure of how to perform
any check, turn to the appropriate
page listed.
Engine oil level Check every
time you fill the fuel tank. See
page .
Engine coolant level Check the
radiator reserve tank every time
you fill the fuel tank. See page .
Automatic transmission Check
the fluid level monthly. See page
.
Brakes Check the fluid level
monthly. See page .
Tires Check the tire pressure
monthly. Examine the tread for
wear and foreign objects. See page
. Lights
Check the operation of
the headlights, parking lights,
taillights, high-mount brake light,
and licen se plate lights monthly.
See page .
182 182
251 253
265 255
CONT INUED
Maintenance Minder
Owner’s Maintenance Checks
Maint enance
241
Page 259 of 331
CONT INUED
Your vehicle has halogen headlight
bulbs. When replacing a bulb, handle
it by its base, and protect the glass
f rom contact with your skin or hard
objects. If you touch the glass, clean
it with denatured alcohol and a clean
cloth.Remove the electrical connector
f rom the bulb by pulling the
connector straight back.
Remove the rubber weather seal
by pulling on the tab.
Unclip the end of the hold-down
wire f rom its slot. Pivot it out of
the way, and remove the bulb.
Theheadlightswereproperlyaimed
when your vehicle was new. If you
regularly carry heavy items on the
pickup bed or pull a trailer,
readjustment may be required.
Adjustmentsshouldbedonebyyour
dealer or other qualif ied mechanic.
1.
2.
3.
Headlight A iming Replacing a Headlight Bulb
Lights
Maint enance
255
WEATHER SEAL CONNECTOR HOLD-DOWN WIRE
BULBHalogen headlight bulbs get very hot
when lit. Oil, perspiration, or a scratch
on the glass can cause the bulb to
overheat and shatter.
Page 260 of 331

Install the new bulb into the hole,
making sure the tabs are in their
slots. Pivot the hold-down wire
back in place, and clip the end into
the slot.
Install the rubber weather seal
over the back of the headlight
assembly.Makesureitisright
side up.To change the passenger’s side
bulb, start the engine, turn the
steering wheel all the way to the
lef t, and turn of f the engine. To
change the driver’s side bulb, turn
the steering wheel to the right.
Use a f lat-tipped screwdriver to
remove the two holding clips f rom
the inner f ender, and pull the inner
f ender cover back.Remove the socket from the
headlight assembly by turning it
one-quarter turn counterclockwise.
Pull the bulb straight out of its
socket. Push the new bulb straight
into the socket until it bottoms.
Push the electrical connector onto
the new bulb. Make sure it is
connected securely. Turn on the
headlights to test the new bulb.
4.
5.
6.
1.
2.3.
4.
Lights
Replacing a Front T urn Signal/
Hazard/Parking L ight Bulb
256
HOLDING CLIPS
Page 261 of 331
Remove the socket by turning it
one-quarter turn counterclockwise.
Remove the burned-out bulb by
pulling it straight out of the socket.
Drop open the tailgate.
Remove the two bolts, and remove
the rear light assembly f rom the
rear pillar.
Determine which of the three
bulbs is burned out: brake/
taillight, turn signal/hazard light,
or back-up light.
Insert the socket back into the
headlight assembly. Turn it
clockwise to lock it in place.
Turn on the lights to make sure
the new bulb is working.
Put the inner f ender cover in place.
Install and lock each holding clip
bypushingonthecenter.
1.
2.
3.
5.
4.
5.
6.
7.
CONT INUED
Lights
Replacing Rear Bulbs
Maint enance
257
Page 262 of 331
Install the new bulb into the
socket.
Push the socket into the light
assembly, and turn it clockwise
until it locks.
Turn on the lights to make sure
the new bulb is working.
Install the rear light assembly in
the rear pillar. Tighten the two
bolts securely.Place a cloth on the edge of the
lens segment. Remove each lens
segment by caref ully prying on its
edge with a small f lat-tipped
screwdriver.Remove the three mounting
screws f rom the light assembly.
Remove the screw under each lens.
Pull the high-mount brake light
assembly out of the vehicle. Remove the lens f rom the light
assembly.
Pull the bulb straight out of its
socket. Push the new bulb straight
into the socket until it bottoms.
1.
2.
3. 4.
5.
6.
7.
8.
9.
6.
Lights
Replacing a High-mount Brake
Light Bulb
258
LENS SEGMENT