Page 284 of 331
Tighten the wheel nuts securely in
the same crisscross pattern. Have
the wheel nut torque checked at
the nearest automotive service
f acility.
Tighten the wheel nuts to:Place the flat tire face up on the
tire tray.
Remove the spacer cone f rom the
wing bolt, turn it over, and put it
back on the bolt.
Securetheflattirebyscrewing
the wing bolt back into its hole.Release the tire tray and slide it
back in place.
Tighten the tire tray holding bolts
securely.
Remove the center cap from the
flat tire.
18.
19.
20.
21.
22.23.
24.
On RTX, RTS, RTL, and Canadian
EXL models
Changing a Flat Tire
280
WING BOLT
SPACER CONE For normal
tireFor spare
tire
94 lbf·ft (127 N·m , 13 kgf·m)
Page 285 of 331
Store the wheel cap or center cap
in the In-Bed Trunk. Make sure it
does not get scratched or
damaged.
Refer to (see page ).
When storing the f lat tire, place
the tool box at the right side of the
In-Bed Trunk as shown. Store the jack and the tools in the
tool box.
25.
26. 27.
28.
205
Changing a T ire with
TPMS
Changing a Flat Tire
T aking Care of t he Unexpect ed
281
TOOL BOX
Loose items can be thrown out
of the vehicle in a crash and
could seriously injure the
occupants.
Store the wheel, jack, and tools
securely before driving.
Page 286 of 331
As a temporary mounting location,
you can secure a spare tire on the
pickup bed, if needed. Placethesparetireonthepickup
bed
as shown.
Place the spacer cone in the wheel
hub,andsecurethesparetireto
the pickup bed with the wing bolt. Ifyouremovethesparetirefromthe
pickup
bed, reinstall the clip back
into its hole.
Remove the clip by pushing the
center of its top.
Remove the spare tire from the
tire tray (see page ). Store or secure the tool box.
1.
2. 3.
4.
5.
276
Changing a Flat Tire
Securing a Spare Tire on the
Pickup Bed
282
SPACER CONE
WING BOLT
Page 294 of 331

However, if the brake pedal does not
feel normal, you should take
immediate action. A problem in one
part of the system’s dual circuit
design will still give you braking at
two wheels. You will feel the brake
pedal go down much farther before
the vehicle begins to slow down, and
you will have to press harder on the
pedal.
Slow down by shifting to a lower
gear, and pull to the side of the road
when it is safe. Because of the long
distance needed to stop, it is
hazardous to drive the vehicle. You
should have it towed, and repaired as
soon as possible. (See
on page .)
If you must drive the vehicle a short
distance in this condition, drive
slowly and carefully.
The
brake system
indicator normally
comes on when
you turn the ignition switch to the
ON (II) position, and as a reminder
to check the parking brake. It will
stay on if you do not fully release the
parking brake.
If the brake system indicator comes
on while driving, the brake fluid level
is probably low. Press lightly on the
brake pedal to see if it feels normal.
If it does, check the brake fluid level
thenexttimeyoustopataservice
station (see page ). If the ABS indicator and the VSA
system indicator come on with the
brake system indicator, have your
vehicle inspected by your dealer
immediately.
If the f luid level is low, take your
vehicle to a dealer, and have the
brake system inspected f or leaks or
worn brake pads. 253
296Emergency
Towing
Brake System Indicator
290
Canada
U.S.
Page 300 of 331
If , due to damage, your vehicle must
be towed with all f our wheels on the
ground, do the f ollowing:Release the parking brake.
Start the engine.
Shif t to D f or several seconds,
then to N.
Turn of f the engine. With all f our wheels on the ground,
it is best to tow the vehicle no farther
than 50 miles (80 km), and keep the
speedbelow35mph(55km/h).
If your vehicle needs to be towed,
call a prof essional towing service or
organization. Never tow your vehicle
with just a rope or chain. It is very
dangerous.
The operator will load
your vehicle on the back of a truck.
Any other method of towing will
damage the drive system. When you
contact the towing agency, inf orm
them a f lat-bed is required.
Emergency Towing
The only way you can saf ely tow
your vehicle is with f lat-bed
equipment.
296
Improper towing preparation will
damage the transmission. Follow the
above procedure exactly. If you cannot
shif t the transmission or start the
engine, your vehicle must be
transported with the all f our wheels of f
the ground. The steering system can be damaged if
the steering wheel is locked. Leave the
ignition switch in the ACCESSORY (I)
position, and make sure the steering
wheel turns f reely bef ore you begin
towing.
Towing your vehicle with two tires on
the ground will damage parts of the
4WD system. It should be transported
on a f lat-bed truck or trailer. Trying to lif t or tow your vehicle by the
bumpers will cause serious damage.
The bumpers are not designed to
support the vehicle’s weight.
Page 301 of 331
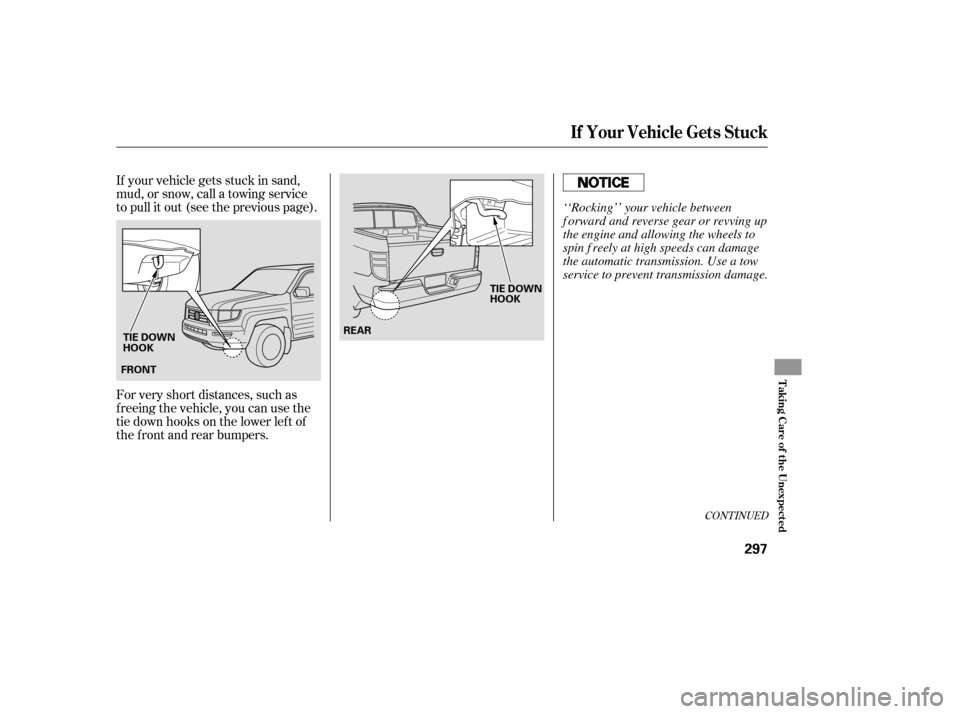
If your vehicle gets stuck in sand,
mud, or snow, call a towing service
to pull it out (see the previous page).
For very short distances, such as
f reeing the vehicle, you can use the
tie down hooks on the lower lef t of
the f ront and rear bumpers.
CONT INUED
If Your Vehicle Gets Stuck
T aking Care of t he Unexpect ed
297
FRONTREAR
TIE DOWN
HOOK TIE DOWN
HOOK
‘‘Rocking’’ your vehicle between
f orward and reverse gear or revving up
the engine and allowing the wheels to
spin f reely at high speeds can damage
the automatic transmission. Use a tow
service to prevent transmission damage.
Page 306 of 331

�Î�Î
�Î
�Î
�Î
�µ�µ �Î
�Î
�Î
�Î
�Î
Specif ications
302
Capacities
Dimensions
Weights
Air Conditioning 1.64 US gal (6.2
)
2.14 US gal (8.1)
4.5 US qt (4.3
)
4.2 US qt (4.0
)
5.3 US qt (5.0
)
3.3 US qt (3.1)
8.5 US qt (8.0)
206.7 in (5,250 mm)
78.0 in (1,980 mm)
70.3 in (1,785 mm)
2.79 US qt (2.64
)
3.01 US qt (2.85)
0.45 US qt (0.43
)
0.48 US qt (0.45)
0.16 US gal (0.6
) 4.8 US qt (4.5
)
Excluding the oil remaining in the engine Including the coolant in the reserve tank and that remaining in the
engine
Reserve tank capacity:
Fuel tank
Engine
coolant
Engine oil
Automatic
transmission
fluid
Rear
differential
fluid
Transfer
assembly
fluid
Windshield
washer
reservoir
Length
Width
Height
Wheelbase
Track
122.0 in (3,100 mm)
67.1 in (1,705 mm)
66.9 in (1,700 mm) 22.01 US gal (83.3
)
See the tire information label
attached to the driver’s doorjamb.
Gross vehicle weight rating
Gross combined weight
rating (GCWR)
Maximum load limit
(Payload)
The GCWR must be reduced 2 percent for every 1,000 feet (305
meters) of elevation.
Refrigerant type
Charge quantity
Lubricant type HFC-134a (R-134a)
21.2 22.9 oz (600 650 g) ND-OIL8 Approx.
Front
Rear
1:
2:Change
Total
Change
Including
filter
Without
filter
Total
Change
Total
Change
Total
Change
Total
10,088 lbs (4,575 kg)
1:
2:
3: On vehicles without moonroof or navigation system 1,530 lbs (690 kg)
1,480 lbs (670 kg)
On vehicles with moonroof and navigation system
1 1
2
2
3
Page 309 of 331

�µWarning: The temperature grade f or
this tire is established f or a tire that
is properly inf lated and not
overloaded. Excessive speed,
underinf lation, or excessive loading,
either separately or in combination,
can cause heat buildup and possible
tire f ailure.
The temperature grades are A (the
highest), B, and C, representing the
tire’s resistance to the generation of
heat, and its ability to dissipate heat
when tested under controlled
conditions on a specif ied indoor
laboratory test wheel. Sustained high
temperature can cause the material
of the tire to degenerate and reduce
tire life, and excessive temperature
can lead to sudden tire f ailure. The
Grade C corresponds to a level of
perf ormance which all passenger car
tires must meet under the Federal
Motor Vehicle Saf ety Standard No.
109. Grades B and A represent
higher levels of perf ormance on the
laboratory test wheel than the
minimum required by law.
DOT Tire Quality Grading (U.S. Vehicles)
Temperature A,B,C
Technical Inf ormation
305