Page 94 of 331
Avoid dropping or throwing the
transmitter.
Protect the transmitter from
extreme temperature.
Do not immerse the transmitter in
any liquid.
If you lose a transmitter, the
replacement needs to be
reprogrammed by your dealer.Remove the screw at the base of
the transmitter with a small
Phillips-head screwdriver.
To replace the battery: Battery type: CR1616 If it takes several pushes on the
button to lock or unlock the doors,
replace the battery as soon as
possible.
Inside the transmitter, separate
the inner cover f rom the keypad
by releasing the two tabs on the
cover. Separate the transmitter by prying
its middle seam with your
f ingernail.
1. 2.
3.
Remote Transmitter Care Replacing the Transmitter
Battery
Remote Transmitter
90
SCREWBATTERY
Page 98 of 331
.
If
you do not fasten the seat belt, you
first hear")
See page for information on
cargo loading and weight limits.
You can also store and lock items in
the In-Bed Trunk (see page ).
If
you do not fasten the seat belt, you
first hear the seat belt reminder
alarm, then the tailgate reminder
beeper sounds.
The indicator does not monitor the
tailgate when it is dropped open.
This
indicator is in the door and
tailgate open monitor on the
instrument panel. It comes on when
the tailgate is swung open or it is not
completely closed. This indicator
worksevenifthekeyisnotinthe
ignition switch.
If the tailgate is swung open or not
closed tightly when the ignition
switch is in the ON (II) position, you
will hear six beeps and see the
indicator blinking. The indicator
stays on until you close the tailgate.
The beeper also sounds and the
indicator blinks when you move the
shift lever out of the Park or neutral
position.
Do
not allow anyone to hang on the
swung open tailgate. This could
damage the tailgate.
Do not leave the tailgate swung open.
The tailgate may swing and shut
accidentally. This could cause
serious injuries.
Thebedlightscomeonwhenyou
sw ing open the tailgate. You can also
turn the bed lights on or off by
pushing the bed light switch on the
dashboard (see page ). 120 95
186
Loading Cargo
T ailgat e Open Indicat or
Dual-Action Tailgate
94
Page 99 of 331

YoucanopentheIn-BedTrunktwo
different ways:
Push the release button on the
lower right side of the In-Bed
Trunk lid when the driver’s door is
unlocked. To
close the In-Bed Trunk, lower the
lid, then press down on the back
edge. If
your vehicle’s battery is
disconnected or goes dead, the
release button on the In-Bed Trunk
lid is disabled. To open the In-Bed
Trunk, use the master key.
Usethemasterkeytoopenthe
In-Bed Trunk when the driver’s
door is locked. Thebedlightscomeonwhenyou
open
the In-Bed Trunk. You can also
turn the bed lights on or off by
pushing the bed light switch on the
dashboard (see page ).
You can store items in the In-Bed
Trunk up to 300 lbs (136 kg). Do not
exceed this weight limit, or you may
damage the In-Bed Trunk. See page
for information on loading cargo
and weight limits.
To store items separately in the
In-Bed Trunk, optional divider
guides are available from your dealer.
When
the In-Bed Trunk is closed
secu rely, it can be locked or
unlocked along with the power door
locks (see page ). 83 120
186
CONT INUED
In-Bed Trunk
Inst rument s and Cont rols
95
RELEASE
BUTTON
TM
Page 101 of 331
There are two cargo hooks f or
plastic grocery bags at the back of
the In-Bed Trunk. They are designed
to hold light items. Heavy objects
may damage the hooks.
To protect items in the In-Bed Trunk,
you can disable its release button by
turning off the main switch in the
glove box and locking the glove box
with the master key.
Even if the main switch is in the OFF
position, you can open the In-Bed
Trunk with the master key.
When you are f inished washing the
In-Bed Trunk, dry it with a sof t cloth,
and reinstall the drain plug. Youcanwashtheinsideof the
In-Bed Trunk with a water and mild
detergent solution, and a sof t brush
or cloth.
To drain water from the In-Bed
Trunk, remove the drain plug by
turning it counterclockwise.Cargo Hooks
Washing the In-Bed T runk
In-Bed T runk Main Switch
In-Bed Trunk
Inst rument s and Cont rols
97
DRAIN PLUG CARGO HOOKS
MAIN SWITCH
TM
Page 102 of 331
�µ
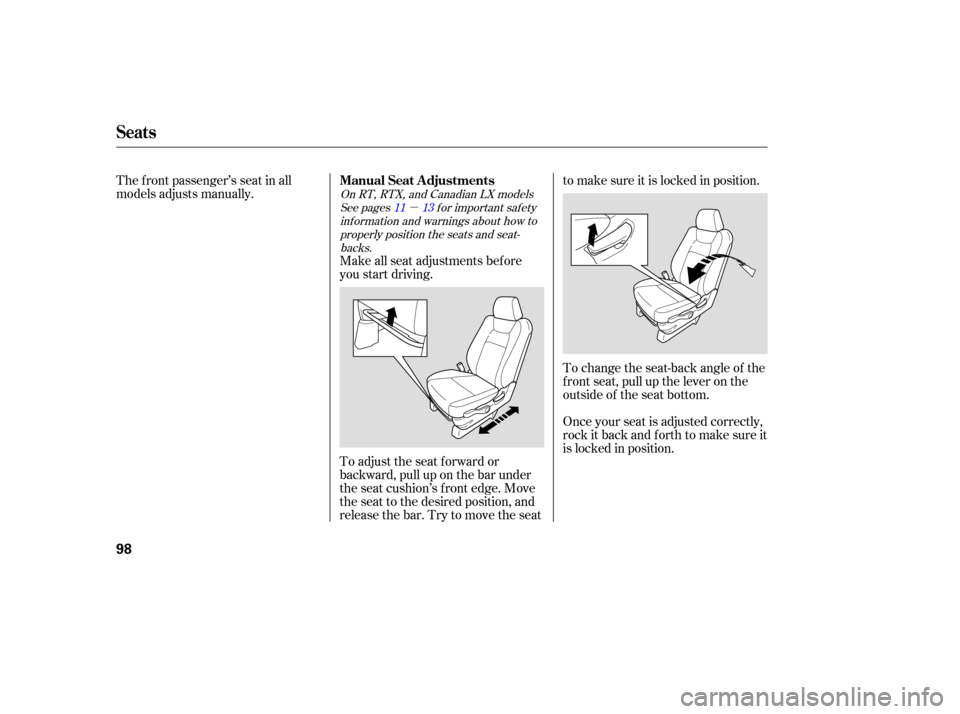
The front passenger’s seat in all
models adjusts manually.
Make all seat adjustm ents before
you start driving.
To adjust the seat forward or
backward, pull up on the bar under
the seat cushion’s front edge. Move
the seat to the desi red position, and
releasethebar.Trytomovetheseat to
make sure it is locked in position.
To change the seat-back angle of the
front seat, pull up the lever on the
outside of the seat bottom.
Once your seat is adjusted correctly,
rock it back and f orth to make sure it
is locked in position.
See pages f or important saf ety
inf ormation and warnings about how toproperly position the seats and seat-backs.
On RT, RTX, and Canadian LX models
11 13
Manual Seat Adjustments
Seats
98
Page 107 of 331
The lef t and right rear seat cushions
can be lifted up separately to make
room f or cargo.
Remove any items from the seat
beforeyoufolduptheseatcushion.To f old a rear seat cushion, pull up
the lever on the outside of the
cushion. The seat cushion pops up,
and the seat legs store underneath it.
Push the cushion firmly against the
seat-back to lock it in place.To return the seat cushion to its
original position, pull the lever
outward, then push down the seat
cushion slowly.
Make sure the seat cushion is locked
securely and the seat legs are
positioned properly in the f loor guide.
CONT INUED
Folding the Rear Seats
Seats
Inst rument s and Cont rols
103
LEGS
FLOOR GUIDE
Page 110 of 331

�µIf the driver’s
window senses any obstacle while it
is closing automatically, it will
reverse direction, and then stop. To
close the window, remove the
obstacle, then use the window switch
again.
Auto reverse stops sensing when the
window is almost closed. You should
always check that all passengers and
objects are away from the window
bef ore closing it. Your vehicle has a power back
window.
This indicator comes on when you
turn the ignition switch from the ON
(II) to the ACCESSORY (I) or LOCK
(0) position without closing the back
window. With the ignition switch in
the ACCESSORY (I) position, the
indicator goes of f af ter about 30
seconds. With the ignition switch in
the LOCK (0) position, the indicator
goes of f af ter about 3 minutes.
If the driver’s window f use is
removed, the AUTO f unction may be
disabled. The power window system
needs to be reset af ter reinstalling
the fuse.
Start the engine. Push down and
hold the driver’s window switch
until the window is f ully open.
Pull and hold the driver’s window
switch to close the window
completely, then hold the switch
f or about 2 seconds.
If the power windows do not operate
properly af ter resetting, have your
vehicle checked by your dealer. 1.
2.
AUTO REVERSE
Back Window
Back Window Open
Indicator
Power Windows
106
Page 111 of 331

To open:
Insert the key in the driver’s door
lock.
Turn the key clockwise, then
release it.
You
can open all of the side windows
from the outside with the remote
transmitter.
Press the UNLOCK button once
to unlock the driver’s door.
Press the UNLOCK button a
second time, and hold it. The
passenger’s doors unlock, and all
four side windows start to open.
To stop the windows, release the
button. You can open and close the side
windows with the key in the driver’s
door lock.
The
back window is not designed to
carry long items through it. Do not
use the opened back window as a
cargo area pass-through.
If
you remove the ignition key and
open the driver’s door without
closing the back window, you hear
five beeps and see the indicator blink.
If you do not close the back window
bef ore the beeper stops, the
indicator stops blinking but remains
on. It will go of f af ter about 3
minutes (see page ).
To open the windows further,
press the button again, within
about 3 seconds.
You cannot close the windows with
the remote transmitter. 1.
2.
3.
1.
2.
69
CONT INUED
Opening the Side Windows with
the Remote Transmitter
Opening/Closing the Side
Windows with the Key
Power Windows
Inst rument s and Cont rols
107
Open
Close
UNLOCK BUTTON