Page 72 of 268

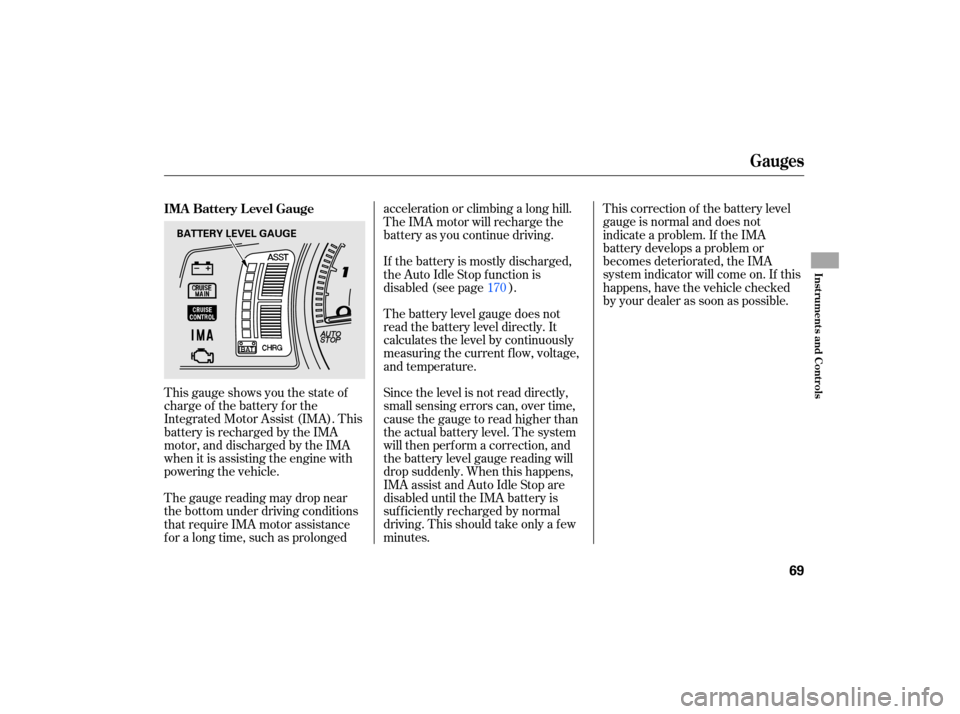
This gauge shows you the state of
charge of the battery for the
Integrated Motor Assist (IMA). This
battery is recharged by the IMA
motor, and discharged by the IMA
when it is assi sting the engine with
powering the vehicle. The
battery level gauge does not
read the battery level directly. It
calculates the level by continuously
measuring the current flow, voltage,
and temperature.
Since the level is not read directly,
small sensing errors can, over time,
cause the gauge to read higher than
the actual battery level. The system
will then perform a correction, and
the battery level gauge reading will
drop suddenly. When this happens,
IMA assist and Auto Idle Stop are
disabled until the IMA battery is
sufficiently recharged by normal
driving. This should take only a few
minutes. This
correction of the battery level
gauge is normal and does not
indicate a problem. If the IMA
battery develops a problem or
becomes deteriorate d, the IMA
system indicator will come on. If this
happens, have the vehic le checked
by your dealer as soon as possible.
The gauge reading may drop near
the bottom under driving conditions
that require IMA motor assistance
for a long time, such as prolonged acceleration or climbing a long hill.
TheIMAmotorwillrechargethe
battery as you continue driving.
If the battery is mostly discharged,
the Auto Idle Stop f unction is
disabled (see page ).
170
IMA Battery Level Gauge
Gauges
Inst rument s and Cont rols
69
BATTERY LEVEL GAUGE
Page 152 of 268
Bef ore you begin driving your
vehicle, you should know what
gasoline to use and how to check the
levels of important f luids. You also
need to know how to properly store
luggage or packages. The
inf ormation in this section will help
you. If you plan to add any
accessories to your vehicle, please
read the information in this section
first..............................
Break-in Period .150
.................
Fuel Recommendation .150
.........
Service Station Procedures .151
....................................
Ref ueling .151
OpeningandClosingthe
.......................................
Hood .152
...................................
Oil Check .153
.............
Engine Coolant Check .154
...............................
Fuel Economy .154
...
Accessories and Modif ications .156
.............................
Carrying Cargo .158
Bef ore Driving
Bef ore Driving
149
Page 156 of 268
Remove the dipstick again, and
check the level. It should be
between the upper and lower
marks.
Wait
a few minutes after turning the
engine off before you check the oil.
Remove the dipstick (orange loop).
To
close the hood, lift it up slightly to
remove the support rod from the
hole. Put the support rod back into
its holding clip. Lower the hood to
about a foot (30 cm) above the
fender, then let it drop. Make sure it
is securely latched. If it is near or below the lower mark,
see
on page .
Wipe of f the dipstick with a clean
cloth or paper towel.
Insert the dipstick all the way back
into its hole.
2.
3. 1.
4.
189
Service Station Procedures
Oil Check
A dding Engine Oil
Bef ore Driving
153
DIPSTICK UPPER MARK
LOWER MARK
SUPPORT ROD
CLIP
GRIP
Page 157 of 268

Drive moderately. Rapid
acceleration, abrupt cornering,
and hard braking use more fuel.
Look at the coolant level in the
radiator reserve tank. Make sure it is
between the MAX and MIN lines. If
it is below the MIN line, see
on page for
information on adding the proper
coolant.
Refer to
on page for information
about checking other items on your
vehicle. Always
maintain your vehicle
according to the maintenance
messages displayed in the
information display. See
on page
.
The build-up of snow or mud on
your vehicle’s underside adds
weight and rolling resistance.
Frequent cleaning helps your f uel
mileage and reduces the chance of
corrosion. Engine oil also af f ects f uel
economy. The f uel ef f icient, low-
viscosity 0W-20 oil recommended
f or your Civic Hybrid is
f ormulated to help the engine use
less f uel. This oil is available at
your dealer. an underinf lated tire
causes more ‘‘rolling resistance,’’
which uses more f uel. You may find that your Civic Hybrid’s
unique combination of an engine and
an electric motor has driving
characteristics that are somewhat
dif f erent f rom what you are used to.
184
184 192
For example,
Service Station Procedures, Fuel Economy
Improving Fuel Economy
Engine Coolant Check
A dding
Engine Coolant
Owner’s Maintenance
Checks Owner’s
Maintenance Checks
154
MAX
MIN RESERVE TANK
Page 167 of 268
Make sure all windows, mirrors,
and outside lights are clean and
unobstructed. Remove frost, snow,
or ice. Check
that any items you may be
carrying are stored properly or
fastened down securely.
Check the seat adjustment (see
page ).
Check the adjustment of the
inside and outside mirrors (see
page ).
Check the steering wheel
adjustment (see page ).
Make sure the doors are securely
closed and locked. Fasten
your seat belt. Check that
your passengers have fastened
their seat belts (see page ).
Youshoulddothefollowingchecks
and
adjustmen ts before you drive
your vehicle.
When you start the engine, check
the gauges and indicato rs in the
instrument panel (see page ).
Check that the hood and trunk are
fully closed.
Visually check the tires. If a tire
looks low, use a gauge to check its
pressure (see page ).
1.
2.
3.
8. 7. 6. 14
9.
4.
5.
93 57
10.
207 89
75
Preparing to Drive
164
Page 172 of 268

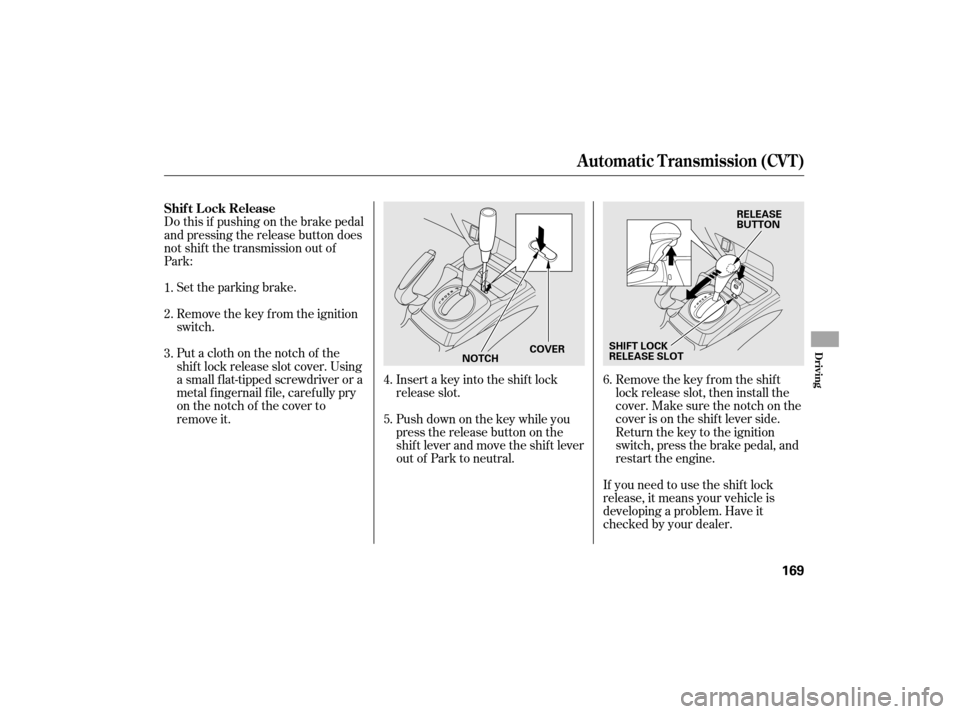
Remove the key from the ignition
switch. Set the parking brake.Remove the key from the shift
lock release slot, then install the
cover. Make sure the notch on the
cover is on the shif t lever side.
Return the key to the ignition
switch, press the brake pedal, and
restart the engine.
If you need to use the shif t lock
release, it means your vehicle is
developing a problem. Have it
checked by your dealer.
Putaclothonthenotchof the
shif t lock release slot cover. Using
a small f lat-tipped screwdriver or a
metal f ingernail f ile, caref ully pry
on the notch of the cover to
remove it.
Do this if pushing on the brake pedal
and pressing the release button does
not shif t the transmission out of
Park:
Insert a key into the shift lock
release slot.
Push down on the key while you
pressthereleasebuttononthe
shif t lever and move the shif t lever
out of Park to neutral.
1.
2.
3.
4.
5.6.
Shif t L ock Release
Automatic Transmission (CVT)
Driving
169
SHIFT LOCK
RELEASE SLOT RELEASE
BUTTON
NOTCH COVER
Page 176 of 268

Your vehicle is equipped with f ront
disc brakes. The brakes on the rear
wheels are drum. A power assist
helps reduce the ef f ort needed on
thebrakepedal.TheABShelpsyou
retain steering control when braking
very hard.
Resting your f oot on the brake pedal
applies the brakes slightly. This
builds up heat, and reduces brake
ef f ectiveness and brake pad lif e. In
addition, f uel economy can be
reduced. It also keeps your brake
lights on all the time, conf using
drivers behind you.Check the brakes after driving
through deep water. Apply the
brakes moderately to see if they f eel
normal. If not, apply them gently and
f requently until they do. Be extra
cautious in your driving.
Your vehicle is equipped with an
advanced hydraulic booster.
The advanced hydraulic booster has
some f eatures.
This f eature enables you to press the
brakepedalwithlessforcebythe
help of hydraulic pressure in the oil
pressure pump.
This f eature controls the braking
pressure appropriately, coordinating
with the regenerating brake of the
IMA motor.
When you release the brake pedal
while the Auto Idle Stop f unction
activates, this f eature keeps the
braking pressure until the engine
starts, and prevents the vehicle from
dropping back.
This f eature helps you apply the
brakes with less f orce during an
emergency braking situation.
Constant application of the brakes
when going down a long hill builds
up heat and reduces their ef f ective-
ness. Use the engine to assist the
brakes by taking your f oot of f the
accelerator and downshif ting to a
lower gear.
Power-Assist Cooperative Control with Regenerative
Brake
Creep Aid System
Brake-Assist
Braking System
Driving
173
Page 180 of 268

If you have the skills and tools to
perform more complex maintenance
tasks on your vehicle, you may want
to purchase the service manual. See
page f or inf ormation on how to
obtain a copy, or see your dealer. This section also includes
instructions on how to read the
maintenance minder messages on
the information display, a
maintenance record, and instructions
for simple maintenance tasks you
may want to take care of yourself. This section explains why it is
important to keep your vehicle well
maintained and how to f ollow basic
maintenance saf ety precautions. ......................
Maintenance Saf ety .178
....................
Maintenance Minder .179
....................
Maintenance Record .186
..............................
Fluid Locations .188
........................
Adding Engine Oil .189
.........
Changing the Oil and Filter .190
..............................
Engine Coolant .192
....................
Windshield Washers .194
........................
Transmission Fluid .195
Continuously Variable ............
Transmission (CVT) .195
....................................
Brake Fluid .196
.............................................
Lights .197
................................
Roof Antenna .202
................
Cleaning the Seat Belts .203
.....................................
Floor Mats .203
..................
DustandPollenFilter .204
.................................
Wiper Blades .205
...........................................
Wheels .207
...............................................
Tires .207
......
Checking the 12 Volt Battery .212
.............................
Vehicle Storage .213
255
Maintenance
Maint enance
177