Page 47 of 311
When not using the LATCH system,
all child seats must be secured to the
vehicle with the lap part of a lap/
shoulder belt.With the child seat in the desired
seating position, route the belt
through the child seat according
to the seat maker’s instructions,
then insert the latch plate into the
buckle.To activate the lockable retractor,
slowly pull the shoulder part of the
belt all the way out until it stops,
then let the belt f eed back into the
retractor.
Af ter the belt has retracted, tug on
it. If the belt is locked, you will not
be able to pull it out. If you can pull
thebeltout,itisnotlocked,and
you will need to repeat these steps.
In addition, the lap/shoulder belts in
all seating positions except the
driver’s have a lockable retractor
that must be activated to secure a
child seat.
1. 2.
3.
Installing a Child Seat with a L ap/
Shoulder Belt
Installing a Child Seat
44
Page 48 of 311

Af ter conf irming that the belt is
locked, grab the shoulder part of
the belt near the buckle, and pull
up to remove any slack from the
lap part of the belt. Remember, if
the lap part of the belt is not tight,
the child seat will not be secure.Push and pull the child seat
f orward and f rom side-to-side to
verify that it is secure enough to
stay upright during normal driving
maneuvers. If the child seat is not
secure, unlatch the belt, allow it to
retract f ully, then repeat these
steps.
To remove slack, it may help to
putweightonthechildseat,or
push on the back of the seat while
pulling up on the belt. To deactivate the lockable retractor
and remove a child seat, unlatch the
buckle, unroute the seat belt, and let
the belt fully retract. Since a tether can provide additional
security to the lap/shoulder belt
installation, we recommend using a
tether whenever one is required or
available. A child seat with a tether can be
installed in any seating position in
the back seat, using one of the
anchorage points shown above.
4. 5.
CONT INUED
Installing a Child Seat with a
Tether
Installing a Child Seat
Driver and Passenger Saf ety
45
COVER
ANCHORAGE POINTS
ANCHOR
Page 58 of 311

This section gives inf ormation about
the controls and displays that
contribute to the daily operation of
your vehicle. All the essential
controls are within easy reach............................
Control Locations .56
............................
Instrument Panel .57
..........
Instrument Panel Indicators .59
.............................................
Gauges .66
.....................................
Odometer .66
..............
Display Change Button .66
...................................
Trip Meter .67
..................................
Fuel Gauge .67
...................
Temperature Gauge .67
Outside Temperature
...................................
Indicator .68
..........
Check Fuel Cap Indicator .68
..................
Maintenance Minder .69
Controls Near the Steering ...........................................
Wheel .70
.
Windshield Wipers and Washers .71
...........
Turn Signal and Headlights .72
............
Daytime Running Lights .73
........
Instrument Panel Brightness .73
.................
Hazard Warning Button .74
.................
Rear Window Def ogger .74
..........
Steering Wheel Adjustment .75
...............................
Keys and Locks .76
........................
Immobilizer System .77
................................
Ignition Switch .78 ......................................
Door Locks .79
......................
Power Door Locks .80
..............
Childproof Door Locks .80
.
Auto Door Locking/Unlocking .81
.....................
Auto Door Locking .81
.................
Auto Door Unlocking .83
................................................
Trunk .87
........
Emergency Trunk Opener .87
.......................
Remote Transmitter .88
.................................................
Seats .91
..............................
Power Windows .96
.........................................
Moonroof .97
.............................................
Mirrors .99
...............................
Parking Brake .100
...............................
Interior Lights .101
.........
Interior Convenience Items .102
.....................
Beverage Holders .103
.........
Accessory Power Socket .103
..................................
Glove Box .103
.............
Console Compartment .103
Instruments and Controls
Inst rument s and Cont rols
55
Page 59 of 311
�Î
�Î
�Î �Î
:
If equipped
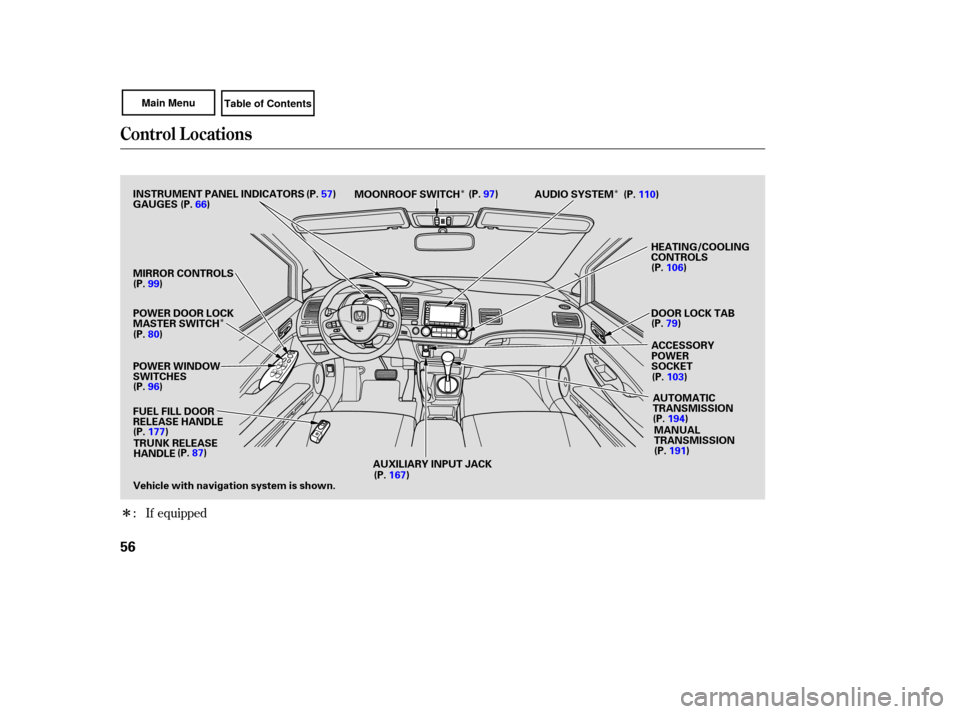
Control Locations
56
POWER WINDOW
SWITCHES AUDIO
SYSTEM
HEATING/COOLING
CONTROLS
POWER DOOR LOCK
MASTER SWITCH
MIRROR
CONTROLS
FUEL FILL DOOR
RELEASE HANDLE AUTOMATIC
TRANSMISSION
MANUAL
TRANSMISSION
MOONROOF
SWITCH
TRUNK RELEASE
HANDLE
Vehicle with navigation system is shown.
INSTRUMENT
PANEL INDICATORS
ACCESSORY
POWER
SOCKET
AUXILIARY INPUT JACK DOOR
LOCK TAB
GAUGES
(P.
57)
(P. 66)
(P. 99)
(P. 80)
(P. 96)
(P. 87) (P.
97)
(P. 110)
(P. 106)
(P. 103)
(P. 194)
(P. 191)
(P. 167)
(P.
177) (P.
79)
Page 60 of 311
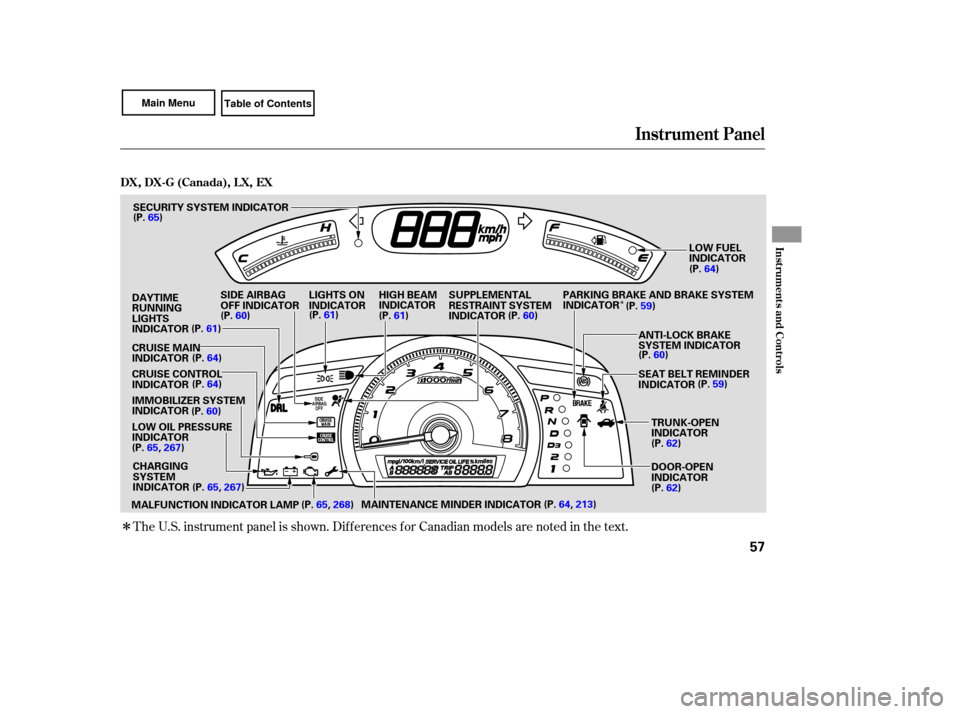
�Î
�Î
The U.S. instrument panel is shown. Differences for Canadian models are noted in the text.
Instrument Panel
Instrument sand Cont ro ls
DX, DX-G (Canada), LX,EX
57
IMMOBILIZER SYSTEM
INDICATOR
LOW OIL PRESSURE
INDICATOR SEAT
BELT REMINDER
INDICATOR
MAINTENANCE MINDER INDICATOR
SUPPLEMENTAL
RESTRAINT
SYSTEM
INDICATOR
LIGHTS
ON
INDICATOR
CRUISE CONTROL
INDICATOR CRUISE MAIN
INDICATOR SECURITY
SYSTEM INDICATOR
LOW FUEL
INDICATOR
SIDE AIRBAG
OFF INDICATOR
DOOR-OPEN
INDICATOR TRUNK-OPEN
INDICATOR
ANTI-LOCK
BRAKE
SYSTEM INDICATOR
HIGH
BEAM
INDICATOR
(P. 62)
(P. 62)
DAYTIME
RUNNING
LIGHTS
INDICATOR
(P.
65)
(P. 60) (P.
61)
(P. 61) (P. 60) (P.
64)
(P. 60)
(P. 59)
(P.
61)
(P. 64)
(P. 64)
(P. 60)
(P. 65, 267)
(P. 65, 267)
(P. 64, 213)
CHARGING
SYSTEM
INDICATOR
MALFUNCTION INDICATOR LAMP (P.
65, 268) PARKING
BRAKE AND BRAKE SYSTEM
INDICATOR (P. 59)
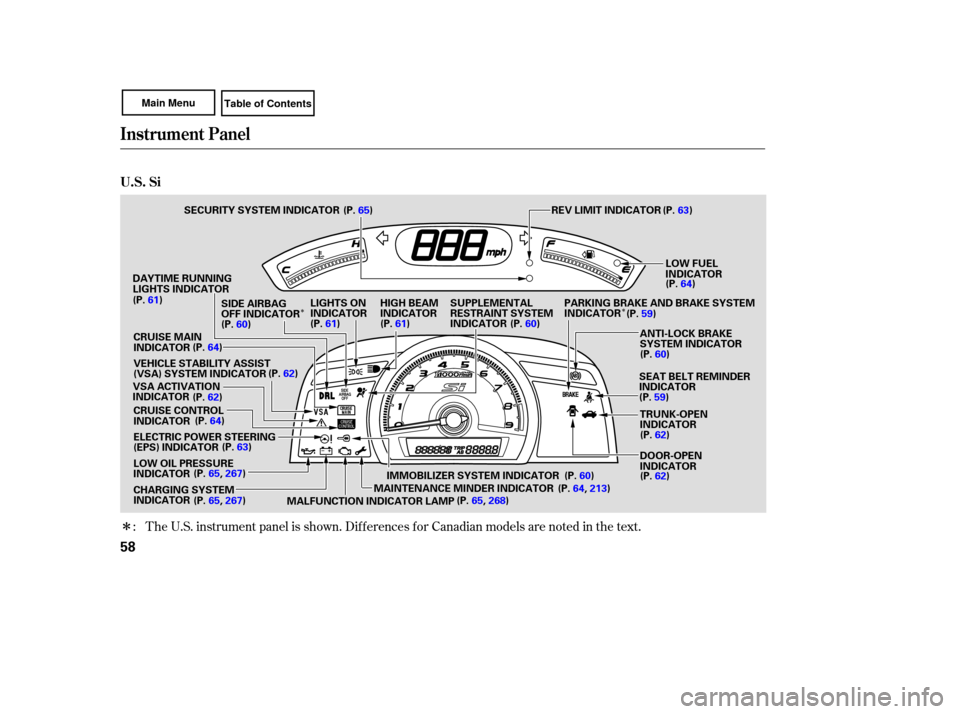
Page 61 of 311
�Î
�Î�Î
The
U.S. instrument panel is shown. Differences for Canadian models are noted in the text.
:
Instrument Panel
U.S. Si
58
LOW OIL PRESSURE
INDICATOR SECURITY
SYSTEM INDICATOR
LOW FUEL
INDICATOR
SEAT BELT REMINDER
INDICATOR
IMMOBILIZER SYSTEM INDICATOR
LIGHTS
ON
INDICATOR SUPPLEMENTAL
RESTRAINT
SYSTEM
INDICATOR
SIDE
AIRBAG
OFF INDICATOR
CRUISE CONTROL
INDICATOR
ELECTRIC POWER STEERING
(EPS) INDICATOR
CRUISE
MAIN
INDICATOR HIGH
BEAM
INDICATOR
CHARGING SYSTEM
INDICATOR ANTI-LOCK
BRAKE
SYSTEM INDICATOR
DOOR-OPEN
INDICATOR TRUNK-OPEN
INDICATOR
REV
LIMIT INDICATOR
(P. 61)
(P. 61) PARKING
BRAKE AND BRAKE SYSTEM
INDICATOR
MAINTENANCE MINDER INDICATOR
DAYTIME
RUNNING
LIGHTS INDICATOR
VSA ACTIVATION
INDICATOR VEHICLE
STABILITY ASSIST
(VSA) SYSTEM INDICATOR (P.
65)
(P. 60) (P.
61) (P. 60) (P.
59)
(P. 60)(P.
64)
(P.
63)
(P. 62)
(P. 62)
(P. 64)
(P. 63)
(P. 65, 267)
(P. 65, 267) (P.
60)
(P. 64, 213) (P.
62)
(P.
62)
(P.
59)
(P.
64)
MALFUNCTION INDICATOR LAMP (P.
65, 268)
Page 63 of 311

position. If it comes on at any other
time, there is a problem with the
ABS. If this")
This indicator normally comes on for
a few seconds when you turn the
ignition switch to the ON (II)
position. If it comes on at any other
time, there is a problem with the
ABS. If this happens, have your
vehicle checked at a dealer. With
this indicator on, your vehicle still
has normal braking ability but no
an ti-lock function. For more
info rmation, see page .
This
indicator comes on for several
seconds when you turn the ignition
switch to the ON (II) position. If it
comes on at any other time, it
indicates a poten tial problem with
your front airbags. This indicator will
also alert you to a poten tial problem
with your side airbags, passenger’s
side airbag automa tic cutoff system,
side curtain airbags, automatic seat
belt tensioners, driver’s seat position
sensor, or the front passenger’s
weight sensors. For more
info rmation, see page . This
indicator comes on when you
turn the ignition switch to the ON
(II) position. If it comes on at any
other time, it indicates that the
passenger’s side airbag has
automatically shut off. For more
info rmation, see page . This
indicator comes on briefly when
you turn the ignition switch to the
ON (II) position. It will then go off if
you have inserted a properly-coded
ignition key. If it is not a properly-
coded key, the indicator will blink,
and the engine’s fuel system will be
disabled (see page ). 77
29 30
200
Supplemental Restraint
System Indicator
Immobilizer System
Indicator
Anti-lock Brake System
(A BS) Indicator Side Airbag Of f
Indicator
Instrument Panel Indicators
60
U.S. Canada
Page 64 of 311
 or LOCK")
This indicator reminds you that the
exterior lights are on. It comes on
when the light switch is in either the
or position. If you turn the
ignition switch to the ACCESSORY
(I) or LOCK (0) position without
turning off the light switch, this
indicator will stay on. A reminder
chime will also sound when you open
the driver’s door.
When you press the hazard warning
button, both turn signal indicato rs
and all turn signals on the outside of
the vehicle flash. If
this indicator comes on when the
ignition switch is turned to the ON
(II) position and the parking brake is
rele ased, it means there is a problem
in a circuit. Have your vehicle
checked by your dealer.
This indicator comes on with the
high beam headlights. For more
info rmation, see page .
This indicator also comes on with
reduced brightness when the
daytime running lights (DRL) are on
(see page ).
The
left or right turn signal indicator
blinks when you signal a lane change
or turn. If an indicator does not blink
or blinks rapidly, it usually means
one of the turn signal bulbs is
burned out (see page ). Replace
the bulb as soon as possible, since
other drivers cannot see that you are
signaling. 238
72
73
Turn Signal and
Hazard Warning
Indicators
Lights On Indicator
‘‘Daytime Running
Lights’’ Indicator
High Beam Indicator
Instrument Panel Indicators
Inst rument s and Cont rols
61