Page 94 of 311
�µ
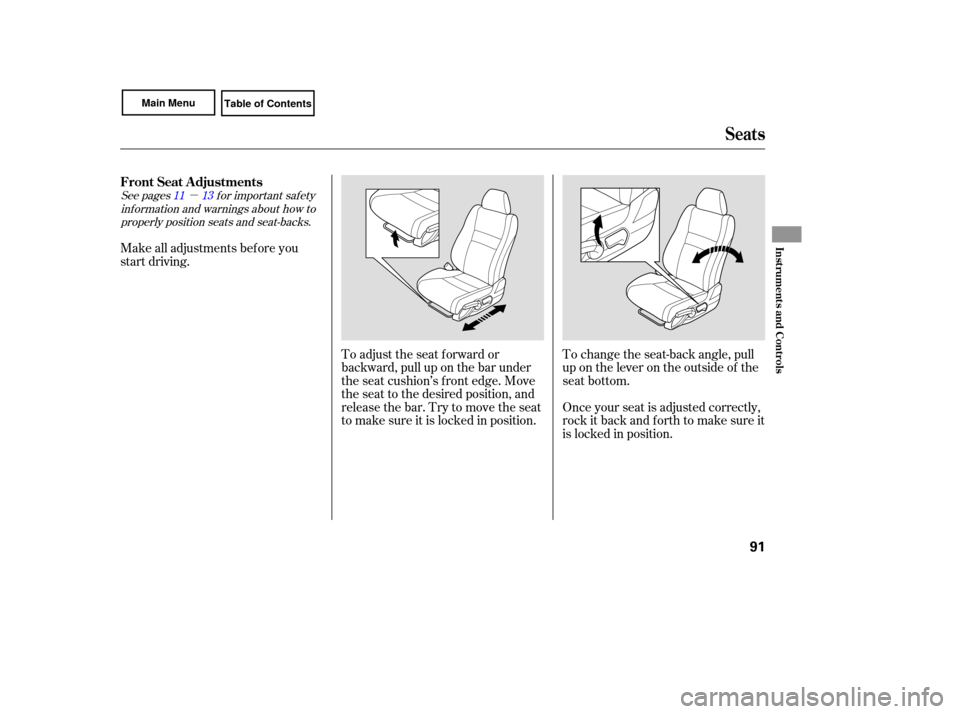
See pages for important safety
inf ormation and warnings about how to properly position seats and seat-backs. 11 13
Make all adjustments bef ore you
start driving.
To adjust the seat f orward or
backward, pull up on the bar under
the seat cushion’s f ront edge. Move
the seat to the desired position, and
releasethebar.Trytomovetheseat
to make sure it is locked in position.Once your seat is adjusted correctly,
rock it back and f orth to make sure it
is locked in position. To change the seat-back angle, pull
up on the lever on the outside of the
seat bottom.
FrontSeatAdjustments
Seats
Inst rument s and Cont rols
91
Page 97 of 311
When storing cargo, you can move
therearcentershoulderbeltoutof
the way by removing the belt from
the guide.To lock the seat-back upright, push it
firmly against the trunk panel. Make
sure it is latched in place by pulling
on the top of the seat. To release the seat-back, pull the
release under the trunk panel. Push
the seat-back down, then let go of
the release.
The lef t and right seat-backs can be
f olded separately f rom inside the
trunk.On EX and U.S. Si models
Seats
94
GUIDE
CENTER SHOULDER BELT Pull
RELEASE
Page 104 of 311
The ceiling light has a three-position
switch;ON(right),DoorActivated,
andOFF(left).IntheDoor
Activated (center) position, the light
comesonwhenyou:Open any door.
Remove the key from the ignition.
Unlock the doors with the key or
the remote transmitter. The f ront ceiling light has a two-
position switch; Door Activated and
OFF.
The f ront ceiling light has two
spotlights. Push the spotlight lenses
to turn them on and off.
After all doors are closed tightly, the
light(s) dims slightly, then f ades out
in about 30 seconds.
If you do not open any door af ter you
unlock the driver’s door or remove
the key from the ignition switch, the
light(s) f ades out in about 30
seconds.
If you leave any door open without
the key in the ignition switch, the
ceiling light(s) will go of f af ter 3
minutes.On models with moonroof
On models with moonroof
CONT INUED
Ceiling L ight
Spotlights
Interior Lights
Inst rument s and Cont rols
101
DOOR ACTIVATED OFF
OFF ON
SWITCHES
DOOR
ACTIVATED
Page 108 of 311

The heating and air conditioning
system in your vehicle provides a
comf ortable driving environment in
all weather conditions.
The standard audio system has
many f eatures. This section
describes those f eatures and how to
use them. (If you have an optional
audio system, ref er to the operating
instructions that came with it.)
Your vehicle has an anti-theft audio
system that requires a code number
to enable it.
The security system helps to dis-
courage vandalism and thef t of your
vehicle..............
Vents, Heating, and A/C . 106
...........................
Using the A/C .106
................................
Audio System .110
Audio System (Models without ...............
navigation system) . 112
......................
Playing the Radio .113
Playing the XM
Satellite ...................
Radio (Optional) .117
............................
Playing a Disc .122
...
Disc Player Error Messages .128
Audio System (Models with ...............
navigation system) .130
......
Playing the AM/FM Radio .130
Playing the XM
Satellite
......................................
Radio .134
............................
Playing a Disc .142
Disc Player Error Messages
(Vehicles with Navigation ..................................
System) .150
.....................
Playing a PC Card .151
AM/FM Radio Reception ............ 163
..................
Protecting Your Discs . 165
................
Remote Audio Controls . 166
.................
Radio Thef t Protection . 168
..........................
Setting the Clock .169
............................
Security System .170 ...............................
Cruise Control .171
All models except U.S. DX
All U.S. models except DX
Features
Features
105
Page 109 of 311
Turn the dial clockwise to increase
the fan speed and airflow. Turn the
dial counterclockwise to decrease it.
Turning this dial clockwise increases
the temperature of the airflow.
This button turns the air
conditioning on and of f . The
indicatorinthebuttonisonwhen
the A/C is on.
When the recirculation indicator is
on, air f rom the vehicle’s interior is
sent throughout the system again.
When the indicator is off, air is
brought in f rom the outside of the
vehicle (fresh air mode).
If equipped
Vents, Heating, and A/C
Air Conditioning (A/C) Button Fan Control Dial
Recirculation Button T emperature Control Dial
106
TEMPERATURE CONTROL DIAL
RECIRCULATION BUTTON
MODE BUTTONS
FAN CONTROL DIAL
MAX A/C BUTTON (If equipped)
(Canadian LX
and EX models)
AIR CONDITIONING BUTTON REAR WINDOW
DEFOGGER
BUTTON
Page 123 of 311
�µ�µ
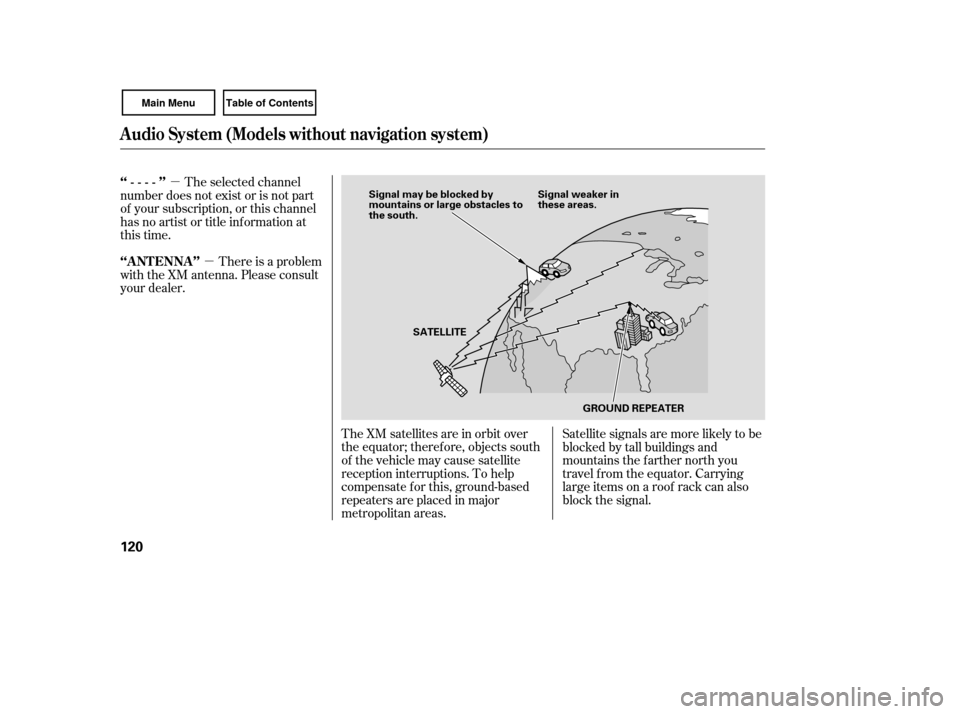
The XM satellites are in orbit over
the equator; therefore, objects south
of the vehicle may cause satellite
reception interruptions. To help
compensate f or this, ground-based
repeaters are placed in major
metropolitan areas. Satellite signals are more likely to be
blocked by tall buildings and
mountains the f arther north you
travel f rom the equator. Carrying
large items on a roof rack can also
block the signal.
The selected channel
number does not exist or is not part
of your subscription, or this channel
has no artist or title inf ormation at
this time.
There is a problem
with the XM antenna. Please consult
your dealer. ‘‘----’’
‘‘A NT ENNA ’’
Audio System (Models without navigation system)
120
Signal may be blocked by
mountains or large obstacles to
the south. Signal weaker in
these areas.
SATELLITE GROUND REPEATER
Page 141 of 311
The XM satellites are in orbit over
the equator; therefore, objects south
of the vehicle may cause satellite
reception interruptions. To help
compensate f or this, ground-based
repeaters are placed in major
metropolitan areas.
Satellite signals are more likely to be
blocked by tall buildings and
mountains the f arther north you
travel f rom the equator. Carrying
large items on a roof rack can also
block the signal.
Audio System (Models with navigation system)
138
Signal may be blocked by
mountains or large obstacles to
the south.Signal weaker in
these areas.
SATELLITE GROUND REPEATER
Page 172 of 311
, and the displayed
time is updated automatically b")
On models with navigation system
On models without navigation system
The navigation system receives
signals f rom the global positioning
system (GPS), and the displayed
time is updated automatically by the
GPS. Ref er to the navigation system
manual f or how to adjust the time.
To set the time, press the CLOCK
(AM, AM/FM) button until the
displayed time begins to blink, then
release the button.
Change the hours by pressing the H
(preset 1) button until the numbers
advance to the desired time. Change
the minutes by pressing the M
(preset 2) button until the numbers
advance to the desired time.
Press the CLOCK (AM, AM/FM)
button again to enter the set time.
You can quickly set the time to the
nearest hour. If the displayed time is
bef ore the half hour, pressing the
CLOCK (AM, AM/FM) button until
you hear a beep, then pressing the R
(preset 3) button sets the clock back
to the previous hour. If the displayed
time is af ter the half hour, the clock
sets f orward to the beginning of the
next hour.
For example: 1:06 will reset to 1:00
1:52 will reset to 2:00
Setting the Clock
Features
169
MINUTE BUTTON MINUTE BUTTON
HOUR BUTTON RESET BUTTON HOUR BUTTON RESET BUTTON CLOCK BUTTON
CLOCK BUTTON
U.S. LX and all Canadian models U.S. EX and Si models

,DoorActivated,
andOFF(left).IntheDoor
Activated (center) position, the light
comesonwhenyou:Open any door.
Remove the key from the ignition.
Unl")