Page 1158 of 1226

308103168 Manual Transmission/Transaxle 308103168
INSTALLATION
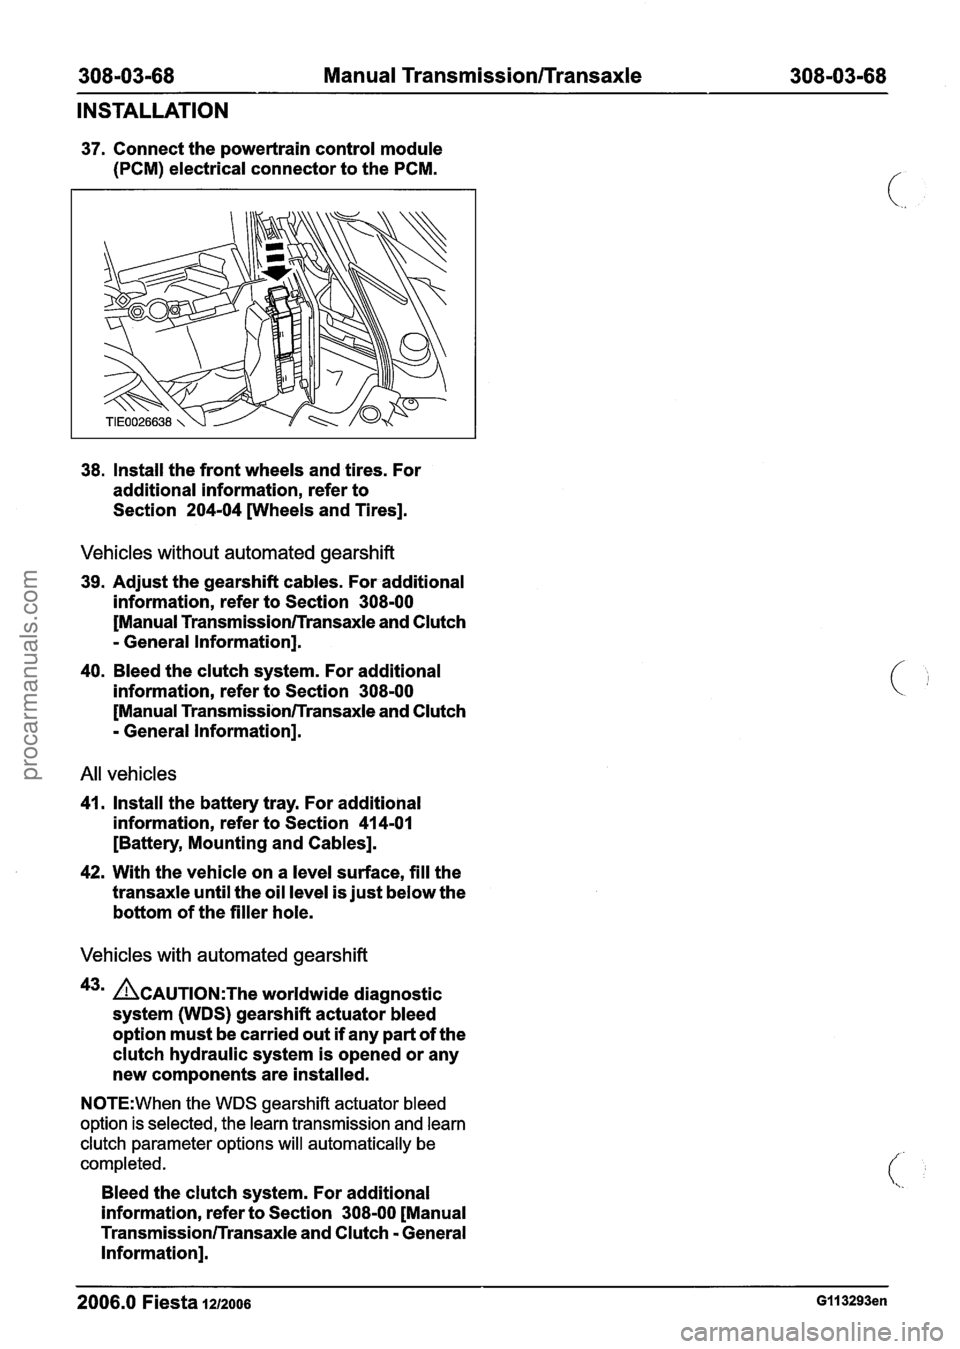
37. Connect the powertrain control module
(PCM) electrical connector to the PCM.
38. Install the front wheels and tires. For
additional information, refer to
Section
204-04 wheels and Tires].
Vehicles without automated gearshift
39. Adjust the gearshift cables. For additional
information, refer to Section
308-00
[Manual Transmission/Transaxle and Clutch
- General Information].
40. Bleed the clutch system. For additional
information, refer to Section
308m00
[Manual Transmission/Transaxle and Clutch
- General Information].
All vehicles
41. Install the battery tray. For additional
information, refer to Section
41 4-01
[Battery, Mounting and Cables].
42. With the vehicle on a level surface, fill the
transaxle until the oil level is just below the
bottom of the filler hole.
Vehicles with automated gearshift
43m ACAUTION:T~~ worldwide diagnostic
system (WDS) gearshift actuator bleed
option must be carried out
if any part of the
clutch hydraulic system is opened or any
new components are installed.
N0TE:When the WDS gearshift actuator bleed
option is selected, the learn transmission and learn
clutch parameter options will automatically be
completed.
Bleed the clutch system. For additional
information, refer to Section
308-00 [Manual
Transmission/Transaxle and Clutch - General
Information].
2006.0 Fiesta 1212006 GII 3293en
procarmanuals.com
Page 1162 of 1226
308-03-72 Manual Transmission/Transaxle 308-03-72
INSTALLATION
20. Attach the gearshift cables to the bracket 23. Connect the reversing lamp switch
and turn the abutment sleeves electrical connector.
counterclockwise.
I I
24. Install the starter motor.
21. Attach the gearshift cables to the selector
levers.
22. Install the gearshift cables cover. 25.
Install the wiring harness retaining bracket. Attach the wiring harness to the retaining
bracket.
26. Lower the vehicle.
2006.0 Fiesta 1212006 G453417en
procarmanuals.com
Page 1171 of 1226
Manual Transmission/Transaxle External
Controls
REMOVAL AND INSTALLATION
Gearshift Lever(l6 524 0)
Removal
I. Remove the gearshift lever trim panel.
Disconnect the cigar lighter electrical
connector.
2. Detach the gearshift cables from the
gearshift lever.
4. Remove the gearshift lever front retaining
bolts.
5. Remove the gearshift lever.
Remove the bolts.
Installation
1. To install, reverse the removal procedure. 3. Detach the gearshift cables from the
retaining bracket. 2. Adjust the gearshift cables. For additional
information, refer to Section
308-00 [Manual Turn the abutment sleeves clockwise. Transmission/Transaxle and Clutch - General
Information].
2006.0 Fiesta 1212006 GI 86744en
procarmanuals.com
Page 1182 of 1226

309-00-6 Exhaust System 309-00-6
REMOVAL AND INSTALLATION
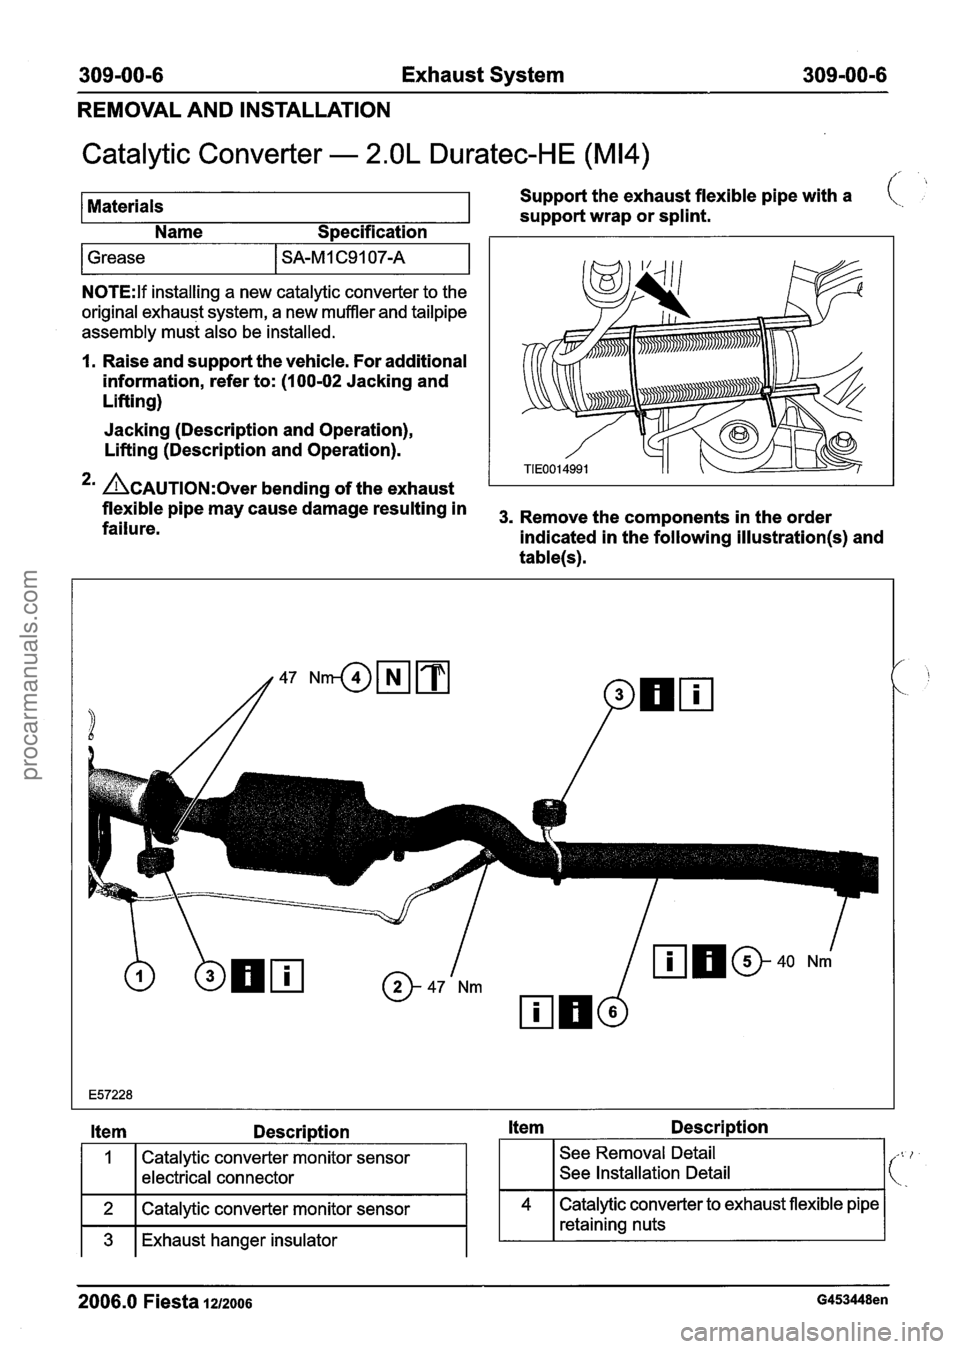
Catalytic Converter - 2.OL Duratec-HE (M14)
/'
Materials Support
the exhaust flexible pipe with a (,
support wrap or splint.
Name Specification
1 Grease I SA-M 1 C9107-A I --
N0TE:lf installing a new catalytic converter to the
original exhaust system, a new muffler and tailpipe
assembly must also be installed.
1. Raise and support the vehicle. For additional
information, refer to:
(1 00-02 Jacking and
Lifting)
Jacking (Description and Operation),
Lifting (Description and Operation).
*' CAUTION:^^^^ bending of the exhaust
flexible pipe may cause damage resulting in 3. Remove the components in the order failure.
indicated in the following illustration(s) and
table(s).
Item Description Item Description
2006.0 Fiesta 1212006 G453448en
2
3
See Removal Detail
See Installation Detail
1
Catalytic converter monitor sensor
electrical connector
Catalytic converter monitor sensor
Exhaust hanger insulator
4 Catalytic converter to exhaust flexible pipe
retaining nuts
procarmanuals.com
Page 1185 of 1226

309-00-9 Exhaust System 309-00-9
REMOVAL AND INSTALLATION
Itern Description Item Descri~tion
Heated oxygen sensor (H02S) electrical
connector See
Removal Detail
See lnstallation Detail
3. To install, reverse the removal procedure.
3
A CAUTI0N:Never use jointing compound
Exhaust flexible pipe to muffler and tailpipe forward of the catalytic converter.
assembly retaining nuts Exhaust
flexible pipe to exhaust manifold
retaining nuts
See Removal Detail
Removal Details
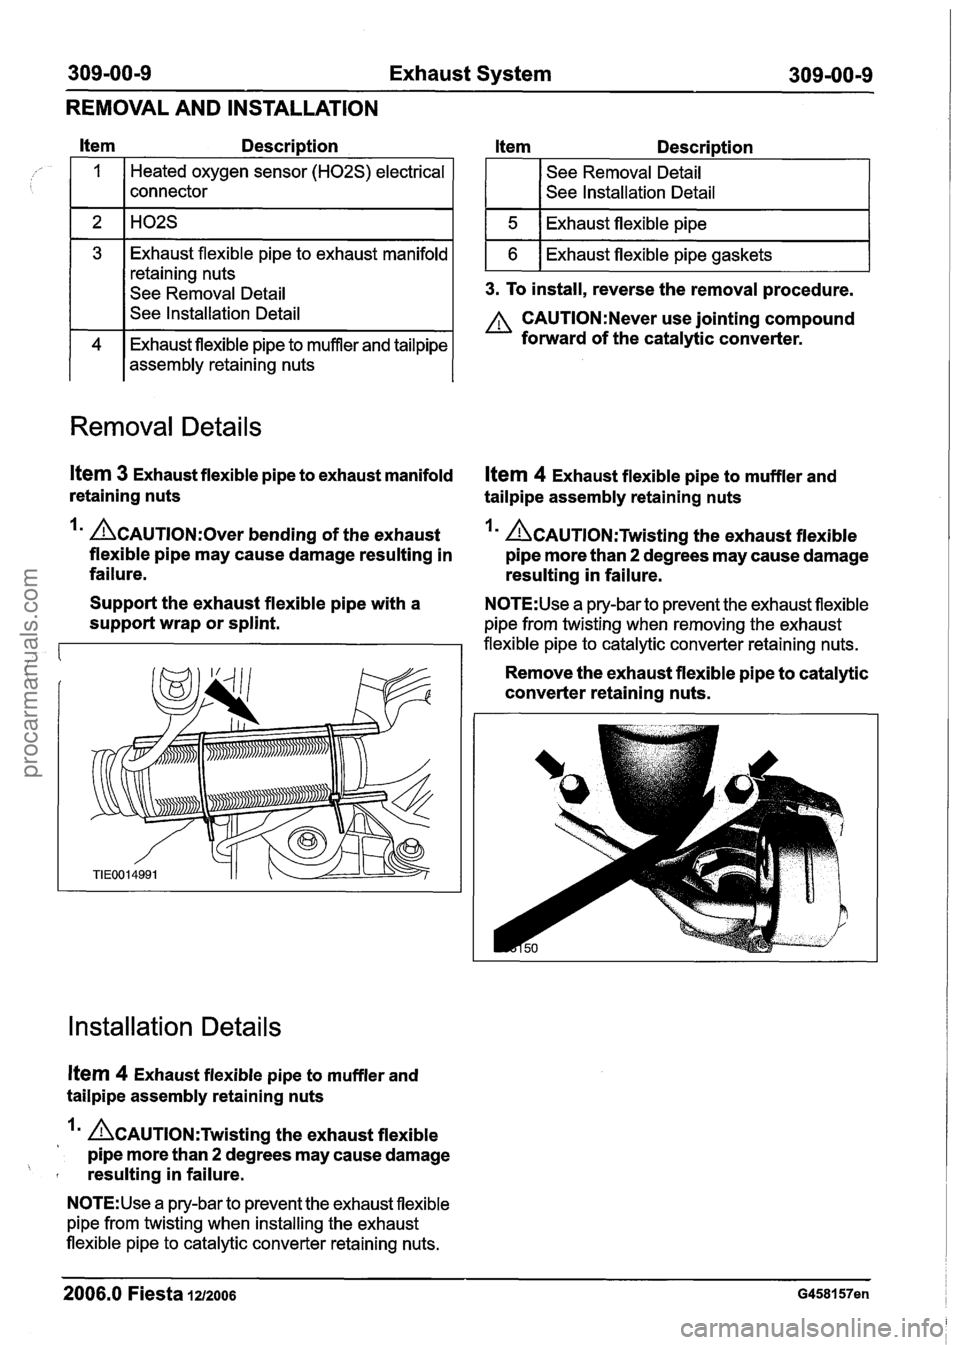
Item 3 Exhaust flexible pipe to exhaust manifold Ifem 4 Exhaust flexible pipe to muffler and
retaining nuts tailpipe assembly retaining nuts
Im &AUTION:O~~~ bending of the exhaust Im &Au~l~N:Twistin~ the exhaust flexible
flexible pipe may cause damage resulting in pipe more than
2 degrees may cause damage
failure. resulting in failure.
Support the exhaust flexible pipe with a
N0TE:Use a pry-bar to prevent the exhaust flexible
support wrap or splint. pipe from twisting when removing the exhaust
flexible pipe to catalytic converter retaining nuts.
Remove the exhaust flexible pipe to catalytic
converter retaining nuts.
Installation Details
Item 4 Exhaust flexible pipe to muffler and
tailpipe assembly retaining nuts
A~AuT10~:Twistin~ the exhaust flexible
pipe more than
2 degrees may cause damage
' resulting in failure.
N0TE:Use a pry-bar to prevent the exhaust flexible
pipe from twisting when installing the exhaust
flexible pipe to catalytic converter retaining nuts.
2006.0 Fiesta 1212006 G458157en
procarmanuals.com
Page 1188 of 1226
31 0-00-2 Fuel System - General Information 31 0-00-2
DIAGNOSIS AND TESTING
Fuel System - 1.3L Duratec-8V (Rocam)/l.25L Duratec-1 6V
(Sigma)/2.0L Duratec-HE (M14)/1.4L Duratec-I 6V
(Sigma)/l.GL Duratec-1 6V (Sigma)
lnspection and Verification
1. Verify the customer concern.
2. Visually inspect for obvious signs of mechanical
or electrical damage.
- Fuel level
- Fuel leak(s)
- Fuel line(s)
- Fuel filter (if
equipped)
- Fuel tank
- Fuel tank filler pipe
- Fuel filler cap
Visual lnspection Chart
- Electrical
connector(s)
- Wiring harness
- Inertia fuel shutoff
(IFS) switch
- Fuel pump module
I Mechanical
3. If an obvious cause for an observed or reported
concern is found, correct the cause (if possible)
before proceeding to the next step
4. If the cause is not visually evident, verify the
symptom and refer to WDS.
Electrical
-
2006.0 Fiesta 1212006 G348253en
procarmanuals.com
Page 1201 of 1226

31 0-01 -3 Fuel Tank and Lines 31 0-01 -3
DESCRIPTION AND OPERATION
Fuel Tank and Lines - 1.25L Duratec-1 6V (Sigma)/l.4L
Duratec-1 6V (Sigma)/l .6L Duratec-1 6V (Sigma)
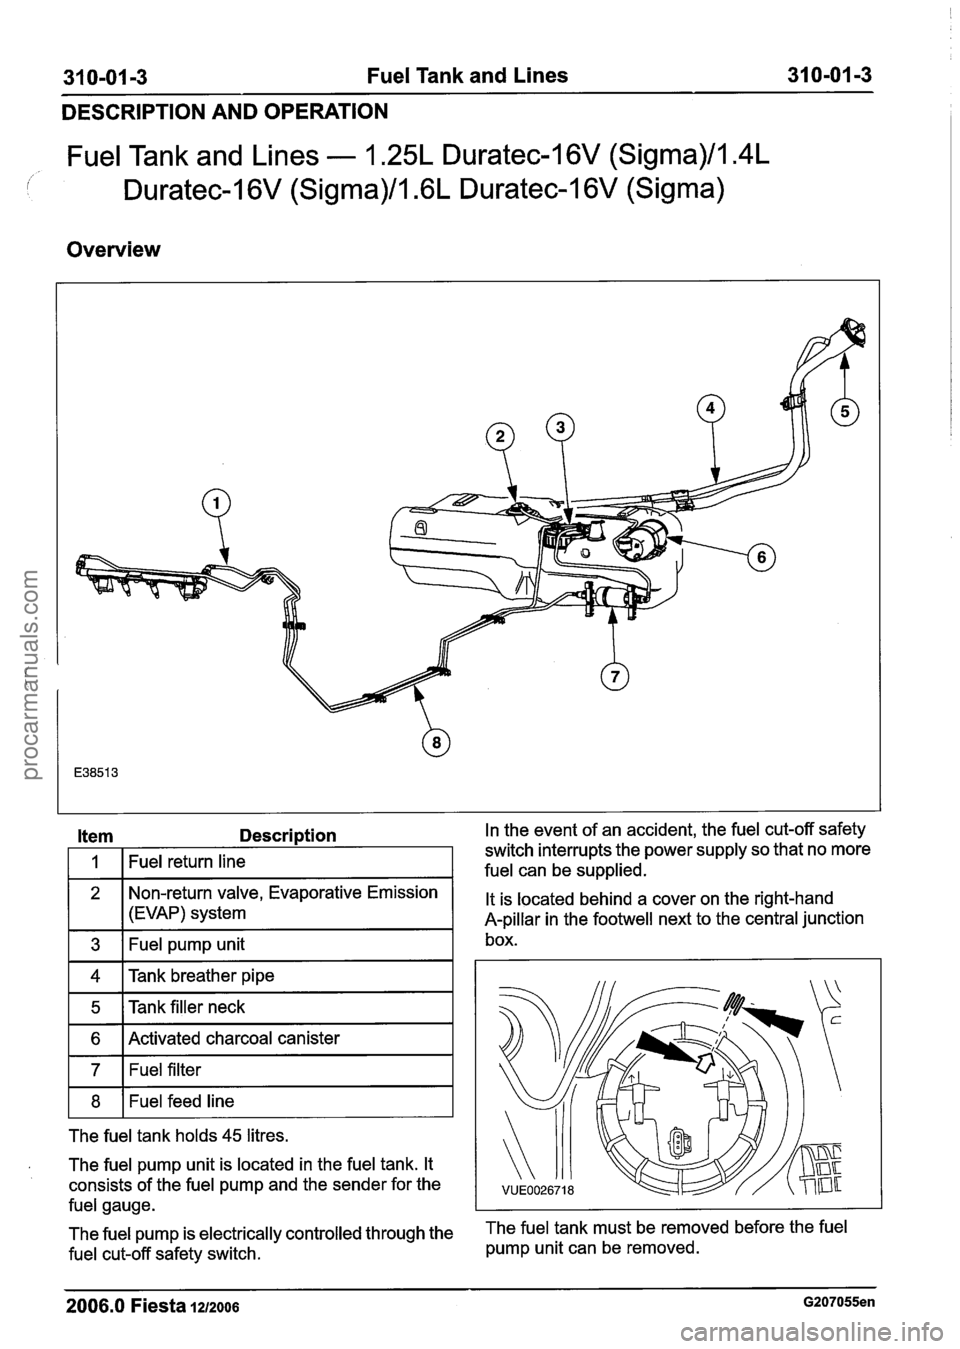
Overview
Item Description In the
event of an accident, the fuel cut-off safety
11 Tank breather pipe I
1
2
3
1 5 1Tankfiller neck I
Fuel return line
1 6 I Activated charcoal canister I
switch interrupts the power supply so that no more
fuel can be supplied.
Non-return valve, Evaporative Emission
(EVAP) system
Fuel pump unit
1 7 1 Fuel filter I
It is located behind a cover on the right-hand
A-pillar in the footwell next to the central junction
box.
1 8 1 Fuel feed line I
The fuel tank holds 45 litres.
a The fuel pump unit is located in the fuel tank. It
consists of the fuel pump and the sender for the
fuel gauge.
The fuel pump is electrically controlled through the
The fuel tank must be removed before the fuel
fuel cut-off safety switch. pump
unit can be removed.
2006.0 Fiesta 1212006 G207055en
procarmanuals.com
Page 1206 of 1226
31 0-01 -8 Fuel Tank and Lines 31 0-01 -8 -- -
REMOVAL AND INSTALLATION
All except vehicles with diesel engine All
except vehicles with diesel engine
12. Disconnect the fuel tank vent pipe from the 14.
Disconnect the fuel pump module electrical '
evaporative emission canister. For connector.
additional information, refer to
Section 310-00 [Fuel System
- General
Information].
All vehicles
13' ~CAUTION:W~~~ lowering the fuel tank,
make sure that excessive strain is not
placed on the fuel lines and electrical
connectors.
Partially lower the fuel tank.
Vehicles with diesel engine
15. Disconnect the fuel level sensor electrical
connector.
All vehicles
16. N0TE:Make note of the color of the fuel
lines to make sure they are connected in
exactly the same positions when installing.
Fuel supply line connectors are white or
are identified by a white band. Fuel return
line connectors are red or are identified by
a red band.
2006.0 Fiesta 1212006 GI 89084en
procarmanuals.com