Page 122 of 154

121CAR MAINTENANCE
If the pressure is too low
the tyre overheats and
this can cause it serious
damage.case, comply with the laws in the
country where the car is being driven.
IMPORTANT
As far as possible avoid sharp brak-
ing and screech starts.
Be careful not to hit the kerb, pot-
holes or other obstacles hard. Driving
for long stretches over bumpy roads
can damage the tyres.
Periodically check that the tyres have
no cuts in the sidewalls, abnormal
swelling or irregular tyre wear. If any
of these occur, have the car seen to
at a Fiat Dealership.
Avoid overloading your car: this can
seriously damage wheels or tyres.
If you get a flat tyre, stop immedi-
ately and change it so as not to dam-
age the tyre, the wheel, the suspen-
sion and the steering.
Tyres age even if they are not used
very much. Cracking of the tread rub-
ber and the sidewalls are a sign of this
ageing. In any case, if the tyres have
been fitted for more than six years
they should be examined by an expert
Tyre pressure must be
correct to ensure good
road holding.Wrong pressure causes uneven
wear of the tyres fig. 8:
A - correct pressure: tyre wears
evenly;
B - under inflated tyre: shoulder
tread wear;
C - over inflated tyre: centre tread
wear.
Tyres must be replaced when the
tread wears down to 1.6 mm. In any
fig. 8
P4Q00086
WHEELS AND TYRES
TYRE PRESSURE
Check the pressure of each tyre, in-
cluding the spare, every two weeks
and before long journeys.
The pressure must be checked when
the tyre is rested and cold.
It is normal for the pressure to rise
when you are driving. If you have to
check or restore the pressure when
the tyres are warm, remember that
the pressure value must be 0.3 bar
above the specified value.
See
WHEELSin TECHNICAL SPECIFICA-
TIONSfor the correct tyre inflation
pressure.
Page 124 of 154

123CAR MAINTENANCE
Changing the windscreen
wiper blade
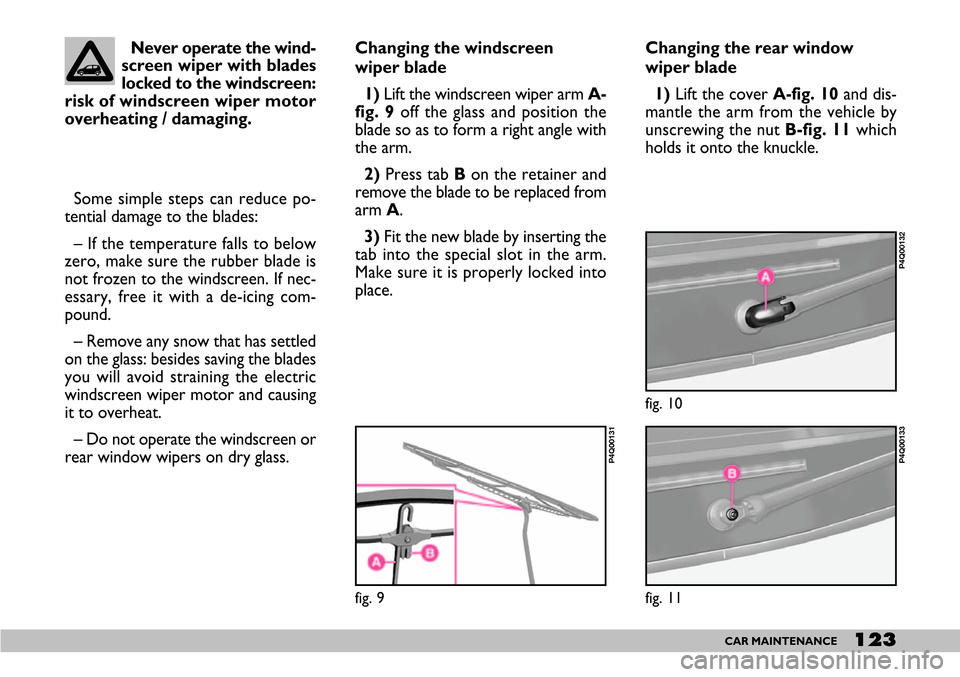
1) Lift the windscreen wiper arm A-
fig. 9off the glass and position the
blade so as to form a right angle with
the arm.
2) Press tab B on the retainer and
remove the blade to be replaced from
arm A.
3) Fit the new blade by inserting the
tab into the special slot in the arm.
Make sure it is properly locked into
place.Changing the rear window
wiper blade
1) Lift the coverA-fig. 10and dis-
mantle the arm from the vehicle by
unscrewing the nut B-fig. 11which
holds it onto the knuckle.
fig. 9
P4Q00131
fig. 10
P4Q00132
fig. 11
P4Q00133
Never operate the wind-
screen wiper with blades
locked to the windscreen:
risk of windscreen wiper motor
overheating / damaging.
Some simple steps can reduce po-
tential damage to the blades:
– If the temperature falls to below
zero, make sure the rubber blade is
not frozen to the windscreen. If nec-
essary, free it with a de-icing com-
pound.
– Remove any snow that has settled
on the glass: besides saving the blades
you will avoid straining the electric
windscreen wiper motor and causing
it to overheat.
– Do not operate the windscreen or
rear window wipers on dry glass.
Page 125 of 154

124CAR MAINTENANCE
The windscreen washer jets can be
directed by adjusting the inclination of
the nozzles. Direct the spray so that
it reaches the highest point reached
by the blades. BODYWORK
PROTECTING THE CAR
FROM ATMOSPHERIC
AGENTS
The main causes of rust are:
– atmospheric pollution;
– salt and humidity in the atmos-
phere (coastal or very hot and humid
areas);
– environmental conditions that are
specific to the season.
In addition, the abrasiveness of dust
in the atmosphere and sand carried by
the wind as well as mud and stones
kicked up by other cars must not be
underestimated.
For your Fiat 600, Fiat has used lead-
ing-edge technological solutions to ef-
fectively protect the body from rust.
These are the most important:
– painting systems and products that
make the car particularly resistant to
rust and scratching; 2) Position the new arm correctly
and fasten the nut B.
3) Replace the cover A.
NOZZLES fig. 12-13
If there is no jet of liquid, first make
sure that there is liquid in the reser-
voir: see
CHECKING FLUID LEVELSin this
chapter.
Then make sure that the holes in the
nozzles
are not clogged up. Use a pin for this
if necessary.
fig. 13
P4Q00127
fig. 12
P4Q00126
Page 128 of 154

127CAR MAINTENANCE
CLEANING SEATS
AND FABRICS
– Remove dust with a soft brush and
vacuum cleaner.
– Brush the seats with a damp
sponge with water and a neutral soap.
– Remove any grease stains with a
specific product.
CLEANING LEATHER SEATS
– Remove the dry dirt with a
chamois leather or very slightly moist
cloth without exerting too much pres-
sure.
– Remove liquid or grease stains
with a dry absorbent cloth without
rubbing. Then wipe with a chamois
leather or soft cloth moistened with
water and neutral soap.
If the stain does not come out, use a
special cleaning compound being par-
ticularly careful to follow the instruc-
tions for use.
IMPORTANT Never use alcohol
or alcohol-base products.PLASTIC PARTS INSIDE
THE CAR
Use special products designed not to
alter the appearance of the compo-
nents.
IMPORTANT Do not use alcohol
or petrol to clean the instrument
panel.
Do not keep aerosol
cans in the car. There is
the risk they might ex-
plode. Aerosol cans must never
be exposed to a temperature
above 50°C; when the weather
starts to get hot the tempera-
ture inside the car might go well
beyond that figure.INTERIORS
From time to time check that water
has not collected under the mats
(from dripping shoes, umbrellas etc.)
which could cause the steel to rust.
Never use inflammable
products such as petro-
leum ether or petrol to
clean inside the car. The electro-
static loads that are generated
while rubbing to clean could be-
come a fire risk.
Page 129 of 154

128TECHNICAL SPECIFICATIONS
T T T T
E E E E
C C C C
H H H H
N N N N
I I I I
C C C C
A A A A
L L L L
S S S S
P P P P
E E E E
C C C C
I I I I
F F F F
I I I I
C C C C
A A A A
T T T T
I I I I
O O O O
N N N N
S S S S
IDENTIFICATION DATA
CHASSIS MARKING
This is stamped on the bed plate in
the boot, on the right fig. 1.
It can be seen by lifting the carpet
and includes:
– vehicle model ZFA 187000
– chassis number.ENGINE MARKING
The marking is stamped on the cylin-
der block and includes the model and
the serial number.
MODEL PLATE
The plate fig. 2 bears the following
identification data:
A - Manufacturer’s name
B - Homologation number
C - Vehicle type code
D - Chassis numberE - Maximum vehicle weight fully
loaded
F - Maximum vehicle weight fully
loaded with trailer
G - Maximum vehicle weight on
front axle
H - Maximum vehicle weight on rear
axle
I - Engine type
L - Body version code
M - Spare part code.
The plate is in the boot, on the left
fig. 3.
fig. 1
P4Q00080
fig. 2
P4Q00081
fig. 3
P4Q00100
Page 130 of 154
129TECHNICAL SPECIFICATIONS
BODYWORK PAINT
IDENTIFICATION PLATE
This plate fig. 4 is applied inside the
tailgate.
It bears the following data:
A - Paint manufacturer
B - Colour name
C - Fiat colour code
D- Respray and touch up code.
fig. 4
P4Q00082
187AXC1A 02
187CXC1A 1C 187A1.000
187A1.000
Versions Code Code
engine type bodywork version
S - Active
Van
ENGINE CODES - BODYWORK VERSIONS
Page 135 of 154

134TECHNICAL SPECIFICATIONS
WINTER TYRES
Use winter tyres as indicated in the
WINTER TYRESchapter.
SMALL SPARE WHEEL
Printed steel rim.
Tubeless tyre.
SNOW CHAINS
Use only low profile chains, see the
SNOW CHAIN CHAPTER.
WHEEL GEOMETRY
Front wheel toe-in measured from
rim to rim: –1 ±1mm
The figures refer to the car in full
running order.Maximum speed rating
Q= up to 160 km/h.
R= up to 170 km/h.
S= up to 180 km/h.
T= up to 190 km/h.
U= up to 200 km/h.
H= up to 210 km/h.
V= up to 240 km/h.
Maximum speed rating
for snow tyres
Q M+S= up to 160 km/h
T M+S= up to 190 km/h
H M+S= up to 210 km/h Example: 165/55 R 13 70 H
165= Nominal width (S, distance
between side walls in mm).
55= Height/width ratio (H/S, as a
percentage).
R= Radial tyre.
13= Rim nominal diameter in
inches (Ø).
70= Load rating (carrying capacity).
H= Maximum speed rating.
fig. 5
P3P01062
UNDERSTANDING TYRE
MARKINGS
The following are the necessary in-
dications to understand the meaning
of the markings on the tyre.