Page 88 of 154

87IN AN EMERGENCY
I I I I
N N N N
A A A A
N N N N
E E E E
M M M M
E E E E
R R R R
G G G G
E E E E
N N N N
C C C C
Y Y Y Y
EMERGENCY
START-UP
If the Fiat CODE cannot deactivate
the engine immobilising system, the
¢and
Uwarning lights stay on and
the engine will not start. Follow the
emergency start-up procedure to
start the engine.
Read the whole procedure care-
fully before trying to carry it out.
If you make a mistake, you must turn
the ignition key back to STOPand
repeat the whole operation from the
beginning (step 1).
1)Read the 5-figure electronic code
given on the CODE card.
2)Turn the ignition key to MAR.3)Press and hold down the acceler-
ator pedal. The injection system warn-
ing light
Uwill come on for about 8
seconds, and then go out. At this
point release the accelerator pedal
and get ready to count the flashes of
warning light
U.
4) Count the number of flashes that
corresponds to the first figure of the
code on the CODE card, then press
the accelerator pedal and keep it there
until the
Uwarning light comes on
for four seconds and then goes out;
release the accelerator pedal.
5) The
Uwarning light will start
flashing again: after it has flashed the
number of times that corresponds to
the second figure on the CODE card,
press the accelerator pedal to the
floor and keep it there.
6) Do the same for the remaining
figures on the CODE card. 7) Once the final figure has been en-
tered, keep the accelerator pedal
pressed. The injection warning light
Uwill light up for four seconds and
then go out; release the accelerator
pedal.
8)The
Uwarning light will flash
rapidly for about 4 seconds to indicate
that the operation has been com-
pleted correctly.
9) Start the engine by turning the ig-
nition key from MARto AVV.
If, however, the
Uwarning light
stays on, turn the ignition key to
STOPand repeat the procedure
from step 1.
IMPORTANTAfter an emergency
start, you should contact a Fiat Deal-
ership, otherwise you will have to re-
peat the procedure described each
time you want to start the engine.
Page 89 of 154

88IN AN EMERGENCY
JUMP STARTING
If the battery is flat, you can use an-
other battery to start the engine. Its
capacity must be the same or slightly
greater than the flat battery (see the
chapter
TECHNICAL SPECIFICATIONS).
Proceed as follows:
1)connect positive terminals Aand
B-fig. 1of the two batteries with a
jump lead.
2)With a second lead, connect the
negative terminal Cof the auxiliary
battery to an earth point Dof the car.IMPORTANTDo not directly
connect the two negative terminals:
sparks could ignite the flammable gas
from the battery.
If the auxiliary battery is fitted in an-
other vehicle, prevent accidental con-
tact of metallic parts.
3)Start the engine.
4)When the engine has been
started, remove the leads in the re-
verse order: D, C, Band finally A.
If the engine fails to start after a few
attempts, do not keep on but have the
car seen to at a Fiat Dealership. Do not carry out this
procedure if you lack ex-
perience; if it is not done
correctly it can cause very in-
tense electrical discharges. In ad-
dition, the fluid contained in the
battery is poisonous and corro-
sive. Avoid contact with skin and
eyes.
You are also advised not to put
naked flames or lighted ciga-
rettes near the battery and not
to cause sparks.
fig. 1
P4Q00087
Under no circumstances
should a battery charger
be used to start the en-
gine: it could damage the elec-
tronic systems and in particular
the ignition and injection control
units.
Page 91 of 154

90IN AN EMERGENCY
TAKE OUT THE TOOLS,
JACK AND SPARE WHEEL
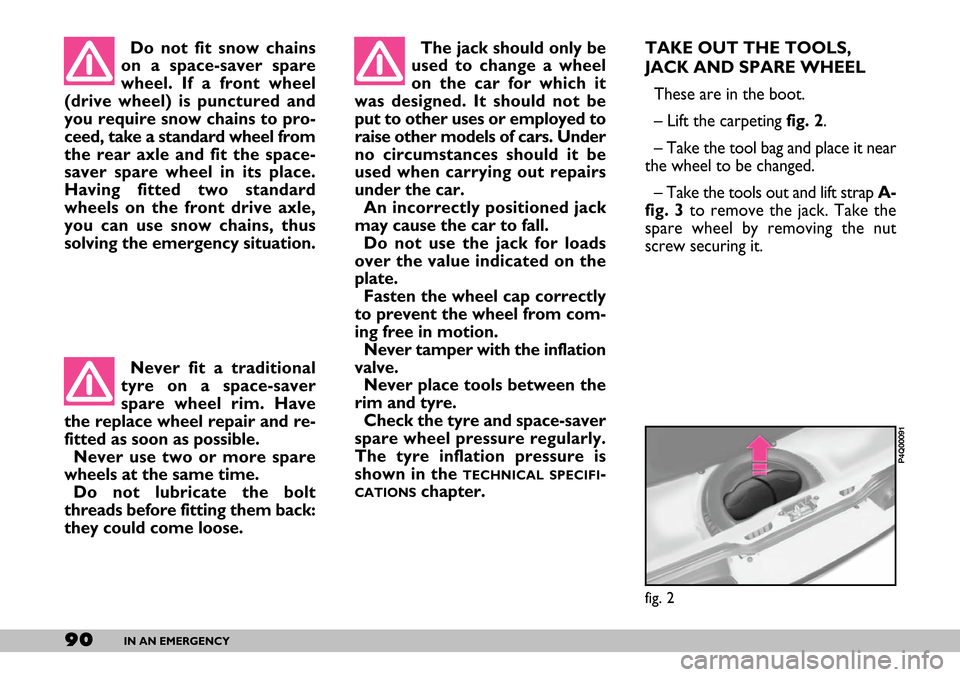
These are in the boot.
– Lift the carpeting fig. 2.
– Take the tool bag and place it near
the wheel to be changed.
– Take the tools out and lift strap A-
fig. 3to remove the jack. Take the
spare wheel by removing the nut
screw securing it.
fig. 2
P4Q00091
Do not fit snow chains
on a space-saver spare
wheel. If a front wheel
(drive wheel) is punctured and
you require snow chains to pro-
ceed, take a standard wheel from
the rear axle and fit the space-
saver spare wheel in its place.
Having fitted two standard
wheels on the front drive axle,
you can use snow chains, thus
solving the emergency situation. The jack should only be
used to change a wheel
on the car for which it
was designed. It should not be
put to other uses or employed to
raise other models of cars. Under
no circumstances should it be
used when carrying out repairs
under the car.
An incorrectly positioned jack
may cause the car to fall.
Do not use the jack for loads
over the value indicated on the
plate.
Fasten the wheel cap correctly
to prevent the wheel from com-
ing free in motion.
Never tamper with the inflation
valve.
Never place tools between the
rim and tyre.
Check the tyre and space-saver
spare wheel pressure regularly.
The tyre inflation pressure is
shown in the
TECHNICAL SPECIFI-
CATIONSchapter. Never fit a traditional
tyre on a space-saver
spare wheel rim. Have
the replace wheel repair and re-
fitted as soon as possible.
Never use two or more spare
wheels at the same time.
Do not lubricate the bolt
threads before fitting them back:
they could come loose.
Page 92 of 154

91IN AN EMERGENCY
Please note:
– The jack requires no adjustments.
– The jack cannot be repaired. If it
breaks it must be replaced with a new
jack.
– No tool, other than its handle, in-
dicated in this chapter, can be fitted
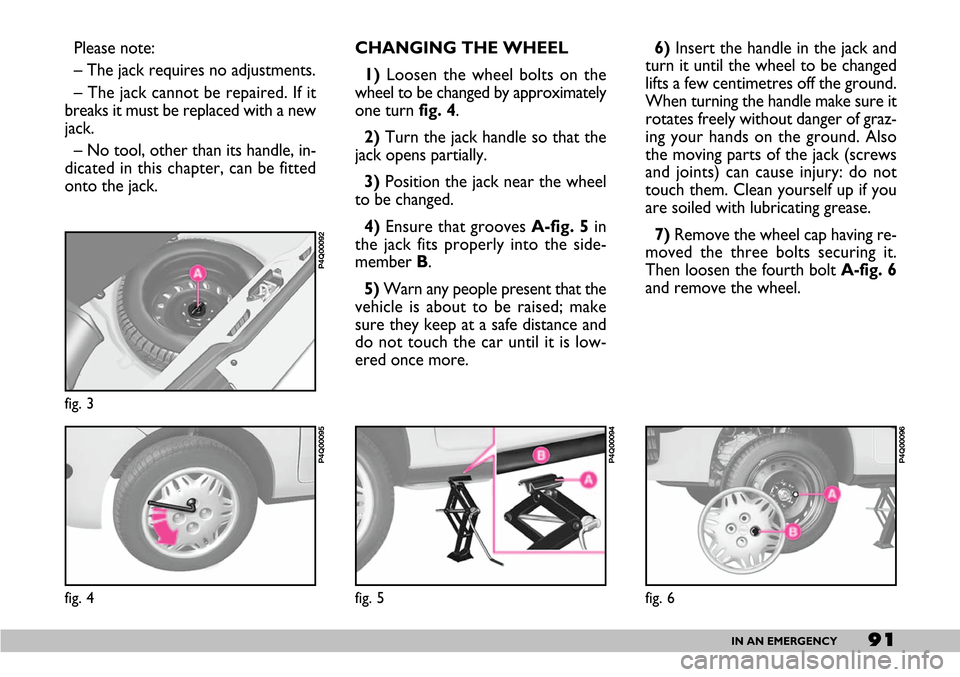
onto the jack. CHANGING THE WHEEL
1)Loosen the wheel bolts on the
wheel to be changed by approximately
one turn fig. 4.
2)Turn the jack handle so that the
jack opens partially.
3)Position the jack near the wheel
to be changed.
4)Ensure that grooves A-fig. 5in
the jack fits properly into the side-
member B.
5)Warn any people present that the
vehicle is about to be raised; make
sure they keep at a safe distance and
do not touch the car until it is low-
ered once more.
fig. 4
P4Q00095
fig. 3
P4Q00092
fig. 5
P4Q00094
6) Insert the handle in the jack and
turn it until the wheel to be changed
lifts a few centimetres off the ground.
When turning the handle make sure it
rotates freely without danger of graz-
ing your hands on the ground. Also
the moving parts of the jack (screws
and joints) can cause injury: do not
touch them. Clean yourself up if you
are soiled with lubricating grease.
7)Remove the wheel cap having re-
moved the three bolts securing it.
Then loosen the fourth bolt A-fig. 6
and remove the wheel.
fig. 6
P4Q00096
Page 93 of 154

92IN AN EMERGENCY
5) Lower the car and remove the
jack.
6)Torque the screws in the order
described above fig. 8.
After refitting the wheel:
– place the spare wheel in its recess
in the boot and fasten it with the ring
nut A-fig. 3;
– put the jack in its bag and place this
in the replaced wheel.
IMPORTANTTubeless tyres are
used.
Check the inflation pressure of the
tyres and the spare wheel regularly.
fig. 9
P4Q00099
8) Ensure that the housings for the
wheel bolts on the spare wheel are
clean and free from dirt which could
cause the wheel bolts to come loose.
9) Fit the space-saver spare wheel
making peg A-fig. 7coincide with one
of the holes B on the wheel.
10)Screw the four fastening bolts.
11)Wind down the jack to lower
the car and remove the jack.
12)Fully tighten the bolts moving in
a criss-cross fashion following the or-
der shown in fig. 8.REFITTING THE STANDARD
WHEEL
1)Following the above procedure,
raise the car and remove the space-
saver wheel.
2)Refit a regular wheel inserting the
first bolt A-fig. 6in the hole opposite
the inflation valve.
3)Fit the wheel cap ensuring symbol
YA-fig. 9corresponds with the in-
flation valve and the previously fixed
bolt B.
4)Insert the other three bolts and
screw them using the specific wrench.
fig. 7
P4Q00203
fig. 8
P4Q00204
Page 95 of 154
94IN AN EMERGENCY
GENERAL INSTRUCTIONS
When a light is not working, check
that it has not fused before changing
the bulb.
For location of fuses, refer to
IF A
FUSE BLOWS
in this chapter.
Before replacing a bulb that does not
work, check that the contacts are not
oxidised.
Burnt-out bulbs must be replaced
with ones of the same type.
Always check the height of the head-
light beam after changing a bulb.
fig. 11
P4Q00160
IMPORTANTOn the inside sur-
face of the headlight there could ap-
pear a slight coat of fogging; this does
not show a defect, since it is a natural
occurrence due to low temperature
and to the degree of humidity in the
air; it will soon disappear as soon as
the lights are turned on. The presence
of drops inside the headlight shows
water seepage, refer to the Fiat
Dealership.
Page 96 of 154
95IN AN EMERGENCY
TYPES OF BULBS fig. 11
Several types of bulbs are installed in
the car:
A. Glass bulbs Snapped into posi-
tion. Pull to remove.
B. Bayonet connection bulbs Re-
move from the bulb holder by press-
ing the bulb and rotating it anti-clock-
wise.
C. Cylindrical bulbs Remove by
pulling away from terminals.
D. Double filament halogen
bulbs To remove the bulb release the
clip holding the bulb in place.
E. Halogen bulb To remove the
bulb, release the clip holding the bulb
in place. BULB (fig. 11) TYPE W
MAIN BEAM
DIPPED BEAM
FRONT SIDE LIGHTS
FRONT DIRECTION INDICATORS
SIDE DIRECTION INDICATORS
REAR DIRECTION INDICATORS
BRAKE/TAILLIGHTS
REVERSE LIGHT
REAR FOGLIGHT
CEILING LAMP
NUMBER PLATE LIGHT
FRONT FOGLIGHT
ADDITIONAL BRAKE LIGHT (3rdbrake light)
D
D
A
B
A
B
B
B
B
C
B
E
AH4 60/55
H4 60/55
W5W 5
P21W 21
W5W 5
P21W 21
P21/5W 21/5
P21W 21
P21W 21
CW5 5
R5W 5
H3 55
W5W 5
Page 97 of 154
96IN AN EMERGENCY
3)fit a new bulb, making the tabs
E-fig. 14 on the metal part coincide
with the specific housings on the
headlight dish;
4)refasten the clip, refit the rubber
guard and refit the connector.
IF AN EXTERIOR LIGHT BURNS OUT
MAIN BEAM AND DIPPED
BEAM HEADLIGHTS
To replace a halogen bulb:
1)take out the connector A-fig. 12
then the rubber protection B;
2)release the fastening clip C-fig. 13
and remove the bulb D;
fig. 12
P4Q01023
fig. 14
P4Q01025
Modifications or repairs
to the electrical system
carried out incorrectly
and without bearing the features
of the system in mind can cause
malfunctions with the risk of fire.
For bulb type and respective power,
see
IF A BULB BURNS OUT.
fig. 13
P4Q01024