2007 FIAT SEDICI reset
[x] Cancel search: resetPage 83 of 266
82
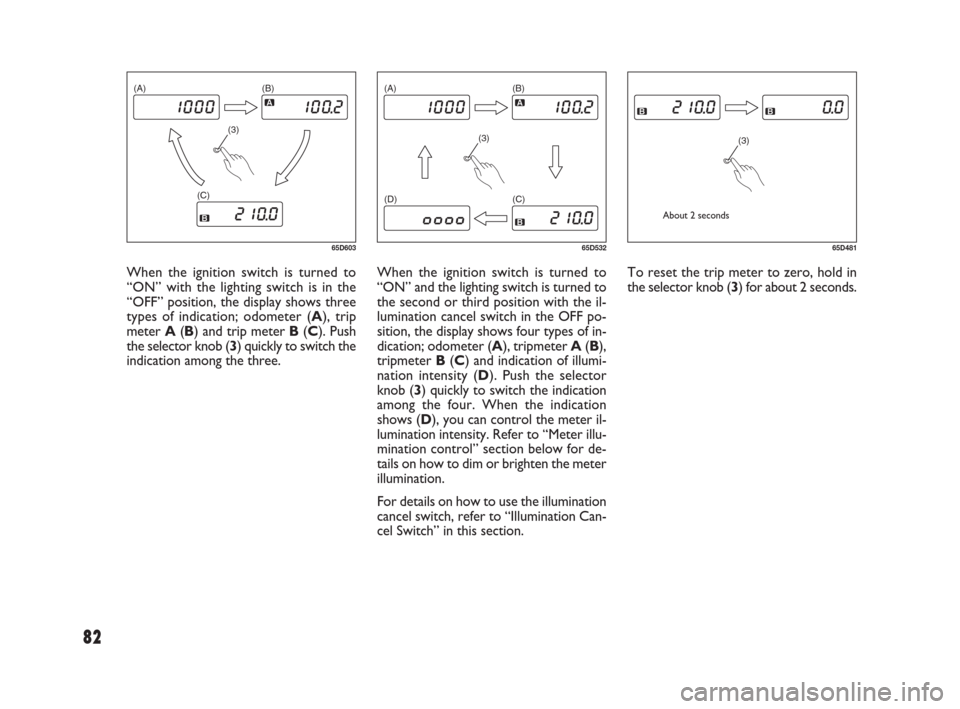
When the ignition switch is turned to
“ON” and the lighting switch is turned to
the second or third position with the il-
lumination cancel switch in the OFF po-
sition, the display shows four types of in-
dication; odometer (A), tripmeter A(B),
tripmeter B(C) and indication of illumi-
nation intensity (D). Push the selector
knob (3) quickly to switch the indication
among the four. When the indication
shows (D), you can control the meter il-
lumination intensity. Refer to “Meter illu-
mination control” section below for de-
tails on how to dim or brighten the meter
illumination.
For details on how to use the illumination
cancel switch, refer to “Illumination Can-
cel Switch” in this section.To reset the trip meter to zero, hold in
the selector knob (3) for about 2 seconds. When the ignition switch is turned to
“ON” with the lighting switch is in the
“OFF” position, the display shows three
types of indication; odometer (A), trip
meter A(B) and trip meter B(C). Push
the selector knob (3) quickly to switch the
indication among the three.
(3) (A) (B)
(C)
65D603
(3) (A) (B)
(C) (D)
65D532
(3)
65D481
About 2 seconds
069-128 Fiat16 New GB 27-11-2007 11:26 Pagina 82
Page 96 of 266
95
THERMOMETER (2)
The thermometer shows the outside tem-
perature when the ignition switch is in the
“ON” position.
If the outside temperature nears freezing,
the mark (d) will come on.
NOTE The thermometer will not indicate
the actual outside temperature when dri-
ving at low speed, or when stopped.FUEL CONSUMPTION (3)
This display can be changed to show in-
stantaneous fuel consumption or average
fuel consumption by changing the display.
Also, the display of fuel consumption can
be turned off if you desire.
When the ignition switch is turned to the
“ACC” or “ON” position:
❒If you selected instantaneous fuel con-
sumption the last time you drove the
vehicle, the display indicates “--.-”.
Unless the vehicle is moving, the display
will indicate “--.-”.
❒If you selected average fuel consump-
tion the last time you drove the vehi-
cle, the display shows the last value of
average fuel consumption. Unless you
reset the value of average fuel con-
sumption, the display will show the val-
ue of average fuel consumption which
includes average fuel consumption dur-
ing previous driving.
For details of how to reset the display,
refer to the explanation in this section.
63J202Type A (For Gasoline Engine Model)
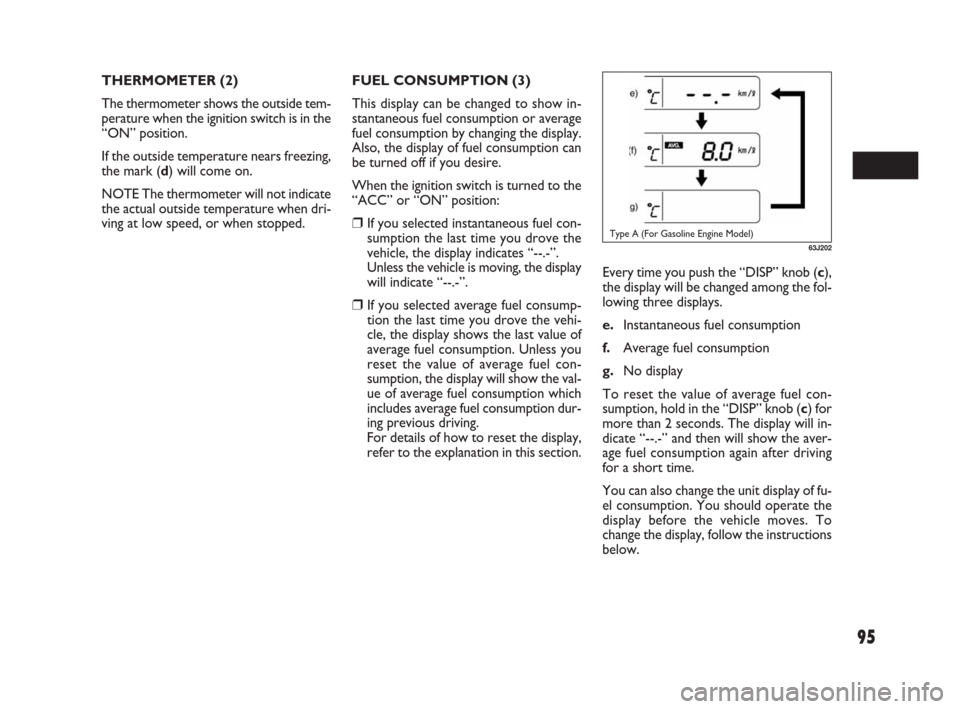
Every time you push the “DISP” knob (c),
the display will be changed among the fol-
lowing three displays.
e.Instantaneous fuel consumption
f.Average fuel consumption
g.No display
To reset the value of average fuel con-
sumption, hold in the “DISP” knob (c) for
more than 2 seconds. The display will in-
dicate “--.-” and then will show the aver-
age fuel consumption again after driving
for a short time.
You can also change the unit display of fu-
el consumption. You should operate the
display before the vehicle moves. To
change the display, follow the instructions
below.
069-128 Fiat16 New GB 27-11-2007 11:26 Pagina 95
Page 114 of 266
113
Press the mute button (2) again to restore
the sound to the preceding level.
NOTE
❒In CD mode, play is temporarily
stopped (pause) instead of muting.
❒If power is switched off, or if some but-
ton is pressed, mute is automatically re-
leased.
Audio Control
Bass / Treble / Balance / Fader can be ad-
justed.
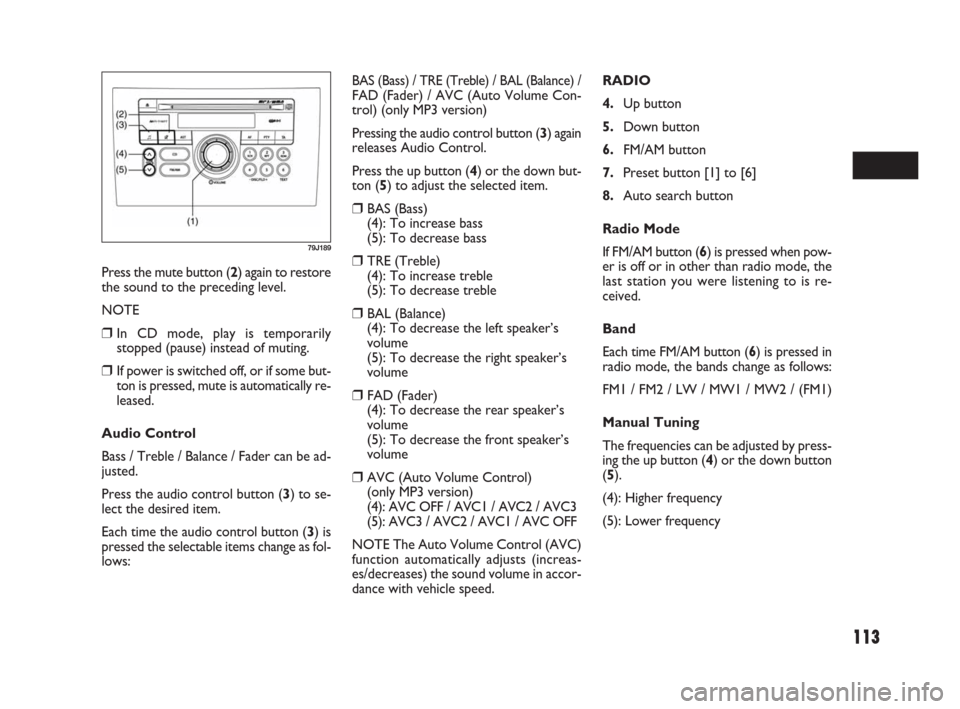
Press the audio control button (3) to se-
lect the desired item.
Each time the audio control button (3) is
pressed the selectable items change as fol-
lows:
79J189
RADIO
4.Up button
5.Down button
6.FM/AM button
7.Preset button [1] to [6]
8.Auto search button
Radio Mode
If FM/AM button (6) is pressed when pow-
er is off or in other than radio mode, the
last station you were listening to is re-
ceived.
Band
Each time FM/AM button (6) is pressed in
radio mode, the bands change as follows:
FM1 / FM2 / LW / MW1 / MW2 / (FM1)
Manual Tuning
The frequencies can be adjusted by press-
ing the up button (4) or the down button
(5).
(4): Higher frequency
(5): Lower frequencyBAS (Bass) / TRE (Treble) / BAL (Balance) /FAD (Fader) / AVC (Auto Volume Con-
trol) (only MP3 version)
Pressing the audio control button (3) again
releases Audio Control.
Press the up button (4) or the down but-
ton (5) to adjust the selected item.
❒BAS (Bass)
(4): To increase bass
(5): To decrease bass
❒TRE (Treble)
(4): To increase treble
(5): To decrease treble
❒BAL (Balance)
(4): To decrease the left speaker’s
volume
(5): To decrease the right speaker’s
volume
❒FAD (Fader)
(4): To decrease the rear speaker’s
volume
(5): To decrease the front speaker’s
volume
❒AVC (Auto Volume Control)
(only MP3 version)
(4): AVC OFF / AVC1 / AVC2 / AVC3
(5): AVC3 / AVC2 / AVC1 / AVC OFF
NOTE The Auto Volume Control (AVC)
function automatically adjusts (increas-
es/decreases) the sound volume in accor-
dance with vehicle speed.
069-128 Fiat16 New GB 27-11-2007 11:26 Pagina 113
Page 115 of 266
114
❒Stations can be preset for FM1, FM2,
LW, MW1, and MW2 respectively.
❒Up to six stations can be preset. If sta-
tions in good receiving condition are
not found, the number of stations pre-
set may be less than six.
❒After you have preset stations, the sta-
tion preset under the button with num-
ber [1] is received. If none of stations
is found, the unit is reset to the pre-
ceding frequency.
❒When stations are preset, the new da-
ta is written over the old data.
❒If AF is ON, only RDS stations are pre-
set.
Preset Station Calling
By pressing any of the preset buttons (7)
with numbers [1] to [6], the correspond-
ing station preset can be received.
NOTE If the button for a station not pre-
set is pressed, the unit displays “- - -”. Manual Preset
If any of the preset buttons (7) with num-
bers [1] to [6] is pressed for about 2 sec-
onds or more, the station received cor-
responding to the pressed button is pre-
set.
NOTE
❒Stations can be preset for FM1, FM2,
LW, MW1, and MW2 respectively.
❒When stations are preset, the new da-
ta is written over the old data.
Auto Preset
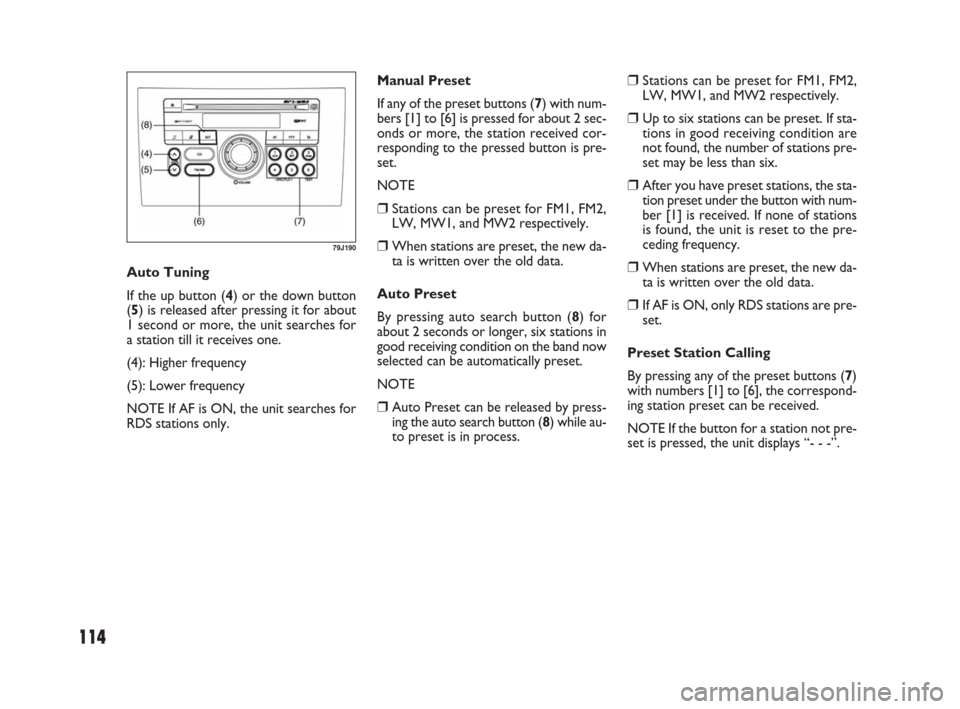
By pressing auto search button (8) for
about 2 seconds or longer, six stations in
good receiving condition on the band now
selected can be automatically preset.
NOTE
❒Auto Preset can be released by press-
ing the auto search button (8) while au-
to preset is in process. Auto Tuning
If the up button (4) or the down button
(5) is released after pressing it for about
1 second or more, the unit searches for
a station till it receives one.
(4): Higher frequency
(5): Lower frequency
NOTE If AF is ON, the unit searches for
RDS stations only.
79J190
069-128 Fiat16 New GB 27-11-2007 11:26 Pagina 114
Page 125 of 266
124
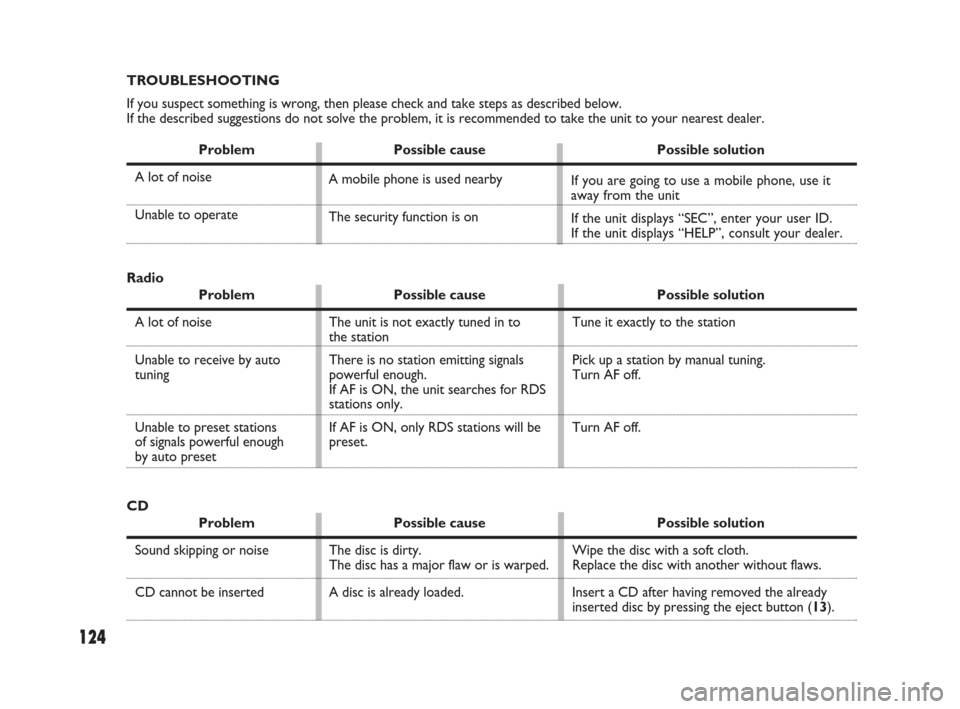
CD
Problem Possible cause Possible solution
Sound skipping or noise
CD cannot be inserted
Wipe the disc with a soft cloth.
Replace the disc with another without flaws.
Insert a CD after having removed the already
inserted disc by pressing the eject button (13). The disc is dirty.
The disc has a major flaw or is warped.
A disc is already loaded.
TROUBLESHOOTING
If you suspect something is wrong, then please check and take steps as described below.
If the described suggestions do not solve the problem, it is recommended to take the unit to your nearest dealer.
Problem Possible cause Possible solution
A lot of noise
Unable to operate
A mobile phone is used nearby
The security function is onIf you are going to use a mobile phone, use it
away from the unit
If the unit displays “SEC”, enter your user ID.
If the unit displays “HELP”, consult your dealer.
Radio
Problem Possible cause Possible solution
A lot of noise
Unable to receive by auto
tuning
Unable to preset stations
of signals powerful enough
by auto presetTune it exactly to the station
Pick up a station by manual tuning.
Turn AF off.
Turn AF off. The unit is not exactly tuned in to
the station
There is no station emitting signals
powerful enough.
If AF is ON, the unit searches for RDS
stations only.
If AF is ON, only RDS stations will be
preset.
069-128 Fiat16 New GB 27-11-2007 11:26 Pagina 124
Page 127 of 266
126
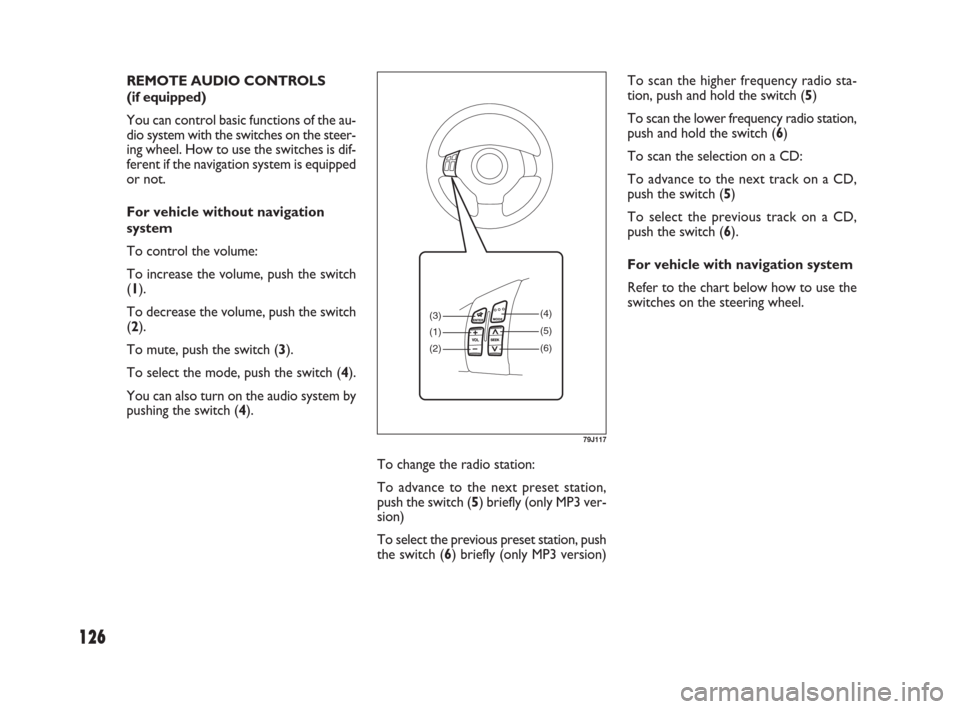
To change the radio station:
To advance to the next preset station,
push the switch (5) briefly (only MP3 ver-
sion)
To select the previous preset station, push
the switch (6) briefly (only MP3 version)To scan the higher frequency radio sta-
tion, push and hold the switch (5)
To scan the lower frequency radio station,
push and hold the switch (6)
To scan the selection on a CD:
To advance to the next track on a CD,
push the switch (5)
To select the previous track on a CD,
push the switch (6).
For vehicle with navigation system
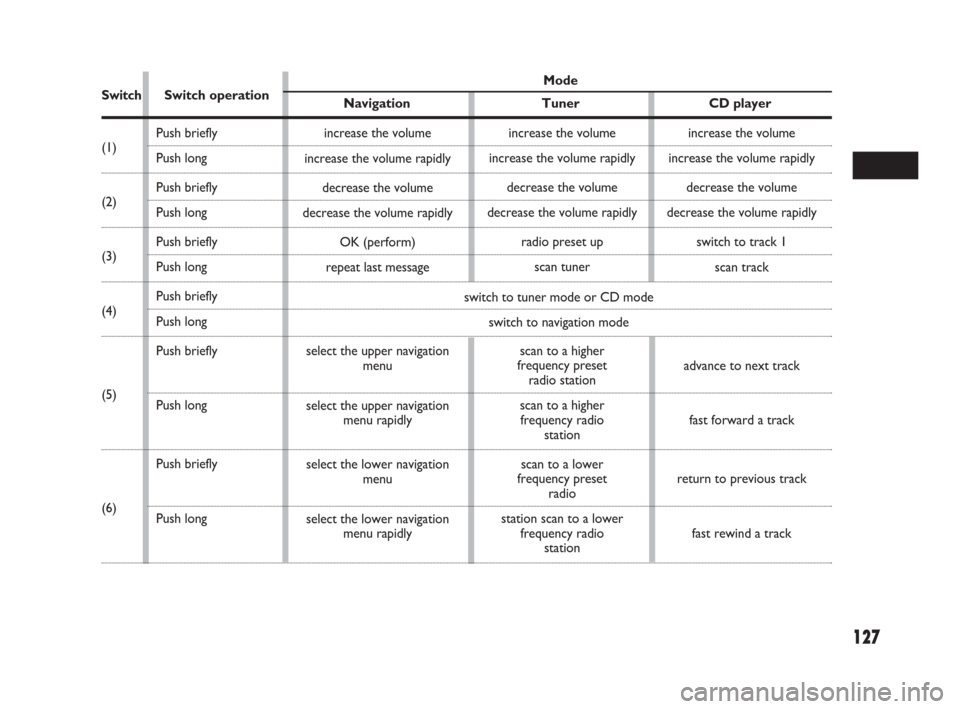
Refer to the chart below how to use the
switches on the steering wheel. REMOTE AUDIO CONTROLS
(if equipped)
You can control basic functions of the au-
dio system with the switches on the steer-
ing wheel. How to use the switches is dif-
ferent if the navigation system is equipped
or not.
For vehicle without navigation
system
To control the volume:
To increase the volume, push the switch
(1).
To decrease the volume, push the switch
(2).
To mute, push the switch (3).
To select the mode, push the switch (4).
You can also turn on the audio system by
pushing the switch (4).
(3)
(1)
(2)(4)
(5)
(6)
79J117
069-128 Fiat16 New GB 27-11-2007 11:26 Pagina 126
Page 128 of 266
127
ModeSwitchSwitch operation
Navigation Tuner CD player
(1)
(2)
(3)
(4)
(5)
(6)
Push briefly
Push long
Push briefly
Push long
Push briefly
Push long
Push briefly
Push long
Push briefly
Push long
Push briefly
Push longincrease the volume
increase the volume rapidly
decrease the volume
decrease the volume rapidly
OK (perform)
repeat last message
select the upper navigation
menu
select the upper navigation
menu rapidly
select the lower navigation
menu
select the lower navigation
menu rapidlyswitch to tuner mode or CD mode
switch to navigation modeincrease the volume
increase the volume rapidly
decrease the volume
decrease the volume rapidly
radio preset up
scan tuner
scan to a higher
frequency preset
radio station
scan to a higher
frequency radio
station
scan to a lower
frequency preset
radio
station scan to a lower
frequency radio
stationincrease the volume
increase the volume rapidly
decrease the volume
decrease the volume rapidly
switch to track 1
scan track
advance to next track
fast forward a track
return to previous track
fast rewind a track
069-128 Fiat16 New GB 27-11-2007 11:26 Pagina 127
Page 192 of 266
191
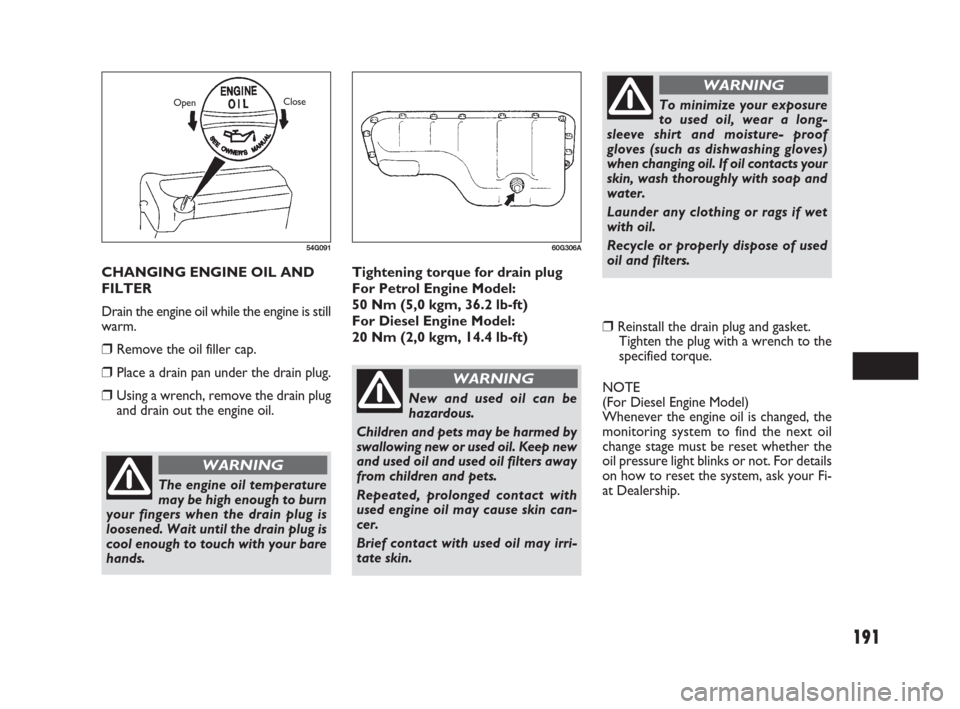
Tightening torque for drain plug
For Petrol Engine Model:
50 Nm (5,0 kgm, 36.2 lb-ft)
For Diesel Engine Model:
20 Nm (2,0 kgm, 14.4 lb-ft)
❒Reinstall the drain plug and gasket.
Tighten the plug with a wrench to the
specified torque.
NOTE
(For Diesel Engine Model)
Whenever the engine oil is changed, the
monitoring system to find the next oil
change stage must be reset whether the
oil pressure light blinks or not. For details
on how to reset the system, ask your Fi-
at Dealership. CHANGING ENGINE OIL AND
FILTER
Drain the engine oil while the engine is still
warm.
❒Remove the oil filler cap.
❒Place a drain pan under the drain plug.
❒Using a wrench, remove the drain plug
and drain out the engine oil.
54G091
OpenClose
The engine oil temperature
may be high enough to burn
your fingers when the drain plug is
loosened. Wait until the drain plug is
cool enough to touch with your bare
hands.
WARNING
60G306A
New and used oil can be
hazardous.
Children and pets may be harmed by
swallowing new or used oil. Keep new
and used oil and used oil filters away
from children and pets.
Repeated, prolonged contact with
used engine oil may cause skin can-
cer.
Brief contact with used oil may irri-
tate skin.
WARNING
To minimize your exposure
to used oil, wear a long-
sleeve shirt and moisture- proof
gloves (such as dishwashing gloves)
when changing oil. If oil contacts your
skin, wash thoroughly with soap and
water.
Launder any clothing or rags if wet
with oil.
Recycle or properly dispose of used
oil and filters.
WARNING
181-224 Fiat16 New GB 27-11-2007 11:29 Pagina 191