2007 FIAT DOBLO boot
[x] Cancel search: bootPage 111 of 218

110DRIVING YOUR VEHICLE
Some suggestions which may help
you to keep the running costs of the
vehicle down and lower the amount
of toxic emissions released into the at-
mosphere are given below.
GENERAL
CONSIDERATIONS
Vehicle maintenance
The overall state of the vehicle is an
important factor which has a marked
influence over fuel consumption and
driving comfort and on the life span of
your vehicle. For this reason care
should be taken to maintain your ve-
hicle by carrying out the necessary
checks and regulations in accordance
with the specifications given in the
SERVICE SCHEDULE (see sections:
spark plugs, idling, air cleaners, diesel
fuel filter, timing).Tyres
Tyre pressure should be checked at
least once every four weeks: if the
pressure is too low fuel consumption
increases as the resistance to the
rolling movement of the tyre is
greater. In this state, tyre wear is in-
creased and handling suffers which will
effect safety.
Unnecessary loads
Do not travel with too much load in
the boot. The weight of the vehicle
and its trim greatly effects consump-
tion and stability.
Roof rack/ski rack
Remove the roof rack or the ski rack
from the roof as soon as they are no
longer used.
These accessories reduce the aero-
dynamic penetration of the vehicle and
will increase consumption. Whentransporting particularly large objects,
use a trailer, where possible.
Electric devices
Use electric devices for the neces-
sary time only. The heated rear win-
dow, fog lights, windscreen wipers,
heater fan require large amounts of
electricity and increasing the request
for power will also increase fuel con-
sumption (up to +25% when driving in
towns).
Climate control system
The climate control system is an ad-
ditional load which greatly effects the
engine leading to higher consumption
(up to +20% in average). When the
temperature outside allows, use the
air vents where possible.
Aerodynamic accessories
The use of non-certified aerodynamic
items may adversely affect air drag and
consumption levels.
CONTAINING RUNNING COSTS AND POLLUTION
Page 127 of 218

Holes and damages on
the tyre side walls cannot
be repaired. Do not use
the quick tyre repair kit if dam-
aging is due to running with flat
tyre.
126IN AN EMERGENCY
QUICK TYRE
REPAIR KIT FIX &
GO automatic
The quick tyre repair kit Fix & Go au-
tomatic is placed in the boot into a
proper container.
The kit includes fig. 16a:
– bottle Acontaining sealer and fit-
ted with:
– filling pipe B
– sticker Cbearing the notice
“max. 80 km/h”, to be placed in a po-
sition visible to the driver (on the in-
strument panel) after fixing the tyre– instruction brochure fig. 16b, to
be used for prompt and proper use of
the quick repair kit and to be then
handed to the personnel charged with
handling the treated tyre
– compressorDincluding gauge and
connections
– a pair of protection gloves locat-
ed in the side space of the compres-
sor
– adapters for inflating different ele-
ments.
In the kit container are also housed
the screwdriver and the tow hitch.In the event of a punc-
ture caused by foreign
bodies, it is possible to re-
pair tyres showing damages on
the track or shoulder up to max
4 mm diameter.
fig. 16a
F0A0540b
fig. 16b
F0A0541b
Hand the instruction
brochure to the person-
nel charged with treating
the tyre repaired with the kit.
Page 132 of 218

131IN AN EMERGENCY
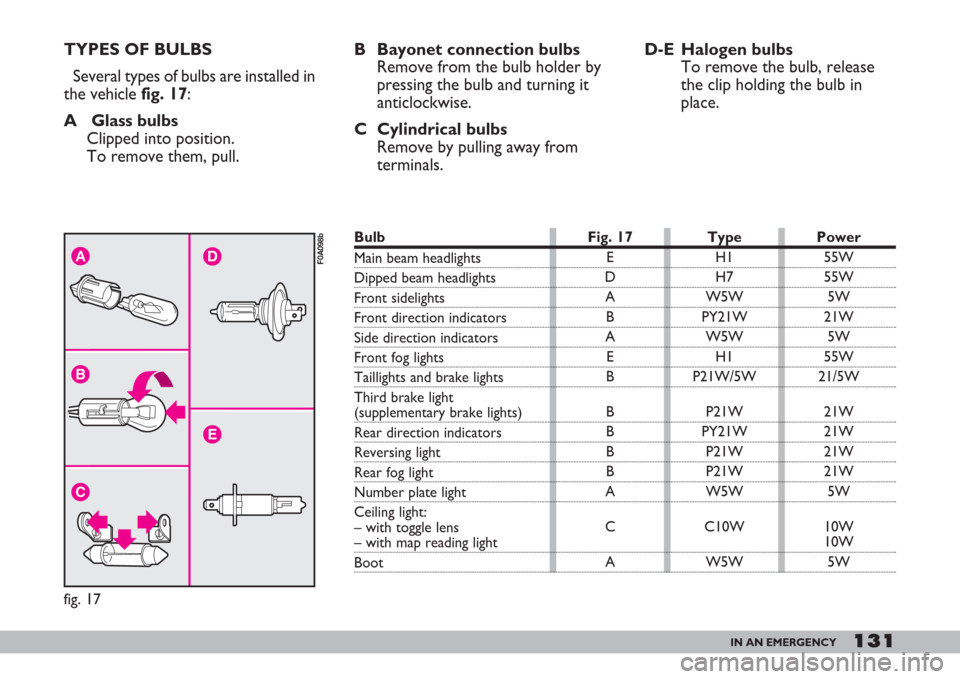
TYPES OF BULBS
Several types of bulbs are installed in
the vehicle fig. 17:
A Glass bulbs
Clipped into position.
To remove them, pull.B Bayonet connection bulbs
Remove from the bulb holder by
pressing the bulb and turning it
anticlockwise.
C Cylindrical bulbs
Remove by pulling away from
terminals.D-E Halogen bulbs
To remove the bulb, release
the clip holding the bulb in
place.
A
B
C
E
D
fig. 17
F0A098b
Fig. 17
E
D
A
B
A
E
B
B
B
B
B
A
C
APower
55W
55W
5W
21W
5W
55W
21/5W
21W
21W
21W
21W
5W
10W
10W
5W Type
H1
H7
W5W
PY21W
W5W
H1
P21W/5W
P21W
PY21W
P21W
P21W
W5W
C10W
W5WBulb
Main beam headlights
Dipped beam headlights
Front sidelights
Front direction indicators
Side direction indicators
Front fog lights
Taillights and brake lights
Third brake light
(supplementary brake lights)
Rear direction indicators
Reversing light
Rear fog light
Number plate light
Ceiling light:
– with toggle lens
– with map reading light
Boot
Page 138 of 218

137IN AN EMERGENCY
CEILING LIGHTS
With toggling lens
To replace a bulb:
1)Remove the ceiling lightfig. 35by
releasing the clipped on lens frame in
the point shown by the arrow.
2)Open the container A-fig. 36and
replace the burnt-out bulb.With map reading lights
To replace a bulb:
1)Remove the ceiling lightA-fig. 37
by releasing the clipped on lens frame
in the point shown by the arrow.
2)Open the bulb container A-fig.
38.
3)Replace the burnt out bulb.BOOT LIGHT
To replace the bulb:
1)Remove the lens A-fig. 39as
shown by the arrow.
2)Open the bulb holder Band re-
move the bulb C(clipped in).
fig. 35
F0A0142b
A
fig. 36
F0A0200b
A
fig. 37
F0A0140b
A
fig. 38
F0A0172b
ABC
fig. 39
F0A0138b
Page 142 of 218

141IN AN EMERGENCY
FUSE SUMMARY TABLE
10
10
10
10
10
10
15
10
7.5
15
10
10
10
7.5
10
7.5
10
20
7.5
40
70
40
20
20
20
20
15
7.5
7.5 F14
F15
F12
F13
F42
F53
F30
F53
F51
F32
F42
F37
F53
F31
F37
F51
F37
F44
F50
F02 – MAXI FUSE
F01 – MAXI FUSE
F04 – MAXI FUSE
F48
F47
F38
F22
F11
F42
F18 42
42
41
41
41
41
42
41
41
41
41
41
41
41
41
41
41
41
41
42
42
42
41
41
41
42
42
41
42
Figure Fuse Ampere
Right-hand main beam
Left-hand main beam
Right-hand dipped beam
Left-hand dipped beam
Boot
Hazard lights
Front fog lights
Direction indicators
Dashboard instrument lights
Light system
Ceiling light
Instrument panel and warning lights (ignition switch powered)
Instrument panel and warning lights (battery powered)
Reversing light
Brake lights
Number plate light
Additional brake light (third stop light)
Cigar lighter
Air bag
Dashboard control unit power: optional functions
Dashboard control unit power: standard functions
ABS power (pump)
Right front power window
Left front power window
Door locking system
Ignition coils
Engine control system secondary loads
ABS control unit (ignition switch powered)
Engine control unit (+battery)
Page 151 of 218

150VEHICLE MAINTENANCE
thousands of kilometres
Check tyre conditions / wear and adjust pressure, if required
Check lighting system operation (headlights, direction indicators,
hazard lights, boot light, passenger's compartment lights,
glove compartment light, instrument panel warning lights, etc.)
Check windscreen wiper/washer operation, adjust nozzles
Check windscreen/rear window wiper blade position/wear
Check front disk brake pad conditions and wear
Check rear drum brake lining conditions and wear
Inspect conditions of: underbody protection, piping (exhaust -
fuel feed and brakes), rubber parts (boots, sleeves, bushings, etc.),
fuel feed and braking system hosing
Check cleanness of locks, bonnet and boot and lever
cleanness and lubrication
Sight inspect accessory drive belt conditions
Replace accessory drive belts
Check/adjust tappet clearance (1.4 8V and 1.9 Multijet versions)
Check and adjust handbrake lever stroke
Check exhaust gas/smokiness (diesel versions)
Check anti-evaporation system
Replace fuel filter (Multijet versions)
SERVICE SCHEDULE
The scheduled service must be carried out every 20,000 km.
20 40 60 80 100 120 140 160 180
●●●●●●●●●
●●●●●●●●●
●●●●●●●●●
●●●●●●●●●
●●●●●●●●●
●●●
●●●●●●●●●
●●●●●●●●●
●●
●
●●●
●●●●
●●●●
●●
●●●
Page 153 of 218

152VEHICLE MAINTENANCE
ANNUAL
INSPECTION
SCHEDULE
For vehicles with an annual
mileage of below 20.000 km (for
example about 10.000 km) the
following yearly inspection pro-
gramme is advised:
– check tyre conditions/wear and ad-
just pressure if required (including the
spare wheel).
– check light system operation (head-
lights, direction indicators, hazard
lights, boot lights, passenger compart-
ment lights, glovebox light, warning
lights, etc.).
– check windscreen wiper/washer
operation, adjust nozzles.
– check windscreen/rear window
blade position/wear
– check front disk brake pad condi-
tions and wear.– check cleanness of bonnet and
boot locks and lever cleanness and lu-
brication
– sight inspect the conditions of: en-
gine, gearbox, transmission, pipes and
hoses (exhaust - fuel - brakes), rubber
parts (boots, sleeves, bushes, etc)
brake and fuel hoses.
– check battery charge.
– visual check on various drive belt
conditions.
– check and top up, if required, fluid
levels (engine coolant, brake fluid,
windscreen washer fluid, battery fluid,
etc.).
– change engine oil.
– change engine oil filter.
– replace pollen filter (where pro-
vided).
ADDITIONAL
CHECKS
Every 1,000 kmor before long
trips, check and top up as necessary:
engine coolant level, brake fluid level,
windscreen washer liquid level, tyre
pressure and conditions.
Every 3,000 km check and top up
as necessary: engine oil level.
You are recommended to use FL
Selenia,products designed and pro-
duced specifically for Fiat vehicles (see
“Capacities” in section “Technical
specifications”).
Page 173 of 218

172VEHICLE MAINTENANCE
Detergents pollute wa-
ter. The vehicle must
therefore be washed in an
area equipped for the collection
and purification of the liquids
used while washing.
IMPORTANT The engine com-
partment should be washed while the
engine is cold and with the ignition key
at STOP. After washing, make sure
that the various protections (e.g. rub-
ber boots and various guards) have
not be removed or damaged. To wash the vehicle properly:
1) Remove the aerial from the roof
to prevent damaging it when washing
the vehicle in an automatic carwash.
2) Wash the body using a low pres-
sure jet of water.
3)Wipe a sponge with a slightly
soapy solution over the bodywork,
frequently rinsing the sponge.
4)Rinse well with water and dry
with a jet of air or a chamois leather.
When drying the vehicle, be careful
to get at those parts which are not so
easily seen e.g. the door frames, bon-
net and around the headlights where
water can most readily collect. You
should leave the vehicle out in the
open so that any water remaining can
evaporate more easily.Detergents pollute wa-
ter. For this reason, the
vehicle must be washed in
an area equipped for the collec-
tion and purification of the liquids
used while washing.
Engine compartment
At the end of each winter season,
carefully clean the engine compart-
ment. Be careful not to direct the jet
of water on the electronic control
units. Have this done at a garage. Do not wash the vehicle after it has
been parked in the sun or while the
bonnet is hot: it could take the shine
off the paint.
Outside plastic parts must be cleaned
following the usual vehicle washing
procedure.
Where possible avoid parking the ve-
hicle under trees; the resinous sub-
stances that certain species of tree
shed dull the paintwork and increase
the possibility of rust forming.
IMPORTANTBird droppings must
be washed off immediately and with
great care as their acid is particularly
aggressive.
Windows
Use specific window cleaner prod-
ucts to clean cloths to avoid scratch-
ing the glass or damaging the trans-
parency.
IMPORTANTTo prevent damage
to the electric heater element, wipe the
inside of the heated rear window gen-
tly in the same direction as the ele-
ments.