2007 DODGE SPRINTER tires
[x] Cancel search: tiresPage 220 of 393

219 Operation
Tires and wheels
4
Always adjust the tire inflation pressure ac-
cording to the tire and loading information
placard on the driver’s door B-pillar.
Underinflated tires wear excessively and/or
unevenly, adversely affect handling and fuel
economy, and are more likely to fail from be-
ing overheated.
Overinflated tires can adversely affect han-
dling and ride comfort, wear unevenly, in-
crease stopping distance, and result in
sudden deflation (blowout) because they are
more likely to become punctured or dam-
aged by road debris, potholes etc.
The TPMS is not able to issue a warning due
to a sudden dramatic loss of pressure (e.g.
tire blowout caused by a foreign object). In
this case bring the vehicle to a halt by care-
fully applying the brakes and avoiding
abrupt steering maneuvers.
Warning
G
Each tire, including the spare (if provided),
should be checked monthly when cold and
inflated to the inflation pressure recom-
mended by the vehicle manufacturer on the
vehicle placard or the tire inflation pressure
label. (If your vehicle has tires of a different
size than the size indicated on the vehicle
placard or the tire inflation pressure label,
you should determine the proper tire infla-
tion pressure for those tires).
As an added safety feature, your vehicle has
been equipped with a Tire Pressure Monitor-
ing System (TPMS) that illuminates a low tire
pressure telltale when one or more of your
tires is significantly underinflated. Accord-
ingly, when the low tire pressure telltale illu-
minates, you should stop and check your
tires as soon as possible, and inflate them to
the proper pressure. Driving on a significant-
ly underinflated tire causes the tire to over-
heat and can lead to tire failure.
Underinflation also reduces fuel efficiency
and tire tread life, and may affect the vehi-
cle’s handling and stopping ability. Please
note that the TPMS is not a substitute for
proper tire maintenance, and it is the driv-
er’s responsibility to maintain correct tire
pressure, even if underinflation has not
reached the level to trigger illumination of
the TPMS low tire pressure telltale.
USA only:
Your vehicle has also been equipped with a
TPMS malfunction indicator to indicate
when the system is not operating properly.
The TPMS malfunction indicator is com-
bined with the low tire pressure telltale.
When the system detects a malfunction, the
telltale will flash for approximately 1 minute
and then remain continuously illuminated.
This sequence will continue upon subse-
quent vehicle start-ups as long as the mal-
function exists. When the malfunction
indicator is illuminated, the system may not
be able to detect or signal low tire pressure
as intended.
\2\2
Page 221 of 393

220 OperationTires and wheels
4
Reactivating Advanced TPMS
The TPMS must be reactivated when you
have adjusted the tire inflation pressure to
a new level (e.g. because of different load
or driving conditions). The TPMS is then
recalibrated to the current tire inflation
pressures.\1Using the tire and loading information
placard on the driver’s door B-pillar
(\2page 206), make sure the tire infla-
tion pressure of all four tires is correct.
\1Press buttonè orÿ on the mul-
tifunction steering wheel repeatedly
until the standard display menu ap-
pears in the multifunction display
(\2page 93).
TPMS malfunctions may occur for a variety
of reasons, including the installation of in-
compatible replacement or alternate tires or
wheels on the vehicle that prevent the TPMS
from functioning properly. Always check the
TPMS malfunction telltale after replacing
one or more tires or wheels on your vehicle
to ensure that the replacement or alternate
tires and wheels allow the TPMS to continue
to function properly.iIf a condition causing the TPMS to mal-
function develops, it may take up to 10
minutes for the system to signal a mal-
function using the TPMS telltale flash-
ing and illumination sequence.
The telltale extinguishes after driving a
few minutes if the malfunction has
been corrected.
iOperating radio transmission equip-
ment (e.g. wireless headsets, two-way
radios) in or near the vehicle could
cause the TPMS to malfunctionWarning!
G
It is the driver’s responsibility to calibrate
the TPMS on the recommended cold infla-
tion pressure. Underinflated tires affect the
ability to steer or brake the vehicle. You
might lose control over the vehicle.
iReactivate the TPMS after adjusting
the tire inflation pressure to the infla-
tion pressure recommended for the ve-
hicle operating condition. Tire pressure
should only be adjusted on cold tires.
Observe the recommended tire infla-
tion pressure on the tire and loading in-
formation placard on the driver’s door
B-pillar (\2page 206).
Page 222 of 393

221 Operation
Tires and wheels
4
\1Press thej or kbutton repeat-
edly until you see the current inflation
pressures for each tire appear in the
display or the following message ap-
pears in the display
Tire pres. displayed
after driving
for several minutes
\1Press reset button0 on the instrument
cluster (\2page 14).
The following message will appear in
the multifunction display:
Tire pres.
Adjust pres.
\1Press æbutton.
The following message will appear in
the multifunction display:
Tire pres. monitor
reactivatedAfter a few minutes' driving, the cur-
rent tire inflation pressure values are
accepted as reference values and then
monitored.If you wish to cancel activation:
\1Press çbutton.
Potential problems associated with un-
derinflated and overinflated tires
Proper tire inflation pressure is essential to
the safe and satisfactory operation of your
vehicle. Three primary areas are affected
by improper tire inflation pressure:
1. Safety
2. Economy
Improper inflation pressures can cause un-
even wear patterns to develop across the
tire tread. These abnormal wear patterns
will reduce tread life resulting in a need for
earlier tire replacement. Underinflation
also increases tire rolling resistance and
results in higher fuel consumption.
Warning
G
Follow recommended tire inflation pres-
sures.
Do not underinflate tires. Underinflated tires
wear excessively and/or unevenly, adverse-
ly affect handling and fuel economy, and are
more likely to fail from being overheated.
Do not overinflate tires. Overinflated tires
can adversely affect handling and ride com-
fort, wear unevenly, increase stopping dis-
tance, and result in sudden deflation
(blowout) because they are more likely to
become punctured or damaged by road de-
bris, potholes etc.Warning
G
Improperly inflated tires are dangerous and
can cause accidents.
Unequal tire inflation pressures can cause
steering problems. You could lose control of
your vehicle.
Unequal tire inflation pressures from one
side of the vehicle to the other can cause
the vehicle to drift to the right or left. Always
drive with each tire inflated to the recom-
mended cold tire inflation pressure.
\2\2
Page 223 of 393

222 OperationTires and wheels
4
3. Ride comfort and vehicle stability
Proper tire inflation contributes to a com-
fortable ride. Overinflation produces a jar-
ring and uncomfortable ride.
Besides the tire name (sales designation)
and manufacturer's name, a number of
markings can be found on a tire.
Below are some explanations regarding
the markings on your vehicle’s tires:
1DOT, Tire Identification Number (TIN)
(\2page 230)
2Maximum tire load (\2page 226)
3Maximum tire inflation pressure
(\2page 229)
4Manufacturer
5Tire ply material (\2page 228)
6Tire size designation, load and speed
rating (\2page 222)
7Tire nameTire size designation, load and speed
rating
1Design standard
2Tire width
3Aspect ratio in %
4Radial tire code
5Rim diameter
6Tire load rating
7Tire speed ratingTire labelingiFor illustrative purposes only. The actu-
al data on tires is specific to each vehi-
cle and may vary from the data shown
in the above illustration.
iFor illustrative purposes only. The actu-
al data on tires is specific to each vehi-
cle and may vary from the data shown
in the above illustration.
Page 224 of 393

223 Operation
Tires and wheels
4
Tire sizes for Sprinter vehicles
Design standard
Depending on the design standards used,
the tire size molded into the side wall may
have no letter or a letter1 preceding the
tire width or the tire load rating designa-
tion.
Letter “LT” preceding the size designation:
Light Truck tire based on U.S. design stan-
dards.
Letter “C” preceding the tire load designa-
tion:
Commercial vehicle tire based on Europe-
an design standards.
Tire width
The tire width2 indicates the nominal tire
width in mm.Aspect ratio
The aspect ratio3 is the dimensional re-
lationship between tire section height and
section width and is expressed in percent-
age. The aspect ratio is arrived at by divid-
ing section height by section width.
Tire code
The tire code4 indicates the tire con-
struction type. The “R” stands for radial
tire type. Letter “D” means diagonal or bias
ply construction; letter “B” means belted-
bias ply construction.
Rim diameter
The rim diameter5 is the diameter of the
bead seat, not the diameter of the rim
edge. Rim diameter is indicated in
inches (in).
Tire load rating
The tire load rating6 is a numerical code
associated with the maximum load a tire
can support.For example, a load rating of 120 corre-
sponds to a maximum load of 3042 lbs
(1380 kg) the tire is designed to support.
If two values are given (as illustrated), the
first value, preceding the slash "/", applies
to single tires (rear axle). The second val-
ue, succeeding the slash "/", applies to
twin tires (dual wheel rear axle).
The commercial vehicle tires based on Eu-
ropean standards may have an additional
value in the parentheses (as illustrated). In
such cases, the value preceding the paren-
theses is valid for European countries and
the parenthesized for the USA and Canada.
Refer also to "Maximum tire load"
(\2page 226) where the maximum load as-
sociated with the load index is indicated in
kilograms and lbs.
Sprinter type
2500
LT 245/75 R 16 120/116 LLT 245/75 R 16 120/116 N
3500
LT 215/85 R 16 115/112 NLT 215/85 R 16 115/112 Q
Page 225 of 393

224 OperationTires and wheels
4
Tire speed rating
The tire speed rating6 indicates the ap-
proved maximum speed for the tire.
The commercial vehicle tires based on Eu-
ropean standards may have an additional
index in the parentheses. In such cases,
the index preceding the parentheses is val-
id for European countries and the paren-
thesized for the USA and Canada.
Warning
G
The tire load rating must always be at least
h a l f o f t h e G A W R o f y o u r v e h i c l e . O t h e r w i s e ,
tire failure may be the result which may
cause an accident and/or serious personal
injury to you or others.
Always replace rims and tires with the same
designation, manufacturer and type as
shown on the original part.Warning
G
Do not overload the tires by exceeding the
specified load limit as indicated on the plac-
ard located on the driver’s door B-pillar.
Overloading the tires can overheat them,
possibly causing a blowout. Overloading the
tires can also result in handling or steering
problems, or brake failure.
iTire load rating6 and tire speed
rating7 are also referred to as “ser-
vice description”.
Warning
G
Even when permitted by law, never operate
a vehicle at speeds greater than the maxi-
mum speed rating of the tires.
Exceeding the maximum speed for which
tires are rated can lead to sudden tire fail-
ure, causing loss of vehicle control and pos-
sibly resulting in an accident and/or
personal injury and possible death, for you
and for others.iAlways observe the speed rating of the
winter tires installed on your Sprinter
vehicle. If the maximum speed for
which your tires are rated is below the
speed rating of your Sprinter vehicle,
you must place a notice to this effect
where it will be seen by the driver.
Such notices are available at your tire
dealer or any authorized Sprinter Deal-
er.
Page 226 of 393

225 Operation
Tires and wheels
4
U.S. tire regulations require each new tire
manufacturer or tire retreader to mold a
TIN into or onto a side wall of each tire pro-
duced.The TIN is a unique identifier which facili-
tates efforts by tire manufactures to notify
purchasers in recall situations or other
safety matters concerning tires and gives
purchasers the means to easily identify
such tires.
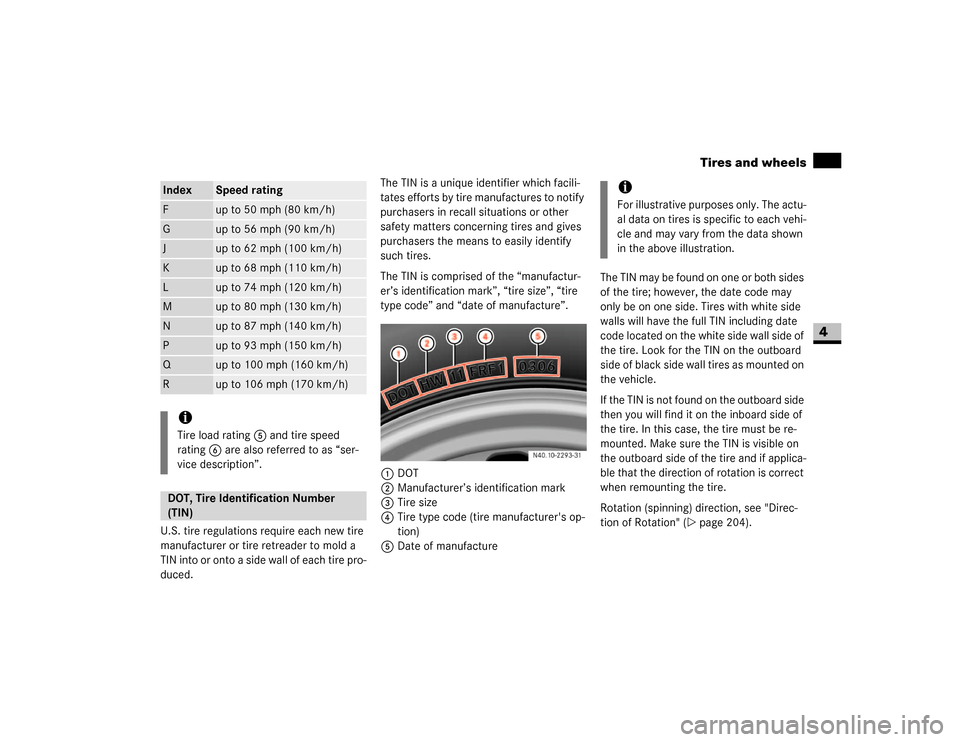
The TIN is comprised of the “manufactur-
er’s identification mark”, “tire size”, “tire
type code” and “date of manufacture”.
1DOT
2Manufacturer’s identification mark
3Tire size
4Tire type code (tire manufacturer's op-
tion)
5Date of manufactureThe TIN may be found on one or both sides
of the tire; however, the date code may
only be on one side. Tires with white side
walls will have the full TIN including date
code located on the white side wall side of
the tire. Look for the TIN on the outboard
side of black side wall tires as mounted on
the vehicle.
If the TIN is not found on the outboard side
then you will find it on the inboard side of
the tire. In this case, the tire must be re-
mounted. Make sure the TIN is visible on
the outboard side of the tire and if applica-
ble that the direction of rotation is correct
when remounting the tire.
Rotation (spinning) direction, see "Direc-
tion of Rotation" (\2page 204).Index
Speed rating
F
up to 50 mph (80 km/h)
G
up to 56 mph (90 km/h)
J
up to 62 mph (100 km/h)
K
up to 68 mph (110 km/h)
L
up to 74 mph (120 km/h)
M
up to 80 mph (130 km/h)
N
up to 87 mph (140 km/h)
P
up to 93 mph (150 km/h)
Q
up to 100 mph (160 km/h)
R
up to 106 mph (170 km/h)
iTire load rating5 and tire speed
rating6 are also referred to as “ser-
vice description”.DOT, Tire Identification Number
(TIN)
iFor illustrative purposes only. The actu-
al data on tires is specific to each vehi-
cle and may vary from the data shown
in the above illustration.
Page 227 of 393

226 OperationTires and wheels
4
DOT (D
epartment O
f T
ransportation)
A tire branding symbol1 which denotes
the tire meets requirements of the
U.S. Department of Transportation.
Manufacturer’s identification mark
The manufacturer’s identification mark2
denotes the tire manufacturer.
New tires have a mark with two symbols.
Retreaded tires have a mark with four sym-
bols. For more information on retreaded
tires, see (\2page 199).
Tire size
The code3 indicates the tire size.
Tire type code
The code4 may, as the manufacturer's
option, be used as a descriptive code for
identifying significant characteristics of
the tire.
Date of manufacture
The date of manufacture5 identifies the
week and year of manufacture.The first two figures identify the week,
starting with “01” to represent the first full
week of the calendar year. The second two
figures represent the year.
For example, "0301" represents the 3rd
week of 2001.
If the date of manufacture code indicated
on the tire is less than 4 figures, do not use
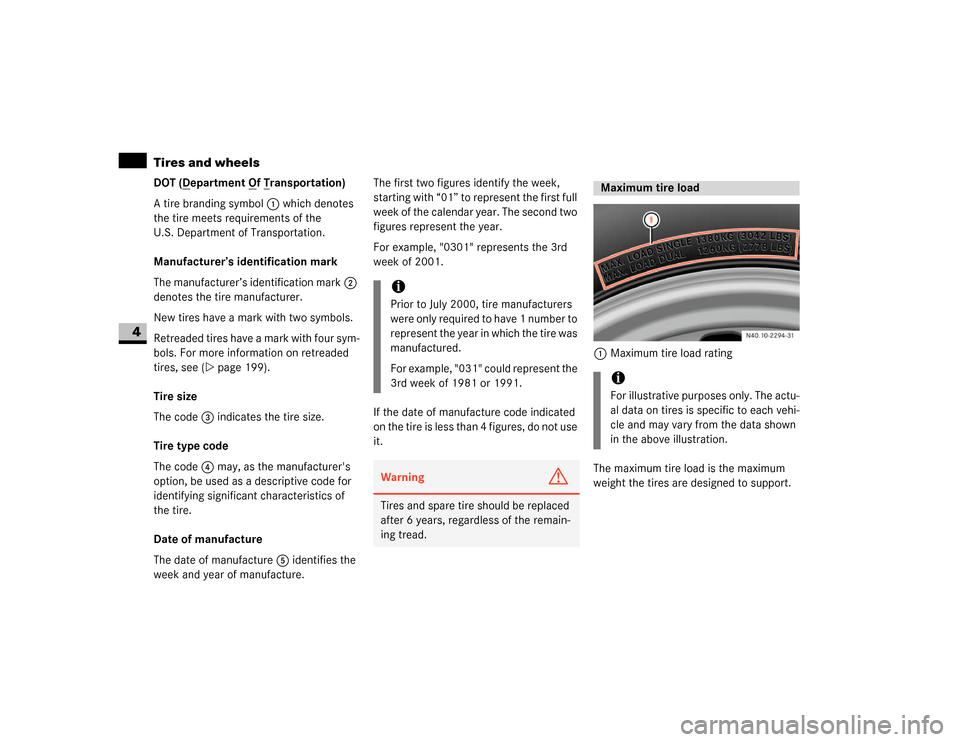
it.1Maximum tire load rating
The maximum tire load is the maximum
weight the tires are designed to support.
iPrior to July 2000, tire manufacturers
were only required to have 1 number to
represent the year in which the tire was
manufactured.
For example, "031" could represent the
3rd week of 1981 or 1991.Warning
G
Tires and spare tire should be replaced
after 6 years, regardless of the remain-
ing tread.
Maximum tire loadiFor illustrative purposes only. The actu-
al data on tires is specific to each vehi-
cle and may vary from the data shown
in the above illustration.